背景
TCP通信を使ってスマホ側のデータを開発PCに送りたいなぁ と思い,簡単なTCP通信のプログラムを作ってやり取りさせてみようと思ったのですが,動作確認のタイミングでハマりにハマりました...。
Windows用のアプリでは通信ができているのに,AndoroidのVirtual Deviceを使った動作確認では通信が通らず,悩みに悩んで約2日...。泣けます.
今後このようなことがなくなるように願い,メモに残します!
なおこちらの記事は,Flutterに関する基礎的な知識を有した方向けです!
環境構築やFlutterの使い方に関しては,公式の記事やチュートリアルをご確認ください!
環境
- OS: Windows 11
-
Flutter:
$ flutter --version Flutter 3.10.5 • channel stable • https://github.com/flutter/flutter.git Framework • revision 796c8ef792 (11 days ago) • 2023-06-13 15:51:02 -0700 Engine • revision 45f6e00911 Tools • Dart 3.0.5 • DevTools 2.23.1 - Andoroid Studio: Flamingo | 2022.2.1
- Java: java17 for Windows
- Visual Studio Code いわずと知れたエディタ Flutterの拡張機能がかなり充実いていてとても使いやすいです!
- Application: for Android 今回はVirtual Deviceを使ったアプリ開発の話です!もしかしたら実機を使った開発ではこんなつらさはないのかもしれません...
内部プログラム
こちらが今回使うプログラムです まずはWindowsビルドで試してみてください!
Flutter側 サーバーを起動してまち,クライアントが接続・切断されるとポップアップが出ます
import 'package:flutter/material.dart';
import 'package:provider/provider.dart';
import 'dart:async';
import 'dart:io';
import 'dart:typed_data';
import 'dart:convert';
import 'package:flutter/cupertino.dart';

void main() {
  runApp(MyApp());
}


class MyApp extends StatelessWidget {
  const MyApp({super.key});

  @override
  Widget build(BuildContext context) {
    return MaterialApp(
      title: 'Flutter Demo',
      theme: ThemeData(
        colorScheme: ColorScheme.fromSeed(seedColor: Colors.deepPurple),
        useMaterial3: true,
      ),
      home: MyHomePage(),
    );
  }
}

class MyHomePage extends StatefulWidget {
  @override
  State<MyHomePage> createState() => _MyHomePageState();
}

class _MyHomePageState extends State<MyHomePage> {
  String ip_port_msg = "";

  ServerSocket? serverSocket;
  @override
  void initState() {
    super.initState();
    startServer();
  }

  Future<void> startServer() async {
    try{
      serverSocket = await ServerSocket.bind("127.0.0.1", 5000);
      print('Server started on ${serverSocket?.address}:${serverSocket?.port}');
      listenForClients();
    } catch (e) {
      print('Error starting server: $e');
    }
  }

  void listenForClients(){
    serverSocket?.listen((client) {
      ip_port_msg = '${client.remoteAddress}:${client.remotePort}';
      print('New client connected: ' + ip_port_msg);
      showConnectionStateDialog(ip_port_msg, 'Connected');
      client.listen(
        (Uint8List data) async {
          String request = String.fromCharCodes(data).replaceAll('\r\n', '');
          client.write('ret:' + request + '\r\n');
        },
        // handle errors
        onError: (error) {
          client.close();
        },
        // handle the closing the connection
        onDone: () {
          client.close();
          debugPrint('socket closed');
          print("disconnected");
          showConnectionStateDialog(ip_port_msg, 'Disconnected');
        },
      );
    });
  }

  void showConnectionStateDialog(msg, state){
    showDialog(
      context: context,
      builder: (_) => CupertinoAlertDialog(
        title: Text(state),
        content: Column(
          children: [
            Text(msg),
            Text(state)
          ],
        ),
        actions: [
          CupertinoDialogAction(
            child: Text('OK'),
            onPressed: () {
              Navigator.of(context).pop();
            },
          ),
        ],
      ),
    );
  }

  @override
  Widget build(BuildContext context) {
    return const Scaffold(
      body: Stack(
        children: [
          Align(
            alignment: Alignment.center,
            child: Text(
                'Hello world'
              ),
          ),
        ],
      ),
    );
  }
}
name: tcp_flutter_python
description: A new Flutter project.
publish_to: 'none' # Remove this line if you wish to publish to pub.dev

version: 1.0.0+1

environment:
  sdk: '>=3.0.5 <4.0.0'

dependencies:
  flutter:
    sdk: flutter
  provider: ^6.0.0
  cupertino_icons: ^1.0.2

dev_dependencies:
  flutter_test:
    sdk: flutter

  flutter_lints: ^2.0.0

flutter:

  # The following line ensures that the Material Icons font is
  # included with your application, so that you can use the icons in
  # the material Icons class.
  uses-material-design: true
続いてPythonのクライアント側 ただ接続してCtrl+Cで接続を切るだけです.
import socket

def start_client():
    server_address = ('127.0.0.1', 5000)
    client_socket = socket.socket(socket.AF_INET, socket.SOCK_STREAM)
    client_socket.connect(server_address)
    print("Connected to the server.")

    while True:
        try:
            print("Now Connecting")

        except KeyboardInterrupt:
            break

    print("Disconnected")
    client_socket.close()

start_client()
動作はこんな感じ
https://drive.google.com/file/d/1HZZ9yNtclO26yGrg9a8WKs3JYeWP7XLS/view?usp=sharing
ですが,全く同じものでもAndoroidのVirtual Deviceを使った動作確認だとこれが通りません.
Python側でこんなエラーが出ます.
ConnectionRefusedError: [WinError 10061] 対象のコンピューターによって拒否されたため,接続できませんでした
そもそも通信自体が確立されていないようです.
今回はこれを克服していきます!
Andoroid EmulatorのIPとPortの話
言及が遅れましたが,Android Studioには,Android Emulatorという仮想デバイスを使ってアプリの動作確認ができる機能があります.これをFlutterでも使用することができます.
こんなかんじ
このシステムが少々厄介で,IPやPortなどが特殊な構造をしています
以下のサイトにそれらがまとめられています.
このあたりをいい感じにつなげてあげることで,Android Emulatorと開発PC間のTCP通信が可能となります.
How to
大まかな流れ
もっとも参考になる場所だったのが以下です
ここでは,開発PC内でAndoroid Emulatorを2台起動して,その間でTCP通信する際の例が載っています.

(https://developer.android.com/studio/run/emulator-networking?hl=ja#connectingから拝借)
今回はココにあるAとBでの通信を考えます.
つまり,Aを開発PC BをAで実行されるエミュレータインスタンスとして,
-
10.0.2.15:<serverPort>をリッスンするように B のサーバーをセットアップ - B のコンソールで,A:
localhost:<localPort>から B:10.0.2.15:<serverPort>へのリダイレクトをセットアップ - AのPCで
PythonのクライアントをA:localhost:<localPort>で接続
というような流れです
今回は以下のような流れで進めます
-
main.dart内で10.0.2.15:6000でBのサーバーをセットアップ - B のコンソールで,A:
127.0.0.1:5000から B:10.0.2.15:6000へのリダイレクトをセットアップ - AのPCでPythonのクライアントを起動 その際,A:
127.0.0.1:5000で接続
ファイル修正
では実際にやってみます.
まずはファイルを修正します
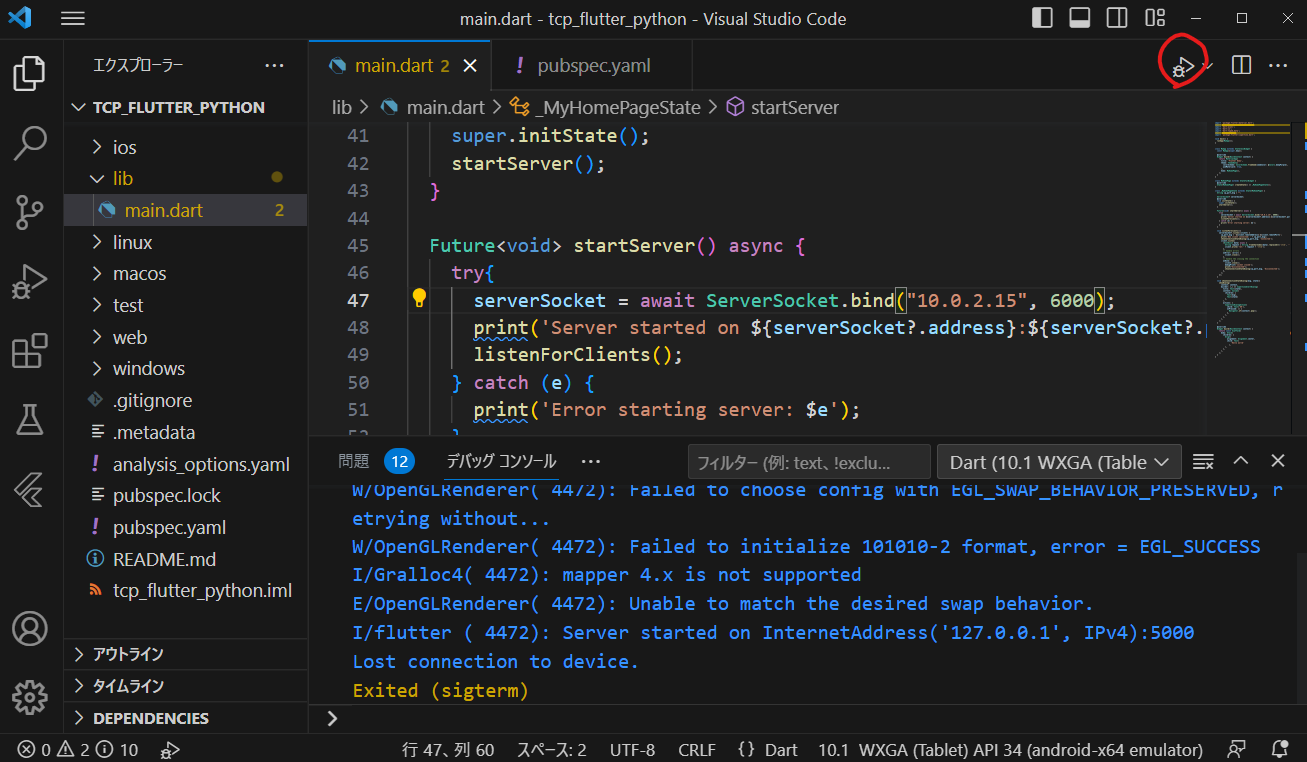
アプリ側の修正
// line 47 `main.dart`内で`10.0.2.15:6000` でBのサーバーをセットアップ
    serverSocket = await ServerSocket.bind("10.0.2.15", 6000);
Python側の修正
# line 7 Pythonのクライアント`127.0.0.1:5000`で起動
    server_address = ('127.0.0.1', 5000)
リダイレクト
続いて2つ目の手順のリダイレクトを行います.
以下のサイトが参考になります.
まずはFlutterからエミュレータを起動します.
Androidデバイスになっているのを確認して

起動
その後VSCodeでターミナルを開き,telnetコマンドを入力します.
$ telnet localhost <emulator-port-number>
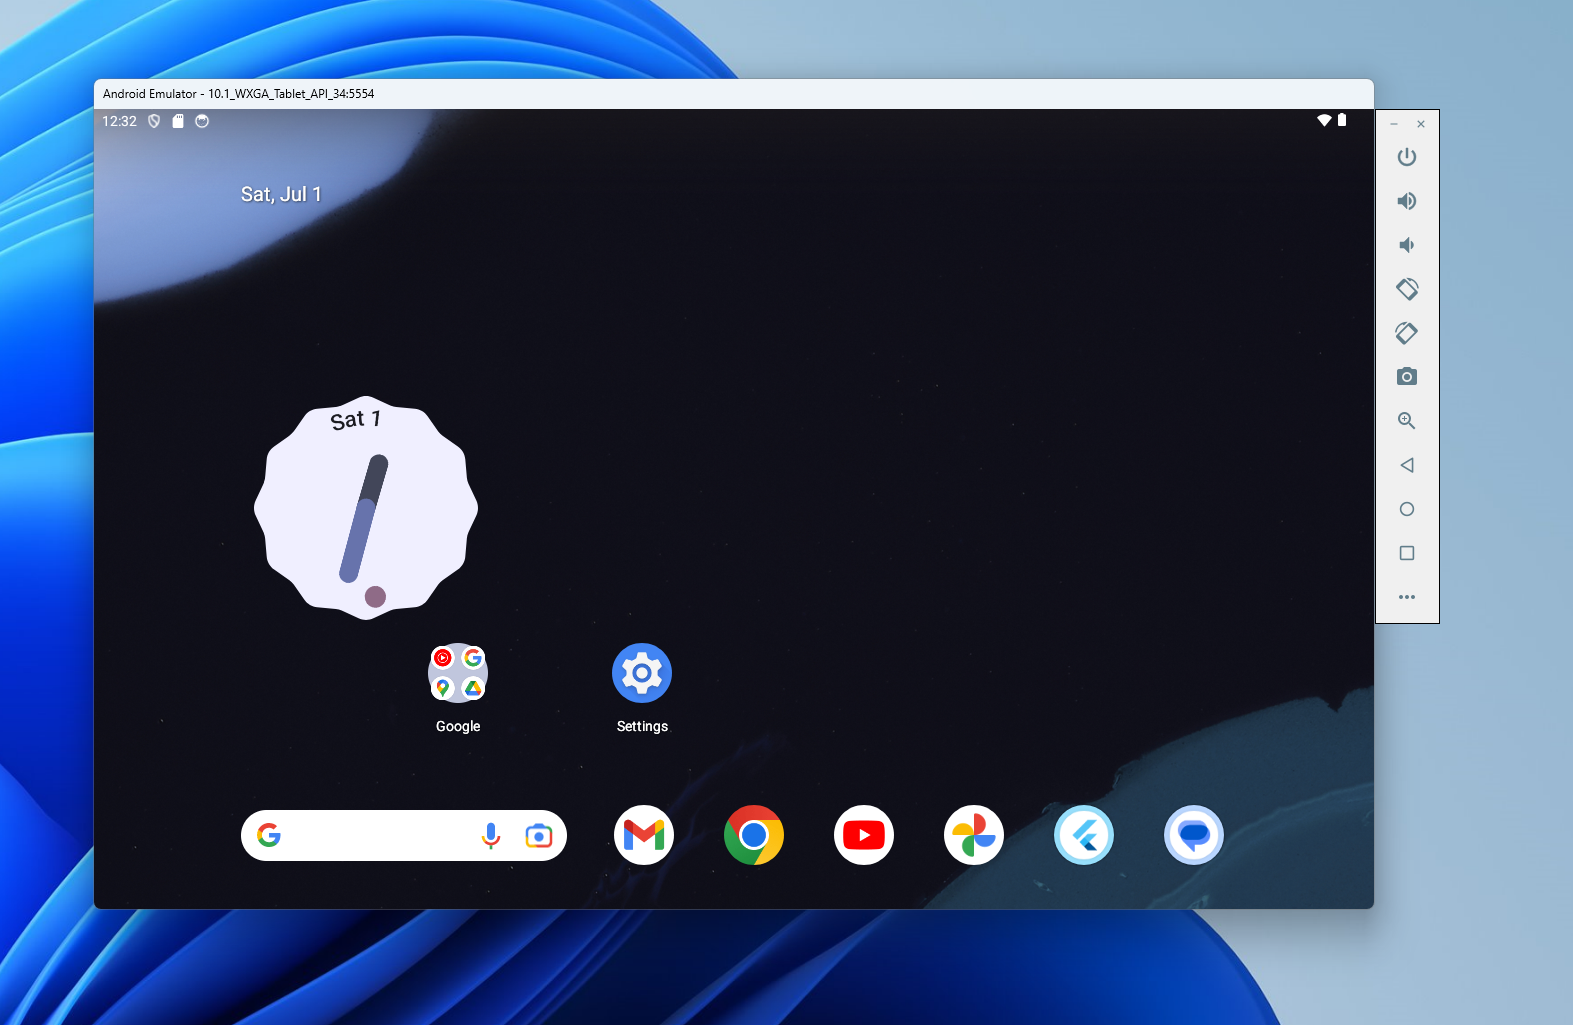
<emulator-port-number>はエミュレータの左上の表示で確認することができます.図の場合は5554です 小さくてすみません!


ここでtelnetコマンドで以下のようなエラーが出る方はWindowsのTelnet設定ができていません!
以下のサイトを参考に設定します.Windows10ですがほぼほぼ同じです
Windowsキーから「コントロール」で検索をかけてコントロールパネルを開きます

プログラムから

機能の有効化または無効化

TelnetクライアントをチェックしてOKを押します

再度コマンドを実行すると通るはずです.私の場合はエミュレータのポートが5554なので,
$ telnet localhost 5554
でした
実行するとこんな感じ
Android Console: Authentication required
Android Console: type 'auth <auth_token>' to authenticate
Android Console: you can find your <auth_token> in
'C:\your\user\home\.emulator_console_auth_token'
OK
コンソール入力できるの?って感じの画面になりますができます 最初は焦りました
ここに書いてあるように,auth <auth_token>コマンドを使った許可が必要になります
自分のユーザー直下に.emulator_console_auth_tokenというファイルができているはずなので,メモ帳などで開き,中身をコピーして貼り付けて実行します
auth your-auth-token
以下が出ればOKです
Android Console: type 'help' for a list of commands
OK
その後リダイレクトを追加します
リダイレクトを追加するには,次のようなコマンドを使用します
redir add <protocol>:<host-port>:<guest-port>
ここで,<protocol>は tcpまたはudpです
<host-port>と<guest-port>はPCとエミュレータの間のマッピングを設定します
今回の場合は以下です
redir add tcp:5000:6000
これで晴れてPCとエミュレータが接続可能になります!
Pythonのクライアントを実行してみてください!無事エミュレータ上にPopUpが出れば成功です!
これでもうまくいかない方は,エミュレータのInternet設定がうまくいってないかもしれません.
自分の設定を置いておくので参考にしてください!
Setting -> Netword & Internet -> Internet
LTEがつながっているかを確認
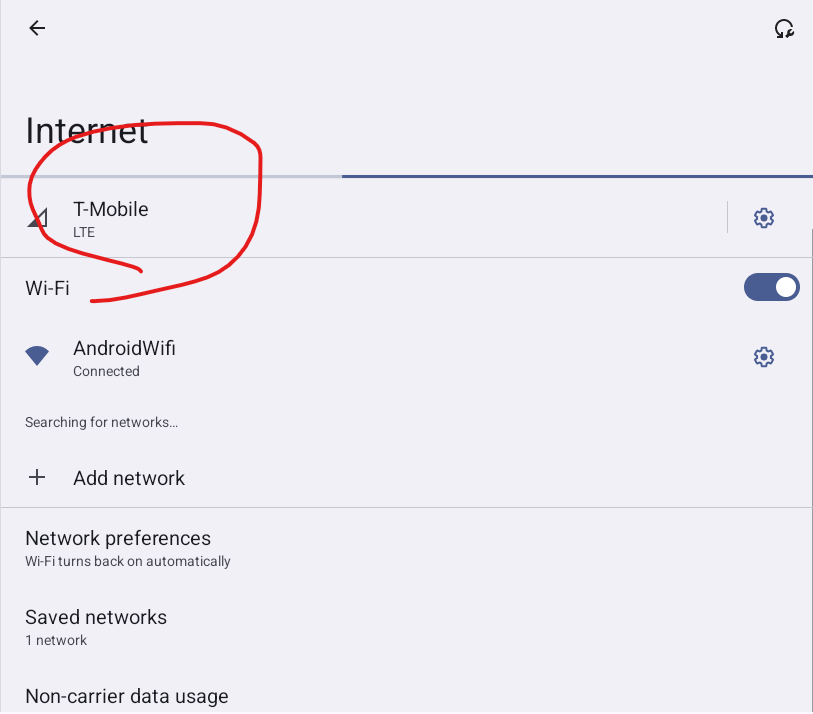
つながっていない場合はエミュレータのCelullar設定を確認して再起動 自分はこんな感じでした

余談
Flutter便利と思って始めたはいいものの
Android Studioが沼過ぎてなかなか難しい...。
今回は以上です! 最後まで見ていただきありがとうございました!