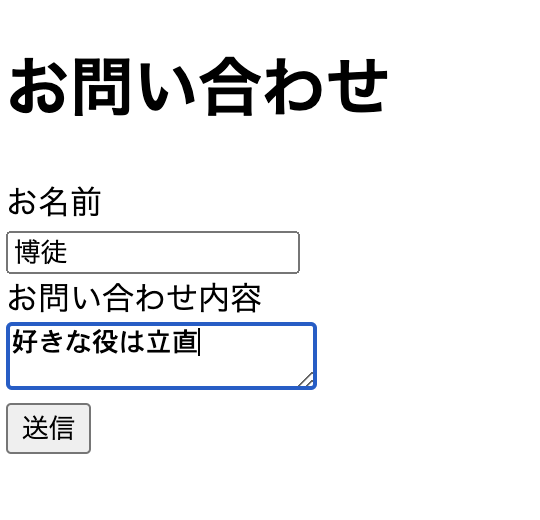
RailsとAction Mailerを使用してシンプルな問い合わせフォームを作成していきます。
メールサーバーとのやり取りの際に認証が必要になるためOAuth2.0認証を実装していきたいと思います。
問い合わせフォームからのメール送信を行う場合に、SMTPサーバー(メールを送信するサーバーのホスト)の認証情報を設定する必要があります。その設定内容にパスワードを設定するところがあるのですが、そこにOAuth2のアクセストークンを入力して認証させるように設定していきます。
少し前ではアプリパスワードを使用して認証していたのですが、非推奨となったためOAuth2を利用します。
rails new contact_form_app --database=postgresql
cd contact_form_app
rails db:create
rails g model Contact name:string message:text
rails db:migrate
rails g controller Contacts new create
class CreateContacts < ActiveRecord::Migration[7.2]
  def change
    create_table :contacts do |t|
      t.string :name
      t.text :message

      t.timestamps
    end
  end
end
今回の問い合わせフォームはシンプルに名前と問い合わせ内容だけのものにします。
Rails.application.routes.draw do
  resources :contacts, only: [:new, :create]
  root 'contacts#new'
end
config/routes.rbに追加
rails g mailer ContactMailer
class ContactMailer < ApplicationMailer
  default to: 'xxxxxxxxx@gmail.com' # 自分のメールアドレスを指定

  def send_contact_email(contact)
    @contact = contact
    mail(subject: 'お問い合わせが届きました')
  end
end
app/mailers/contact_mailer.rbにメール送信処理を記述
5.contacts_controller.rbに処理を記述する
class ContactsController < ApplicationController
  def new
    @contact = Contact.new
  end

  def create
    @contact = Contact.new(contact_params)
    if @contact.valid?
      ContactMailer.send_contact_email(@contact).deliver_now
      flash[:notice] = 'お問い合わせが送信されました。'
      redirect_to root_path
    else
      flash.now[:alert] = '送信に失敗しました。入力内容を確認してください。'
      render :new
    end
  end

  private

  def contact_params
    params.require(:contact).permit(:name, :email, :message)
  end
end
6.app/views/contacts/new.html.erbにビューを作成
<h1>お問い合わせ</h1>
<%= form_with model: @contact, url: contacts_path, local: true do |f| %>
  <div>
    <%= f.label :name, 'お名前' %><br>
    <%= f.text_field :name %>
  </div>
  <div>
    <%= f.label :message, 'お問い合わせ内容' %><br>
    <%= f.text_area :message %>
  </div>
  <div>
    <%= f.submit '送信' %>
  </div>
<% end %>

<% if flash[:notice] %>
  <p style="color: green;"><%= flash[:notice] %></p>
<% elsif flash[:alert] %>
  <p style="color: red;"><%= flash[:alert] %></p>
<% end %>
7.app/views/contact_mailer/send_contact_email.text.erbを作成し、ビューを作成
お問い合わせがありました。

お名前: <%= @contact.name %>
メッセージ:
<%= @contact.message %>
8.config/environments/development.rbにSMTPの設定を追記
config.action_mailer.delivery_method = :smtp
config.action_mailer.smtp_settings = {
  address: 'smtp.gmail.com',
  port: 587,
  domain: 'example.com',
  user_name: 'xxxxxxxxxx@example.com', # 自分のメールアドレス
  password: 'xxxxxxxxxxxxxx',          # アクセストークン
  authentication: 'xoauth2',           # OAuth2.0を使用して認証
  enable_starttls_auto: true
}

config.action_mailer.default_url_options = { host: 'localhost', port: 3000 }
9.Google Cloud側の設定
Google Cloud プロジェクトの作成
上記URLを参考にしてクライアントIDとクライアントシークレットが表示されるところまで進める。

10.アクセストークンの取得と設定
①サービスアカウントを管理クリック
②サービスアカウントを作成クリック
③任意のサービスアカウント名を入力(サービスアカウントIDは自動で入力されるものでOK)
また、下記は省略可です。
このサービス アカウントにプロジェクトへのアクセスを許可する
ユーザーにこのサービス アカウントへのアクセスを許可
完了を押下する。
④鍵を管理を押下
⑤新しい鍵を作成

⑥JSONで作成を押下

ファイルがダウンロードフォルダにダウンロードされる
⑦config/keysフォルダを作成し、先ほどのJSONファイルを保存する
⑧config/environments/development.rbファイルに下記を記載する
ここで設定がうまくいってないとサーバーが立ち上がらないエラーが起きます。
require 'googleauth'

# アクセストークンを取得
scope = 'https://mail.google.com/' # Gmailのスコープ
authorizer = Google::Auth::ServiceAccountCredentials.make_creds(
  json_key_io: File.open('config/keys/xxxxxxxxxx.json'), # サービスアカウントキーのパス
  scope: scope
)
token = authorizer.fetch_access_token!['access_token']

Rails.application.configure do
  config.action_mailer.delivery_method = :smtp
  config.action_mailer.smtp_settings = {
  address: 'smtp.gmail.com',
  port: 587,
  domain: 'example.com',
  user_name: 'xxxxxxxxxxxx@xxxx.xxx', # 自分のメールアドレス
  password: token,  # アクセストークンの使用
  authentication: 'xoauth2',
  enable_starttls_auto: true
}
config.action_mailer.default_url_options = { host: 'localhost', port: 3000 }
11.動作確認
サーバーを立ち上げてフォームから問い合わせを送る
rails s
問い合わせを送ったらターミナルのログを見てメールが送られているか確認できる
Started POST "/contacts" for ::1 at 2024-12-25 15:27:31 +0900
Processing by ContactsController#create as TURBO_STREAM
  Parameters: {"authenticity_token"=>"[FILTERED]", "contact"=>{"name"=>"博徒", "message"=>"好きな役は立直"}, "commit"=>"送信"}
  Rendering layout layouts/mailer.text.erb
  Rendering contact_mailer/send_contact_email.text.erb within layouts/mailer
  Rendered contact_mailer/send_contact_email.text.erb within layouts/mailer (Duration: 0.1ms | GC: 0.0ms)
  Rendered layout layouts/mailer.text.erb (Duration: 0.5ms | GC: 0.0ms)
ContactMailer#send_contact_email: processed outbound mail in 5.0m
Delivered mail 676ba5d3c46e7_8d2d5a14964f2@xxxxxxxMacBook-Air.local.mail (1536.8ms)
Date: Wed, 25 Dec 2024 15:27:31 +0900
From: from@example.com
To: xxxxxxxxxxx@xxxxx.com ←送信先
Message-ID: <xxxxxxxxx_xxxxxxxx@xxxxxxxMacBook-Air.local.mail>
終了です。
最後に
簡単にですがまとめました。
本番環境でやっていないのでメールが実際に届くかどうかなどの確認ができていないですが、config/environments/development.rbに記載している設定内容をProduction.rbに記載すればそのまま確認までできるのかなと思います。
時間があったらやります。
下記記事でOAuthについてわかりやすくまとめてあったので参考にしてください。

