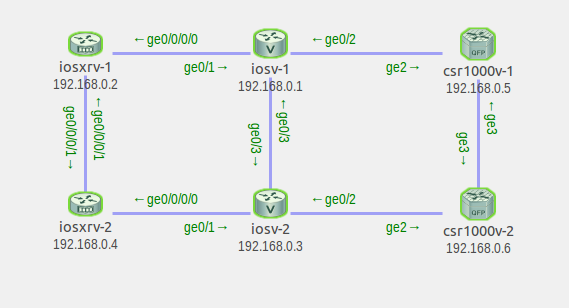
Ciscoルータで、SNMPからpingする方法を紹介します。今回はLinuxのsnmpset/snmpwalkコマンドでSNMPを操作しました。
はじめに
CiscoルータにはCLIからpingする方法以外に、CISCO-PING-MIBを利用してSNMPからpingする方法があります。最近、シスコのVIRL - Virtual Internet Routing Labを購入したので各種IOSで実験してみました。

図. VIRLの実験環境(IOSv, IOS XRv, IOS CSR1000vが動作するネットワーク)
やってみた
VIRL環境の管理系ネットワーク(Shared flat network)からsnmpset/snmpwalkコマンドでIOS XRvでSNMP pingした結果です。
# エントリが無い状態
kooshin@virl:~$ snmpwalk -v2c -cprivate 172.16.1.125 ciscoPingEntry
CISCO-PING-MIB::ciscoPingEntry = No Such Object available on this agent at this OID

# インスタンス番号111でエントリ作成
kooshin@virl:~$ snmpset -v2c -cprivate 172.16.1.125 ciscoPingEntryStatus.111 i 5
CISCO-PING-MIB::ciscoPingEntryStatus.111 = INTEGER: createAndWait(5)

# 初期状態のエントリ
kooshin@virl:~$ snmpwalk -v2c -cprivate 172.16.1.125 ciscoPingEntry
CISCO-PING-MIB::ciscoPingPacketCount.111 = INTEGER: 5
CISCO-PING-MIB::ciscoPingPacketSize.111 = INTEGER: 100
CISCO-PING-MIB::ciscoPingPacketTimeout.111 = INTEGER: 2000 milliseconds
CISCO-PING-MIB::ciscoPingDelay.111 = INTEGER: 0 milliseconds
CISCO-PING-MIB::ciscoPingTrapOnCompletion.111 = INTEGER: false(2)
CISCO-PING-MIB::ciscoPingCompleted.111 = INTEGER: false(2)
CISCO-PING-MIB::ciscoPingEntryStatus.111 = INTEGER: notReady(3)
CISCO-PING-MIB::ciscoPingVrfName.111 = STRING: "default"

# オーナをvirlで設定
kooshin@virl:~$ snmpset -v2c -cprivate 172.16.1.125 ciscoPingEntryOwner.111 s virl
CISCO-PING-MIB::ciscoPingEntryOwner.111 = STRING: virl

# IPv4プロトコルを設定
kooshin@virl:~$ snmpset -v2c -cprivate 172.16.1.125 ciscoPingProtocol.111 i 1
CISCO-PING-MIB::ciscoPingProtocol.111 = INTEGER: ip(1)

# IPv4アドレスを16進数で設定、192.168.0.6 => C0A80006
kooshin@virl:~$ snmpset -v2c -cprivate 172.16.1.125 ciscoPingAddress.111 x C0A80006
CISCO-PING-MIB::ciscoPingAddress.111 = Hex-STRING: C0 A8 00 06

# パケット送信間隔を100msecで設定
kooshin@virl:~$ snmpset -v2c -cprivate 172.16.1.125 ciscoPingDelay.111 i 100
CISCO-PING-MIB::ciscoPingDelay.111 = INTEGER: 100 milliseconds

# 送信パケット数を10で設定
kooshin@virl:~$ snmpset -v2c -cprivate 172.16.1.125 ciscoPingPacketCount.111 i 10
CISCO-PING-MIB::ciscoPingPacketCount.111 = INTEGER: 10

# ping実行前の状態
kooshin@virl:~$ snmpwalk -v2c -cprivate 172.16.1.125 ciscoPingEntry
CISCO-PING-MIB::ciscoPingProtocol.111 = INTEGER: ip(1)
CISCO-PING-MIB::ciscoPingAddress.111 = Hex-STRING: C0 A8 00 06
CISCO-PING-MIB::ciscoPingPacketCount.111 = INTEGER: 10
CISCO-PING-MIB::ciscoPingPacketSize.111 = INTEGER: 100
CISCO-PING-MIB::ciscoPingPacketTimeout.111 = INTEGER: 2000 milliseconds
CISCO-PING-MIB::ciscoPingDelay.111 = INTEGER: 100 milliseconds
CISCO-PING-MIB::ciscoPingTrapOnCompletion.111 = INTEGER: false(2)
CISCO-PING-MIB::ciscoPingCompleted.111 = INTEGER: false(2)
CISCO-PING-MIB::ciscoPingEntryOwner.111 = STRING: virl
CISCO-PING-MIB::ciscoPingEntryStatus.111 = INTEGER: notInService(2)
CISCO-PING-MIB::ciscoPingVrfName.111 = STRING: "default"

# pingを実行
kooshin@virl:~$ snmpset -v2c -cprivate 172.16.1.125 ciscoPingEntryStatus.111 i 1
CISCO-PING-MIB::ciscoPingEntryStatus.111 = INTEGER: active(1)

# pingの実行結果を確認、10パケット送信し、10パケット受信していることを確認
kooshin@virl:~$ snmpwalk -v2c -cprivate 172.16.1.125 ciscoPingEntry
CISCO-PING-MIB::ciscoPingProtocol.111 = INTEGER: ip(1)
CISCO-PING-MIB::ciscoPingAddress.111 = Hex-STRING: C0 A8 00 06
CISCO-PING-MIB::ciscoPingPacketCount.111 = INTEGER: 10
CISCO-PING-MIB::ciscoPingPacketSize.111 = INTEGER: 100
CISCO-PING-MIB::ciscoPingPacketTimeout.111 = INTEGER: 2000 milliseconds
CISCO-PING-MIB::ciscoPingDelay.111 = INTEGER: 100 milliseconds
CISCO-PING-MIB::ciscoPingTrapOnCompletion.111 = INTEGER: false(2)
CISCO-PING-MIB::ciscoPingSentPackets.111 = Counter32: 10
CISCO-PING-MIB::ciscoPingReceivedPackets.111 = Counter32: 10
CISCO-PING-MIB::ciscoPingMinRtt.111 = INTEGER: 1 milliseconds
CISCO-PING-MIB::ciscoPingAvgRtt.111 = INTEGER: 6 milliseconds
CISCO-PING-MIB::ciscoPingMaxRtt.111 = INTEGER: 59 milliseconds
CISCO-PING-MIB::ciscoPingCompleted.111 = INTEGER: true(1)
CISCO-PING-MIB::ciscoPingEntryOwner.111 = STRING: virl
CISCO-PING-MIB::ciscoPingEntryStatus.111 = INTEGER: active(1)
CISCO-PING-MIB::ciscoPingVrfName.111 = STRING: "default"

# エントリを削除
kooshin@virl:~$ snmpset -v2c -cprivate 172.16.1.125 ciscoPingEntryStatus.111 i 6
CISCO-PING-MIB::ciscoPingEntryStatus.111 = INTEGER: destroy(6)

# エントリが削除されていることを確認
kooshin@virl:~$ snmpwalk -v2c -cprivate 172.16.1.125 ciscoPingEntry
CISCO-PING-MIB::ciscoPingEntry = No Such Object available on this agent at this OID
VIRLの環境はUbuntu14.04で動作しています。今回はこの環境にsnmpパッケージをインストールして、snmpset/snmpwalkで実行してみました。
事前にCISCO-PING-MIBとCISCO-TCの2つのMIBを保存してあります。Ciscoルータのポート一覧をSNMPで取得するで紹介したsnmp-mibs-downloaderで取得すると楽です。
IOSvとIOS XRvの違いはほどんどありません。
唯一の違いがciscoPingVrfNameの初期値が、IOSvの場合は空文字""で、IOS XRvの場合は"default"が設定されています。
CISCO-PING-MIB
CISCO-PING-MIBは、snmpsetコマンドでpingパラメータを設定(write)し、snmpget/snmpwalkコマンドでpingの結果を取得(read)ます。
writeするSNMP OID
- ciscoPingEntry (1.3.6.1.4.1.9.9.16.1.1.1.1) - PingEntryの保持OID
- ciscoPingEntryStatus (1.3.6.1.4.1.9.9.16.1.1.1.16) - ステータスをintで設定(必須)
- 1:active、PingEntryに設定したパラメータでpingを実行
- 2:notInService
- 3:notReady
- 4:createAndGo
- 5:createAndWait、PingEntryを作成する、一番初めに設定
- 6:destroy、PingEntryを削除
- ciscoPingEntryOwner (1.3.6.1.4.1.9.9.16.1.1.1.15) - 任意の文字列を指定(必須)
- ciscoPingProtocol (1.3.6.1.4.1.9.9.16.1.1.1.2) - プロトコル指定(必須)
- 1:ip
- 20:ipv6
- ciscoPingAddress (1.3.6.1.4.1.9.9.16.1.1.1.3) - 16進数でアドレス指定(必須)
- ciscoPingDelay (1.3.6.1.4.1.9.9.16.1.1.1.7) - 送信間隔(任意)
- ciscoPingPacketCount (1.3.6.1.4.1.9.9.16.1.1.1.4) - 送信するパケットの数(任意)
readするSNMP OID
- ciscoPingSentPackets (1.3.6.1.4.1.9.9.16.1.1.1.9) - 送信ICMPパケット数
- ciscoPingReceivedPackets (1.3.6.1.4.1.9.9.16.1.1.1.10) - 受信ICMPパケット数
- ciscoPingCompleted (1.3.6.1.4.1.9.9.16.1.1.1.14) - pingが完了しているか
やり方
各OIDに任意のインスタンス番号を付与して、snmpsetコマンドでパラメータを設定します。
- ciscoPingEntryStatusにcreateAndWait(INTEGER 5)を設定し、インスタンス作成
- ciscoPingEntryOwnerに任意の文字列(STRING)を設定
- ciscoPingProtocolにIPv4の場合はip(INTEGER 1)を設定
- ciscoPingAddressにIPv4の場合は16進数表現でIPアドレス(HEX STRING)を設定(例:192.168.0.4の場合はC0A80004)
- ciscoPingDelayやciscoPingPacketCountを任意で設定
- ciscoPingEntryStatusにactive(INTEGER 1)を設定
- ciscoPingEntryで実行結果を取得
- ciscoPingEntryStatusにdestroy(INTEGER 6)を設定し、インスタンスを削除
おわりに
アドレスを16進数で指定する必要があるため、手動での実行には向きません。スクリプトと一緒に使うとping監視が捗りそうです。
VRFの指定ができるため、VRF単位のネットワークの監視に使えます。VRFの数が多くて監視に困っていたので、監視スクリプトを作成できそうです。
参考
- 割りと使ってるCISCO-PING-MIB - @shtsuchi
- Ping MIB の実装 - Cisco Systems