目次
1.はじめに
2.システム構成
3.前提
4.カスタマーゲートウェイ作成
5.仮想プライベートゲートウェイ作成
6.VPN設定、Cisco用設定ファイルの出力
7.Cisco用設定ファイルの編集
8.感想
9.その他
99.参考サイト
1.はじめに
こんにちは。
最近NAT配下のCiscoとAWSをVPN接続を検証したので、VPN接続までの簡単な流れとCisco設定ファイルを作る中で重要となった部分のメモを残します。Ciscoの設定は、BGPを使用せず静的ルーティングをした時の設定となっています。
2.システム構成
システム構成は、以下のようになります。
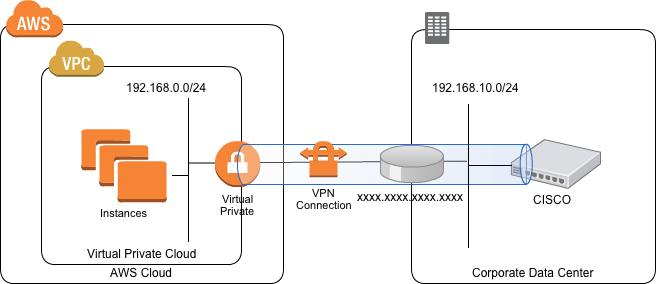
VPN接続先であるCiscoは、NATされたネットワーク下にあります。
そのため、Ciscoが持っているIPアドレスは、プレイベートIPアドレスとなります。
3.前提
・CiscoのIOSバージョンが12.4以上であること。
・基本的なAWS内部のネットワーク構成が完了していること。(VPCの作成、ルーティングetc..)
・NATしているルータ及びその経路で、下記ポートが許可されていること。
ESP(tcp):50
IKE(udp):500,4500
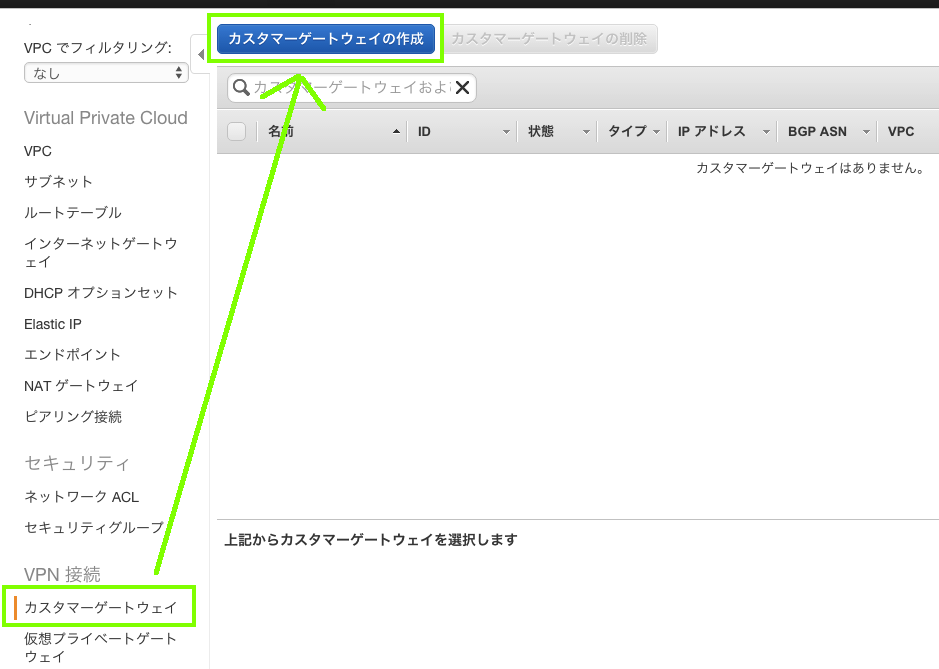
4.カスタマーゲートウェイ作成
それでは、データセンター側の設定、カスタマーゲートウェイの作成をしていきます。
4.1 [VPC]-[カスタマーゲートウェイ]-[カスタマーゲートウェイの作成]をクリックします。
4.2 必要項目を入力し、[作成]をクリックします。
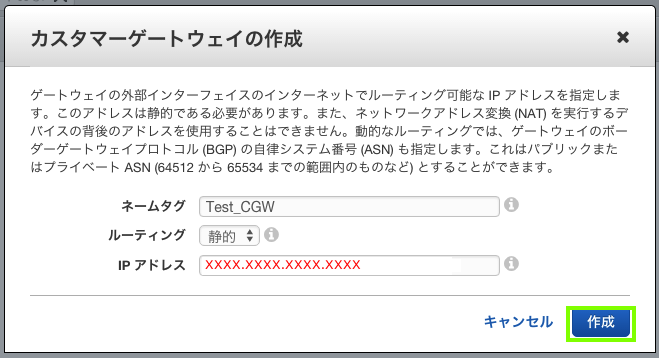
今回は、BGPを使用ないので、ルーティングは、[静的]を選択しています。
IPアドレスは、データセンター側のグローバルIPアドレスを入力します。
カスタマーゲートウェイが作成できていることを確認します。
5.仮想プライベートゲートウェイ作成
AWS側の設定、仮想プライベートゲートウェイの作成をします。
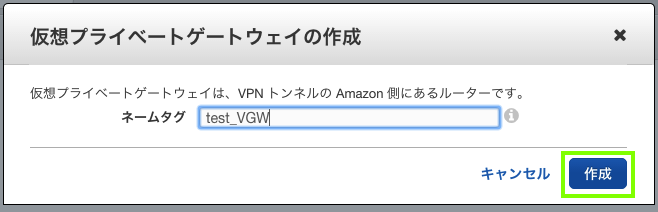
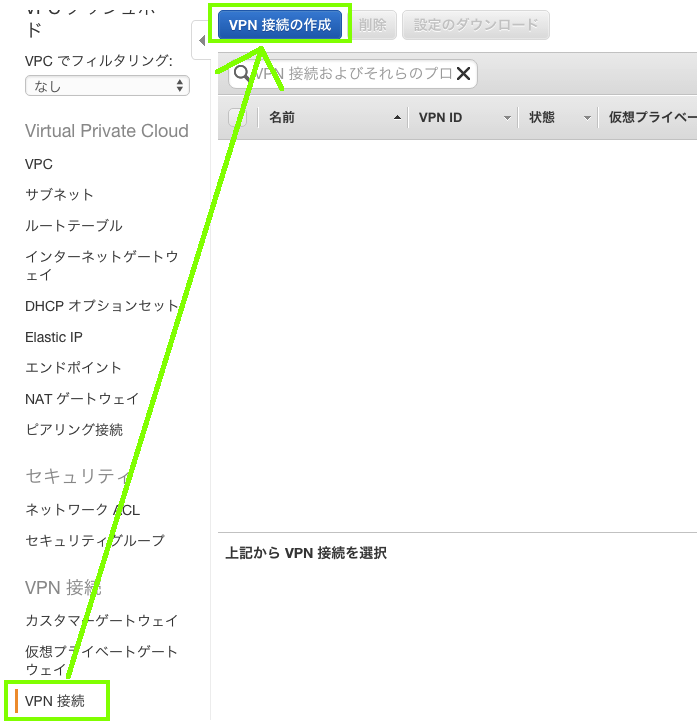
5.1 [VPC]-[仮想プライベートゲートウェイ]-[仮想プライベートゲートウェイの作成]をクリックします。

5.2 任意のネームタグを入力し、[作成]をクリックします。
これでプライベートゲートウェイは、作成されますが、まだVPCとの関連付けができていません。
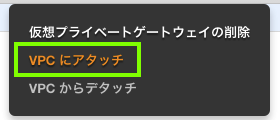
5.3 作成したプライベートゲートウェイを右クリックし、[VPCにアタッチ]をクリックします。
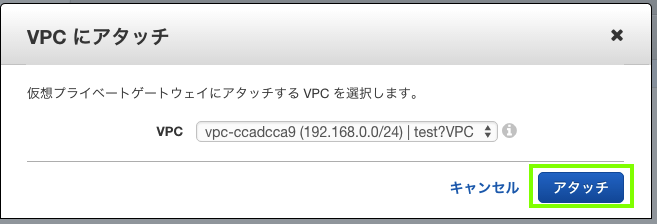
5.4 関連付けを行うVPCを選択し、[アタッチ]をクリックします。
6.VPN設定、Cisco用設定ファイルの出力
AWS側、データセンター側の設定が完了したので、
VPNの設定を行っていきます。
また、Ciscoへ導入する設定ファイルもこの項目の中で行います。
6.1 [VPC]-[VPN接続]-[VPN接続の作成]をクリックします。
6.2 必要項目を入力し、[作成]をクリックします。
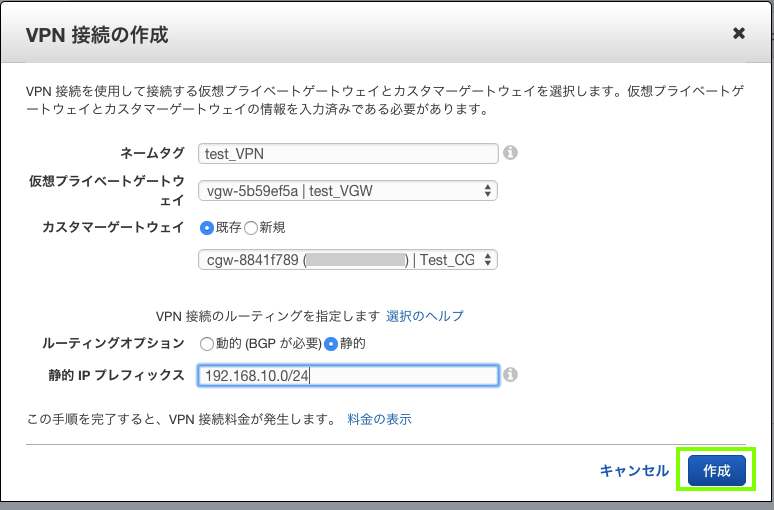
プライベートゲートウェイ、仮想カスタマーゲートウェイは、先ほど作成したものを選択します。
ルーティングオプションは、静的を選択します。(BGP使っている方は、動的。)
静的IPプレフィックスは、データデンター側のプライベートネットワークを指定します。
=注意=
作成画面にも記載してありますが、VPNを設定した時から、時間単位で課金が始まるので注意です。
1 時間当たり 0.048 USD/VPN 接続(東京リージョンへの接続)
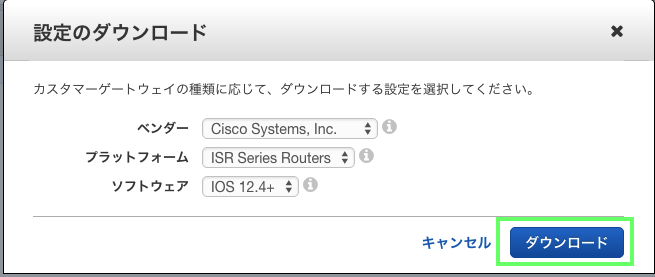
6.3 [設定のダウンロード]をクリックします。

6.4 必要項目を選択し、[ダウンロード]をクリックします。
これで、VPNの設定とCisco用設定ファイルの出力が完了しました。
7.Cisco用設定ファイルの編集
出力した設定ファイルをそのままCiscoに入れてもVPN接続をすることはできません。
そのため、設定ファイルの一部を編集する必要があります。
編集した点は、主に以下となります。
crypto keyringの [local address] をグローバルIPアドレスからCiscoのプライベートIPアドレスへ変更。
crypto isakmp profileの [local address] をグローバルIPアドレスからCiscoのプライベートIPアドレスへ変更。
interface Tunnelの [tunnel source] をグローバルIPアドレスからCiscoのプライベートIPアドレスへ変更。
今回は、トンネルを2つ作っているので、トンネルごとに上記設定を変更する必要があります。
参考に、設定ファイルの載せておきます。
グローバルIPアドレス等は、マスキングしてますが出力した設定ファイルから変更はしてません。
Cisco用設定ファイル
! Amazon Web Services
! Virtual Private Cloud

! AWS utilizes unique identifiers to manipulate the configuration of
! a VPN Connection. Each VPN Connection is assigned an identifier and is
! associated with two other identifiers, namely the
! Customer Gateway Identifier and Virtual Private Gateway Identifier.
!
! Your VPN Connection ID          : vpn-xxxxxxxxxxx
! Your Virtual Private Gateway ID         : vgw-xxxxxxxxxxx
! Your Customer Gateway ID        : cgw-xxxxxxxxxxx
!
!
! This configuration consists of two tunnels. Both tunnels must be
! configured on your Customer Gateway.
!
! --------------------------------------------------------------------------------
! IPSec Tunnel #1
! --------------------------------------------------------------------------------
! #1: Internet Key Exchange (IKE) Configuration
!
! A policy is established for the supported ISAKMP encryption,
! authentication, Diffie-Hellman, lifetime, and key parameters.
!
! Note that there are a global list of ISAKMP policies, each identified by
! sequence number. This policy is defined as #200, which may conflict with
! an existing policy using the same number. If so, we recommend changing
! the sequence number to avoid conflicts.
!
crypto isakmp policy 200
  encryption aes 128
  authentication pre-share
  group 2
  lifetime 28800
  hash sha
exit

! The ISAKMP keyring stores the Pre Shared Key used to authenticate the
! tunnel endpoints.
!
crypto keyring keyring-vpn-xxxxxxxxxxx-0
  local-address <CiscoのプライベートIPアドレス>
  pre-shared-key address xxxxxxxxxxx key xxxxxxxxxxx
exit

! An ISAKMP profile is used to associate the keyring with the particular
! endpoint.
!
crypto isakmp profile isakmp-vpn-xxxxxxxxxxx-0
  local-address <CiscoのプライベートIPアドレス>
  match identity address xxxxxxxxxxx
  keyring keyring-vpn-xxxxxxxxxxx-0
exit

! #2: IPSec Configuration
!
! The IPSec transform set defines the encryption, authentication, and IPSec
! mode parameters.
!
crypto ipsec transform-set ipsec-prop-vpn-xxxxxxxxxxx-0 esp-aes 128 esp-sha-hmac
  mode tunnel
exit

! The IPSec profile references the IPSec transform set and further defines
! the Diffie-Hellman group and security association lifetime.
!
crypto ipsec profile ipsec-vpn-xxxxxxxxxxx-0
  set pfs group2
  set security-association lifetime seconds 3600
  set transform-set ipsec-prop-vpn-xxxxxxxxxxx-0
exit

! Additional parameters of the IPSec configuration are set here. Note that
! these parameters are global and therefore impact other IPSec
! associations.
! This option instructs the router to clear the "Don't Fragment"
! bit from packets that carry this bit and yet must be fragmented, enabling
! them to be fragmented.
!
crypto ipsec df-bit clear

! This option enables IPSec Dead Peer Detection, which causes periodic
! messages to be sent to ensure a Security Association remains operational.
!
crypto isakmp keepalive 10 10 on-demand

! This configures the gateway's window for accepting out of order
! IPSec packets. A larger window can be helpful if too many packets
! are dropped due to reordering while in transit between gateways.
!
crypto ipsec security-association replay window-size 128

! This option instructs the router to fragment the unencrypted packets
! (prior to encryption).
!
crypto ipsec fragmentation before-encryption


! --------------------------------------------------------------------------------
! #3: Tunnel Interface Configuration
!
! A tunnel interface is configured to be the logical interface associated
! with the tunnel. All traffic routed to the tunnel interface will be
! encrypted and transmitted to the VPC. Similarly, traffic from the VPC
! will be logically received on this interface.
!
! Association with the IPSec security association is done through the
! "tunnel protection" command.
!
! The address of the interface is configured with the setup for your
! Customer Gateway.  If the address changes, the Customer Gateway and VPN
! Connection must be recreated with Amazon VPC.
!
interface Tunnel1
  ip address xxxxxxxxxxx 255.255.255.252
  ip virtual-reassembly
  tunnel source <CiscoのプライベートIPアドレス>
  tunnel destination xxxxxxxxxxx
  tunnel mode ipsec ipv4
  tunnel protection ipsec profile ipsec-vpn-xxxxxxxxxxx-0
  ! This option causes the router to reduce the Maximum Segment Size of
  ! TCP packets to prevent packet fragmentation.
  ip tcp adjust-mss 1387
  no shutdown
exit

! ----------------------------------------------------------------------------
! #4 Static Route Configuration
!
! Your Customer Gateway needs to set a static route for the prefix corresponding to your
! VPC to send traffic over the tunnel interface.
! An example for a VPC with the prefix 10.0.0.0/16 is provided below:
! ip route 10.0.0.0 255.255.0.0 Tunnel1 track 100
!
! SLA Monitor is used to provide a failover between the two tunnels. If the primary tunnel fails, the redundant tunnel will automatically be used
! This sla is defined as #100, which may conflict with an existing sla using same number.
! If so, we recommend changing the sequence number to avoid conflicts.
!
ip sla 100
   icmp-echo xxxxxxxxxxx source-interface Tunnel1
   timeout 1000
   frequency 5
exit
ip sla schedule 100  life forever start-time now
track 100 ip sla 100 reachability
! --------------------------------------------------------------------------------
! --------------------------------------------------------------------------------
! IPSec Tunnel #2
! --------------------------------------------------------------------------------
! #1: Internet Key Exchange (IKE) Configuration
!
! A policy is established for the supported ISAKMP encryption,
! authentication, Diffie-Hellman, lifetime, and key parameters.
!
! Note that there are a global list of ISAKMP policies, each identified by
! sequence number. This policy is defined as #201, which may conflict with
! an existing policy using the same number. If so, we recommend changing
! the sequence number to avoid conflicts.
!
crypto isakmp policy 201
  encryption aes 128
  authentication pre-share
  group 2
  lifetime 28800
  hash sha
exit

! The ISAKMP keyring stores the Pre Shared Key used to authenticate the
! tunnel endpoints.
!
crypto keyring keyring-vpn-xxxxxxxxxxx-1
  local-address <CiscoのプライベートIPアドレス>
  pre-shared-key address xxxxxxxxxxx key xxxxxxxxxxx
exit

! An ISAKMP profile is used to associate the keyring with the particular
! endpoint.
!
crypto isakmp profile isakmp-vpn-xxxxxxxxxxx-1
  local-address <CiscoのプライベートIPアドレス>
  match identity address xxxxxxxxxxx
  keyring keyring-vpn-xxxxxxxxxxx-1
exit

! #2: IPSec Configuration
!
! The IPSec transform set defines the encryption, authentication, and IPSec
! mode parameters.
!
crypto ipsec transform-set ipsec-prop-vpn-xxxxxxxxxxx-1 esp-aes 128 esp-sha-hmac
  mode tunnel
exit

! The IPSec profile references the IPSec transform set and further defines
! the Diffie-Hellman group and security association lifetime.
!
crypto ipsec profile ipsec-vpn-xxxxxxxxxxx-1
  set pfs group2
  set security-association lifetime seconds 3600
  set transform-set ipsec-prop-vpn-xxxxxxxxxxx-1
exit

! Additional parameters of the IPSec configuration are set here. Note that
! these parameters are global and therefore impact other IPSec
! associations.
! This option instructs the router to clear the "Don't Fragment"
! bit from packets that carry this bit and yet must be fragmented, enabling
! them to be fragmented.
!
crypto ipsec df-bit clear

! This option enables IPSec Dead Peer Detection, which causes periodic
! messages to be sent to ensure a Security Association remains operational.
!
crypto isakmp keepalive 10 10 on-demand

! This configures the gateway's window for accepting out of order
! IPSec packets. A larger window can be helpful if too many packets
! are dropped due to reordering while in transit between gateways.
!
crypto ipsec security-association replay window-size 128

! This option instructs the router to fragment the unencrypted packets
! (prior to encryption).
!
crypto ipsec fragmentation before-encryption


! --------------------------------------------------------------------------------
! #3: Tunnel Interface Configuration
!
! A tunnel interface is configured to be the logical interface associated
! with the tunnel. All traffic routed to the tunnel interface will be
! encrypted and transmitted to the VPC. Similarly, traffic from the VPC
! will be logically received on this interface.
!
! Association with the IPSec security association is done through the
! "tunnel protection" command.
!
! The address of the interface is configured with the setup for your
! Customer Gateway.  If the address changes, the Customer Gateway and VPN
! Connection must be recreated with Amazon VPC.
!
interface Tunnel2
  ip address xxxxxxxxxxx 255.255.255.252
  ip virtual-reassembly
  tunnel source <CiscoのプライベートIPアドレス>
  tunnel destination xxxxxxxxxxx
  tunnel mode ipsec ipv4
  tunnel protection ipsec profile ipsec-vpn-xxxxxxxxxxx-1
  ! This option causes the router to reduce the Maximum Segment Size of
  ! TCP packets to prevent packet fragmentation.
  ip tcp adjust-mss 1387
  no shutdown
exit

! ----------------------------------------------------------------------------
! #4 Static Route Configuration
!
! Your Customer Gateway needs to set a static route for the prefix corresponding to your
! VPC to send traffic over the tunnel interface.
! An example for a VPC with the prefix 10.0.0.0/16 is provided below:
! ip route 10.0.0.0 255.255.0.0 Tunnel2 track 200
!
! SLA Monitor is used to provide a failover between the two tunnels. If the primary tunnel fails, the redundant tunnel will automatically be used
! This sla is defined as #200, which may conflict with an existing sla using same number.
! If so, we recommend changing the sequence number to avoid conflicts.
!
ip sla 200
   icmp-echo 169.254.25.21 source-interface Tunnel2
   timeout 1000
   frequency 5
exit
ip sla schedule 200  life forever start-time now
track 200 ip sla 200 reachability
! --------------------------------------------------------------------------------


! Additional Notes and Questions
!  - Amazon Virtual Private Cloud Getting Started Guide:
!       http://docs.amazonwebservices.com/AmazonVPC/latest/GettingStartedGuide
!  - Amazon Virtual Private Cloud Network Administrator Guide:
!       http://docs.amazonwebservices.com/AmazonVPC/latest/NetworkAdminGuide
!  - XSL Version: 2009-07-15-1119716
上記設定をCiscoに流し込めばVPN接続ができます。
-注意-
Object Trackingは、Ciscoで利用しているラインセンスによって使用できない場合があります。
参考:IP SLA Configuration - Object Tracking
8.感想
・今回は、NAT配下のCiscoとVPN接続したため、AWSで出力した設定ファイルを修正しなければなりませんでした。ただ、グローバル直結の環境ならば、AWSで出力した設定をCiscoにそのまま入れれば、繋がるんじゃないかと思います。
・初めてVPN接続をやってみたのですが、ネットワークがまだまだ弱いなと感じました。Ciscoのソフトウェアルーターなどがあるようなので、もっと触ってみようと思います。
9.その他
・システム構成図を作成する際、Cacooを使ったのですが、すごく使いやすかったです。
アイコンも豊富ですし、今後も利用してみようと思います。
以上となります。
修正が必要な部分等ありましたら、ご連絡お願いします!
99.参考サイト
https://docs.aws.amazon.com/ja_jp/AmazonVPC/latest/NetworkAdminGuide/Cisco_NoBGP.html
http://www.infraexpert.com/study/ipsla2.html
http://blog.serverworks.co.jp/tech/2015/12/17/nat-t-rtx/
http://dev.classmethod.jp/etc/cisco-csr1000v-on-aws/
大変参考にさせていただきました。
ありがとうございます。