AzureのAPIを使用して、ささっと画像ファイルから顔情報を取得してみます。意外とハードルが低いので、これをベースに他のAPIやアイデアと紐づけると面白いものが作れそうですよね。
利用するサービス
Microsoft Azure Face API(のDetect機能)
Azureの中でもCognitive Servicesと呼ばれる、AIや機械学習を用いたサービスの内の一つです。
何ができるのか
画像ファイル内に含まれる人物の顔を検出したり、比較対象の画像に写っている人が同一人物かを検証できたりします。
Face API紹介ページにデモがあるので、実際にどういうことができるのか試してみると面白いです。
今回使用するのはDetect(顔検出)という機能ですが、Face APIではこの他に以下の機能が提供されています。
①Find Similar
②Group
③Identify
④Verify
※①③④を利用するためにはDetect実行時に発行されるFace IDが必要となります。
やり方
APIキーの取得
こちらのページから、「Face」という項目の横にある「APIキーの取得」というボタンを選択してください。

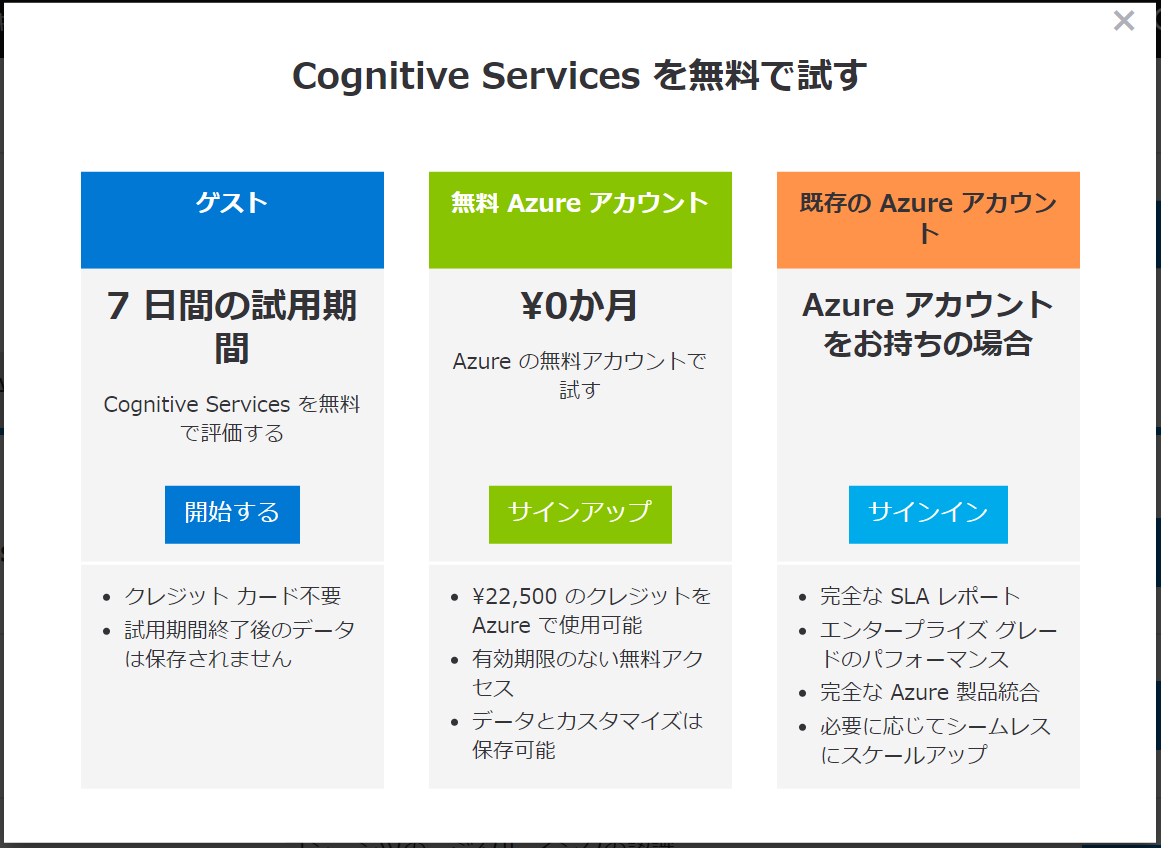
まだAzureのアカウントを持っていない方は以下のような画面が出ると思います。
Azureのサービスを利用するために、まずはアカウントを登録する必要があります。

こちらにも書いてありますが、Face APIは「20件のトランザクション/分」であれば毎月30,000トランザクションまでは無料で使用できるようです。お試しで利用する分にはとりあえず問題ないかと思います。
とりあえずやってみたいということであれば、7日間だけ利用できるゲストユーザーでもいいでしょう。
登録できたら、以下のような画面が表示されると思います。

この内、「キー1」または「キー2」がAPIキーです。この後使うので、メモしておいてください。
ちなみになぜAPIキーが2つあるのかは不明です…。
とりあえずどちらを使っても問題なくデータが取得できました。
コードをコピペする
ソースコードは公式のFace APIクイックスタートに記載のサンプルを持ってきて、一部コメントを日本語にしただけです。こう書けば使えるよ!という情報は公式ページ見れば全部載っています。
(この記事の意味…?)
今回はC#で書いてますが、Face APIクイックスタートの遷移先のサイドバーから以下のサンプルも表示できます。
(GO, Java, JavaScript, Node.js, PHP, Python, Ruby, cURL)
以下はC#のコンソールアプリ(.NET Framework)のソースです。
新規プロジェクトを作成して、using含めコピペしてください。
using System;
using System.IO;
using System.Net.Http;
using System.Net.Http.Headers;
using System.Text;

namespace FaceDetection
{
    class Program
    {
        const string subscriptionKey = "あなたのAPIキー";
        const string uriBase = "https://westcentralus.api.cognitive.microsoft.com/face/v1.0/detect";

        static void Main(string[] args)
        {
            Console.WriteLine("Detect faces:");
            Console.Write("Enter the path to an image with faces that you wish to analyze: ");

            // 画像ファイルパスの入力
            string imageFilePath = Console.ReadLine();

            if (File.Exists(imageFilePath))
            {
                try
                {
                    MakeAnalysisRequest(imageFilePath);
                    Console.WriteLine("\nWait a moment for the results to appear.\n");
                }
                catch (Exception e)
                {
                    Console.WriteLine("\n" + e.Message + "\nPress Enter to exit...\n");
                }
            }
            else
            {
                Console.WriteLine("\nInvalid file path.\nPress Enter to exit...\n");
            }
            Console.ReadLine();
        }

        // Face APIを使用して画像分析を行う
        static async void MakeAnalysisRequest(string imageFilePath)
        {
            HttpClient client = new HttpClient();

            // リクエストヘッダー
            client.DefaultRequestHeaders.Add("Ocp-Apim-Subscription-Key", subscriptionKey);

            // リクエストパラメータ
            string requestParameters = "returnFaceId=true&returnFaceLandmarks=false" +
                "&returnFaceAttributes=age,gender,headPose,smile,facialHair,glasses," +
                "emotion,hair,makeup,occlusion,accessories,blur,exposure,noise";

            // Face API呼び出し時のURLを作成
            string uri = uriBase + "?" + requestParameters;

            HttpResponseMessage response;

            // ローカルの画像ファイルパスを文字列からバイト型配列へ変換
            byte[] byteData = GetImageAsByteArray(imageFilePath);

            using (ByteArrayContent content = new ByteArrayContent(byteData))
            {
                // リクエストヘッダーの作成
                content.Headers.ContentType = new MediaTypeHeaderValue("application/octet-stream");

                // Face APIの呼び出し
                response = await client.PostAsync(uri, content);

                // 実行結果からJSONの取得
                string contentString = await response.Content.ReadAsStringAsync();

                // JSONの出力
                Console.WriteLine("\nResponse:\n");
                Console.WriteLine(JsonPrettyPrint(contentString));
                Console.WriteLine("\nPress Enter to exit...");
            }
        }

        // ファイルパス上にある画像をバイト配列に変換
        static byte[] GetImageAsByteArray(string imageFilePath)
        {
            using (FileStream fileStream =
                new FileStream(imageFilePath, FileMode.Open, FileAccess.Read))
            {
                BinaryReader binaryReader = new BinaryReader(fileStream);
                return binaryReader.ReadBytes((int)fileStream.Length);
            }
        }

        // JSONの整形を行う
        static string JsonPrettyPrint(string json)
        {
            if (string.IsNullOrEmpty(json))
                return string.Empty;

            json = json.Replace(Environment.NewLine, "").Replace("\t", "");

            StringBuilder sb = new StringBuilder();
            bool quote = false;
            bool ignore = false;
            int offset = 0;
            int indentLength = 3;

            foreach (char ch in json)
            {
                switch (ch)
                {
                    case '"':
                        if (!ignore) quote = !quote;
                        break;
                    case '\'':
                        if (quote) ignore = !ignore;
                        break;
                }

                if (quote)
                    sb.Append(ch);
                else
                {
                    switch (ch)
                    {
                        case '{':
                        case '[':
                            sb.Append(ch);
                            sb.Append(Environment.NewLine);
                            sb.Append(new string(' ', ++offset * indentLength));
                            break;
                        case '}':
                        case ']':
                            sb.Append(Environment.NewLine);
                            sb.Append(new string(' ', --offset * indentLength));
                            sb.Append(ch);
                            break;
                        case ',':
                            sb.Append(ch);
                            sb.Append(Environment.NewLine);
                            sb.Append(new string(' ', offset * indentLength));
                            break;
                        case ':':
                            sb.Append(ch);
                            sb.Append(' ');
                            break;
                        default:
                            if (ch != ' ') sb.Append(ch);
                            break;
                    }
                }
            }

            return sb.ToString().Trim();
        }
    }
}
APIキーを書き換える
const string subscriptionKey = "あなたのAPIキー";を、先ほどメモしたAPIキーに書き換えてください。
完成!
実行してコンソール上で画像ファイルのパスを指定してあげれば、解析結果が返ってきます。簡単ですね。
uriBaseにはFace API取得時に表示された「エンドポイント+/detect」で、接続先のURLを設定しています。なのでもしFace APIのFind Similarを使う場合には「エンドポイント+/findsimilars」のように指定することになります。
もっと具体的なURLの書き方についてはFace API公式リファレンスの「Request URL」の項目を参考にしてみてください。
また、requestParametersのreturnFaceAttributes=の後に指定している項目が、顔の属性としてJSON形式で返ってきます。例えば年齢と性別の情報だけが欲しければ、
"&returnFaceAttributes=age,gender"
としてあげればOKです。
どのような情報が取得できるのか?
上記コードを実行してリクエストが成功すれば、画像の解析結果がJSONで返ってきます。
今回はぱくたそよりダウンロードした以下の画像を使用してみます。

ちなみにJPEG、PNG、GIF(検出対象は最初のフレームのみ)、BMPの画像ファイルがサポートされており、画像サイズは1KB以上、6MB以下でなければなりません。
Face APIに画像を投げると、以下のJSONがかえってきました。
右側の「◆」「・」に各項目の説明を記載しています。
[
   {
      "faceId": "674125e9-c135-4755-b845-a4a99166c093",
      "faceRectangle": {		◆顔の座標
         "top": 58,
         "left": 72,
         "width": 92,
         "height": 92
      },
      "faceAttributes": {
         "smile": 0.0,			◆笑顔
         "headPose": {			◆顔の傾き
            "pitch": -15.2,		・上を向いているか、下を向いているか
            "roll": 3.8,		・顔の向きはそのままに、時計回りにどのくらい傾きがあるか
            "yaw": 0.8			・右を向いているか、左を向いているか
         },
         "gender": "male",		◆性別
         "age": 25.0,			◆年齢
         "facialHair": {		◆髭
            "moustache": 0.1,	・くち髭
            "beard": 0.1,		・あご髭
            "sideburns": 0.1	・ほお髯
         },
         "glasses": "NoGlasses",◆眼鏡の有無
         "emotion": {			◆感情
            "anger": 0.001,		・怒り
            "contempt": 0.0,	・軽蔑
            "disgust": 0.0,		・嫌悪
            "fear": 0.0,		・恐れ
            "happiness": 0.0,	・幸せ
            "neutral": 0.999,	・通常
            "sadness": 0.0,		・悲しみ
            "surprise": 0.0		・驚き
         },
         "blur": {				◆対象がぼやけて写っているか
            "blurLevel": "low",
            "value": 0.04
         },
         "exposure": {			◆露出度
            "exposureLevel": "goodExposure",
            "value": 0.69
         },
         "noise": {				◆ノイズ
            "noiseLevel": "low",
            "value": 0.0
         },
         "makeup": {			◆化粧
            "eyeMakeup": false,	・アイメイク
            "lipMakeup": false	・口紅、リップ
         },
         "accessories": [		◆アクセサリーの有無(帽子含む)

         ],
         "occlusion": {			◆顔を塞いでいるか
            "foreheadOccluded": false,	・額
            "eyeOccluded": false,		・目
            "mouthOccluded": false		・口
         },
         "hair": {				◆髪の毛
            "bald": 0.04,		・薄毛の度合い
            "invisible": false,	・帽子等で髪の毛が見えない場合にtrue
            "hairColor": [		・髪色(数値でソートされて表示。"invisible": trueだと表示されない)
               {
                  "color": "black",
                  "confidence": 0.98
               },
               {
                  "color": "brown",
                  "confidence": 0.92
               },
               {
                  "color": "other",
                  "confidence": 0.31
               },
               {
                  "color": "gray",
                  "confidence": 0.26
               },
               {
                  "color": "red",
                  "confidence": 0.1
               },
               {
                  "color": "blond",
                  "confidence": 0.09
               }
            ]
         }
      }
   }
]
結構詳細にわかりますね。
今回は1人分だけですが、同じ画像に2人以上写っていた場合、検出できた人数分の配列が返ってきます。
Detectだけでも、趣味レベルでの単純な画像ファイルの振り分けなどいろいろできそうです。
ちなみに以下のように人の顔が写っていない(と認識された)場合、

特にエラーとはならずに空っぽの[]が返ってきます。
今回はFace APIを使用して画像から顔の属性を検出してみました。
次回はDetectで取得したFace IDを使って、2枚の画像の中に同じ人物がいるかを検出してみたいと思います。