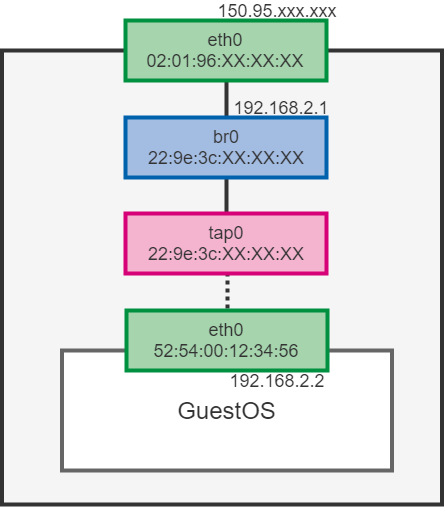
完成予想図
実行環境
ConohaのVPSを利用
# cat /etc/os-release | grep CENTOS_MANTISBT_PROJECT
CENTOS_MANTISBT_PROJECT="CentOS-7"
CENTOS_MANTISBT_PROJECT_VERSION="7"
# uname -r
3.10.0-957.1.3.el7.x86_64
qemuのインストールとcirrosイメージのダウンロード
seabiosを入れないとbiosが無いといわれるので入れる
# yum install -y qemu seabios
# qemu-system-x86_64 --version

(process:13448): GLib-WARNING **: 02:11:04.004: gmem.c:489: custom memory allocation vtable not supported
QEMU emulator version 2.0.0, Copyright (c) 2003-2008 Fabrice Bellard
# wget http://download.cirros-cloud.net/0.4.0/cirros-0.4.0-x86_64-disk.img
# file cirros-0.4.0-x86_64-disk.img
cirros-0.4.0-x86_64-disk.img: QEMU QCOW Image (v3), 46137344 bytes
bridgeとtapの作成
# brctl addbr br0
# brctl show br0
bridge name     bridge id               STP enabled     interfaces
br0             8000.000000000000       no
# ifconfig br0 192.168.2.1
# ifconfig br0
br0: flags=4099<UP,BROADCAST,MULTICAST>  mtu 1500
        inet 192.168.2.1  netmask 255.255.255.0  broadcast 192.168.2.255
        ether 00:00:00:00:00:00  txqueuelen 1000  (Ethernet)
        RX packets 0  bytes 0 (0.0 B)
        RX errors 0  dropped 0  overruns 0  frame 0
        TX packets 0  bytes 0 (0.0 B)
        TX errors 0  dropped 0 overruns 0  carrier 0  collisions 0

# ip tuntap add tap0 mode tap
# ip tuntap show tap0
tap0: tap UNKNOWN_FLAGS:800
br0にtap0を追加する方法が2個ある
今回は方法1を使う
方法1:/etc/qemu-if{up,down}を使う方法
/etc/qemu-if{up,down}:qemuの{起動,終了}時に実行される
# cat /etc/qemu-ifup
# !/bin/bash
ifconfig $1 0.0.0.0 promisc up
brctl addif br0 $1
# cat /etc/qemu-ifdown
# !/bin/bash
brctl delif br0 $1
ifconfig $1 down
方法2:/etc/qemu-if{up,down}を使わない方法
qemu実行時にscript=noとdownscript=noを指定する必要あり
# ifconfig tap0 0.0.0.0 promisc up
# brctl addif br0 tap0
# brctl show
bridge name     bridge id               STP enabled     interfaces
br0             8000.2e734667a24c       no              tap0
親機とVMの疎通
# qemu-system-x86_64

// 起動後
$ sudo ifconfig eth0 192.168.2.2
$ sudo route add default gw 192.168.2.1
$ ping -c 1 <host-ip>
PING <host-ip> (<host-ip>): 56 data bytes
64 bytes from <host-ip>: seq=0 ttl=64 time=1.485 ms

--- <host-ip> ping statistics ---
1 packets transmitted, 1 packets received, 0% packet loss
round-trip min/avg/max = 1.485/1.485/1.485 ms
VMと外部の疎通
IPフォワードの有効化、NATの設定
# echo 1 > /proc/sys/net/ipv4/ip_forward
# iptables -t nat -A POSTROUTING -o eth0 -j MASQUERADE

// VM上で
$ ping -c 1 8.8.8.8
PING 8.8.8.8 (8.8.8.8): 56 data bytes
64 bytes from 8.8.8.8: seq=0 ttl=121 time=2.264 ms

--- 8.8.8.8 ping statistics ---
1 packets transmitted, 1 packets received, 0% packet loss
round-trip min/avg/max = 2.264/2.264/2.264 ms
めでたしめでたし