はじめに
最近、勉強用にKubernetes、Docker環境を使いたいことが多くあります。
コンテナを動かすサーバーはそれなりのスペックが必要なのでお金がかかってしまいます。
そのため、Terraformで楽に環境を作りたいと思います。
作成する構成
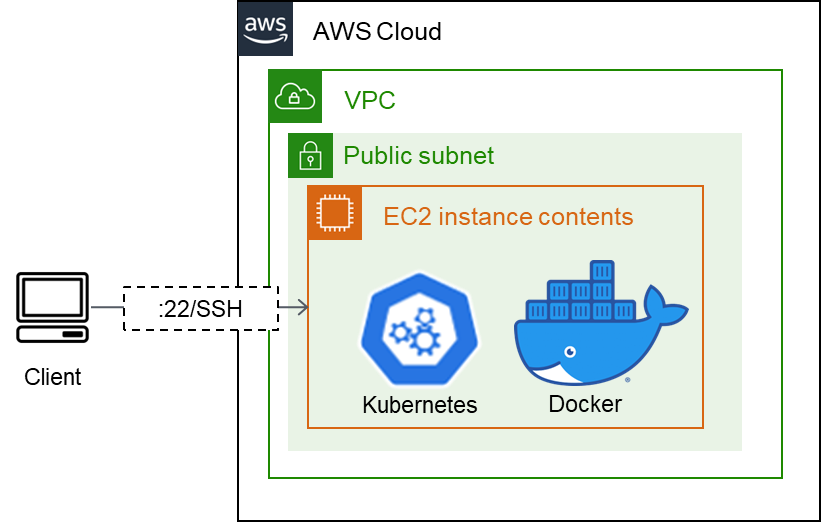
EC2を作成して、クラスタを作ります。ClientからSSH接続してEC2内部でクラスタにアクセスするようにします。
作業の流れ
もし手作業で1つ1つ作る場合は以下の流れになります。
- EC2を配置するネットワーク(VPC,サブネット)を作成する
勉強用にネットワークセキュリティグループでアクセス制限したうえで作成したいです。しかし、クライアントのグローバルIPを調べたり覚えておくのは面倒です。 - SSH接続のためのキーペアを作成する
事前に作成しておいたキーを使ってキーペアを作成します。 - EC2を作成する
シングルノードで作成します。SSH接続するにはEC2のグローバルIPを知らないといけませんが、AWSコンソールにアクセスして確認するのが面倒です。 - Kubernetes、Dockerをインストールする
勉強の目的によってKubernetesは使わない場合があります。共通部分はモジュール化してインストール方法を個別で指定できるようにしたいです。
一連の流れをTerraformで行うようにしたいです。
実践する
ネットワークを作成するtfファイル
data "http" "client_global_ip" {
  url = "https://ifconfig.co/ip"
}
locals {
  allowed_cidr = replace("${data.http.client_global_ip.response_body}/32","\n","")
}
resource "aws_vpc" "test_vpc" {
  cidr_block = "10.0.0.0/16"
}
resource "aws_subnet" "test_subnet" {
  vpc_id = aws_vpc.test_vpc.id
  map_public_ip_on_launch = true
  cidr_block = "10.0.0.0/24"
}
resource "aws_internet_gateway" "test_igw" {
  vpc_id = aws_vpc.test_vpc.id
}
resource "aws_route_table" "test_rt" {
  vpc_id = aws_vpc.test_vpc.id
  route {
      cidr_block = "0.0.0.0/0"
      gateway_id = aws_internet_gateway.test_igw.id
  }
}
resource "aws_route_table_association" "test_rta" {
  subnet_id = aws_subnet.test_subnet.id
  route_table_id = aws_route_table.test_rt.id
}
resource "aws_security_group" "test_sg" {
  vpc_id = aws_vpc.test_vpc.id
  ingress {
    from_port = 22
    to_port = 22
    protocol = "tcp"
    cidr_blocks = [local.allowed_cidr]
  }

  egress {
    from_port   = 0
    to_port     = 0
    protocol    = "-1"
    cidr_blocks = ["0.0.0.0/0"]
  }
}
以下のリソースを作成します。
| リソース種類 | 説明 |
|---|---|
| aws_vpc | EC2を配置するVPC |
| aws_subnet | EC2を配置するサブネット。配置するインスタンスにグローバルIPを付与するようにしています。 |
| aws_internet_gateway | インターネットにアクセスするためのゲートウェイ |
| aws_route_table | ネットワークの経路を定義するルートテーブル |
| aws_route_table_association | ルートテーブルとサブネットを紐づける設定 |
| aws_security_group | ネットワークへのアクセス制限をするセキュリティグループ。クライアントのグローバルIPを自動取得して設定するようにしています。 |
※参考
キーペアを作成するtfファイル
resource "aws_key_pair" "test_kp" {
  public_key = file(var.instance_public_key)
}
以下のリソースを作成します。
| リソース種類 | 説明 |
|---|---|
| aws_key_pair | SSH接続に使うキーペア。変数に公開鍵のパスを入れて、file()で読み込んでpublic_keyに渡すようにしています。 |
EC2を作成するtfファイル
data "aws_ssm_parameter" "ami" {
  name = "${var.ami_name}"
}
resource "aws_network_interface" "test_ni"{
  subnet_id = aws_subnet.test_subnet.id
  security_groups = [aws_security_group.test_sg.id]
}
resource "aws_instance" "test_instance" {
  ami = data.aws_ssm_parameter.ami.value
  instance_type = "${var.instance_type}"
  key_name = aws_key_pair.test_kp.id
  network_interface {
    network_interface_id = aws_network_interface.test_ni.id
    device_index = 0
  }
  root_block_device {
    volume_size = ${var.root_block_volume_size}
  }
}
以下のリソースを作成します。
| リソース種類 | 説明 |
|---|---|
| aws_network_interface | EC2に設定するネットワークインターフェース。 |
| aws_instance | クラスタを作成するEC2。最新のAMIイメージを取得して起動するようにしています。 |
※参考
Kubernetes、Dockerをインストールするtfファイル
勉強の目的によりインストール内容、方法が異なり、tfファイルを使い分ける必要が出てきます。
今回はKubernetesを使う場合について記載します。
resource "null_resource" "init_ec2" {
  triggers = {
    public_ip = "${module.common_resources.test_instance.public_ip}"
  }

  connection {
    type = "ssh"
    user = "ec2-user"
    host = self.triggers.public_ip
    private_key = file(module.common_resources.instance_private_key)
  }

  provisioner "remote-exec" {
    script = "../scripts/install-docker.sh"
  }
  provisioner "remote-exec" {
    script = "../scripts/install-kubernetes.sh"
  }
}
今回はあまり関係ありませんが、remote-execを分けると再ログイン扱いとなり、グループ変更などを反映できて便利だと思いました。
#!/bin/bash -ex

echo 'install docker'
VERSION="20.10.17"
sudo yum install -y docker-${VERSION}
sudo systemctl start docker
sudo usermod -aG docker $(whoami)
#!/bin/bash -ex

echo "install kubernetes"

echo "`ip -4 a show eth0 | grep -oP '(?<=inet\s)\d+(\.\d+){3}'` `hostname`" | sudo tee -a /etc/hosts
cat << EOF | sudo tee -a /etc/yum.repos.d/kubernetes.repo
[kubernetes]
name=Kubernetes
baseurl=https://packages.cloud.google.com/yum/repos/kubernetes-el7-x86_64
enabled=1
gpgcheck=1
repo_gpgcheck=0
gpgkey=https://packages.cloud.google.com/yum/doc/yum-key.gpg https://packages.cloud.google.com/yum/doc/rpm-package-key.gpg
EOF

#sudo sed -i 's/^SELINUX=enforcing$/SELINUX=permissive/' /etc/selinux/config
VERSION="1.26.0"
sudo yum install -y kubelet-${VERSION} kubeadm-${VERSION} kubectl-${VERSION} --disableexcludes=kubernetes
sudo swapoff -a
sudo systemctl start kubelet
sudo systemctl enable kubelet
cat << EOF | sudo tee /etc/docker/daemon.json
{
  "exec-opts": ["native.cgroupdriver=systemd"]
}
EOF
sudo systemctl daemon-reload
sudo systemctl restart docker
sudo systemctl restart kubelet
sudo kubeadm init

mkdir -p $HOME/.kube
sudo cp -i /etc/kubernetes/admin.conf $HOME/.kube/config
sudo chown $(id -u):$(id -g) $HOME/.kube/config

echo 'setup master node'
kubectl apply -f https://github.com/weaveworks/weave/releases/download/v2.8.1/weave-daemonset-k8s.yaml
CONTROL_PLANE=$(kubectl get node | grep control-plane | awk '{print $1}')
kubectl taint nodes $CONTROL_PLANE node-role.kubernetes.io/control-plane:NoSchedule-

echo 'setup kubectl'
echo 'alias k="kubectl"' >> ~/.bash_profile
また、プロバイダーを定義したtfファイルを作成します。
terraform {
  required_providers {
    aws = {
      source = "registry.terraform.io/hashicorp/aws"
      version = "4.47.0"
    }
    http = {
      source = "registry.terraform.io/hashicorp/http"
      version = "3.2.1"
    }
    null = {
      source = "registry.terraform.io/hashicorp/null"
      version = "3.2.1"
    }
  }
}

provider "aws" {
(略)
}
provider "http" {}
provider "null" {}

module "common_resources" {
  source = "../common"
}
init,applyして動いていることを確認する
細かいtfファイルの内容は省きます。以下のように作成したファイルを配置します。
$ pwd;find . | sort | sed '1d;s/^\.//;s/\/\([^/]*\)$/|--\1/;s/\/[^/|]*/|  /g'
/home/ari_sangu/qiita/99.tools/tf-with-ec2
|--common #AWSのリソースを定義したモジュール
|  |--keypair.tf
|  |--network.tf
|  |--output.tf
|  |--server.tf
|  |--terraform.tf
|  |--variables.tf
|--kubernetes #Kubernetesクラスタを作成するファイル
|  |--initialize-server.tf
|  |--output.tf
|  |--terraform.tf
|--scripts #クラスタを作成するためのスクリプト
|  |--install-docker.sh
|  |--install-kubernetes.sh
それではterraformコマンドを実行していきます。
$ cd kubernetes/
$ terraform init
また、AWSのCLIを実行するには認証が必要なのですが、今回はローカルに認証ファイルを置きたくなかったので環境変数で設定しました。
$ source ../../aws-cli-source.sh
export AWS_ACCESS_KEY_ID='...'
export AWS_SECRET_ACCESS_KEY='...'
export AWS_REGION='...'
applyします。
$ terraform apply
・・・
Outputs:

ssh_cmd = "ssh -i <key> ec2-user@18.183.62.67"
Terraformでは上記のようにEC2のグローバルIPをOutputsとして表示することができます。
output.tfに以下のように書いてます。
output "ssh_cmd" {
  description = "to access ec2 by ssh"
  value = "ssh -i ${var.instance_private_key} ec2-user@${aws_instance.test_instance.public_ip}"
}
無事クラスタができるとSSH接続後、kubectlコマンドが使えるようになっています。
[ec2-user@ip-10-0-0-90 ~]$ k version
WARNING: This version information is deprecated and will be replaced with the output from kubectl version --short.  Use --output=yaml|json to get the full version.
Client Version: version.Info{Major:"1", Minor:"26", GitVersion:"v1.26.0", GitCommit:"b46a3f887ca979b1a5d14fd39cb1af43e7e5d12d", GitTreeState:"clean", BuildDate:"2022-12-08T19:58:30Z", GoVersion:"go1.19.4", Compiler:"gc", Platform:"linux/amd64"}
Kustomize Version: v4.5.7
Server Version: version.Info{Major:"1", Minor:"26", GitVersion:"v1.26.0", GitCommit:"b46a3f887ca979b1a5d14fd39cb1af43e7e5d12d", GitTreeState:"clean", BuildDate:"2022-12-08T19:51:45Z", GoVersion:"go1.19.4", Compiler:"gc", Platform:"linux/amd64"}
作ったリソースを削除する
放置すると高額コストになるので、使い終わったら削除します。
$ terraform destroy
・・・
Destroy complete! Resources: 10 destroyed.
おわりに
今まで手動でやっていたものをコマンド一つでできるようにしてみました。
初めはコマンドに慣れていることもあって恩恵を感じにくかったのですが、少しコマンドを忘れた時に思い出す量が少なくてよいと思いました。
ただ、今まで手動で行っていたことをtfファイルに起こす必要があります。書き方は勉強して管理しやすくしていく必要があると感じました。
これからも勉強していきます。
