記事を書いたきっかけ
- 案件で使った技術をメモとして残しておきたかったから
ぶっちゃけ最近アウトプットしてなかったから
対象者
- Terraform を触れたことがない人
- AWS のマネコンからインフラの立ち上げに飽きた人
動作環境
- Cloud9(設定は全てデフォルトでOK。今回は立ち上げ手順は省略)
- 作成されるリソースが IAM ポリシーに含まれていること
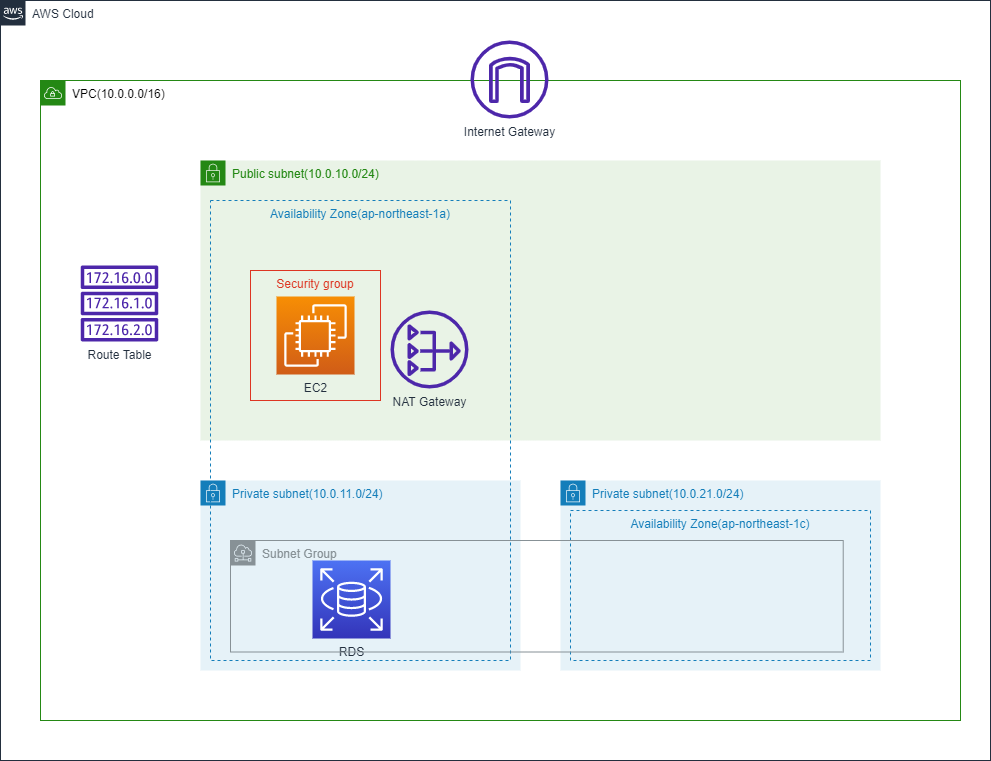
本記事で作るインフラ構成
- パブリックサブネットに踏み台サーバを1台設置
- プライベートサブネットからインターネットに接続させるため、NAT ゲートウェイを設置
- プライベートサブネットにDBサーバを1台設置
- サブネットグループは2つ以上の AZ が必要なため、サブネットを2つ展開
- DB サーバにはパブリックサブネットからのみ接続可能
ディレクトリ構成
Terraform の立ち上げは一番簡単な方法でやっています。Module は作ってません。
.
|-- main.tf (terraformの初期化・プロバイダ指定)
|-- network.tf (VPC・各種ゲートウェイ・サブネット・ルートテーブルの設定)
|-- security.tf (セキュリティグループの設定)
|-- server.tf(キーペアアップロード・EC2インスタンス・サブネットグループ・RDSの設定)
コード
main.tf
main.tf
# --------------------------------
#  main
# --------------------------------

# Terraformの初期化
terraform {
  required_version = "~> 1.1.0"
  required_providers {
    aws = {
      source  = "hashicorp/aws"
      version = "~> 4.0"
    }
  }
}

# プロバイダ指定
provider "aws" {
  region = "ap-northeast-1"
  /* Cloud9を使っていて 「AWS managed temporary credentials」 がオンの場合不要。
  それ以外の場合は、認証情報が必要になる */
  # access_key = "ACCESS_KEY_HERE"
  # secret_key = "SECRET_KEY_HERE"
}
network.tf
今回はサブネットグループを作るためだけにプライベートサブネットを2つ作っているため、
subnet-private-2(10.0.21.0/24) とのルートテーブルは作っていません。
network.tf
# --------------------------------
#  network
# --------------------------------

# --------------------------------
# VPC
resource "aws_vpc" "main" {
  cidr_block = "10.0.0.0/16"
  tags = {
    Name = "vpc"
  }
}

# --------------------------------
# インターネットゲートウェイ
resource "aws_internet_gateway" "main" {
  vpc_id = aws_vpc.main.id
  tags = {
    Name = "igw"
  }
}

# --------------------------------
# ElasticIP
resource "aws_eip" "main" {
  vpc = "true"
  depends_on = [aws_internet_gateway.main]
  tags = {
    Name = "gw-eip"
  }
}
# NATゲートウェイ
resource "aws_nat_gateway" "main" {
  allocation_id = aws_eip.main.id
  subnet_id = aws_subnet.public.id
  depends_on = [aws_internet_gateway.main]
  tags = {
    Name = "ngw"
  }
}

# --------------------------------
# Public
# 1.1 パブリックサブネット
resource "aws_subnet" "public" {
  vpc_id = aws_vpc.main.id
  cidr_block = "10.0.10.0/24"
  availability_zone = "ap-northeast-1a"
  map_public_ip_on_launch = true  # falseにするとプライベートサブネットになる
  tags = {
    Name = "subnet-public"
  }
}

# 2.1 ルートテーブル
resource "aws_route_table" "public" {
  vpc_id = aws_vpc.main.id
  tags = {
    Name = "rt-public"
  }
}

# 2.2 ルートテーブルとパブリックサブネットの関連付け
resource "aws_route_table_association" "public" {
  subnet_id      = aws_subnet.public.id
  route_table_id = aws_route_table.public.id
}

# 2.3 ルート定義 (踏み台サーバ → インターネットゲートウェイ → インターネット)
resource "aws_route" "public_to_internet" {
  destination_cidr_block = "0.0.0.0/0"
  route_table_id = aws_route_table.public.id
  gateway_id = aws_internet_gateway.main.id
}

# --------------------------------
# Private
# 1.1 プライベートサブネット
resource "aws_subnet" "private_1" {
  vpc_id = aws_vpc.main.id
  cidr_block = "10.0.11.0/24"
  availability_zone = "ap-northeast-1a"
  map_public_ip_on_launch = false
  tags = {
    Name = "subnet-private-1"
  }
}
resource "aws_subnet" "private_2" {
  vpc_id = aws_vpc.main.id
  cidr_block = "10.0.21.0/24"
  availability_zone = "ap-northeast-1c"
  map_public_ip_on_launch = false
  tags = {
    Name = "subnet-private-2"
  }
}

# 2.1 ルートテーブル作成
resource "aws_route_table" "private" {
  vpc_id = aws_vpc.main.id
  tags = {
    Name = "rt-private"
  }
}

# 2.2 ルートテーブルとプライベートサブネットの関連付け
resource "aws_route_table_association" "private" {
  subnet_id      = aws_subnet.private_1.id
  route_table_id = aws_route_table.private.id
}

# 2.3 ルート定義 (DBサーバ → NATゲートウェイ → インターネット)
resource "aws_route" "private_to_internet" {
  destination_cidr_block = "0.0.0.0/0"
  route_table_id = aws_route_table.private.id
  nat_gateway_id = aws_nat_gateway.main.id
}
security.tf
security.tf
# --------------------------------
#  security
# --------------------------------

# --------------------------------
# 踏み台サーバ
# セキュリティーグループ
resource "aws_security_group" "bastion" {
    name = "sg-bastion"
    vpc_id = aws_vpc.main.id

    ingress { # インバウンド
        description = "allow ssh connection"
        from_port = 22
        to_port = 22
        protocol = "tcp"
        cidr_blocks = ["0.0.0.0/0"] # あくまで一例です。本番環境でこれをやったら叱られます。
    }

    egress { # アウトバウンド
        from_port = 0
        to_port = 0
        protocol = -1  # 全てのプロトコル
        cidr_blocks  = ["0.0.0.0/0"]
    }

    tags = {
        Name = "sg-bastion"
    }
}

# --------------------------------
# 踏み台サーバ
# セキュリティグループ
resource "aws_security_group" "db" {
    name = "sg-db"
    vpc_id = aws_vpc.main.id

    ingress {
        description = "allow mysql connection"
        from_port = 3306
        to_port = 3306
        protocol = "tcp"
        cidr_blocks = ["10.0.10.0/24"]
    }

    egress {
        from_port = 0
        to_port = 0
        protocol = -1
        cidr_blocks  = ["0.0.0.0/0"]
    }

    tags = {
        Name = "sg-db"
    }
}
server.tf
踏み台サーバにユーザーデータで MySQLをインストールしているが、
RDSに接続するためにインストールしているだけで、ここにはDBを展開しないので注意。
server.tf
# --------------------------------
#  server
# --------------------------------

# --------------------------------
# キーペアアップロード
resource "aws_key_pair" "main" {
  key_name   = "keypair"
  public_key = file("/home/ec2-user/.ssh/id_rsa.pub") # SSHキーは後ほど作成
  tags = {
      Name = "keypair"
  }
}

#--------------------------------
# 踏み台サーバ
# EC2インスタンス
resource "aws_instance" "bastion" {
    ami = "ami-08a8688fb7eacb171"
    instance_type = "t2.micro"
    key_name = aws_key_pair.main.id
    subnet_id = aws_subnet.public.id
    vpc_security_group_ids = [aws_security_group.bastion.id]
    tags = {
        Name = "bastion-server"
    }
    user_data = <<-EOF
              #!/bin/bash
              sudo yum -y install mysql
              EOF
}


#--------------------------------
# DBサーバ
# サブネットグループ
resource "aws_db_subnet_group" "db" {
    name = "rds-subnet-group"
    subnet_ids = [aws_subnet.private_1.id, aws_subnet.private_2.id]
    tags = {
        Name = "db-subnet-group"
    }
}

# RDS
resource "aws_db_instance" "db" {
    identifier = "rds-db"
    allocated_storage = 10
    engine = "mysql"
    engine_version = "5.7"
    instance_class = "db.t2.micro"
    db_name = "db"
    username = "hogehoge"
    password = "hugahuga"
    vpc_security_group_ids = [aws_security_group.db.id]
    multi_az = false  # trueにするとマルチAZでmaster-slave構成になるので注意
    db_subnet_group_name = aws_db_subnet_group.db.id
    parameter_group_name = "default.mysql5.7"
    skip_final_snapshot = true # 削除する際にスナップショットが自動で作られなくなります
}
起動前の確認
SSHキー作成
$ ssh-keygen –t rsa –b 4096
文法確認
$ terraform validate
dry-run(作成前に構築されるインフラを出力してくれる)
$ terraform plan
起動
$ terraform apply

An execution plan has been generated and is shown below.
Resource actions are indicated with the following symbols:
  + create

Terraform will perform the following actions:
(中略)

Plan: 19 to add, 0 to change, 0 to destroy.

Do you want to perform these actions?
  Terraform will perform the actions described above.
  Only 'yes' will be accepted to approve.

  Enter a value: (yesと入力)

(中略)
Apply complete! Resources: 19 added, 0 changed, 0 destroyed.
踏み台サーバ・RDSに接続
事前踏み台サーバのパブリックIPアドレスと、
DBサーバのRDSエンドポイントを確認すること。
MySQLに接続できれば成功です。
$ ssh -i /home/ec2-user/.ssh/id_rsa ec2-user@(踏み台サーバのパブリックIPアドレス)
(中略)
[ec2-user@ip-xxx-xxx-xx-xxx ~] mysql -h (RDSエンドポイント) -P 3306 -u hogehoge -p
Enter password: (hugahugaと入力)
Welcome to the MariaDB monitor.  Commands end with ; or \g.
Your MySQL connection id is 7
Server version: 5.7.36 Source distribution

Copyright (c) 2000, 2018, Oracle, MariaDB Corporation Ab and others.

Type 'help;' or '\h' for help. Type '\c' to clear the current input statement.

MySQL [(none)]>
後片付け
$ terraform destroy
(中略)

Plan: 0 to add, 0 to change, 19 to destroy.

Do you want to perform these actions?
  Terraform will perform the actions described above.
  Only 'yes' will be accepted to approve.

  Enter a value: (yesと入力)

(中略)
Apply complete! Resources: 19 destroyed.
感想
案外簡単にIaCを使うことが出来た。ただ管理するとなると結構難しそうだと感じました。
(また後で記述するかもしれません。初心者のため多少のミスがあるかもしれないので、指摘があると助かります)