はじめに
こんにちは。
今日もCrystalの薄いネタをやっていきます。
僕は英語の翻訳をする時に、DeepLをよく使っています。本格的な翻訳がほしいときはChatGPTを使いますが、ChatGPTは文章が平坦かつ饒舌になるので、かえって不便な場合があります。
DeepLは、WindowsやMac用にアプリを提供していますが、Linux用はありません。
今日はCrystalを使ってDeepLのサイトをUbuntu用にアプリ化します。
webview
こちらのライブラリを使えば一発です。
まずはプロジェクトを作成して
crystal init app deepl-gui
cd deepl-gui
vi shard.yml
webviewを shard.yml に追加します。
dependencies:
  webview:
    github: naqvis/webview
インストールします。
shards install
src/deepl-gui.cr を編集します。
require "webview"

WIDTH  = 960
HEIGHT = 640
TITLE = "DEEPL"
DEEPL_URL = "https://www.deepl.com/translator"

wv = Webview.window(
  WIDTH, HEIGHT, Webview::SizeHints::NONE,
  TITLE, DEEPL_URL
)

wv.run
wv.destroy
ビルドします
shards build
実行します
bin/deepl-gui
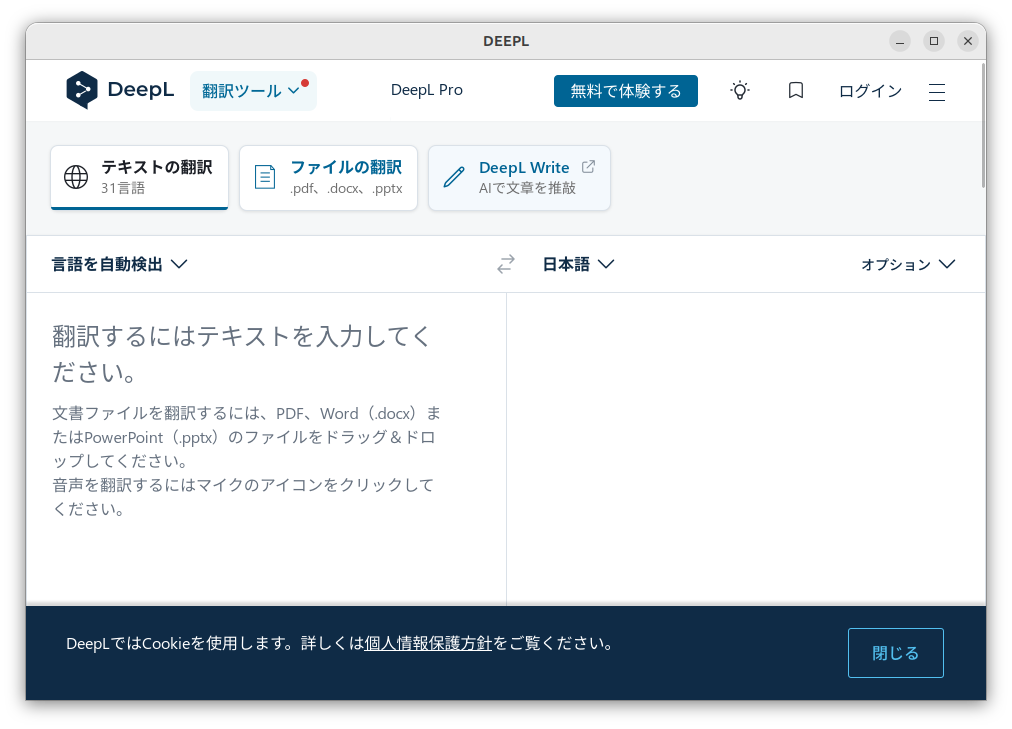
こんな感じで DeepL の画面が起動すれば大成功です。
メールアドレスとパスワードでDeepLにログインすることもできます。
CrystalではMakeを使うのが慣習ですので、Makefileをつけておきましょう。
.PHONY: build
build:
	shards build

.PHONY: spec
spec:
	crystal spec

.PHONY: clean
clean:
	rm -rf lib bin

.PHONY: install
install: build
	cp ./bin/deepl-gui /usr/local/bin/
アイコンをつけよう
このままでは殺風景なので、アイコンをつけてみましょう。
Ubuntuの場合は、iconは /usr/share/icons または usr/share/pixmaps に保存されています。ここではより簡単な pixmaps を利用しましょう。
アイコン画像を用意して、icons ディレクトリに配置します。ここでは deepl_icon_256.png としました。
├── icons
│   └── deepl_icon_256.png
デスクトップエントリファイル deepl-gui.desktop を書きます
[Desktop Entry]
Type=Application
Name=Deepl GUI
Comment=GUI for the Deepl translation service
Icon=deepl-gui
Exec=/usr/local/bin/deepl-gui
Terminal=false
Categories=Utility
Makefileを書きます(ここはChatGPTの力を借りました)
.PHONY: build spec clean install_test

build: ./bin/deepl-gui

./bin/deepl-gui:
	shards build

test:
	crystal spec

clean:
	rm -rf lib bin

install: ./bin/deepl-gui
	install -D -m 755 ./bin/deepl-gui /usr/local/bin/deepl-gui
	install -D -m 644 ./icons/deepl_icon_256.png /usr/share/pixmaps/deepl-gui.png
	install -D -m 644 ./deepl-gui.desktop /usr/share/applications/deepl-gui.desktop
これで checkinstll を使って、パッケージを作れるようになります。
sudo checkinstall
The package documentation directory ./doc-pak does not exist.
Should I create a default set of package docs?  [y]: n
このパッケージの説明を書いてください
説明の末尾は空行かEOFにしてください。
>> deepl-gui
*****************************************
**** Debian package creation selected ***
*****************************************

このパッケージは以下の内容で構成されます:

0 -  Maintainer: [ root@mouse ]
1 -  Summary: [ deepl-gui ]
2 -  Name:    [ icons ]
3 -  Version: [ 20231219 ]
4 -  Release: [ 1 ]
5 -  License: [ GPL ]
6 -  Group:   [ checkinstall ]
7 -  Architecture: [ amd64 ]
8 -  Source location: [ icons ]
9 -  Alternate source location: [  ]
10 - Requires: [  ]
11 - Recommends: [  ]
12 - Suggests: [  ]
13 - Provides: [ icons ]
14 - Conflicts: [  ]
15 - Replaces: [  ]

変更するものの番号を入力してください。Enterで続行します:
2 を deepl-gui に、3 を 1.0 に変更しておきます。
0 -  Maintainer: [ root@mouse ]
1 -  Summary: [ deepl-gui ]
2 -  Name:    [ deepl-gui ]
3 -  Version: [ 1.0 ]
4 -  Release: [ 1 ]
5 -  License: [ GPL ]
6 -  Group:   [ checkinstall ]
7 -  Architecture: [ amd64 ]
8 -  Source location: [ icons ]
9 -  Alternate source location: [  ]
10 - Requires: [  ]
11 - Recommends: [  ]
12 - Suggests: [  ]
13 - Provides: [ icons ]
14 - Conflicts: [  ]
15 - Replaces: [  ]
インストールが無事に完了したら、パッケージを確認してみましょう。
dpkg -L deepl-gui
/.
/usr
/usr/local
/usr/local/bin
/usr/local/bin/deepl-gui
/usr/share
/usr/share/applications
/usr/share/applications/deepl-gui.desktop
/usr/share/doc
/usr/share/doc/deepl-gui
/usr/share/doc/deepl-gui/LICENSE
/usr/share/doc/deepl-gui/README.md
/usr/share/pixmaps
/usr/share/pixmaps/deepl-gui.png
また、ディレクトリの中に deepl-gui_1.0-1_amd64.deb が作られているはずです。
WebViewを使ってDeepLのサイトをアプリ化することができました。
Show apps からアプリが開けることを確認しましょう。
おわりに
僕はFirefoxをメインブラウザとして使っていますが、DeepLアプリはとっても便利だと思います。DeepLのようなアプリは、ブラウザとは別に開いていた方がコピーアンドペーストには便利です。
今回はCrystalというよりも、Makefile piyo.desktop checkinstall といったツールを使ってUbuntuのパッケージを作る方法でした。技術的に難しいことをしていないのですが、プログラミングで生活が便利になると嬉しいですね。
今回はUbuntuの記事でしたが、MacやWindowsでも同じようなことができると書かれています。ほかにも、webviewでは、CrystalからJavaScriptを利用したり、JavaScriptからCrystalを読んだりすることもできるようです。いろいろな応用が考えられると思います。
この記事は以上です。
