はじめに
ここでは1-2年前にGUIの練習のために作ったyardを見るだけのソフトを振り返って、RubyでどうやってGUIソフトを作るんだったかというのを思い出して、自分用テンプレートにまとめたいと思います。この記事は ruby/gtk3 について中級的な内容をまとめています。初心者の方はこちらを見てください。
【Ruby】10分でGladeを使って作るRuby/GTK3 GUIアプリ
このソフトは、ローカルにインストールされたgemを表示するだけのやつなので、かならずしも実用的ではないよ。
Github : https://github.com/kojix2/yardview
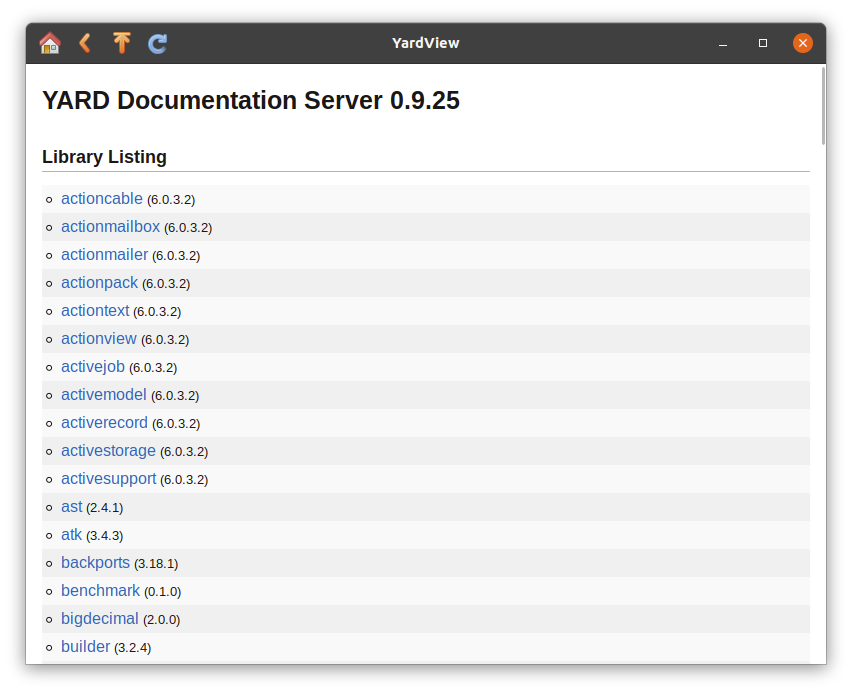
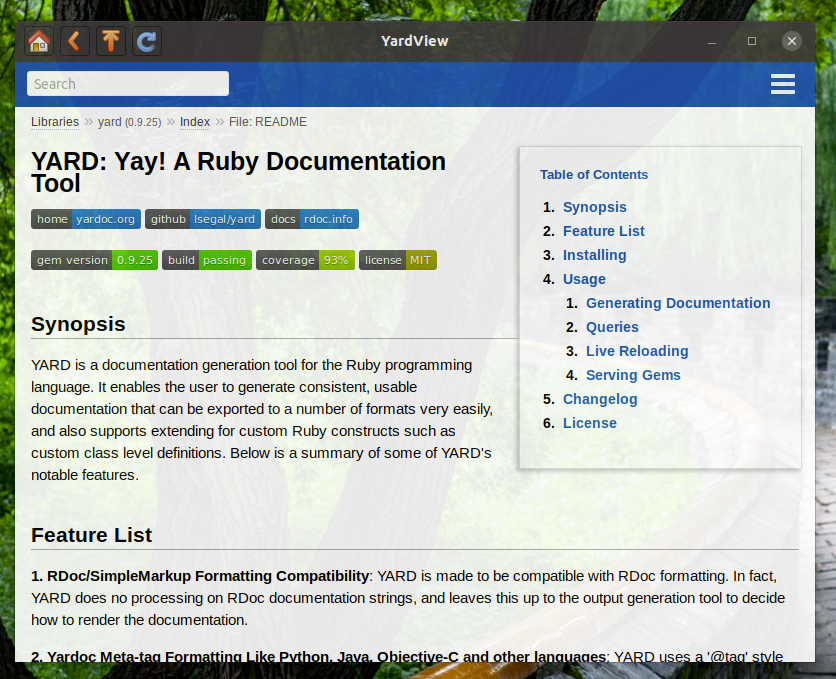
ちょっと透けるようになっています。コードではなくGladeの設定でいじっています。
一応Gemで試せます。(環境によっては動かないかも)
gem install yardview_gtk3
起動
yardview
元ネタ
Lazarus Lazaridisさんの記事。Todoアプリをつくています。
- https://iridakos.com/programming/2018/01/25/creating-a-gtk-todo-application-with-ruby
- https://github.com/iridakos/gtk-todo-tutorial
この元ネタの英語の内容がすらすら読める人はそれで十分なのですが、この記事にもシグナルハンドリングで少し楽をする方法など、元ネタ以上の内容が少し含まれています。
Gemにする
実行ファイルを追加するオプション --exe -b
bundle gem yardview --exe
いつもどおりgemspecファイルを編集
  spec.add_dependency 'yard'
  spec.add_dependency 'gtk3'
  spec.add_dependency 'webkit2-gtk'
  spec.add_development_dependency 'bundler'
  spec.add_development_dependency 'rake'
ユーザーはRubyに詳しい → Gemfile.lock は含めない
ユーザーはRuby関係ない → Gemfile.lock 残す
ディレクトリ構成
.
├── Gemfile
├── LICENSE.txt
├── README.md
├── Rakefile
├── exe
│   └── yardview
├── lib
│   ├── yardview
│   │   ├── application.rb
│   │   ├── application_window.rb
│   │   └── version.rb
│   └── yardview.rb
├── resources
│   ├── LICENSE
│   ├── gresources.xml
│   ├── ruby.png
│   ├── yardview.ui
│   └── yardview_screenshot.png
└── yardview.gemspec
面倒なので、exe/yardview に直接いろいろ書いています。
ポイントは、途中で glib-compile-resources を実行しているところです。GResourceというGnomeのリソースフレームワークを利用します。このコマンドにパスが通ってない場合は実行できないと思うので、何らかの対策が必要かも知れません。Windowsだとどうなんだろう…。あと、毎回リソースをコンパイルして、終了時に捨てる方式が本当にいいのかという問題はある気がします。
# !/usr/bin/env ruby

require 'optparse'
require 'yardview'
require 'fileutils'

port_num ||= 8808

opt = OptionParser.new
opt.program_name = 'Yardview'
opt.version = Yardview::VERSION
opt.on('-p', '--port VAL', Integer) { |v| port_num = v }
opt.parse!(ARGV)

resource_xml = File.expand_path('../resources/gresources.xml', __dir__)
resource_bin = File.expand_path('../gresource.bin', __dir__)

system('glib-compile-resources',
       '--target', resource_bin,
       '--sourcedir', File.dirname(resource_xml),
       resource_xml)

at_exit do
  FileUtils.rm_f(resource_bin)
end

app = Yardview.application

resource = Gio::Resource.load(resource_bin)
Gio::Resources.register(resource)

app.signal_connect :activate do |application|
  window = Yardview::ApplicationWindow.new application, port: port_num
  window.present
end

app.run
今回はウェブページを表示するので webkit2-gtk を追加します。
require 'yardview/version'
require 'yardview/application'
require 'yardview/application_window'
require 'webkit2-gtk'

module Yardview
end
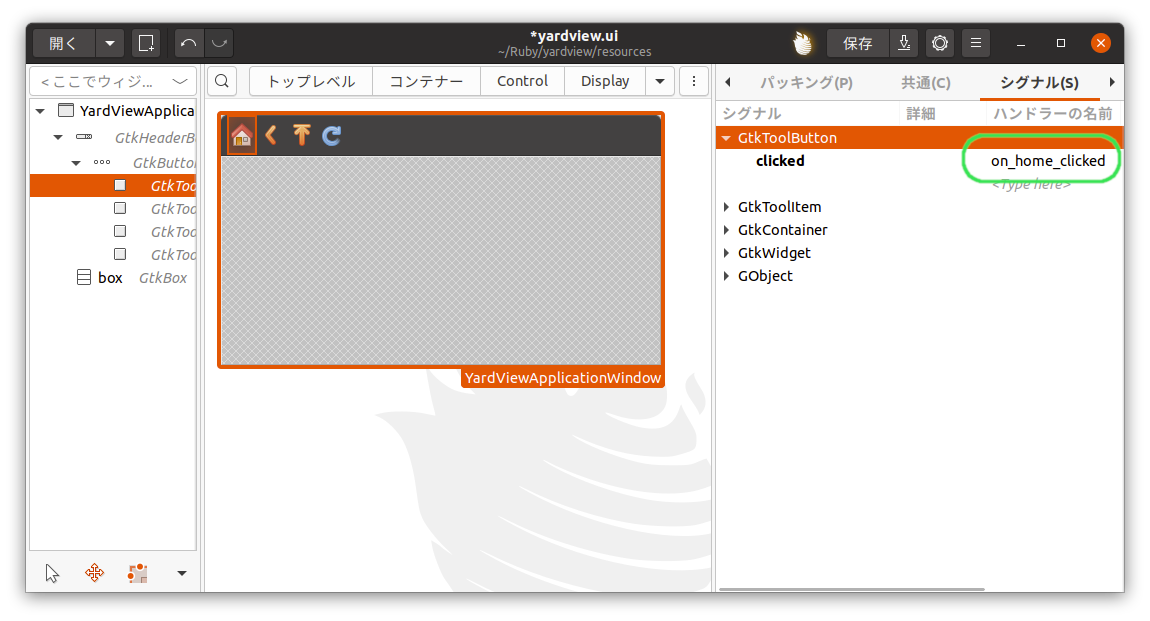
Glade側でシグナルのハンドラーの名前を指定しておきます。
使用するファイルを書いておく。
<?xml version="1.0" encoding="UTF-8"?>
<gresources>
  <gresource prefix="/com/github/kojix2/yardview">
    <file preprocess="xml-stripblanks">yardview.ui</file>
    <file>ruby.png</file>
  </gresource>
</gresources>
ここがミソなのですが、クラス変数にApplicationのインスタンスを詰め込んで参照できるようにしておきます。
require 'gtk3'

module Yardview
  class << self
    def application
      @@application ||= Gtk::Application.new('com.github.kojix2.yardview', :flags_none)
    end
  end
end
type_register, set_template, bind_template_child set_connect_func あたりが重要なおまじないです。
type_register はGlibやGObjectの世界と統合につかわれるそうです。(正直よくわかっていません)
set_template でui ファイルを指定します。ファイルパスではなく、GResourceから指定していることに注意してください。
set_template_child は、widgetにアクセスできるメソッドを提供します。下の方で変数のように登場する box は実はwidgetにアクセスするためのメソッド呼び出しです。
set_connect_func は自動でシグナルをRubyのメソッドにつないでいます。(ここは元ネタではやっていない部分です)
require 'gtk3'

module Yardview
  class ApplicationWindow < Gtk::ApplicationWindow
    type_register

    def self.init
      set_template resource: '/com/github/kojix2/yardview/yardview.ui'
      bind_template_child 'box'
      set_connect_func do |handler_name|
        lambda do
          Yardview.application.active_window.__send__(handler_name)
        end
      end
    end

    attr_accessor :port

    def initialize(application, port: port_num)
      super application: application
      set_title 'YardView'
      set_icon GdkPixbuf::Pixbuf.new resource: '/com/github/kojix2/yardview/ruby.png'

      @port = port
      start_yard_server
      create_gui
    end

    def create_gui
      signal_connect('destroy') do
        Process.kill(:INT, @yard)
        @yard = nil
      end
      at_exit { Process.kill(:INT, @yard) unless @yard.nil? }
      @view = WebKit2Gtk::WebView.new
      @view.load_uri("http://localhost:#{port}")
      box.add @view, expand: true, fill: true
      @view.show
    end

    def port_open?(port)
      !system("lsof -i:#{port}", out: '/dev/null')
    end

    def on_home_clicked
      @view.load_uri("http://localhost:#{port}")
    end

    def on_back_clicked
      @view.go_back
    end

    def on_top_clicked
      @view.run_javascript('window.scrollTo(0,0);')
    end

    def on_refresh_clicked
      @view.reload
    end

    def start_yard_server
      if port_open? port
        @yard = spawn("yard server -g -p #{port} --reload")
        sleep 1
      else
        raise "port #{port} is in use!"
      end
    end
  end
end
RubyでGUIアプリを作っていると問題になりやすいのは非同期っぽい処理ですが、コマンドの実行だけでなんとかなってしまうものはspawn がオススメです。比較的プラットフォームを問わずに動作してくれます。
以上、書いている本人もよくわかっていないところが多い記事ですが、だいたいこんな感じ書けば動きます。
これは積極的にGnomeの機能を使っていこうという感じのテンプレートです。いやいやGResourceとかいらないし、GObjectとRubyのオブジェクトを統合する必要もないし、シグナルハンドリングも毎回ベタ書きすればいいじゃん、ということならもっと簡単にできるとは思います。
この記事は以上です。