追記 (2018/01/07)
This class was deprecated in API level 26.1.0.
consider using ConstraintLayout and associated layouts instead.
非推奨となったようです。今後の開発では使うべきではありません。
代わりに ConstraintLayout を使用してください。
LinearLayout を用いた均等配置
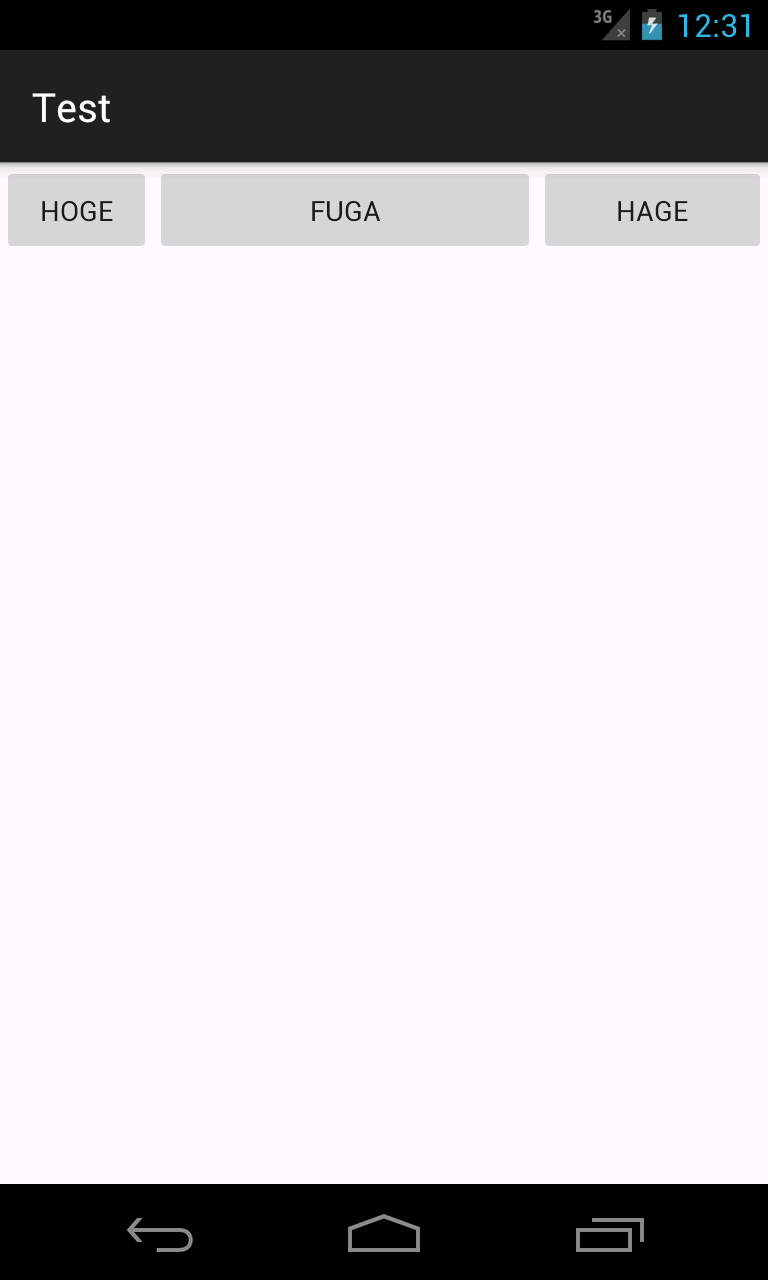
例えば「横幅が同じボタンを横に 2 つ並べたい」という要件があったとする。
これを実装するには昔からある LinearLayout の layout_weight を使用した均等配置イディオムを使用する。
以下の様な感じだ:
<LinearLayout
    xmlns:android="http://schemas.android.com/apk/res/android"
    android:orientation="horizontal"
    android:layout_width="match_parent"
    android:layout_height="match_parent">
    <Button
        android:layout_width="0dp"
        android:layout_height="wrap_content"
        android:layout_weight="1"
        android:text="hoge"/>
    <Button
        android:layout_width="0dp"
        android:layout_height="wrap_content"
        android:layout_weight="1"
        android:text="fuga"/>
</LinearLayout>
横に均等割したい場合は android:layout_width=0dp とし 縦にしたい場合は android:layout_height=0dp とした上で android:layout_weight="1" とする。layout_weight で重み付けを行えるので以下のように全体からの割合での表示も可能:
<LinearLayout
    xmlns:android="http://schemas.android.com/apk/res/android"
    android:orientation="horizontal"
    android:layout_width="match_parent"
    android:layout_height="match_parent">
    <Button
        android:layout_width="0dp"
        android:layout_height="wrap_content"
        android:layout_weight="2"
        android:text="hoge"/>
    <Button
        android:layout_width="0dp"
        android:layout_height="wrap_content"
        android:layout_weight="5"
        android:text="fuga"/>
    <Button
        android:layout_width="0dp"
        android:layout_height="wrap_content"
        android:layout_weight="3"
        android:text="hage"/>
</LinearLayout>
上記例だと hoge が横 20% fuga が横 50% で hage が横 30% で表示される。
問題点
LinearLayout だとこのように均等配置ができるが FrameLayout と RelativeLayout ではできない。なので RelativeLayout でレイアウト構成しており一部分だけ均等配置したい要件が出てきた時に LinearLayout をそこだけ入れ子にする必要が出てくる。
しかも LinearLayout でやると一度に横方向若しくは縦方向の均等配置しかできない。
例えば「画面いっぱいに表示されるカレンダー UI」を作りたいとしよう。
曜日のぶんだけ横に均等配置。そして表示に必要なぶん (6 行ぶん) 縦にも均等配置。
愚直にやろうとすると以下のように LinearLayout を入れ子にすることになってしまう:
<LinearLayout
    xmlns:android="http://schemas.android.com/apk/res/android"
    android:orientation="vertical"
    android:layout_width="match_parent"
    android:layout_height="match_parent">
    <LinearLayout
        android:layout_width="match_parent"
        android:layout_height="0dp"
        android:layout_weight="1"
        android:orientation="horizontal">
        <View
            android:layout_width="0dp"
            android:layout_height="match_parent"
            android:layout_weight="1"/>
        <View
            android:layout_width="0dp"
            android:layout_height="match_parent"
            android:layout_weight="1"/>
        <View
            android:layout_width="0dp"
            android:layout_height="match_parent"
            android:layout_weight="1"/>
        <View
            android:layout_width="0dp"
            android:layout_height="match_parent"
            android:layout_weight="1"/>
        <View
            android:layout_width="0dp"
            android:layout_height="match_parent"
            android:layout_weight="1"/>
        <View
            android:layout_width="0dp"
            android:layout_height="match_parent"
            android:layout_weight="1"/>
        <View
            android:layout_width="0dp"
            android:layout_height="match_parent"
            android:layout_weight="1"/>
    </LinearLayout>

    ... (あと 5 回同じものが続く)

</LinearLayout>
実現はできるが View 階層が深い。可能であれば階層を減らしたい。
Android で「縦も横も均等に配置」というのは割と難しい。
GridLayout にも均等に伸ばすという機能はないので自分で Fragment のサイズを測ってからそれぞれの View の width と height を計算して適用してやる必要があるが Fragment だと onCreateView() や onActivityCreated() のタイミングだとまだ View がレンダリングされていない為サイズを取得できない。
ViewTreeObserver.addOnGlobalLayoutListener() を使って View ツリーの構築後に呼ばれるコールバック内で計算することでようやく実現出来はする:
    @Override
    public void onActivityCreated(Bundle savedInstanceState) {
        super.onActivityCreated(savedInstanceState);

        // これはダメ. View ツリー構築前なので常に 0 が返る
        final int width = mGridLayout.getWidth();  // => 0
        final int height = mGridLayout.getHeight();  // => 0

        // View ツリー構築直後に呼ばれるリスナをセット
        ViewTreeObserver observer = mGridLayout.getViewTreeObserver();
        observer.addOnGlobalLayoutListener(new ViewTreeObserver.OnGlobalLayoutListener() {
            @Override
            public void onGlobalLayout() {
                // GridLayout のサイズを取得してそれぞれ除算して View の width と height を計算してセット
            }
        });
    }
サラっと書いてみたがいろいろ罠がある (内容は忘れた)。こんなものは面倒臭いのでなるべく使いたくない。
そこで PercentRelativeLayout
Android Support Library 23.0 から PercentRelativeLayout (と PercentFrameLayout) というのが提供された。
View のサイズとマージンを百分率で指定できるという優れ物である。
例によって build.gradle に以下を書いて sync すれば使えるようになる:
dependencies {
    compile 'com.android.support:percent:23.0.0'
}
通常の RelativeLayout に加えて以下の属性が追加されている。属性名を見ればどういったものかすぐわかるだろう:
- layout_widthPercent
- layout_heightPercent
- layout_marginPercent
- layout_marginLeftPercent
- layout_marginTopPercent
- layout_marginRightPercent
- layout_marginBottomPercent
- layout_marginStartPercent
- layout_marginEndPercent
例えば最初のボタンの横方向均等配置の例だと以下のようになる:
<android.support.percent.PercentRelativeLayout
    xmlns:android="http://schemas.android.com/apk/res/android"
    xmlns:tools="http://schemas.android.com/tools"
    xmlns:app="http://schemas.android.com/apk/res-auto"
    android:layout_width="match_parent"
    android:layout_height="match_parent"
    tools:context=".MainActivity">
    <Button
        android:id="@+id/hoge"
        app:layout_widthPercent="50%"
        android:layout_height="wrap_content"
        android:text="hoge"/>
    <Button
        android:id="@+id/fuga"
        app:layout_widthPercent="50%"
        android:layout_height="wrap_content"
        android:layout_toRightOf="@id/hoge"
        android:text="fuga"/>
</android.support.percent.PercentRelativeLayout>
android:layout_width の代わりに app:layout_widthPercent を指定して横幅をパーセント指定している。
RelativeLayout は android:layout_toRightOf などと相対位置を指定しなければならないのが若干面倒だが、
マージンもパーセント指定できるのだから app:layout_marginLeftPercent=50% などとして代用できてしまう:
<android.support.percent.PercentRelativeLayout
    xmlns:android="http://schemas.android.com/apk/res/android"
    xmlns:tools="http://schemas.android.com/tools"
    xmlns:app="http://schemas.android.com/apk/res-auto"
    android:layout_width="match_parent"
    android:layout_height="match_parent"
    tools:context=".MainActivity">
    <Button
        android:id="@+id/hoge"
        app:layout_widthPercent="50%"
        android:layout_height="wrap_content"
        android:text="hoge"/>
    <Button
        android:id="@+id/fuga"
        app:layout_widthPercent="50%"
        android:layout_height="wrap_content"
        app:layout_marginLeftPercent="50%"
        android:text="fuga"/>
</android.support.percent.PercentRelativeLayout>
これを使えば縦横同時に均等配置できるのでカレンダー UI を 1 階層で表現可能となる。
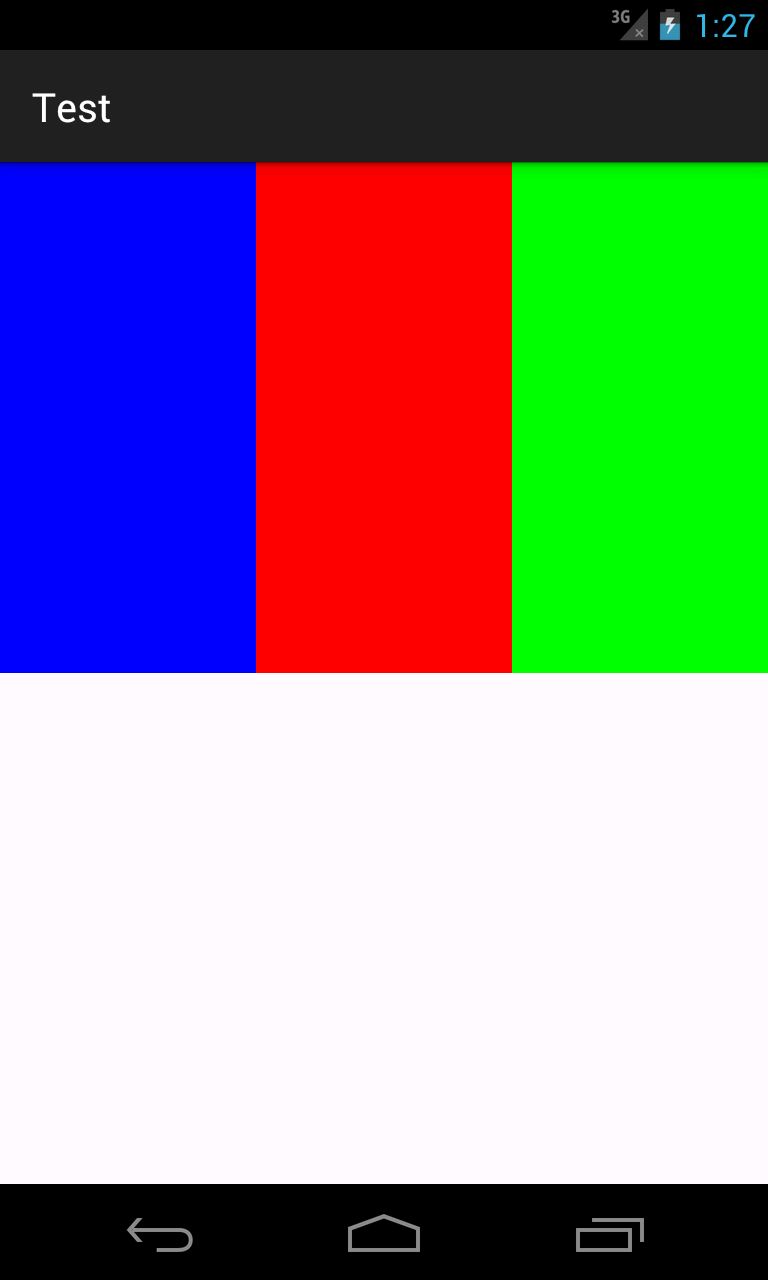
100 が割り切れない数で分割したい場合はどうするのか?
例えば 3 分割したい場合は 100 ÷ 3 = 33.333333... で表現できない。だが大丈夫。小数点も表記できる。
試してみたが 33.3% 程度だと合わせても 99.9% だからなのか隙間が出来てしまう。33.33% でもまだ隙間ができる。
手元の端末だと小数点 6 桁まで書くと隙間ができなかった。以下のように試してみるといいかもしれない。
<android.support.percent.PercentRelativeLayout
    xmlns:android="http://schemas.android.com/apk/res/android"
    xmlns:tools="http://schemas.android.com/tools"
    xmlns:app="http://schemas.android.com/apk/res-auto"
    android:layout_width="match_parent"
    android:layout_height="match_parent"
    tools:context=".MainActivity">
    <View
        android:id="@+id/view1"
        app:layout_widthPercent="33.333333%"
        app:layout_heightPercent="50%"
        android:background="#0000ff"/>
    <View
        android:id="@+id/view2"
        app:layout_widthPercent="33.333333%"
        app:layout_heightPercent="50%"
        android:layout_toRightOf="@id/view1"
        android:background="#ff0000"/>
    <View
        android:id="@+id/view3"
        app:layout_widthPercent="33.333333%"
        app:layout_heightPercent="50%"
        android:layout_toRightOf="@id/view2"
        android:background="#00ff00"/>
</android.support.percent.PercentRelativeLayout>
しかし 6 分割だと 100 ÷ 6 = 16.666666... だがどれだけ多くしても隙間ができてしまった。
仕方がないので以下のように最後のみ layout_width="match_parent" にして凌ぐことにする:
<android.support.percent.PercentRelativeLayout
    xmlns:android="http://schemas.android.com/apk/res/android"
    xmlns:tools="http://schemas.android.com/tools"
    xmlns:app="http://schemas.android.com/apk/res-auto"
    android:layout_width="match_parent"
    android:layout_height="match_parent"
    tools:context=".MainActivity">
    <View
        android:id="@+id/view1"
        app:layout_widthPercent="16.666666%"
        app:layout_heightPercent="50%"
        android:background="#0000ff"/>
    <View
        android:id="@+id/view2"
        app:layout_widthPercent="16.666666%"
        app:layout_heightPercent="50%"
        android:layout_toRightOf="@id/view1"
        android:background="#ff0000"/>
    <View
        android:id="@+id/view3"
        app:layout_widthPercent="16.666666%"
        app:layout_heightPercent="50%"
        android:layout_toRightOf="@id/view2"
        android:background="#00ff00"/>
    <View
        android:id="@+id/view4"
        app:layout_widthPercent="16.666666%"
        app:layout_heightPercent="50%"
        android:layout_toRightOf="@id/view3"
        android:background="#888800"/>
    <View
        android:id="@+id/view5"
        app:layout_widthPercent="16.666666%"
        app:layout_heightPercent="50%"
        android:layout_toRightOf="@id/view4"
        android:background="#008888"/>
    <View
        android:id="@+id/view6"
        android:layout_width="match_parent"
        app:layout_heightPercent="50%"
        android:layout_toRightOf="@id/view5"
        android:background="#880088"/>
</android.support.percent.PercentRelativeLayout>
他の Layout でもこれを使いたい
RelativeLayout, FrameLayout だけでなく他の Layout でも使いたいという欲求があるかもしれない。
PercentFrameLayout, PercentRelativeLayout のソースを見ると実装が全く同じなので、
ただ単にこれをコピペして親クラスを使いたい Layout のクラスにすればよいだけとなる。
本当はこういうのはトレイト1で実装されているべきだが仕方ないところだ。
-
Java8 だとインターフェースのデフォルト実装 ↩