かっこいい画面が作りたかったので、やってみた備忘録。
やりたいこと
Three.jsがとてもかっこいいんですが、値の設定が静的なので、何とか動的に値を変えつつ画面に反映できないかな、、、と。このサンプルを使ってみます。
イメージとしては、この画像で異常が検出されたところを赤くアラート表示したりできないかな、と。
実際の流れの整理
Githubからサンプルを持って来て、必要なものだけ抜き出します。
異常があったら表示する、という感じにしたいので、以前投稿したロジックを使います。
AWS LambdaでDynamoDBから取得した値に任意の集計をかける(グルーピング処理追加)
最新値を取得する中で、異常があったら対象の項目に変化をつけたいと思います。
とりあえずサンプルをAWS上で動かす
AWS上で動作させたいので、とりあえずこのサンプルをAWS上に乗せる必要があります。
- 必要なファイルの抽出(抽出結果などはこちらに。https://github.com/kojiisd/aws-threejs )
- 適当な名前のバケットをS3に作成(今回は「aws-three」という名前にしました)
- ファイルのアップロード
- パーミッションの適用
パーミッションの適用は、とりあえず以下のコマンドで一括でつけました。実際の運用を考えると、もっと慎重にならないといけないところだとは思います。こちらのサイトを参考にさせてもらいました。
$ aws s3 ls --recursive s3://aws-three/ | awk '{print $4}' | xargs -I{} aws s3api put-object-acl --acl public-read --bucket aws-three --key "{}"
これで一旦サンプルがS3上で動くようになりました。
データの中身を理解する
実際にソースを読んで見ると、一つ一つのオブジェクトをどの様に格納しているかがわかります。
var table = [
	"H", "Hydrogen", "1.00794", 1, 1,
	"He", "Helium", "4.002602", 18, 1,
	"Li", "Lithium", "6.941", 1, 2,
	"Be", "Beryllium", "9.012182", 2, 2,
	:
	:
5つの要素で1セットとしてオブジェクトを表示している様です。元の実装がいいかどうかは置いておいて(^^;とりあえずこれを動的に変更できるようにします。
DBからの値をtableに反映する
データの構造自体はとても単純なので、1レコード5カラムのデータを持つテーブルを作成すれば、後々データの内容全てをDBから持ってくることも可能になりそうです。
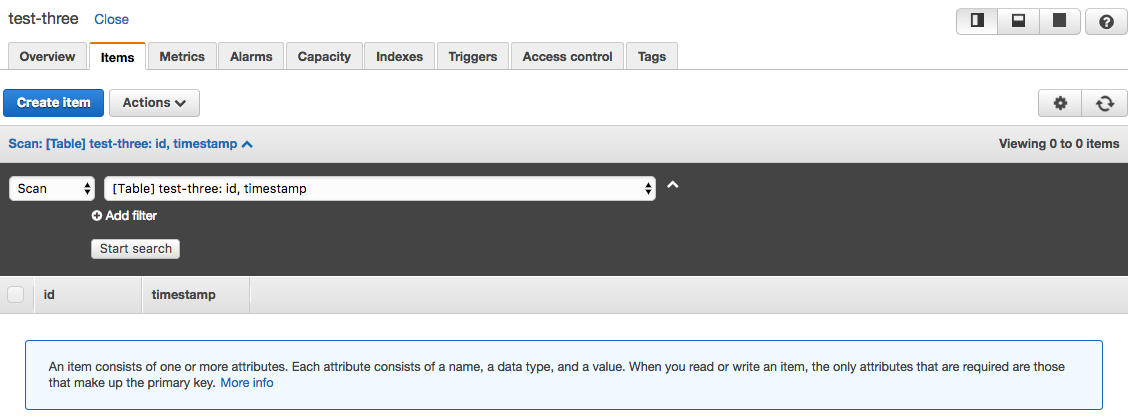
DynamoDBで下記の様な単純なテーブルを作成します。もちろんAWS Consoleから作成可能ですが、Localで同じスキーマを作成したい場合はこんな感じで定義を流し込めばOK。
var params = {
    TableName: "test-three",
    KeySchema: [
        {
            AttributeName: "id",
            KeyType: "HASH"
        },
        {
            AttributeName: "timestamp",
            KeyType: "RANGE"
        }
    ],
    AttributeDefinitions: [
        {
            AttributeName: "id",
            AttributeType: "S"
        },
        {
            AttributeName: "timestamp",
            AttributeType: "S"
        }
    ],
    ProvisionedThroughput: {
        ReadCapacityUnits: 1,
        WriteCapacityUnits: 1
    }
};

dynamodb.createTable(params, function(err, data) {
    if (err) ppJson(err);
    else ppJson(data);
});
はい、無事出来ました。
データの準備と投入
次にデータを流し込みます。こんな感じでpythonスクリプトでサクッと。実行する前に、クライアントのAWS認証設定が正しいことを確認してください。
args = sys.argv

if len(args) < 4:
    print "Usage: python data-insert.py <FileName> <Region> <Table>"
    sys.exit()

dynamodb = boto3.resource('dynamodb', region_name=args[2])
table = dynamodb.Table(args[3])

if __name__ == "__main__":
    print "Data insert start."
    target = pandas.read_csv(args[1])
    for rowIndex, row in target.iterrows():
        itemDict = {}
        for col in target:
            if row[col] != None and type(row[col]) == float and math.isnan(float(row[col])) and row[col] != float('nan'):
                continue
            elif row[col] == float('inf') or row[col] == float('-inf'):
                continue
            elif type(row[col]) == float:
                itemDict[col] = Decimal(str(row[col]))
            else:
                itemDict[col] = row[col]
        print itemDict

        table.put_item(Item=itemDict)

    print "Data insert finish."
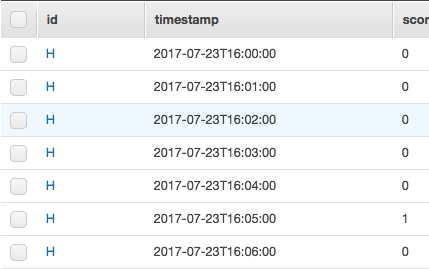
とりあえずこんなデータを用意しました。先ほどのスクリプトで投入します。
id,score,timestamp
"H",0,"2017-07-23T16:00:00"
"H",0,"2017-07-23T16:01:00"
"H",0,"2017-07-23T16:02:00"
"H",0,"2017-07-23T16:03:00"
"H",0,"2017-07-23T16:04:00"
"H",1,"2017-07-23T16:05:00"
"H",0,"2017-07-23T16:06:00"
無事投入できました。
$ python data-insert.py sample-data.csv us-east-1 test-three
Data insert start.
{'timestamp': '2017-07-23T16:00:00', 'score': 0, 'id': 'H'}
{'timestamp': '2017-07-23T16:01:00', 'score': 0, 'id': 'H'}
{'timestamp': '2017-07-23T16:02:00', 'score': 0, 'id': 'H'}
{'timestamp': '2017-07-23T16:03:00', 'score': 0, 'id': 'H'}
{'timestamp': '2017-07-23T16:04:00', 'score': 0, 'id': 'H'}
{'timestamp': '2017-07-23T16:05:00', 'score': 1, 'id': 'H'}
{'timestamp': '2017-07-23T16:06:00', 'score': 0, 'id': 'H'}
Data insert finish.
API Gatewayの設定
絞り込み結果を得るためのLambdaを実行するRESTの口を設けます。API Gatewayを設定してPOST通信でデータが来た場合に該当のLambdaを実行するようにします。
画面からDynamoDBのデータを取得する
定期的に画面からDynamoDBのデータを取得します。今回はCognitoによるセキュアな通信は実装しません。他のページで色々と実装されている方がいるので、そちらを参考にして見てください。
処理の流れとしては、以下のような感じ。(S3からの取得処理が定期的に実行される)
S3 → API Gateway → Lambda → DynamoDB
API GatewayでSDK生成
API Gatewayの設定を以下にし、SDKを生成します。
- HTTPメソッドはPOSTを指定
- とりあえず認証などは今回はかけない
で、作成されたSDKを、本家のページを参考に埋め込みます。
API Gateway で生成した JavaScript SDK を使用する
以下のコードをScriptタグ部分に貼り付けました。
		<script type="text/javascript" src="../extralib/axios/dist/axios.standalone.js"></script>
		<script type="text/javascript" src="../extralib/CryptoJS/rollups/hmac-sha256.js"></script>
		<script type="text/javascript" src="../extralib/CryptoJS/rollups/sha256.js"></script>
		<script type="text/javascript" src="../extralib/CryptoJS/components/hmac.js"></script>
		<script type="text/javascript" src="../extralib/CryptoJS/components/enc-base64.js"></script>
		<script type="text/javascript" src="../extralib/url-template/url-template.js"></script>
		<script type="text/javascript" src="../extralib/apiGatewayCore/sigV4Client.js"></script>
		<script type="text/javascript" src="../extralib/apiGatewayCore/apiGatewayClient.js"></script>
		<script type="text/javascript" src="../extralib/apiGatewayCore/simpleHttpClient.js"></script>
		<script type="text/javascript" src="../extralib/apiGatewayCore/utils.js"></script>
		<script type="text/javascript" src="../extralib/apigClient.js"></script>
実際にAPI Gatewayにアクセスするスクリプトはこんな感じになります。
SDKを用いてAPI Gatewayにブラウザからアクセスしてみる
var apigClient = apigClientFactory.newClient();

var params = {
    // This is where any modeled request parameters should be added.
    // The key is the parameter name, as it is defined in the API in API Gateway.
    "Content-Type": "application/x-www-form-urlencoded"
};

var body = {

    "label_id": "id",
    "label_range": "timestamp",
    "id": [
    "H"
    ],
    "aggregator": "latest",
    "time_from": "2017-07-23T16:00:00.000",
    "time_to": "2017-07-23T16:06:00.000",
    "params": {
    "range": "timestamp"
    }
};


  var additionalParams = {
    // If there are any unmodeled query parameters or headers that must be
    //   sent with the request, add them here.
    headers: {
    },
    queryParams: {
    }
  };

  apigClient.rootPost(params, body, additionalParams)
      .then(function(result){
        // Add success callback code here.
        alert("Success");
        alert(JSON.stringify(result));
      }).catch( function(result){
        // Add error callback code here.
      });
パラメータ(body部)には「AWS LambdaでDynamoDBから取得した値に任意の集計をかける(グルーピング処理追加)」で必要になるJSONを渡します。
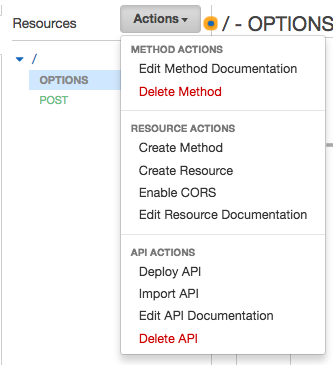
API GatewayにアクセスするにはCORSの設定が必要なので、AWS Consoleから設定します。この際Resourcesで変更したものはStaging環境に再デプロイをしないと追加で設定した項目は反映されないので注意(ハマった。。。)
「Enable CORS」から設定できます。
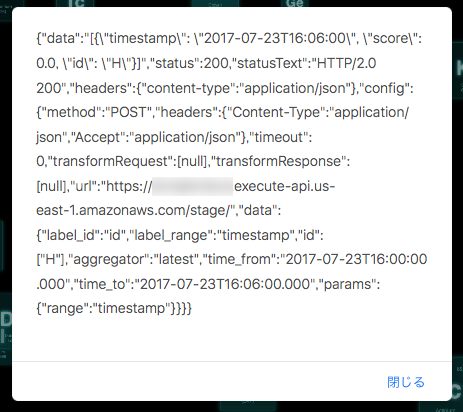
実際に画面にアクセスすると、サーバから値が取れたことがわかります。(今回はAPI KEYなどはOFFにしていますが、実際に運用するとなったら、もちろん考慮が必要です。)
無事値が取れました。ここまでくればもう一息です。
取得した値を元に画面に変更を加える
さて、先ほど取得できた値には「score」というものが入っています。この「score」値を元に画面のコンポーネントに変化を加えます。
持ってきたサンプルコードの中で色に影響を与えているのは以下のコードになります。
for ( var i = 0; i < table.length; i += 5 ) {

	var element = document.createElement( 'div' );
	element.className = 'element';
	element.style.backgroundColor = 'rgba(0,127,127,' + ( Math.random() * 0.5 + 0.25 ) + ')';
全てのコンポーネントに対してrgbaで値を与えているので、ここを変更します。とはいえ、そのまま変更しようとしてもinit()メソッドを実行すると追加でコンポーネントが描画されてしまうので、描画後に変更が可能なように以下のようなidの埋め込みを行います。
var element = document.createElement( 'div' );
element.className = 'element';
element.id = table[ i ];                        // ここが追加したところ
element.style.backgroundColor = 'rgba(0,127,127,' + ( Math.random() * 0.5 + 0.25 ) + ')';
これらの準備を前提として、処理の流れは以下とします。
- DynamoDBから取ってきたjson値をオブジェクトに変換。
- 一旦オブジェクト配列としてidとscore値を持たせるようにする。
- オブジェクト配列でループ処理を実装し、その中でscore値が「0」ではないidに対して、色の変更を実施する。
今回の準備を踏まえると、上記で対象となるのは「id: H」となります。DynamoDBからデータを取得するために、rootPost呼び出し後のコールバック処理を以下のように変更します。今回色変更の処理をシュッと実装するために、jQueryを読み込ませています。
apigClient.rootPost(params, body, additionalParams)
    .then(function(result){
        var resultObjArray= new Array();
        // Add success callback code here.
        var resultJson = JSON.parse(result.data);
        for (var index = 0; index < resultJson.length; index++) {
            var resultObj = new Object();
            resultObj.id = resultJson[index].id;
            resultObj.score = resultJson[index].score
            resultObjArray[index] = resultObj;
        }

        for (var index = 0; index < resultObjArray.length; index++) {
            var resultObj = resultObjArray[index];
            if (resultObj.score != 0) {
                $('#' + resultObj.id).css('background-color', 'rgba(255,127,127,' + ( Math.random() * 0.5 + 0.25 ) + ')')
            }
        }

    }).catch( function(result){
        // Add error callback code here.
        alert("Failed");
        alert(JSON.stringify(result));
    });
DynamoDBに格納されている値(検索期間の最新)を「1」に変更して画面を更新すると、無事赤くなりました。
実行タイミングを任意にするためにボタンからのクリックイベントとして実装する
このままでもいいのですが、今のままだと最初のアニメーションが終わる前に色が変わるので、色が変わった感がありません。ですので一つボタンを追加してクリックしたら画面に値を反映する、という手法を取ろうと思います。
先ほどのrootPostを呼び出すプログラムを、画面に配置したボタンのイベントとして処理させます。
<button id="getData">Get Data from DynamoDB</button>
画面にはこんな感じでボタンを配置し、jQueryでイベントを登録します。
$(document).ready(function(){
    $("#getData").click(function() {
        apigClient.rootPost(params, body, additionalParams)
        .then(function(result){
            var resultObjArray= new Array();
            // Add success callback code here.
            var resultJson = JSON.parse(result.data);
            for (var index = 0; index < resultJson.length; index++) {
                var resultObj = new Object();
                resultObj.id = resultJson[index].id;
                resultObj.score = resultJson[index].score
                resultObjArray[index] = resultObj;
            }

            for (var index = 0; index < resultObjArray.length; index++) {
                var resultObj = resultObjArray[index];
                if (resultObj.score != 0) {
                    $('#' + resultObj.id).css('background-color', 'rgba(255,127,127,' + ( Math.random() * 0.5 + 0.25 ) + ')')
                }
            }

        }).catch( function(result){
            // Add error callback code here.
            alert("Failed");
            alert(JSON.stringify(result));
        });
    });
});
これで無事画面から操作することが可能になりました。ボタンを押すといい感じに「H」の要素が赤く光っています。
まとめ
もともとかっこいいと思っていたThree.jsの画面をカスタマイズして監視画面(IoTとかのデバイス監視画面)のような機能にできないものか、と実装してみましたが、なんとかここまでたどり着けました。
DynamoDBからの取得間隔やIDの指定方法など、まだまだハードコーディングな部分はありますが、土台は出来上がったのであとはちょっとのカスタマイズで実際に使えそうなところまではイメージが持てました。元々の実装の仕組みも理解できたので、条件が合えば文言を変えるなども実現できそうです。
やっぱり業務で使うものもかっこいい画面でないとね、と思うこの頃です。
(GithubのコードはAPI GatewayのSDKさえ埋め込めば動くような作りにしています)


