マップアプリのようなUIで使用したい機能がありまして、今回自前で実装をしてみました。
実装の内容や使用した機能について、今後のためにこの場を借りてまとめることにしました。
動作イメージ
今回作ったUIの動作イメージです。
デモ用に、地図で選択した位置で撮影した写真を表示するアプリを作成しました。
・場所を未選択の状態:全ての写真を表示
・場所を選択した状態:選択した位置で撮影した写真を表示
といった感じです。
モーダルのような見た目のViewを作り、その中にコレクションビューを配置して
拡大表示の場合のみスクロールできるようにしています。
— 小岩井 (@WfODXAd0jmop1Ev) September 18, 2020
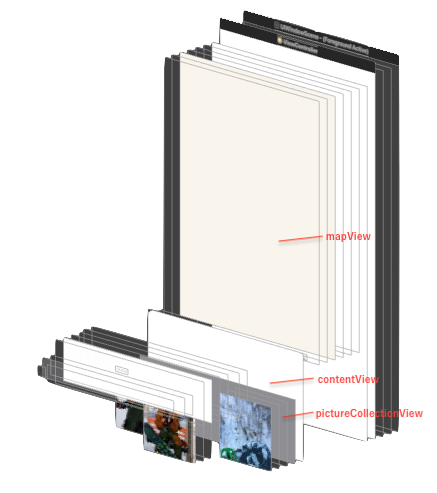
レイアウトイメージ
今回のデモのレイアウトは、次のように組んでいます。
実装で使用した機能
- UIPanGestureRecognizer
- UIView.transform
- UIView.animate
- UIGestureRecognizerDelegate
UIPanGestureRecognizer
目的:pictureCollectionViewへのスワイプのアクションを認識したい
パンジェスチャーを認識する機能で、座標の情報の変化や速度を取得することが可能です。
今回は、 translation(in: UIView?)を使って座標情報の変化を監視しました。
override func viewDidLoad() {
    super.viewDidLoad()

    let collectionViewPanGesture = UIPanGestureRecognizer(target: self, action: #selector(handlePanGesture(sender:)))
    collectionViewPanGesture.delegate = self
    pictureCollectionView.addGestureRecognizer(handlePanGesture)
}

@objc private func handlePanGesture(sender: UIPanGestureRecognizer) {
    let translation = sender.translation(in: contentView)
    print("translationY : ", translation.y)

    # 省略
}
これでパンジェスチャーにより座標が、どのくらい移動したいかの情報が取得できるようになりました。
UIView.transform
目的:pictureCollectionViewへのスワイプのアクションの情報をViewへ反映させたい
次に移動した座標を、実際にViewへ反映させます。
Viewへの反映には UIView.transform を使用して反映させています。
@objc private func handlePanGesture(sender: UIPanGestureRecognizer) {
    let translation = sender.translation(in: contentView)
    switch sender.state {
    case .changed:
       contentView.transform = CGAffineTransform(translationX: 0, y: translation.y)
    default:
       break
    }
}
UIGestureRecognizer.Stateが、changedのタイミングで更新します。
これにより、ユーザーの動きに追従させるように見せる準備ができました。
実際には、縮小表示から拡大表示にする際の調整に次のような対応を入れています。
override func viewDidLoad() {
    super.viewDidLoad()

    let collectionViewPanGesture = UIPanGestureRecognizer(target: self, action: #selector(handlePanGesture(sender:)))
    collectionViewPanGesture.delegate = self
    pictureCollectionView.addGestureRecognizer(handlePanGesture)

    // 最初に画面を表示した際の位置を調整(デフォルトの位置)
    contentViewTop.constant = 400
}

@objc private func handlePanGesture(sender: UIPanGestureRecognizer) {
    let translation = sender.translation(in: contentView)
    let maxVertical = -contentViewTop.constant

    switch sender.state {
    case .began:
       adjustValue = 0

       // 拡大表示の際に調整する値を設定
       if !contentView.transform.isIdentity {
          adjustValue = maxVertical
       }
    case .changed:
       let y = max(maxVertical, trans.y + adjustValue)
       contentView.transform = CGAffineTransform(translationX: 0, y: y)
    default:
       break
    }
}
UIView.animate
目的:スワイプアクションが止まった時にViewを拡大・縮小させたい
UIView.animateを使用して、ジェスチャーが終了したタイミングで
Viewを拡大・縮小させてモーダルのように見せます。
@objc private func handlePanGesture(sender: UIPanGestureRecognizer) {
    let translation = sender.translation(in: contentView)
    let maxVertical = -contentViewTop.constant

    switch sender.state {
    case .changed:
       let y = max(maxVertical, trans.y + adjustValue)
       contentView.transform = CGAffineTransform(translationX: 0, y: y)
    case .ended, .cancelled:
       if translation.y < 0  {
          UIView.animate(withDuration: 0.2, animations: {
             self.contentView.transform = CGAffineTransform(translationX: 0,
                                                                       y: maxVertical)
          })
       } else {
          UIView.animate(withDuration: 0.2, animations: {
             self.contentView.transform = .identity
          })
       }
    default:
       break
    }
}
例では、パンジェスチャーの方向が上の場合には、拡大のアニメーションをさせています。
一方で下の場合では、縮小のアニメーションをさせます。
方向の判定には、translation.yの値を参照して判断しています。
これで、pictureCollectionViewのisScrollEnabledが無効の場合に
ジェスチャーに応じてViewを拡大・縮小できるようになります。
UIGestureRecognizerDelegate
目的:pictureCollectionViewのスクロールを有効にしつつ、他のジェスチャーも認識させたい
pictureCollectionViewのisScrollEnabledが有効の状態においても、
特定の条件の元でパンジェスチャーを有効にするためにUIGestureRecognizerDelegateを使用します。
パンジェスチャーを有効にする条件
今回ジェスチャーを有効にする条件を次の条件を満たす場合に設定しました。
以下の2つを満たす。
- contentViewが拡大表示の状態
- pictureCollectionViewが一番上にある状態
または
- contentViewが縮小表示の状態
を対象としました。
gestureRecognizer(_:shouldRecognizeSimultaneouslyWith:)
ここでは、ジェスチャーの同時認識を許可するかどうかの制御を行います。
今回の場合ですと、pictureCollectionViewに対してのスクロールとパンジェスチャーが対象になります。
戻り値にtrueを設定する事で、同時認識が許可されます。
extension ViewController: UIGestureRecognizerDelegate {
    func gestureRecognizer(_ gestureRecognizer: UIGestureRecognizer, shouldRecognizeSimultaneouslyWith otherGestureRecognizer: UIGestureRecognizer) -> Bool {
        gestureRecognizer.view == pictureCollectionView
    }
}
ここでは、引数のgestureRecognizer.viewにて対象のView(今回はpictureCollectionView)の場合にのみ
trueを返すように設定しました。
これで、pictureCollectionViewに対して、複数のジェスチャーが認識できるようになりました。
gestureRecognizerShouldBegin(_:)
ここでは、ジェスチャーの認識を開始するかどうかの制御を行います。
今回は、pictureCollectionViewのパンジェスチャーに対して
①contentViewが拡大表示の状態 かつ pictureCollectionViewが一番上にある状態
②contentViewが縮小表示の状態
のどちらかに該当する場合に開始するように設定します。
extension ViewController: UIGestureRecognizerDelegate {
    func gestureRecognizerShouldBegin(_ gestureRecognizer: UIGestureRecognizer) -> Bool {
        if pictureCollectionView.contentOffset.y <= 0 {
            return true
        }

        return !pictureCollectionView.isScrollEnabled
    }
}
また、handlePanGesture内の拡大・縮小のアニメーションが完了したタイミングにisScrollEnabledを更新する処理を追加します。
@objc private func handlePanGesture(sender: UIPanGestureRecognizer) {
    let translation = sender.translation(in: contentView)
    let maxVertical = -contentViewTop.constant

    switch sender.state {
    case .changed:
       let y = max(maxVertical, trans.y + adjustValue)
       contentView.transform = CGAffineTransform(translationX: 0, y: y)
    case .ended, .cancelled:
       if translation.y < 0  {
          UIView.animate(withDuration: 0.2, animations: {
             self.contentView.transform = CGAffineTransform(translationX: 0,
                                                                       y: maxVertical)
          }) { _ in
             self.pictureCollectionView.isScrollEnabled = true // 追加
          }
       } else {
          UIView.animate(withDuration: 0.2, animations: {
             self.contentView.transform = .identity
          }) { _ in
             self.pictureCollectionView.isScrollEnabled = false // 追加
          }
       }
    default:
       break
    }
}
これで、意図した条件下の場合にのみスワイプによるViewの拡大・縮小の体験ができます。
更にそれ以外の場合は、普通のpictureCollectionViewの機能が使えるようになりました。
