この記事はFUJITSU Advent Calendar 2018の14日目の記事です。
記事の内容は全て個人の見解であり、執筆内容は執筆者自身の責任です。所属する組織は関係ありません。
はじめに
はじめまして、koishiです。
ふだんはネットワーク機器やExcelと戯れています。
今回はPythonとNETCONFでCisco機器のポート管理表作成の自動化を目指してみたので、まとめました。
なんでポート管理表の自動化?
ポート管理表はネットワーク機器の各ポートのVLANやモードなどの情報をまとめたものです。
私の場合はネットワーク機器のconfigを目視で確認し、機器より触れる時間が長いExcelに転記していました。
このポート管理表の作成・修正作業は機器が数台であれば簡単ですが、数十台・数百台になるとこれは大変で工数もたくさんかかりますし、単純作業のため集中力が切れてミスも発生します。

なんといっても一番の理由は楽しくありません。
そこで最近流行り?のPythonやNETCONFを使って、ポート管理表の自動作成を試してみました。
NETCONFとは
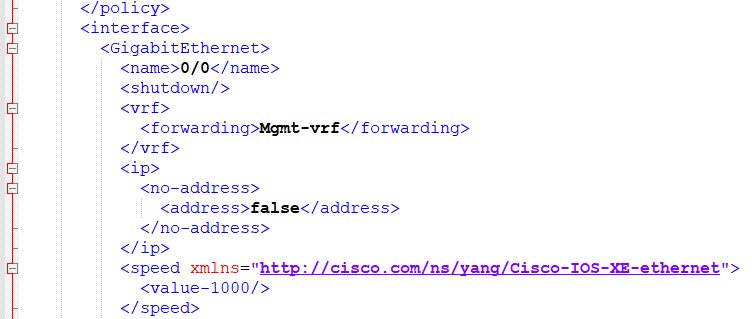
NETCONF(Network Configuration Protocol)は、ネットワーク機器の設定取得や更新するためのプロトコルであり、NETCONFを使うと、下のように機器設定等をXML形式で取得したり、設定を変更することが可能となります。

目標のPythonスクリプト
こんな感じで動かしたいという思いではじめました。
1.デバイスリストの各機材にアクセス
2.NETCONF経由でポート情報を取得
3.Excelにポート情報を記載
環境
Catalyst9300:IOS-XE 16.09.01
Python:2.7.12
スイッチの準備
まずスイッチに対して、NETCONF経由で設定を取得できるようにする必要があります。
今回はすでにtelnetやsshでログインできるスイッチに下のように設定しました。
!認可の設定
aaa authorization exec default local

!NETCONFの有効化
netconf-yang
※後半のyangはNETCONFでやりとりされるデータモデリング言語であるYANGを示しています。
NETCONFがちゃんと有効化されていると「show netconf-yang statistics」で下のように表示されます。
Switch#show netconf-yang statistics
netconf-start-time  : 2018-12-13T17:14:18+00:00
in-rpcs             : 0
in-bad-rpcs         : 0
out-rpc-errors      : 0
out-notifications   : 0
in-sessions         : 0
dropped-sessions    : 0
in-bad-hellos       : 0

Switch#
有効化されていないとこんな感じです。
Switch#show netconf-yang statistics
The process for the command is not responding or is otherwise unavailable
取得したい情報の調査
NETCONFの有効化が完了したところで、今回の機材のどの機能(capability)にアクセスできるか、ポート管理表を作るために必要な情報はどこに格納されているかを確認します。
情報の調査にはオープンソースのYangブラウザである「YangExplorer」を使いました。
https://github.com/CiscoDevNet/yang-explorer
デバイスリストの作成
デバイスリストは単純にcsvファイルで作成しました。
ipaddress,user,password
10.71.154.90,test,test
Pythonスクリプト
一番大事なPythonスクリプトの部分は下のように作成しました。
# !/usr/bin/env python
# -*- coding: utf-8 -*-
from ncclient import manager
import xmltodict
import xlsxwriter
import json
import csv
import datetime

# IOS-XE capabilityの指定
iosxe_payload = """
<filter xmlns="urn:ietf:params:xml:ns:netconf:base:1.0">
  <native xmlns="http://cisco.com/ns/yang/Cisco-IOS-XE-native"/>
</filter>
"""

# デバイスリストの読み込み
with open("devices.csv", "rb") as f:
    r = csv.DictReader(f)
    devices = list(r)

for device in devices:
    # IOS-XEから読み取り
    m = manager.connect(host=device["ipaddress"], port=830, username=device["user"], password=device["password"],hostkey_verify=False, device_params={'name': 'iosxe'})
    iosxe_response = m.get(iosxe_payload).xml
    iosxe_dict = xmltodict.parse(iosxe_response)
    iosxe_json = json.dumps(iosxe_dict, indent=4)
    iosxe_data = json.loads(iosxe_json)

    result = []
    for intf in iosxe_data['rpc-reply']['data']['native']['interface']['GigabitEthernet']:
        intf_sum = {}
        intf_sum['name'] = intf['name']
        intf_sum['shut'] = '-'
        intf_sum['mode'] = '-'
        intf_sum['vlan'] = '-'
        intf_sum['description'] = '-'

        #ポート管理表に必要な値の取得
        if intf.has_key('shutdown'):
            intf_sum['shut'] = 'shutdown'
        if intf.has_key('switchport'):
            intf_sum['mode'] = intf['switchport']['mode'].keys()[1]
            if intf_sum['mode'] == 'access':
                if intf['switchport'].has_key('access'):
                    intf_sum['vlan'] = intf['switchport']['access']['vlan']['vlan']
        if intf.has_key('description'):
            intf_sum['description'] = intf['description']

        #インターフェース順に並び変えるためのindex作成
        int_name_array = intf_sum['name'].split('/')
        index = 0
        if len(int_name_array) == 3:
            index += int(int_name_array[0]) * 10000
            index += int(int_name_array[1]) * 100
            index += int(int_name_array[2])
        else:
            index += int(int_name_array[0]) * 100
            index += int(int_name_array[1])
        intf_sum['index'] = index

        #各インタフェースごとの結果を格納
        result.append(intf_sum)

    #日にちの取得
    date1 = datetime.date.today()

    #Excelの作成
    wb = xlsxwriter.Workbook(iosxe_data['rpc-reply']['data']['native']['hostname'] + u'_ポート一覧表_' + str(date1) + ".xlsx")
    ws = wb.add_worksheet(u'ポート管理表')
    ws.set_column('A:F', 20)
    waku = wb.add_format()
    waku.set_bold()

    ws.write(0,0,u'ポート管理表', waku)
    ws.write(1,0,u'ホスト名', waku)
    ws.write(1,1,'{}'.format(iosxe_data['rpc-reply']['data']['native']['hostname']))
    ws.write(2,0,u'インターフェース種別', waku)
    ws.write(2,1,u'インタフェース番号',waku)
    ws.write(2,2,u'shut/no shut', waku)
    ws.write(2,3,u'モード',waku)
    ws.write(2,4,u'VLAN番号',waku)
    ws.write(2,5,u'description',waku)

    row_id = 3
    for port in sorted(result,key=lambda x:x['index']):
        ws.write(row_id,0,'GigabitEthernet')
        ws.write(row_id,1,port['name'])
        ws.write(row_id,2,port['shut'])
        ws.write(row_id,3,port['mode'])
        ws.write(row_id,4,port['vlan'])
        ws.write(row_id,5,port['description'])
        row_id += 1
    wb.close()
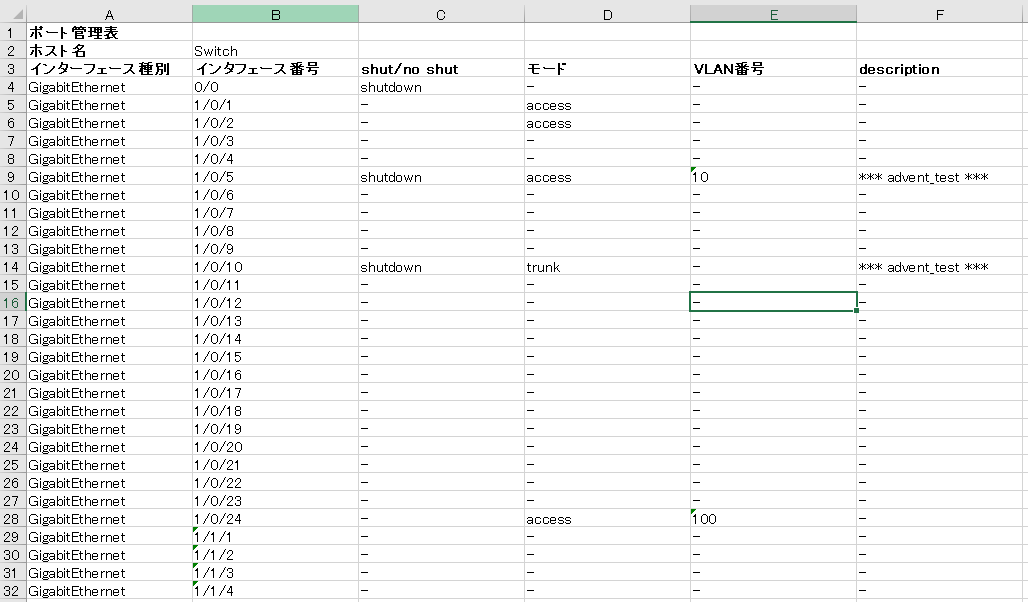
結果
まとめ
NETCONFでネットワーク機器の設定を取得でき、それをPythonスクリプトで処理することによって、日々の単純作業負荷がぐんと減ることを実感できました。まだまだ他にもプログラムで簡略化できることはたくさんあると思うので、挑戦していきたいと思います!
今回のPythonスクリプト作成にあたり、身近の有識者の皆さんには本当にお世話になりました。ありがとうございました!
参考
本記事作成にあたり、参考にさせていただきました。ありがとうございました。
CSR1000V (IOS16)のNetconf/YANGを試してみる
[YANG ExplorerでYANGモデルに慣れる]
(https://qiita.com/kikuta1978/items/fc205d85bbe742e7b10b)
