株式会社ピーアールオー(あったらいいな!を作ります) Advent Calendar 2019 の25日目。2019年のアドベントカレンダーのフィナーレを飾る、筆者の**マジであったらいいな!**はこちら〜!
リスナーの声を届けたい! → DJに"声"でリクエストしてみよう!
前回の記事での DJ-Bot は Bot と言いつつ固定のキーワードしか持てないのでリスナーの"声"が届かないDJなのですよね・・・
ぢゃ〜、Chrome搭載の音声認識APIを使って、リスナーの"声"をガチでラズパイDJに届けてみましょうか!(マジすか?!)
ということで…今回はAngularにて、"マイクからの音声を文字列に変換して送信する"リクエストフォームを作成いたします。
さらにこれをNode-REDにそのまま載せてみたいと思います。
1. Node-RED を SSL 対応 & 静的サイト有効化
まずはNode-REDで静的なコンテンツを載せられるように設定を変更します。
またChromeでマイクを使うには HTTPS がマストなので Node-RED にSSL対応を施します。
1-1. 静的コンテンツの有効化
まずは以下のサイトを参考に Node-REDのstatic fileを有効にしましょう。
...
    httpStatic: '/home/pi/node-red-static/',
...
これは、以上でOKです。
1-2. SSL証明書作成でHTTPS化
まず以下のページを参考に、普通のApache と同様の手順でオレオレSSL証明書を作成しましょう。
$ mkdir ~/.node-red/ssl
$ cd ~/.node-red/ssl
$ sudo openssl genrsa -des3 -out server.key 2048
...
(パスワードを入力)
...
$ sudo openssl rsa -in server.key -out server.key
...
(パスワードを再度、入力)
...
$ sudo openssl req -new -days 3650 -key server.key -out server.csr
...
$ sudo openssl x509 -in server.csr -out server.crt -req -signkey server.key -days 3650
$ sudo chown pi:pi *
$ chmod 400 *
で、~/.node-red/ssl以下にSSL証明書が作成されました。ちなみに最初の2048ですが、手順では1024となっています。現在では暗号化の強度が足りない?とのことでNode-RED起動時にエラーとなってしまいます。
Node-REDの設定は以下の手順で行います。
...
var fs = require("fs");
...
    https: {
       key: fs.readFileSync('.node-red/ssl/server.key'),
       cert: fs.readFileSync('.node-red/ssl/server.crt')
    },
...
fsモジュールを有効にして server.keyとserver.crtを読み込んでいます。
これで node-red-start でNode-REDを起動し、https://xxxx~でアクセスできれば設定完了です。
2. Angular CLI をセットアップ
Angular の CLI ですが、こいつをそのまま npm install -g するのは憲法違反なので(ラズパイの場合はsudoが必要でややこしいことになる)、nvm から npm i -g します。
$ curl -o- https://raw.githubusercontent.com/nvm-sh/nvm/v0.35.2/install.sh | bash
...
で、ターミナルを開き直して、
$ nvm install 10
...
node.jsのインストールが終わればもう使えるようになっておりますので、そのまま@angular/cliをインストールいたします。
$ npm i -g @angular/cli
ラズパイだけの環境だし、-gしてもいいよね?!
それではアプリを生成します。
$ pwd
/home/pi
$ ng new DjRequestApp
$ cd DjRequestApp
はい、ラズパイだからってホームディレクトリ直下でアプリを生成してます。
Angularのビルド先を Node-RED の下に向けます。
...
          "builder": "@angular-devkit/build-angular:browser",
          "options": {
            "outputPath": "../node-red-static/DjRequestApp",
...
そして忘れてはいけないのが、index.htmlの<base>です。
今回は https://192.168.x.x:1880/DjRequestApp/以下のような位置にAngularを配置しますので、<base href="/DjRequestApp/"> と修正します。
一旦、Angularのソースは弄らずに、このままデプロイしてみてNode-REDの設定もちゃんとできているか確認してみましょう。
$ npm run build --prod
でビルド&デプロイします。
別のターミナルで Node-REDを起動しておきます。
$ node-red-start
ブラウザでアクセスしてみましょう。
はい、Anuglarの初期ページが無事に表示されました。引き続き実装に参りましょう!!
3. Angular の実装
以下の音声認識APIをインストールいたします。
$ npm i @kamiazya/ngx-speech-recognition
それではサンプルをほぼコピペしてみます。
まずはHTMLですが…
<p>DJ Requested: {{message}}</p>
<button
  [disabled]="service.started$ | async"
  (click)="listen()"
>listen</button>
ボタン押されたらlisten()が呼ばれるシンプルなフォーム?です。
続いてコンポーネント本体です。
import { Component } from '@angular/core';

import {
  RxSpeechRecognitionService,
  resultList,
} from '@kamiazya/ngx-speech-recognition';

@Component({
  selector: 'app-root',
  templateUrl: './app.component.html',
  styleUrls: ['./app.component.scss'],
  providers:[
    RxSpeechRecognitionService
  ]
})
export class AppComponent {
  message = '';

  constructor(
    public service: RxSpeechRecognitionService,
    private http: HttpClient
  ) { }

  listen() {
    this.service
      .listen()
      .pipe(resultList)
      .subscribe((list: SpeechRecognitionResultList) => {
        this.message = list.item(0).item(0).transcript;
        console.log('RxComponent:onresult', this.message, list);
      });
  }
}
これだで本当に音声認識、できるのでしょうか・・・?!
4. 果たして本当にマイクから音声認識できるのか?!
いったん、ビルドをかけて Node-RED に載せてみましょう。
$ npm run build --prod
で、Chromeリロードしてみます。"サイトの設定"でマイクがブロックされていたら"確認"か"許可"をお願いします。
Listenボタンをクリックするとマイクの許可を求められるかもしれませんが、"許可"をお願いします!
スクショがうまく撮れませんでしたがChromeのタブが録音中っぽくなっているかと思います。
その間にリクエストする冬っぽいキーワードを呟いてみます。
おぉ!!!!認識してるぅぅ〜!!!
うまく message に認識できた文字列が入ってきました。
後はこれを NODE-Red にPOSTすればDJに声が届きますね!!!
AngularのHttpClientを使用して、messageをPOSTするようにコンポーネントを修正しましょう。
HttpClientの使い方はお決まりですが、まずは app.module.tsで importsにモジュールを追加します。
import { HttpClientModule } from '@angular/common/http';
...
  imports: [
    BrowserModule,
    HttpClientModule
  ],
...
確かBrowserModuleの後、という決まりもあったような気がします。続いて、コンポーネント側でインジェクトしてもらいます。
import { HttpClient } from '@angular/common/http';
...
  constructor(
    public service: RxSpeechRecognitionService,
    private http: HttpClient
  ) { }

  listen() {
    this.service
      .listen()
      .pipe(resultList)
      .subscribe((list: SpeechRecognitionResultList) => {
        this.message = list.item(0).item(0).transcript;
        console.log('RxComponent:onresult', this.message, list);
        this.http.post("/DjRequest",this.message)
          .subscribe(()=>{});
      });
  }
}
this.http.post("/DjRequest",this.message).subscribe(...);を追加いたしました。
NODE-Redで用意するエンドポイントは /DjRequest とします。
5. REST エンドポイントの用意
POSTの用意が出来たら Node-RED 側でエンドポイントを作成します。
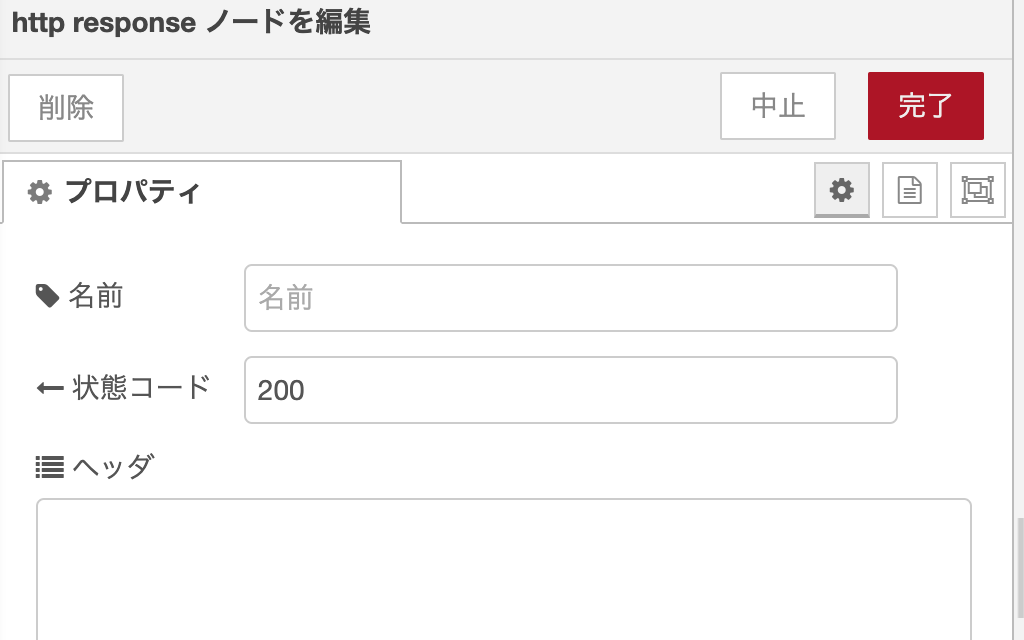
"http in"ノードを置いて、メソッドにPOST、URLに/DjRequest を指定します。
基本はこれだけなのですが、戻り値を作成する "function"ノードと"http response"ノードも配置します。
functionノードは以下の通り、OKメッセージを送るだけです。
msg.payload = { message: 'ok' }

return msg;
このメッセージをステータス200で送り返せば、REST APIは完了です。
さて、デバッグノードを付けて、Angularから試しにPOSTしてみましょう!
$ npm run build --prod
で、いくつか呟いてみた結果が以下です。
バッチリ、POSTされています。つ、ついに…
6. 接続&実行!
AnguarとNode-RED の疎通ができたようなので、こいつをパイプで結びます!
最後に、リクエストのbodyから payloadにメッセージを載せる "function"ノードを設置して完了です。
var message = msg.req.body
msg.payload = message
return msg;
これでREST APIにPOSTされたメッセージが req.bodyからpayloadに載ります。後は前回の記事の"プレイリストの検索"のパイプラインに繋げれば・・・OKです!!
全体としては以下のようになりました。
これで準備は整いました。
さぁ、声が届くか!?

無事に ラズパイDJ に パーティーの一声が届いた模様です!!
それでは、冬といえばこれだ〜!!!

ロマンスの神様 ♪───O(≧∇≦)O────♪
いや〜、ウケるw
まとめ
駆け足ではございますが、以下のようなことを試してみました。
- Node-RED を HTTPS化
- Node-RED で静的コンテンツの有効化
- Node-RED で Anguarをホスティング
- Angular で音声認識
- Node-RED から Spotify API 呼び出し
- Raspberry Pi4 で Spotify Connect 再生
いや〜相変わらず技術多め濃いめのウザ熱いクリスマスになりましたね〜!!
それではラズパイDJの🔊BGM🔊に乗って🎄パーティー🎄を始めましょうか!


