環境
- Xcode 12.5
- Swift 5.4
動作イメージ
表題通り、縦横比の異なる画像を横スクロールするCollectionViewで均等な間隔で表示します。
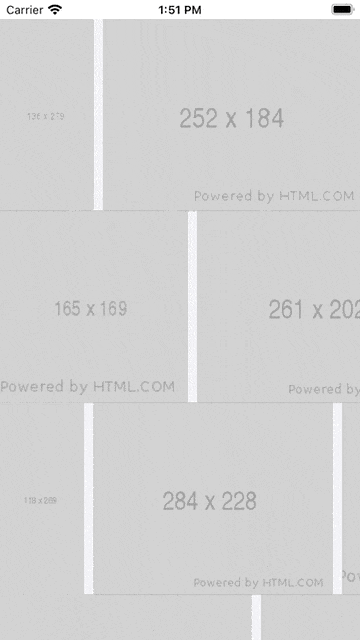 |
※表示している画像は PLACEHOLDER.COM から取得しています
大まかなView階層
UITableView
UITableViewCell
UICollectionView
UICollectionViewCell
UIImageView
前提
-
UITableViewCellの高さは任意の値で固定 -
UICollectionViewCellの横幅は可変(self-sizing) - iOS14のみで挙動を確認しているのでiOS12などでバグが起こるかもしれません
実装
ViewController
import UIKit

final class PlaceholderListViewController: UIViewController {
    private var tableView: UITableView!
    private var images: [[UIImage?]] = [] {
        didSet {
            tableView.reloadData()
        }
    }
    private let reuseId = String(describing: PlaceholderListTableViewCell.self)

    override func loadView() {
        super.loadView()
        view.backgroundColor = .systemBackground

        tableView = {
            let tableView = UITableView()
            tableView.dataSource = self
            tableView.separatorInset = .zero
            tableView.register(PlaceholderListTableViewCell.self, forCellReuseIdentifier: reuseId)
            tableView.rowHeight = PlaceholderListTableViewCell.height
            view.addSubview(tableView)
            tableView.translatesAutoresizingMaskIntoConstraints = false
            NSLayoutConstraint.activate([
                tableView.topAnchor.constraint(equalTo: view.safeAreaLayoutGuide.topAnchor),
                tableView.bottomAnchor.constraint(equalTo: view.safeAreaLayoutGuide.bottomAnchor),
                tableView.leadingAnchor.constraint(equalTo: view.safeAreaLayoutGuide.leadingAnchor),
                tableView.trailingAnchor.constraint(equalTo: view.safeAreaLayoutGuide.trailingAnchor)
            ])
            return tableView
        }()
    }

    override func viewDidLoad() {
        super.viewDidLoad()
        //...(*1)
        images = // 画像を設定
    }
}
// MARK: - UITableViewDataSource
extension PlaceholderListViewController: UITableViewDataSource {
    func tableView(_ tableView: UITableView, numberOfRowsInSection section: Int) -> Int {
        images.count
    }

    func tableView(_ tableView: UITableView, cellForRowAt indexPath: IndexPath) -> UITableViewCell {
        guard let cell = tableView.dequeueReusableCell(withIdentifier: reuseId, for: indexPath) as? PlaceholderListTableViewCell
        else { fatalError() }
        cell.setup(images: images[indexPath.row])
        return cell
    }
}
(*1)GIFの表示では確認のため以下の様な処理を用いています。
images = repeatElement((), count: 5)
    .map { _ in
        repeatElement((), count: 5)
            .map { _ in (Int.random(in: (100...300)), Int.random(in: (100...300))) }
            .map { "https://via.placeholder.com/\($0)x\($1)" }
            .map { UIImage(urlString: $0) }
    }

private extension UIImage {
    convenience init?(urlString: String) {
        guard let url = URL(string: urlString) else { return nil }
        do {
            let data = try Data(contentsOf: url)
            self.init(data: data)
        }
        catch {
            return nil
        }
    }
}
UITableViewCell & UICollectionView
import UIKit

final class PlaceholderListTableViewCell: UITableViewCell {
    static let height: CGFloat = PlaceholderListCollectionViewCell.height
    private var collectionView: UICollectionView!
    private var images: [UIImage?] = [] {
        didSet {
            collectionView.reloadData()
        }
    }
    private let reuseId = String(describing: PlaceholderListCollectionViewCell.self)

    override init(style: UITableViewCell.CellStyle, reuseIdentifier: String?) {
        super.init(style: style, reuseIdentifier: reuseIdentifier)

        let layout: UICollectionViewFlowLayout = {
            let layout = UICollectionViewFlowLayout()
            layout.scrollDirection = .horizontal
            layout.minimumLineSpacing = 10
            layout.estimatedItemSize = UICollectionViewFlowLayout.automaticSize //...(※2)
            return layout
        }()

        collectionView = {
            let collectionView = UICollectionView(frame: .zero, collectionViewLayout: layout)
            collectionView.backgroundColor = .secondarySystemBackground
            collectionView.dataSource = self
            collectionView.register(PlaceholderListCollectionViewCell.self, forCellWithReuseIdentifier: reuseId)
            contentView.addSubview(collectionView)
            collectionView.translatesAutoresizingMaskIntoConstraints = false
            NSLayoutConstraint.activate([
                collectionView.topAnchor.constraint(equalTo: contentView.safeAreaLayoutGuide.topAnchor),
                collectionView.bottomAnchor.constraint(equalTo: contentView.safeAreaLayoutGuide.bottomAnchor),
                collectionView.leadingAnchor.constraint(equalTo: contentView.safeAreaLayoutGuide.leadingAnchor),
                collectionView.trailingAnchor.constraint(equalTo: contentView.safeAreaLayoutGuide.trailingAnchor)
            ])
            return collectionView
        }()
    }

    required init?(coder: NSCoder) {
        fatalError("init(coder:) has not been implemented")
    }

    override func prepareForReuse() {
        super.prepareForReuse()
        images = []
    }

    func setup(images: [UIImage?]) {
        self.images = images
    }
}
// MARK: - UICollectionViewDataSource
extension PlaceholderListTableViewCell: UICollectionViewDataSource {
    func collectionView(_ collectionView: UICollectionView,
                        numberOfItemsInSection section: Int) -> Int {
        images.count
    }

    func collectionView(_ collectionView: UICollectionView,
                        cellForItemAt indexPath: IndexPath) -> UICollectionViewCell {
        guard let cell = collectionView.dequeueReusableCell(withReuseIdentifier: reuseId, for: indexPath) as? PlaceholderListCollectionViewCell
        else { fatalError() }
        cell.setImage(image: images[indexPath.row])
        return cell
    }
}
(※2)UICollectionViewCell を自動リサイズさせるために、itemSize ではなく estimatedItemSize に値を設定します。
UICollectionViewCell & UIImageView
import UIKit

final class PlaceholderListCollectionViewCell: UICollectionViewCell {
    static let height: CGFloat = 200 // 前提より高さは200で固定
    private var imageView: UIImageView!

    override init(frame: CGRect) {
        super.init(frame: frame)
        contentView.backgroundColor = .tertiarySystemBackground

        imageView = {
            let imageView = UIImageView()
            imageView.contentMode = .scaleAspectFit
            contentView.addSubview(imageView)
            imageView.translatesAutoresizingMaskIntoConstraints = false
            //...(*3)
            NSLayoutConstraint.activate([
                imageView.topAnchor.constraint(equalTo: contentView.topAnchor),
                imageView.bottomAnchor.constraint(equalTo: contentView.bottomAnchor),
                imageView.leadingAnchor.constraint(equalTo: contentView.leadingAnchor),
                imageView.trailingAnchor.constraint(equalTo: contentView.trailingAnchor)
            ])
            return imageView
        }()
    }

    required init?(coder: NSCoder) {
        fatalError("init(coder:) has not been implemented")
    }

    override func prepareForReuse() {
        super.prepareForReuse()
        imageView.image = nil
    }

    override func preferredLayoutAttributesFitting(_ layoutAttributes: UICollectionViewLayoutAttributes) -> UICollectionViewLayoutAttributes {
        super.preferredLayoutAttributesFitting(layoutAttributes)
        //...(*4)
        guard let imageSize = imageView.image?.size else { return layoutAttributes }
        let imageAspectRatio: CGFloat = imageSize.width / imageSize.height
        layoutAttributes.size = .init(width: Self.height * imageAspectRatio,
                                      height: Self.height)
        return layoutAttributes
    }

    func setImage(image: UIImage?) {
        imageView.image = image
    }
}
(*3)サイズ変更されるCellに追従するようUIImageViewはContentViewにぴったりレイアウトされるようにしておきます。
(*4)表示する画像の縦横比を取得して、Cellの縦幅(今回だと200px)を基準に表示枠のサイズ修正をします。
layoutAttributesにはCellに適用されるレイアウトの情報が含まれています。
参考にした記事
- Apple Developer Document - automaticSize
- Apple Developer Document - preferredLayoutAttributesFitting(_:)
- iOS 10時代の Self-sizing UICollectionViewCell
- Swift UICollectionViewのcellサイズを自動調整する