VMware vSphere間で仮想マシンを移行するとなるとまず第一に選択肢に上がるHCXですが、大規模に移行するのであれば自動化を考えたいところです。
今回はPowerCLIでの自動化を試してみたのでハマりどころを記録しておきます。
結論 - ハマりポイントまとめ
- オレオレ証明書であれば
Invalid Certificateを許可する設定が必要 - Managerに接続するとDestination Siteが見れないのでConnectorに接続
- 移行の実行結果はRead Onlyとなり、UIから詳細パラメータは見れないしUIから実行制御もできない
- IP変更だけしたい場合もゲートウェイ設定とDNS指定が必要
- 仮想マシンが複数NIC構成されており、同一ネットワークに接続されているケースに対応できない
- Bulk移行時にIP変更する場合、HostName指定が必要
環境
- HCX 4.10.2
- Windows Server 2022
- PowerShell 7.4.6
- PowerCLI 13.3.0 build 24145081

事前準備
PowerShellのインストール
作業端末(Windows Server 2022)にはPowerShellが入っていなかったのでまずはそのインストールから。
下記サイトを参考にMSIパッケージからPowerShellをインストール。
Windows への PowerShell のインストール - Microsoft Learn Challenge
PS C:\Users\Administrator> pwsh
PowerShell 7.4.6
PowerCLIのインストール
PowerCLIとはvSphere等のVMware製品の管理や自動化のためのツールです。
PowerCLI is the tool millions of customers around the world use to manage and automate their VMware environments. Discover what you can achieve with PowerCLI today.
VMware PowerCLI - Broadcom Developer Portal
今回はHCXの自動化のためにPowerCLIを使っていきます。
色々警告が出ますが気にせずインストール。
PS C:\Users\Administrator> Install-Module -Name VMware.PowerCLI

Untrusted repository
You are installing the modules from an untrusted repository. If you trust this repository, change its
InstallationPolicy value by running the Set-PSRepository cmdlet. Are you sure you want to install the modules from
'PSGallery'?
[Y] Yes  [A] Yes to All  [N] No  [L] No to All  [S] Suspend  [?] Help (default is "N"): A #<<< Aを選択

PS C:\Users\Administrator> Get-PowerCLIVersion
WARNING: Please consider joining the VMware Customer Experience Improvement Program, so you can help us make PowerCLI a better product. You can join using the following command:

Set-PowerCLIConfiguration -Scope User -ParticipateInCEIP $true

VMware's Customer Experience Improvement Program ("CEIP") provides VMware with information that enables VMware to improve its products and services, to fix problems, and to advise you on how best to deploy and use our products.  As part of the CEIP, VMware collects technical information about your organization’s use of VMware products and services on a regular basis in association with your organization’s VMware license key(s).  This information does not personally identify any individual.

For more details: type "help about_ceip" to see the related help article.

To disable this warning and set your preference use the following command and restart PowerShell:
Set-PowerCLIConfiguration -Scope User -ParticipateInCEIP $true or $false.
WARNING: The cmdlet "Get-PowerCLIVersion" is deprecated. Please use the 'Get-Module' cmdlet instead.

PowerCLI Version
----------------
   VMware.PowerCLI 13.3.0 build 24145081
---------------
Component Versions
---------------
   VMware Common PowerCLI Component 13.3 build 24145081
   VMware Cis Core PowerCLI Component PowerCLI Component 13.3 build 24145081
   VMware VimAutomation VICore Commands PowerCLI Component PowerCLI Component 13.3 build 24145081
HCX Managerへの接続
HCX Managerへの接続
まずはHCXに接続していきます。
PS C:\Users\Administrator> Connect-HCXServer -Server "192.168.1.1" # HCX Manager

Specify Credential
Please specify server credential
User: administrator@vsphere.local                           #<<< 認証情報を入力
Password for user administrator@vsphere.local: **********   #<<< 認証情報を入力

Connect-HCXServer: 2024/12/18 21:37:16  Connect-HCXServer               One or more errors occurred. (The SSL connection could not be established, see inner exception.) (The SSL connection could not be established, see inner exception.)
SSL接続できないとのエラーです。オレオレ証明書を許可する設定が必要だったようです。
参考:Connect-VIServer The SSL connection could not be established - Broadcom Communuty
PS C:\Users\Administrator> Set-PowerCLIConfiguration -InvalidCertificateAction Ignore

Perform operation?
Performing operation 'Update VMware.PowerCLI configuration.'?
[Y] Yes  [A] Yes to All  [N] No  [L] No to All  [S] Suspend  [?] Help (default is "Y"): Y #<<< Yを選択

Scope    ProxyPolicy     DefaultVIServerMode InvalidCertificateAction  DisplayDeprecationWarnings WebOperationTimeout
                                                                                                  Seconds
-----    -----------     ------------------- ------------------------  -------------------------- -------------------
Session  UseSystemProxy  Multiple            Ignore                    True                       300
User                                         Ignore
AllUsers
気を取り直してもう一度
PS C:\Users\Administrator> Connect-HCXServer -Server "192.168.1.1" # HCX Manager

Specify Credential
Please specify server credential
User: administrator@vsphere.local                           #<<< 認証情報を入力
Password for user administrator@vsphere.local: **********   #<<< 認証情報を入力


Server                         User
------                         ----
192.168.1.1                 administrator@vsphere.local
今度はちゃんとログインできました。認証情報は -User と -Password で指定しても認証できる模様。今回は確認してませんが、しっかり自動化するのであれば認証方法も考えないとですね。
Getting Started with VMware HCX cmdlets - Broadcom Developer Portal
SourceとDestinationの取得
仮想マシン移行にあたり、移行元と先のHCX情報を保持する必要があるため、SourceとDestination情報を取得します。
が、なぜかDestinationが見つかりません。
PS C:\Users\Administrator> Get-HCXSite -Source

Type Name                                               Id
---- ----                                               --
VC   vcsa8.example.com                                  xxxxxxxx-6e90-4feb-9863-9fd82f15ca91

PS C:\Users\Administrator> Get-HCXSite -Destination
PS C:\Users\Administrator>
どうやらConnector側に接続しないと見えないようです。Connector側に接続しなおし、無事SourceとDestinationを取得できました。
PS C:\Users\Administrator> Connect-HCXServer -Server "192.168.2.1" # HCX Connector

Specify Credential
Please specify server credential
User: administrator@vsphere.local                           #<<< 認証情報を入力
Password for user administrator@vsphere.local: **********   #<<< 認証情報を入力


Server                         User
------                         ----
192.168.2.1                 administrator@vsphere.local

PS C:\Users\Administrator> Get-HCXSite -Source

Type Name                                               Id
---- ----                                               --
VC   vcsa7.example.com                                  yyyyyyyy-b5ca-447c-893f-494779ce030f

PS C:\Users\Administrator> Get-HCXSite -Destination

Type Name                                               Id
---- ----                                               --
VC   vcsa8.example.com                                  xxxxxxxx-6e90-4feb-9863-9fd82f15ca91
仮想マシンの移行
下記のAWSドキュメントを参考にスクリプトを作成していきます。
Migrate VMware VMs with HCX Automation by using PowerCLI - AWS Documentation
基本パターンであれば上記ドキュメントのサンプルのままでも動くのですが、移行時のIP変更や移行設定をカスタマイズしようとすると少し調整が必要だったのでポイントをかいつまんで残しておきます。
スクリプト全文は最後の方にありますのでとにかくサンプルが欲しい方はそちらをご覧ください。
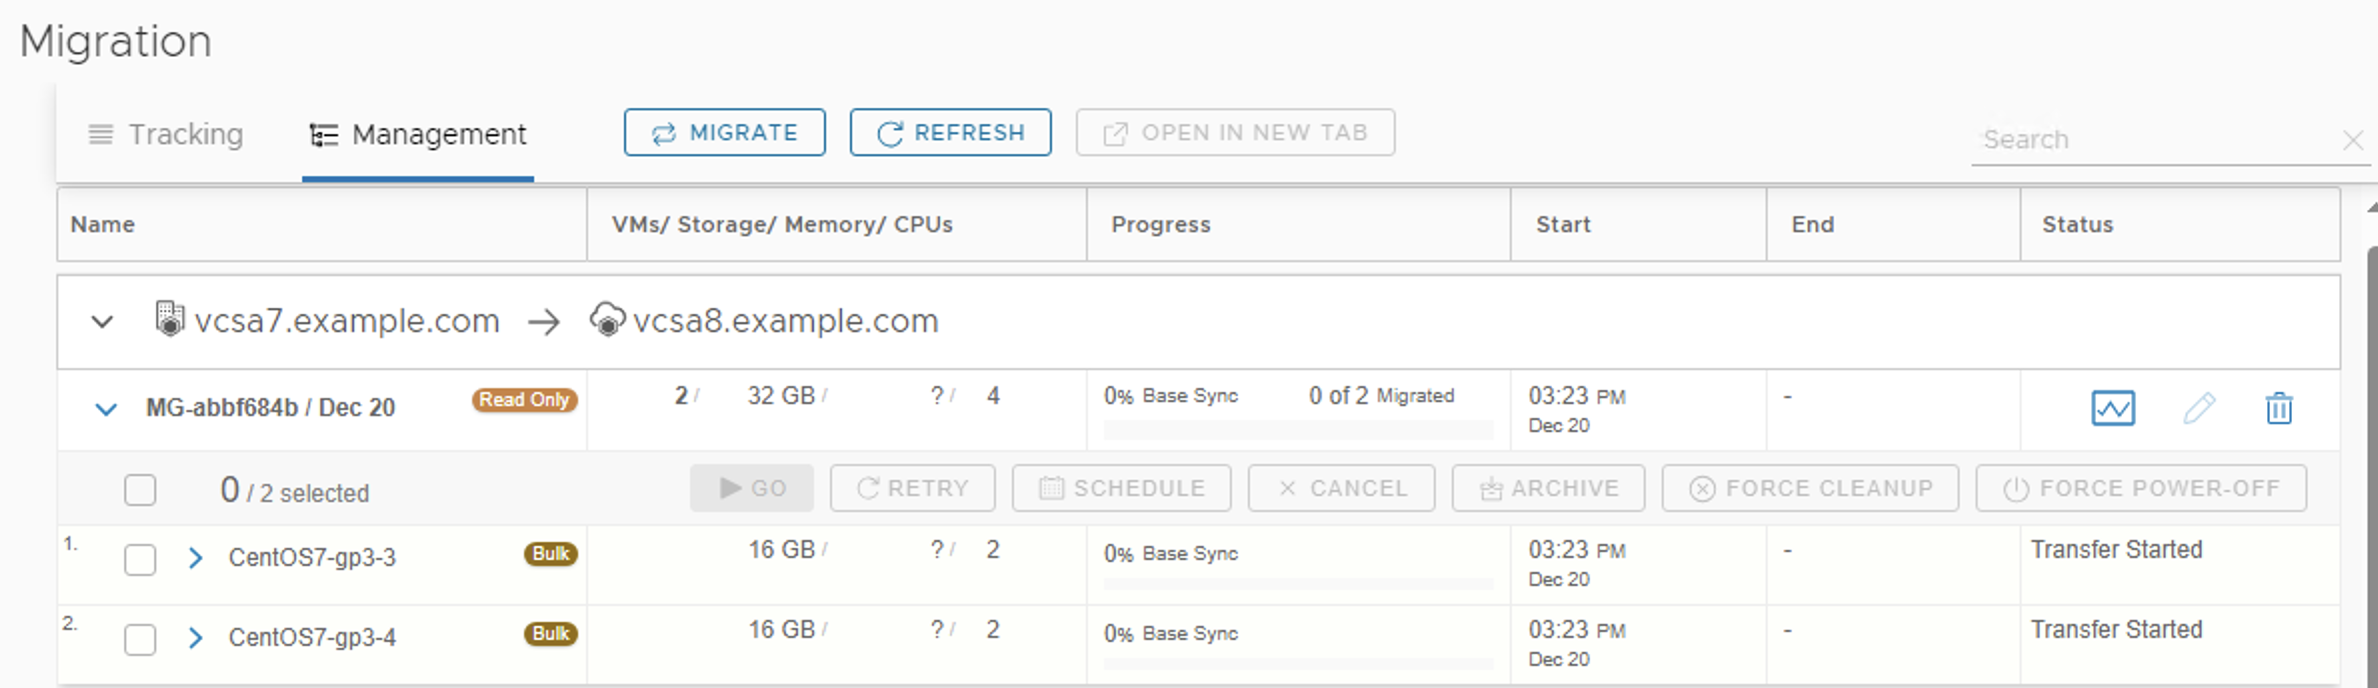
実行はRead Onlyとなり、UIから詳細パラメータは見れない
PowerCLIで実行した場合、UI上Read Onlyとなりました。鉛筆マークはクリックできなくなっています。

UIで見れる情報としては上図に出ているものが全てとなり、IP変更やDNS変更設定は情報として見れません。調べた限りPowerCLIでも設定内容を後から確認することは出来なさそうです。(APIなら取得できるかもしれません。)
実行時の -Confirm:$false を外せばGUI上で実行制御できたりしないかと試行錯誤してみましたがダメでした。(単純にShell上で実行確認が入るだけでした)
Start-HCXMigration -Migration $NewMigration -Confirm:$false
その他オプションもドキュメント一通り見ましたが、現状ではこれを回避する手段はなさそうです。
IP変更だけしたい場合もゲートウェイ設定とDNS指定が必要
これはPowerCLIでの仕様というよりGUIで実施しても同じ挙動だったので、HCX 4.10.2ではそうなったという話かもしれません。
IP変更だけしようと各NICに変更後のIPとネットマスクだけを記載すると検証段階でゲートウェイを埋めるようエラーがでます。
これは複数NIC時も同様で、全NICにおいてゲートウェイ設定を入れないとエラーとなるようになっているようです。(実際にデフォルトゲートウェイに反映されるのはPrimary NICに設定したゲートウェイだけ)
また、IP変更時はDNS設定 DNS Customization(最低Primary DNSとDNS suffix)を含めないとDNS設定が消えました。移行後に /etc/resolv.conf が空になっているので空白で上書きしてしまっているのかもしれません。
仮想マシンが複数NIC構成されており、同一ネットワークに接続されているとMACアドレスをうまく取得できない
PowerCLIでは仮想マシン名と接続先ネットワーク名からIP変更対象のvNICを判定するという挙動らしく、複数vNICが同じポートグループ(ネットワーク)に接続されている場合は最初のvNICのMACアドレスを取ってきてしまいます。
PS C:\Users\Administrator> $NetworkCustomizations

NetworkName  : LS-VM-gp3
MacAddress   : 00:50:56:85:20:9b
IPAddress    : 10.200.3.103
NetMask      : 255.255.255.0
Gateways     : {10.200.3.254}
PrimaryDns   :
SecondaryDns :
DnsSuffix    :
VM           : CentOS7-gp3-3

NetworkName  : LS-VM-gp3
MacAddress   : 00:50:56:85:20:9b   #<<< 別NICにもかかわらずMACが1つ目と同じになっている
IPAddress    : 10.200.8.188
NetMask      : 255.255.255.0
Gateways     : {10.200.8.254}
PrimaryDns   :
SecondaryDns :
DnsSuffix    :
VM           : CentOS7-gp3-3

NetworkName  : LS-VM-gp3
MacAddress   : 00:50:56:85:20:9b   #<<< 別NICにもかかわらずMACが1つ目と同じになっている
IPAddress    : 10.200.8.189
NetMask      : 255.255.255.0
Gateways     : {10.200.8.254}
PrimaryDns   :
SecondaryDns :
DnsSuffix    :
VM           : CentOS7-gp3-3
ドキュメントのNetworkNameの欄に以下の記載がありました。
Specifies the name of the network to which the VM NIC is currently connected on the source side. This is required to get the MAC address of the network adapter that gets included as part of the GuestOSCustomization payload.
New-HCXGuestOSNetworkCustomization - Broadcom Developer Portal
PowerCLIでは他にvNICを指定する方法がないため、現状では複数vNICが同一ポートグループ(ネットワーク)に接続されている仮想マシンのIP変更は出来なさそうです。GUIからだと指定できるので、API経由では指定できるようになっているのだと思います。
Bulk移行時にIP変更する場合、HostName指定が必要
IP変更の場合だけでなく、NetworkCustomizationを含める場合、HostName を含めていないと Test-HCXMigration の検証で失敗しました。
Test-HCXMigration $NewMigration | Format-Table -AutoSize -Wrap
#> {com.vmware.vapi.std.errors.invalid_request {'messages': [], 'data': struct {'errors': [struct {'code': E_INVALID_SCHEMA, 'message': JSONObject["name"] not found.}]}, 'error_type': INVALID_REQUEST}.}
以下の例のように、New-HCXGuestOSCustomization で -HostName 指定することでエラーは出なくなりました。
$GuestOSCustomizations = New-HCXGuestOSCustomization -HostName $vm1 -PrimaryDns $PrimaryDns -DnsSuffixes $DnsSuffix -NetworkCustomizations $NetworkCustomizations
スクリプト全文
今回の実行したスクリプト全文はこちらです。複数台仮想マシン移行も問題なく動いています。
スクリプトの前提
- 仮想マシン2台を移行
- 各仮想マシンは3NIC構成
- 移行元および移行先ネットワークは全ての仮想マシンで同一の構成
- 移行時にIPを変更
- Bulk Migrationで移行
ただ動くだけのスクリプトなのでキレイさは全く考えていません。(本来は最低限、同じ処理はループさせたり、変数はCSVから持ってきたりするべき。。)
スクリプト
<# Migration Variables #>
$HcxServer = "192.168.2.1"
$DstComputeName = "RP8-gp3" # Target Resource Pool
$DstDSName = "datastore-esxi8-gp3" # Target Datastore
$vmName1 = "CentOS7-gp3-3"
$vmName2 = "CentOS7-gp3-4"

<# Guest OS Customization #>
$DstNetworkName1 = "LS-VM-gp3-new" # Target NSX Segment
$DstNetworkName2 = "LS-VM-gp3-new" # Target NSX Segment
$DstNetworkName3 = "LS-VM-gp3-new" # Target NSX Segment
$PrimaryDns = "192.168.1.8"
$DnsSuffixes = "example.com"
$DstIp1_1 = "10.200.3.103"
$DstIp1_1gw = "10.200.3.254"
$DstIp1_1mask = "255.255.255.0"
$DstIp1_2 = "10.200.8.188"
$DstIp1_2gw = "10.200.8.254"
$DstIp1_2mask = "255.255.255.0"
$DstIp1_3 = "10.200.8.189"
$DstIp1_3gw = "10.200.8.254"
$DstIp1_3mask = "255.255.255.0"
$DstIp2_1 = "10.200.3.104"
$DstIp2_1gw = "10.200.3.254"
$DstIp2_1mask = "255.255.255.0"
$DstIp2_2 = "10.200.8.198"
$DstIp2_2gw = "10.200.8.254"
$DstIp2_2mask = "255.255.255.0"
$DstIp2_3 = "10.200.8.199"
$DstIp2_3gw = "10.200.8.254"
$DstIp2_3mask = "255.255.255.0"

<# Environment Setup #>
Connect-HCXServer -Server $HcxServer
$HcxDstSite = Get-HCXSite -Destination
$HcxSrcSite = Get-HCXSite -Source
$DstCompute = Get-HCXContainer -Name $DstComputeName -Site $HcxDstSite
$DstDS = Get-HCXDatastore -Name $DstDSName -Site $HcxDstSite

<# VM1 #>
$vm1 = Get-HCXVM -Name $vmName1
$SrcNetwork1 = Get-HCXNetwork -Name $vm1.Network[0] -Type NsxtSegment -Site $HcxSrcSite
$DstNetwork1 = Get-HCXNetwork -Name $DstNetworkName1 -Type NsxtSegment -Site $HcxDstSite
$SrcNetwork2 = Get-HCXNetwork -Name $vm1.Network[1] -Type NsxtSegment -Site $HcxSrcSite
$DstNetwork2 = Get-HCXNetwork -Name $DstNetworkName2 -Type NsxtSegment -Site $HcxDstSite
$SrcNetwork3 = Get-HCXNetwork -Name $vm1.Network[2] -Type NsxtSegment -Site $HcxSrcSite
$DstNetwork3 = Get-HCXNetwork -Name $DstNetworkName3 -Type NsxtSegment -Site $HcxDstSite

$NetworkMappings = New-Object System.Collections.ArrayList
$Mapping1 = New-HCXNetworkMapping -SourceNetwork $SrcNetwork1 -DestinationNetwork $DstNetwork1 -PrimaryNic $true
$NetworkMappings.Add($Mapping1)
$Mapping2 = New-HCXNetworkMapping -SourceNetwork $SrcNetwork2 -DestinationNetwork $DstNetwork2
$NetworkMappings.Add($Mapping2)
$Mapping3 = New-HCXNetworkMapping -SourceNetwork $SrcNetwork3 -DestinationNetwork $DstNetwork3
$NetworkMappings.Add($Mapping3)
$NetworkCustomizations = New-Object System.Collections.ArrayList
$NetworkCustomization1 = New-HCXGuestOSNetworkCustomization -VM $vm1 -NetworkName $srcNetwork1 -IPAddress $DstIp1_1 -Gateways $DstIp1_1gw -NetMask $DstIp1_1mask
$NetworkCustomizations.Add($NetworkCustomization1)
$NetworkCustomization2 = New-HCXGuestOSNetworkCustomization -VM $vm1 -NetworkName $srcNetwork2 -IPAddress $DstIp1_2 -Gateways $DstIp1_2gw -NetMask $DstIp1_2mask
$NetworkCustomizations.Add($NetworkCustomization2)
$NetworkCustomization3 = New-HCXGuestOSNetworkCustomization -VM $vm1 -NetworkName $srcNetwork3 -IPAddress $DstIp1_3 -Gateways $DstIp1_3gw -NetMask $DstIp1_3mask
$NetworkCustomizations.Add($NetworkCustomization3)
$GuestOSCustomizations = New-HCXGuestOSCustomization -HostName $vm1 -PrimaryDns $PrimaryDns -DnsSuffixes $DnsSuffix -NetworkCustomizations $NetworkCustomizations
$NewMigration1 = New-HCXMigration -VM $vm1 -MigrationType Bulk -SourceSite $HcxSrcSite -DestinationSite $HcxDstSite -TargetComputeContainer $DstCompute -TargetDatastore $DstDS -NetworkMapping $NetworkMappings -RetainMac $true -MigrateCustomAttributes $true -RemoveSnapshots $false -RemoveISOs $false -GuestOSCustomization $GuestOSCustomizations

<# VM2 #>
$vm2 = Get-HCXVM -Name $vmName2
$SrcNetwork1 = Get-HCXNetwork -Name $vm2.Network[0] -Type NsxtSegment -Site $HcxSrcSite
$DstNetwork1 = Get-HCXNetwork -Name $DstNetworkName1 -Type NsxtSegment -Site $HcxDstSite
$SrcNetwork2 = Get-HCXNetwork -Name $vm2.Network[1] -Type NsxtSegment -Site $HcxSrcSite
$DstNetwork2 = Get-HCXNetwork -Name $DstNetworkName2 -Type NsxtSegment -Site $HcxDstSite
$SrcNetwork3 = Get-HCXNetwork -Name $vm2.Network[2] -Type NsxtSegment -Site $HcxSrcSite
$DstNetwork3 = Get-HCXNetwork -Name $DstNetworkName3 -Type NsxtSegment -Site $HcxDstSite

$NetworkMappings = New-Object System.Collections.ArrayList
$Mapping1 = New-HCXNetworkMapping -SourceNetwork $SrcNetwork1 -DestinationNetwork $DstNetwork1 -PrimaryNic $true
$NetworkMappings.Add($Mapping1)
$Mapping2 = New-HCXNetworkMapping -SourceNetwork $SrcNetwork2 -DestinationNetwork $DstNetwork2
$NetworkMappings.Add($Mapping2)
$Mapping3 = New-HCXNetworkMapping -SourceNetwork $SrcNetwork3 -DestinationNetwork $DstNetwork3
$NetworkMappings.Add($Mapping3)
$NetworkCustomizations = New-Object System.Collections.ArrayList
$NetworkCustomization1 = New-HCXGuestOSNetworkCustomization -VM $vm2 -NetworkName $srcNetwork1 -IPAddress $DstIp2_1 -Gateways $DstIp2_1gw -NetMask $DstIp2_1mask
$NetworkCustomizations.Add($NetworkCustomization1)
$NetworkCustomization2 = New-HCXGuestOSNetworkCustomization -VM $vm2 -NetworkName $srcNetwork2 -IPAddress $DstIp2_2 -Gateways $DstIp2_2gw -NetMask $DstIp2_2mask
$NetworkCustomizations.Add($NetworkCustomization2)
$NetworkCustomization3 = New-HCXGuestOSNetworkCustomization -VM $vm2 -NetworkName $srcNetwork3 -IPAddress $DstIp2_3 -Gateways $DstIp2_3gw -NetMask $DstIp2_3mask
$NetworkCustomizations.Add($NetworkCustomization3)
$GuestOSCustomizations = New-HCXGuestOSCustomization -HostName $vm2 -PrimaryDns $PrimaryDns -DnsSuffixes $DnsSuffix -NetworkCustomizations $NetworkCustomizations
$NewMigration2 = New-HCXMigration -VM $vm2 -MigrationType Bulk -SourceSite $HcxSrcSite -DestinationSite $HcxDstSite -TargetComputeContainer $DstCompute -TargetDatastore $DstDS -NetworkMapping $NetworkMappings -RetainMac $true -MigrateCustomAttributes $true -RemoveSnapshots $false -RemoveISOs $false -GuestOSCustomization $GuestOSCustomizations

<# Migration #>
$NewMigration = New-Object System.Collections.ArrayList
$NewMigration.Add($NewMigration1)
$NewMigration.Add($NewMigration2)

Test-HCXMigration $NewMigration
Start-HCXMigration -Migration $NewMigration -Confirm:$false
参考サイト
HCX - PowerCli operations and best practices - Broadcom KB
Migrate VMware VMs with HCX Automation by using PowerCLI - AWS Documentation
Getting Started with VMware HCX cmdlets - Broadcom Developer Portal