ちょっとしたアプリをAkkaベースで作ってみたくて、Play frameworkを試してみることに。
Playを使う上でSlickは鉄板の組み合わせと思ってたけど、結構イレギュラーな感じなのかな。
設定もデフォルトから変えないといけなかったし、Railsみたいにサクッと始めるとはいかなかったです。分かってしまえばどうということは無いでしょうが。
というわけで備忘録がてらチュートリアルを書いてみました。
基本的には、takuya0301さんの「Play 2.5 と Slick 3.1 のチュートリアル」の記事のまんまなのですが、その通りにやってもうまくいかなかったところがバージョンのせいかあったので対応しています。
プロジェクトの作成
Playの始め方はsbtを書くとかgiter8とかIntelliJで始めるとか色々あります。
何となく、ひな形はActivatorから始めるのが楽な気がするので、Activatorベースで進めます。
というわけで、まずはActivatorをインストールして環境変数にパスを通します。Macならbrewで入るみたいですね。
Windowsなら普通にダウンロードして環境変数にパス通すでOKです。
続いて下記コマンドでひな形を作成。
$ activator new example-play play-scala
$ cd example-play
これでひな形は完成。とりあえず起動してみましょう。この辺はRailsっぽいですね。
activator-uiから実行する手もあるけど、今回はコマンドベースで。
$ activator
$ [example-play] # ここからactivator上での作業
$ [example-play] run

--- (Running the application, auto-reloading is enabled) ---

[info] p.c.s.NettyServer - Listening for HTTP on /0:0:0:0:0:0:0:0:9000

(Server started, use Ctrl+D to stop and go back to the console...)
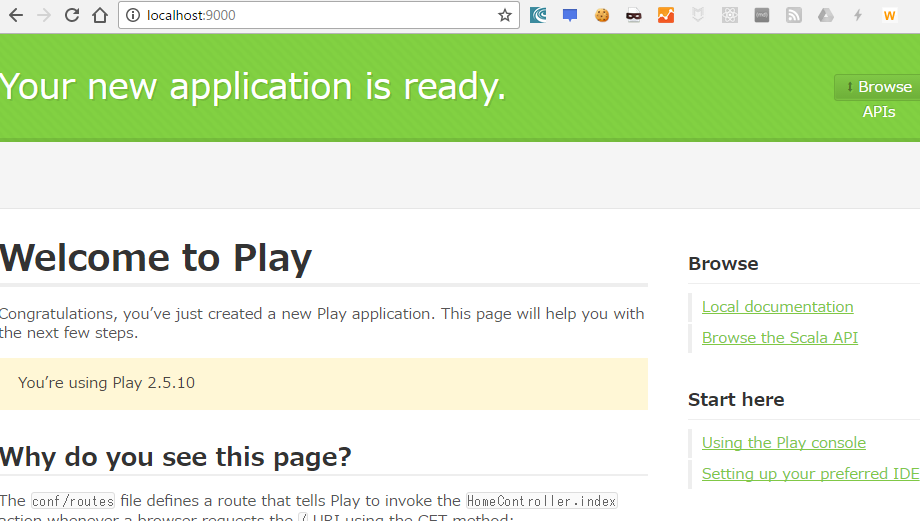
という分けでブラウザでhttp://localhost:9000にアクセスしてみましょう。下記のような画面になってれば成功です。
なお、コンパイルとかしてるので初回アクセスは少し時間がかかります。
Ctrl+Dでプロセスを停止できるので、停止しておきます。
設定ファイルの修正
build.sbtの修正
ひな形が無事動いたので、build.sbtにslick向けの設定を追加します。修正前後の差分は下記の通り
@@ -7,9 +7,11 @@ lazy val root = (project in file(".")).enablePlugins(PlayScala)
 scalaVersion := "2.11.7"

 libraryDependencies ++= Seq(
-  jdbc,
   cache,
   ws,
-  "org.scalatestplus.play" %% "scalatestplus-play" % "1.5.1" % Test
+  "org.scalatestplus.play" %% "scalatestplus-play" % "1.5.1" % Test,
+  "com.typesafe.play" %% "play-slick" % "2.0.0",
+  "com.typesafe.play" %% "play-slick-evolutions" % "2.0.0",
+  "com.h2database" % "h2" % "1.3.176"
 )
Slickは通常のJDBCとは異なるアクセスをするので、jdbcモジュールを外す必要があります。
evolutionsというのはRailsのようにSQLを管理するJavaのライブラリです。
また、今回は公式チュートリアルと同じくH2をデータベースとして使う予定なので、H2を設定してあります。
application.confの修正
公式にも記載あがある通り、Slickを使う場合は、JDBCでは無いせいかDB周りの設定はslick.dbs.defaultを使う必要あります。
なので、ごそっと書きのように入れ替えました。
@@ -303,51 +303,14 @@ play.evolutions {
   #db.default.enabled = false
 }

-## Database Connection Pool
-# https://www.playframework.com/documentation/latest/SettingsJDBC
-# ~~~~~
-# Play doesn't require a JDBC database to run, but you can easily enable one.
-#
-# libraryDependencies += jdbc
-#
-play.db {
-  # The combination of these two settings results in "db.default" as the
-  # default JDBC pool:
-  #config = "db"
-  #default = "default"
-
-  # Play uses HikariCP as the default connection pool.  You can override
-  # settings by changing the prototype:
-  prototype {
-    # Sets a fixed JDBC connection pool size of 50
-    #hikaricp.minimumIdle = 50
-    #hikaricp.maximumPoolSize = 50
-  }
-}
-
-## JDBC Datasource
-# https://www.playframework.com/documentation/latest/JavaDatabase
+## Datasource
 # https://www.playframework.com/documentation/latest/ScalaDatabase
 # ~~~~~
-# Once JDBC datasource is set up, you can work with several different
-# database options:
 #
 # Slick (Scala preferred option): https://www.playframework.com/documentation/latest/PlaySlick
-# JPA (Java preferred option): https://playframework.com/documentation/latest/JavaJPA
-# EBean: https://playframework.com/documentation/latest/JavaEbean
-# Anorm: https://www.playframework.com/documentation/latest/ScalaAnorm
-#
-db {
-  # You can declare as many datasources as you want.
-  # By convention, the default datasource is named `default`
-
-  # https://www.playframework.com/documentation/latest/Developing-with-the-H2-Database
-  #default.driver = org.h2.Driver
-  #default.url = "jdbc:h2:mem:play"
-  #default.username = sa
-  #default.password = ""
-
-  # You can turn on SQL logging for any datasource
-  # https://www.playframework.com/documentation/latest/Highlights25#Logging-SQL-statements
-  #default.logSql=true
-}
+
+slick.dbs.default.driver="slick.driver.H2Driver$"
+slick.dbs.default.db.driver="org.h2.Driver"
+slick.dbs.default.db.url="jdbc:h2:mem:play;DB_CLOSE_DELAY=-1"
+slick.dbs.default.db.user=sa
+slick.dbs.default.db.password=""
ポイントはDB_CLOSE_DELAY=-1で、これを指定しないと、後で説明するApply this script now!ボタンを押しても、ウンともスンとも言わなかったので要注意です。
アプリケーション機能の追加
設定が終わったので、アプリケーション機能を追加します。
Railsだとこの辺もGeneratorである程度よしにする感じですが、Playは手書き文化っぽい? 求ム情報。
このあたりはtakuya0301さんの記事をたんたんと写経。解説とかもそちらが参考になると思うので読んでみてください。
SQLの追加
evalutionむけにはdefault配下に一定のルールでSQLを書けばいいみたい。
1.sqlは下記のようにCREATEとDROP時のものを書きます
# --- !Ups

CREATE TABLE "CAT" (
    "NAME" VARCHAR NOT NULL PRIMARY KEY,
    "COLOR" VARCHAR NOT NULL
);

# --- !Downs

DROP TABLE "CAT";
DTOとDAO
つづいてDTO。これはcase classでさくりと。
package models

case class Cat(name: String, color: String)
DAOも作ります。
package dao

import scala.concurrent.Future

import javax.inject.Inject
import models.Cat
import play.api.db.slick.DatabaseConfigProvider
import play.api.db.slick.HasDatabaseConfigProvider
import play.api.libs.concurrent.Execution.Implicits.defaultContext
import slick.driver.JdbcProfile

class CatDAO @Inject()(protected val dbConfigProvider: DatabaseConfigProvider) extends HasDatabaseConfigProvider[JdbcProfile] {
  import driver.api._

  private val Cats = TableQuery[CatsTable]

  def all(): Future[Seq[Cat]] = db.run(Cats.result)

  def insert(cat: Cat): Future[Unit] = db.run(Cats += cat).map { _ => () }

  private class CatsTable(tag: Tag) extends Table[Cat](tag, "CAT") {

    def name = column[String]("NAME", O.PrimaryKey)
    def color = column[String]("COLOR")

    def * = (name, color) <> (Cat.tupled, Cat.unapply _)
  }
}
ViewとController
表題の通りですが、まずはルーティング設定を変えるためにconf/routesを修正。
 # An example controller showing a sample home page
 GET     /                           controllers.HomeController.index
+POST    /insert/cat                 controllers.HomeController.insertCat
 # An example controller showing how to use dependency injection
 GET     /count                      controllers.CountController.count
 # An example controller showing how to write asynchronous code
つづいて、Controller。これは既存にある/app/controllers/HomeController.scalaを修正します。
@@ -3,22 +3,36 @@ package controllers
 import javax.inject._
 import play.api._
 import play.api.mvc._
+import play.api.db._
+import dao.CatDAO
+import models.Cat
+import play.api.data.Form
+import play.api.data.Forms.mapping
+import play.api.data.Forms.text
+import play.api.libs.concurrent.Execution.Implicits.defaultContext

 @Singleton
-class HomeController @Inject() extends Controller {
+class HomeController @Inject()(catDao: CatDAO) extends Controller {

-  def index = Action {
-    Ok(views.html.index("Your new application is ready."))
+  def index = Action.async {
+    catDao.all().map {
+      cats => Ok(views.html.index(cats))
+    }
   }

+  def insertCat = Action.async { implicit request =>
+    val cat: Cat = catForm.bindFromRequest.get
+    catDao.insert(cat).map(_ => Redirect(routes.HomeController.index))
+  }
+
+  val catForm = Form(
+    mapping(
+      "name" -> text(),
+      "color" -> text()
+    )(Cat.apply)(Cat.unapply)
+  )
 }
これに合わせて、index.scala.htmlも修正。
@@ -1,20 +1,23 @@
-@*
- * This template takes a single argument, a String containing a
- * message to display.
- *@
-@(message: String)
+@(cats: Seq[Cat])

-@*
- * Call the `main` template with two arguments. The first
- * argument is a `String` with the title of the page, the second
- * argument is an `Html` object containing the body of the page.
- *@
-@main("Welcome to Play") {
+@main("Cat database") {
+<div>
+ <div id="cats">
+  <h2>Insert a kitty cat here:</h2>

-    @*
-     * Get an `Html` object by calling the built-in Play welcome
-     * template and passing a `String` message.
-     *@
-    @play20.welcome(message, style = "Scala")
+  <form action="/insert/cat" method="POST">
+   <input name="name" type="text" placeholder="name your feline friend"/>
+   <input name="color" type="text" placeholder="enter the color of this kitty cat"/>
+   <input type="submit"/>
+  </form>

-}
+  <h2>Previously inserted cats:</h2>
+  <table>
+   <tr><th>Name</th><th>Color</th></tr>
+   @for(c <- cats){
+   <tr><td>@c.name</td><td>@c.color</td></tr>
+   }
+  </table>
+ </div>
+</div>
+}
アプリケーションの起動
では、アプリケーションを起動します。
[example-play] $ run

--- (Running the application, auto-reloading is enabled) ---

[info] p.c.s.NettyServer - Listening for HTTP on /0:0:0:0:0:0:0:0:9000

(Server started, use Ctrl+D to stop and go back to the console...)
http://localhost:9000 にアクセスすると下記のようなエラー画面になります。
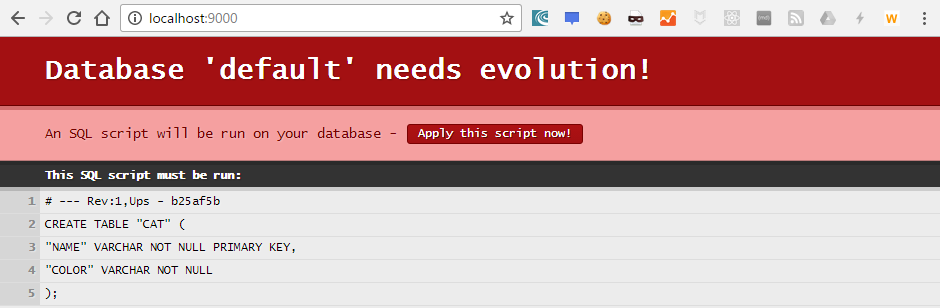
ようは、使おうとしているテーブルが無いよ! ってエラーですね。赤字のApply this script now!を押して適用してやりましょう。
そうすると、下記のような画面になるはずです。
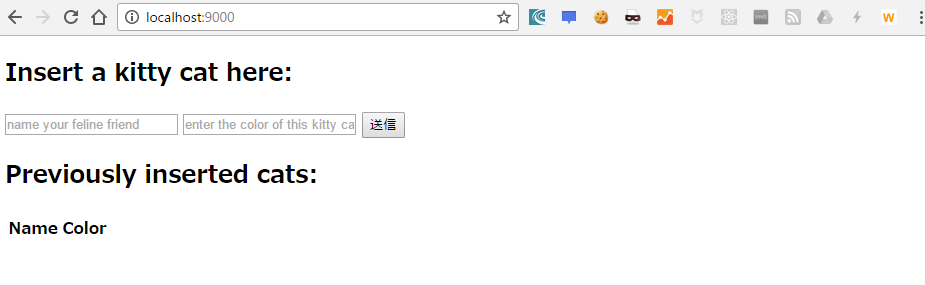
これで成功ですね。もし、Apply this script now!を押しても画面が変わらずDB変更がされてなければ、DB_CLOSE_DELAY=-1が抜けているかもしれないのでapplication.confを見直してください。
デバックモードでの起動
最後におまけでデバッグモードでの起動の仕方です。
$ activator debug run -jvm-debug 8888
runの前にdebugコマンドを書いておくことでログレベルがデバッグになります。
jvm-debugはデバッグ用のポートをしていすることになるので、こちらにIDE等からアタッチすればデバッグが可能です。
まとめ
おもったより手こずりましたが、無事Play + Slickの開発準備が整いました。この辺がRails並みに整備されるともっといいのですが。
まあ、微妙に罠っぽい挙動だったところもあるので、そのうち治ると予想。
Playの非同期性を活かすならSlick3がやはり一番だろうし、本質に行くまでの躓きは減っておいてほしいなー。
それでは、Happy Hacking!