はじめに
アプリ内でメーラーを起動させ、
CSVファイルを添付したメールを送信したいと思い、実装しました。
今回は、アプリ内でメーラーを起動してメール送信するやり方をまとめました。
手順
- MessageUIフレームワークを追加する
- MessageUIをimportする
- MFMailComposeViewControllerインスタンスを生成し、宛先や本文などを設定する
- MFMailComposeViewControllerDelegateで終了処理を実装する
1. フレームワークの追加
フレームワーク追加に関する参考サイト
まず、プロジェクトにMessageUIフレームワークを追加します。
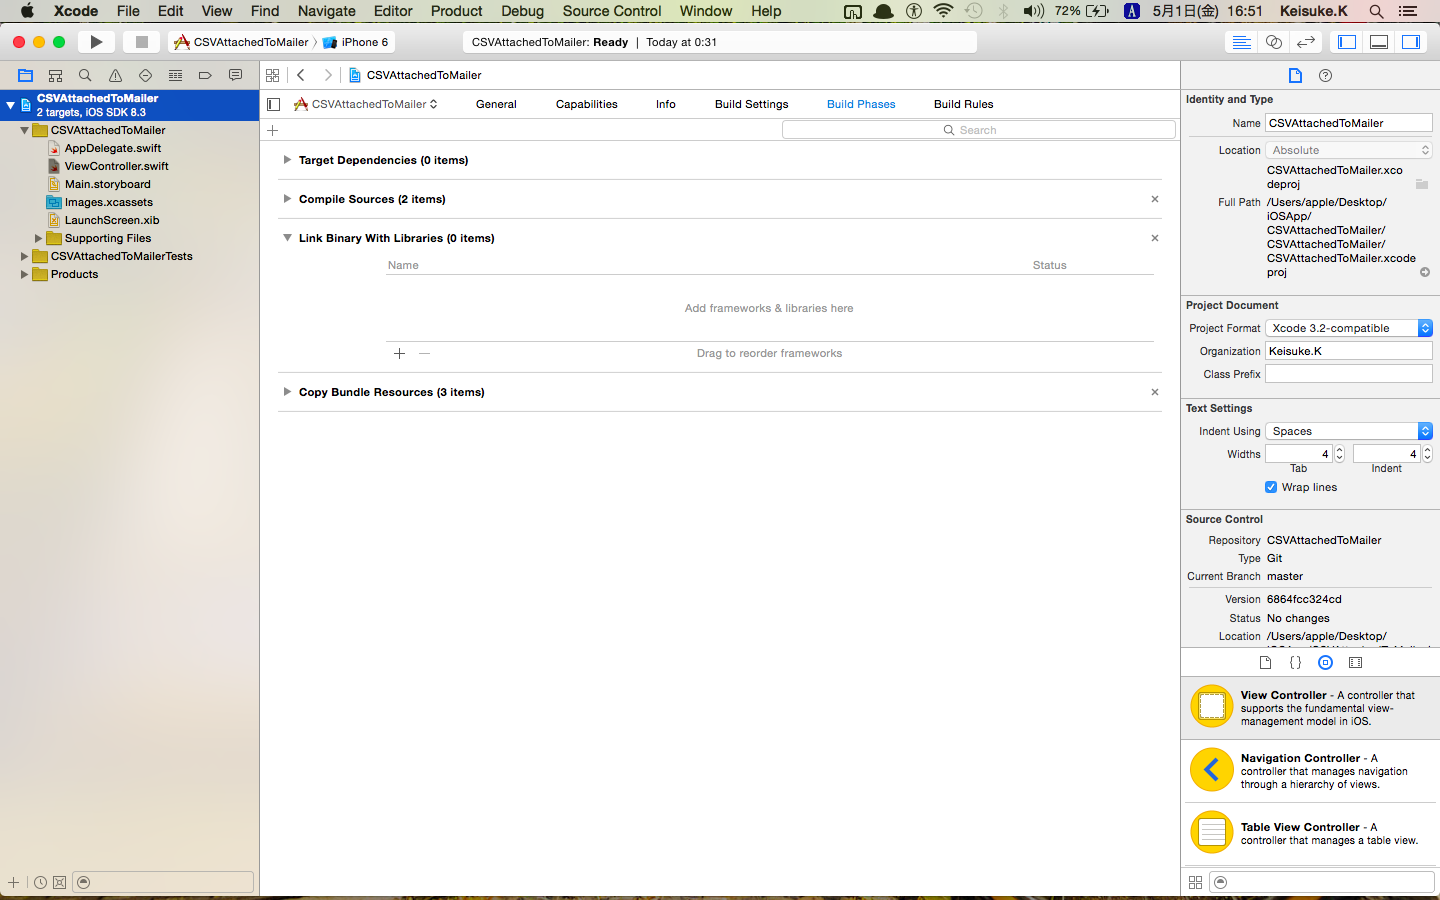
①ナビゲーションエリアのプロジェクト名が書かれている項目をクリックし、
BuildPhasesの項目をクリックします。下記画像参照。
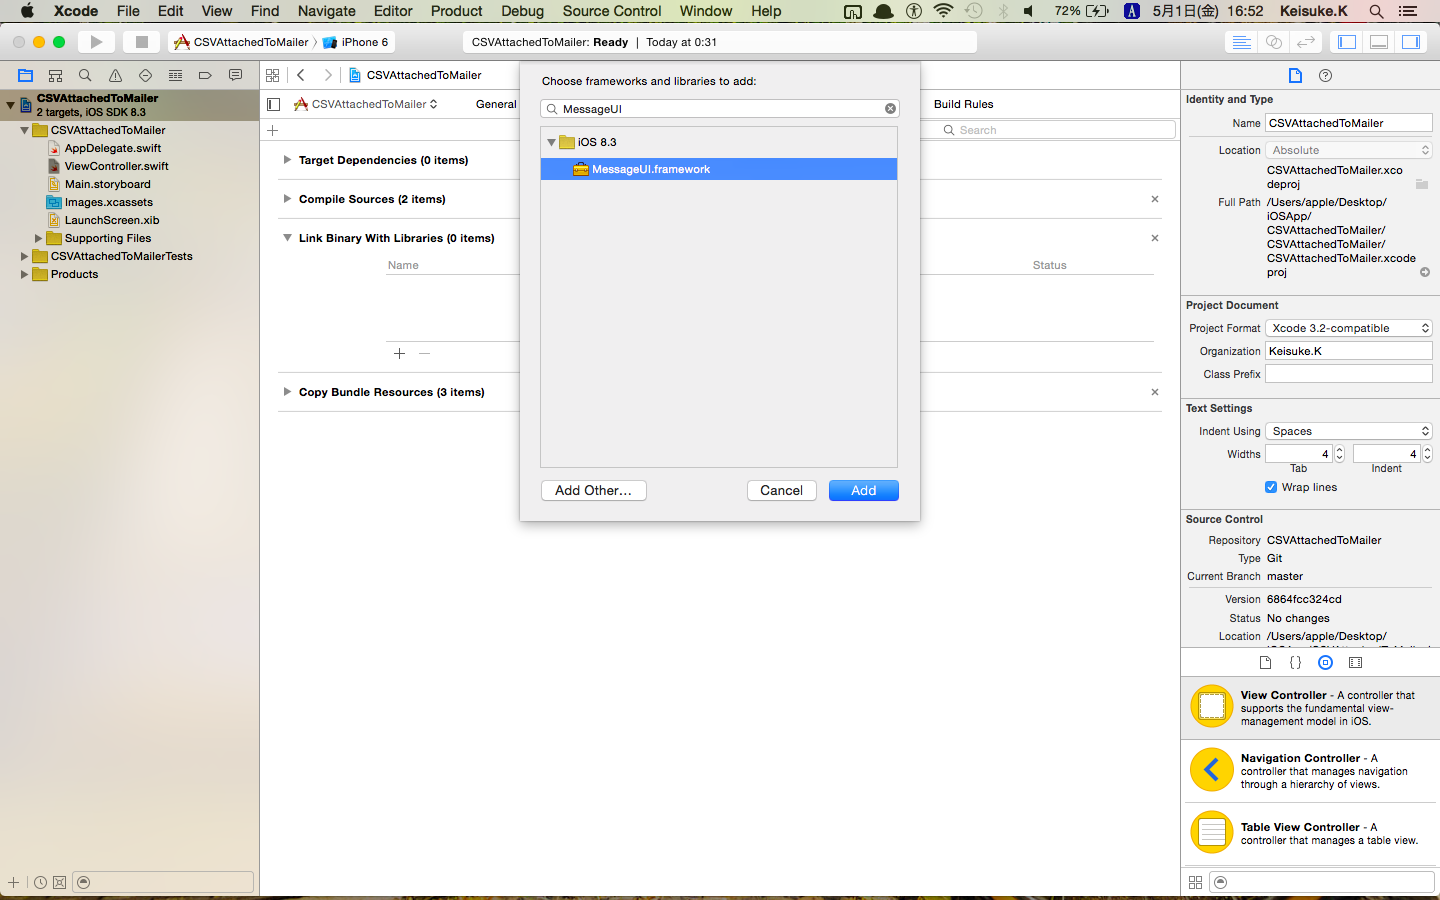
②Link Binary with Librariesの**+マークをクリックする。
検索欄にMessageUIと入力するとMessageUI.framework**が出てくる。
MessageUI.frameworkを選択し、Addをクリックする。下記画像参照。
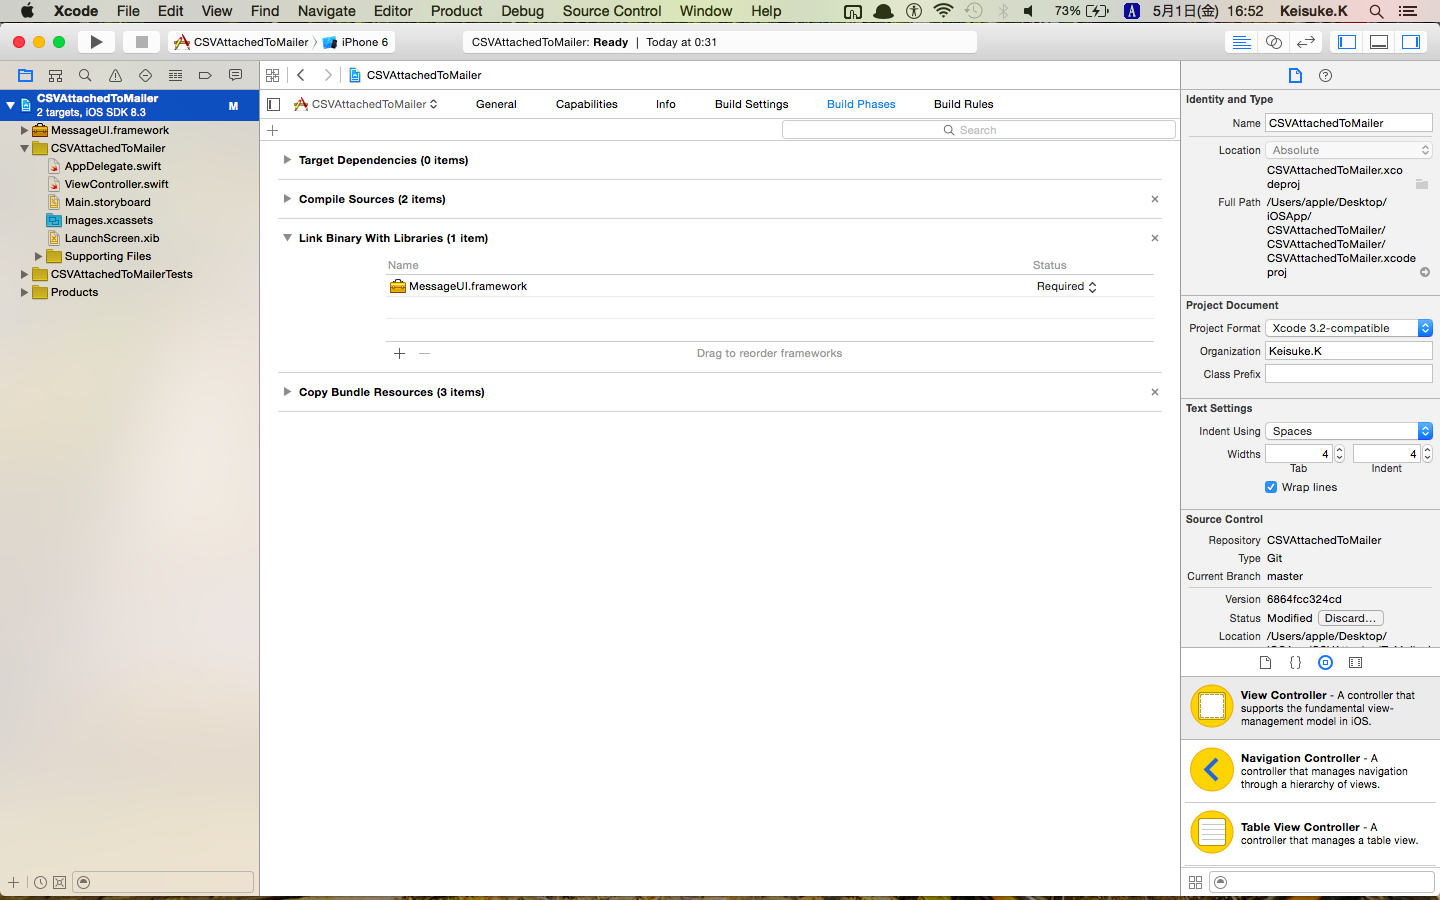
③そうすると、Link Binary with LibrariesにMessageUI.frameworkが追加されている。
下記画像参照。
2. 準備
import MessageUIを追加する。
終了処理を実装するために、MFMailComposeViewControllerDelegateを追加する。
import UIKit
import MessageUI

class ViewController: UIViewController, MFMailComposeViewControllerDelegate{

    override func viewDidLoad() {
        super.viewDidLoad()
        // Do any additional setup after loading the view, typically from a nib.
    }

    override func didReceiveMemoryWarning() {
        super.didReceiveMemoryWarning()
        // Dispose of any resources that can be recreated.
    }
}
3. ボタンをクリックしたらメーラーが起動するようにする
3-1. ボタンの作成
適当にボタンを作成します。(以下、storyboardは使用しないで作成しています)
ViewController.swiftにlet startMailerBtn = UIButton(frame: CGRectMake(0,0,200,30))を追加します。
そして、**viewDidLoad()**に以下を追加します。
startMailerBtn.layer.position = CGPoint(x:self.view.bounds.width/2,y:y:self.view.bounds.height/2);
startMailerBtn.setTitle("メール送信", forState: .Normal)
startMailerBtn.setTitleColor(UIColor.blueColor(), forState: .Normal)
startMailerBtn.addTarget(self, action: "onClickStartmailerBtn:", forControlEvents: .TouchUpInside)
self.view.addSubview(startMailerBtn)
↓全体
import UIKit
import MessageUI

class ViewController: UIViewController, MFMailComposeViewControllerDelegate{

    let startMailerBtn = UIButton(frame: CGRectMake(0,0,200,30))

    override func viewDidLoad() {
        super.viewDidLoad()
        // Do any additional setup after loading the view, typically from a nib.

        startMailerBtn.layer.position = CGPoint(x:self.view.bounds.width/2,y:y:self.view.bounds.height/2);
        startMailerBtn.setTitle("メール送信", forState: .Normal)
        startMailerBtn.setTitleColor(UIColor.blueColor(), forState: .Normal)
        startMailerBtn.addTarget(self, action: "onClickStartMailerBtn:", forControlEvents: .TouchUpInside)
        self.view.addSubview(startMailerBtn)

    }

    override func didReceiveMemoryWarning() {
        super.didReceiveMemoryWarning()
        // Dispose of any resources that can be recreated.
    }


}
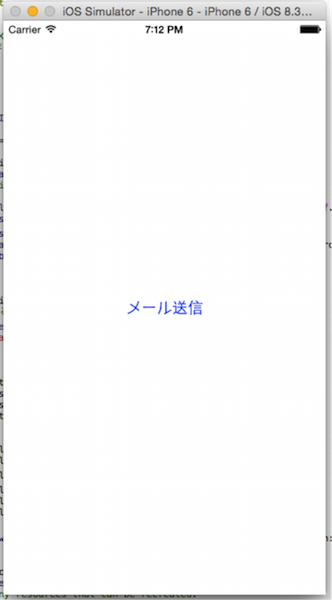
これで"メール送信"という名前のボタンを表示できました。
3-2. ボタンをクリックしたらメーラーが起動する処理
ボタンがクリックされた時の処理を追加するために、
まずViewController.swiftにonClickStartMailerBtn関数を追加します。
その中に、以下を追加します。
//メールを送信できるかチェック
if MFMailComposeViewController.canSendMail()==false {
    println("Email Send Failed")
    return
}

var mailViewController = MFMailComposeViewController()
var toRecipients = ["to@1gmail.com"] //Toのアドレス指定
var CcRecipients = ["cc@1gmail.com","Cc2@1gmail.com"] //Ccのアドレス指定
var BccRecipients = ["Bcc@1gmail.com","Bcc2@1gmail.com"] //Bccのアドレス指定

mailViewController.mailComposeDelegate = self
mailViewController.setSubject("メールの件名")
mailViewController.setToRecipients(toRecipients) //Toアドレスの表示
mailViewController.setCcRecipients(CcRecipients) //Ccアドレスの表示
mailViewController.setBccRecipients(BccRecipients) //Bccアドレスの表示
mailViewController.setMessageBody("メールの本文", isHTML: false)
self.presentViewController(mailViewController, animated: true, completion: nil)
↓全体
import UIKit
import MessageUI

class ViewController: UIViewController, MFMailComposeViewControllerDelegate{

    let startMailerBtn = UIButton(frame: CGRectMake(0,0,200,30))

    override func viewDidLoad() {
        super.viewDidLoad()
        // Do any additional setup after loading the view, typically from a nib.

        startMailerBtn.layer.position = CGPoint(x:self.view.bounds.width/2,y:self.view.bounds.height/2);
        startMailerBtn.setTitle("メール送信", forState: .Normal)
        startMailerBtn.setTitleColor(UIColor.blueColor(), forState: .Normal)
        startMailerBtn.addTarget(self, action: "onClickStartMailerBtn:", forControlEvents: .TouchUpInside)
        self.view.addSubview(startMailerBtn)

    }

    func onClickStartMailerBtn(sender: UIButton) {
        //メールを送信できるかチェック
        if MFMailComposeViewController.canSendMail()==false {
            println("Email Send Failed")
            return
        }

        var mailViewController = MFMailComposeViewController()
        var toRecipients = ["to@1gmail.com"]
        var CcRecipients = ["cc@1gmail.com","Cc2@1gmail.com"]
        var BccRecipients = ["Bcc@1gmail.com","Bcc2@1gmail.com"]


        mailViewController.mailComposeDelegate = self
        mailViewController.setSubject("メールの件名")
        mailViewController.setToRecipients(toRecipients) //Toアドレスの表示
        mailViewController.setCcRecipients(CcRecipients) //Ccアドレスの表示
        mailViewController.setBccRecipients(BccRecipients) //Bccアドレスの表示
        mailViewController.setMessageBody("メールの本文", isHTML: false)

        self.presentViewController(mailViewController, animated: true, completion: nil)
    }

    override func didReceiveMemoryWarning() {
        super.didReceiveMemoryWarning()
        // Dispose of any resources that can be recreated.
    }


}
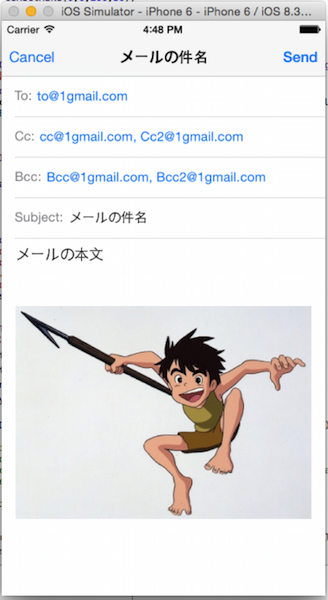
これで、ボタンを押したら以下のようにメーラーを表示させることが出来ました。

もし、
メール本文に画像を表示させたい場合は、
以下のプログラムをonClickStartMailerBtn関数に
追加してあげれば下記の画像のようにメール本文に画像を表示できます。
var image = UIImage(named: "myphoto.png")
var imageData = UIImageJPEGRepresentation(image, 1.0)
mailViewController.addAttachmentData(imageData, mimeType: "image/png", fileName: "image")
3-3. 終了処理の追加
このままだと、SendやCancelをクリックしてもメール画面が閉じないため、
以下の閉じる処理を追加する。
func mailComposeController(_ controller: MFMailComposeViewController, didFinishWith result: MFMailComposeResult, error: Error?) {
        switch result {
        case .cancelled:
            print("Email Send Cancelled")
            break
        case .saved:
            print("Email Saved as a Draft")
            break
        case .sent:
            print("Email Sent Successfully")
            break
        case .failed:
            print("Email Send Failed")
            break
        default:
            break
        }
        controller.dismiss(animated: true, completion: nil)
    }
↓全体
import UIKit
import MessageUI

class ViewController: UIViewController, MFMailComposeViewControllerDelegate{

    let startMailerBtn = UIButton(frame: CGRectMake(0,0,200,30))

    override func viewDidLoad() {
        super.viewDidLoad()
        // Do any additional setup after loading the view, typically from a nib.

        startMailerBtn.layer.position = CGPoint(x:self.view.bounds.width/2,y:self.view.bounds.height/2);
        startMailerBtn.setTitle("メール送信", forState: .Normal)
        startMailerBtn.setTitleColor(UIColor.blueColor(), forState: .Normal)
        startMailerBtn.addTarget(self, action: "onClickStartMailerBtn:", forControlEvents: .TouchUpInside)
        self.view.addSubview(startMailerBtn)

    }

    func onClickStartMailerBtn(sender: UIButton) {
        //メールを送信できるかチェック
        if MFMailComposeViewController.canSendMail()==false {
            println("Email Send Failed")
            return
        }

        var mailViewController = MFMailComposeViewController()
        var toRecipients = ["to@1gmail.com"]
        var CcRecipients = ["cc@1gmail.com","Cc2@1gmail.com"]
        var BccRecipients = ["Bcc@1gmail.com","Bcc2@1gmail.com"]


        mailViewController.mailComposeDelegate = self
        mailViewController.setSubject("メールの件名")
        mailViewController.setToRecipients(toRecipients) //宛先メールアドレスの表示
        mailViewController.setCcRecipients(CcRecipients)
        mailViewController.setBccRecipients(BccRecipients)
        mailViewController.setMessageBody("メールの本文", isHTML: false)

        self.presentViewController(mailViewController, animated: true, completion: nil)
    }

    func mailComposeController(_ controller: MFMailComposeViewController, didFinishWith result: MFMailComposeResult, error: Error?) {
        switch result {
        case .cancelled:
            print("Email Send Cancelled")
            break
        case .saved:
            print("Email Saved as a Draft")
            break
        case .sent:
            print("Email Sent Successfully")
            break
        case .failed:
            print("Email Send Failed")
            break
        default:
            break
        }
        controller.dismiss(animated: true, completion: nil)
    }

    override func didReceiveMemoryWarning() {
        super.didReceiveMemoryWarning()
        // Dispose of any resources that can be recreated.
    }

}
これで、"メール送信"ボタンをクリックしたらメーラーが起動して、
メールを送信したりメール画面を閉じたりすることが出来ました。
完成版ソースコード
https://github.com/chankei1/CSVAttachedToMailer
このリポジトリに後日csvファイルを添付できるプログラムも追加していこうと思っています。
おわりに
今回は、宛先メールアドレス・件名・本文の指定をしてメーラーを起動し、
メール本文に画像を表示させてメール送信するところまでまとめました。
後日、このメールにアプリ内で生成したCSVファイルを自動添付するやり方をまとめようと思います。
参考サイト
「MFMailComposeViewControllerでメールを送信する」
URL:http://www.mikamiz.jp/dev/iphone/a0005.html
「【swift】アプリ内でmailerを立ち上げてーバグリポート機能の実装【CoffeeNote開発記録】」
URL:http://totutotu.hatenablog.com/entry/2014/12/11/%E3%80%90swift%E3%80%91%E3%82%A2%E3%83%97%E3%83%AA%E5%86%85%E3%81%A7mailer%E3%82%92%E7%AB%8B%E3%81%A1%E4%B8%8A%E3%81%92%E3%81%A6%E3%83%BC%E3%83%90%E3%82%B0%E3%83%AA%E3%83%9D%E3%83%BC%E3%83%88%E6%A9%9F
「アプリから画像を添付してメールを送信する方法」
URL:http://www.crossbridge.biz/mfmailcomposeviewcontroller-with-image
「Stack Overflow(Failed on using Swift to implement in-app email)」
URL:http://stackoverflow.com/questions/24255270/failed-on-using-swift-to-implement-in-app-email