前提
切り替えることに関して2018/07現在、flutterは微妙です。
簡単に切り替えられる方法としてそれぞれのosで以下を追加すればいいはずですが、flutterではできません。
- BuildType (Android)
- Configurations (ios)
なぜかというとflutterコマンドのオプションには、--flavor はあるのですが、--buildtype のような指定ができません。
--release と --debug があるだけです。
なので、以下を追加することになります。
- flavor (Android)
- shcemes (ios)
これ、知っている人にはわかると思いますが、本番/ステージング/開発環境を切り替えるには使いづらいです。
まあ、仕組みがないのでやるしかありません。
Buildは以下のように指定します。
$ flutter build ios --debug --flavor dev
この記事では、flavorに以下を指定します。
開発=dev
ステージング=qa
本番=prod
ios
次からは、XCodeで作業するので開きます。
$ open ios/Runner.xcworkspace
まずは、以下を参考にSchemeを作成しましょう。

flutterで以下のコマンドを打つと何が起こるかというと
$ flutter build ios --debug --flavor dev
ConfigurationsのDebug-devが使われます。
なので、configurationsを追加します。
以下の画像のように追加します。
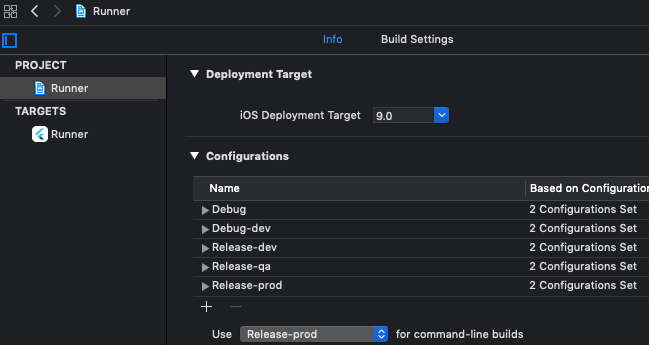
2019/1/24 上記画像を現在の構成に変更。それに伴い以下の内容を取消
ちなみにビルド時に自分はfastlaneを利用していますが、うまくできなかった部分があったのでこうしています。
ReleaseをAppstoreにしているとfastlane matchでappstore用のプロビジョニングプロファイルも見てしまい、adhocじゃないからできないというエラーが出てしまう。Release-prodだけをAppStoreにする。Releaseはqaにする。そうしないとqaにしたい場合に本番環境が作成される。
できなかったことは以上です。(flutterがconfigurationsだけでできればこんなにややこしい構成にしないで済むのですが。。)
次に、ios/Flutter/ に dev.xcconfig、qa.xcconfig、prod.xcconfig ファイルを作成して以下を記述します。
#include "Generated.xcconfig"

FLUTTER_TARGET=lib/main.dart
他にアーカイブするときにエラーが出るのでRelease.xcconfigには以下を追加します。
TRACK_WIDGET_CREATION=
次にdebugのConfigurationを追加したのでPodfileに'Debug-dev' => :debug を記述します。
project 'Runner', {
  'Debug' => :debug,
  'Debug-dev' => :debug,
  'Profile' => :release,
  'Release' => :release
}
これでそれぞれのConfigurationsを利用するときのファイルが揃いました。
flutterコマンドでbuildできるはずです。
それぞれの環境用のアプリ
別アプリ化
次は、環境ごとに別アプリとして認識させて、同じ端末に同居させたいでしょう。
その際にflutterでの注意すべきことは、Build Settings -> Product Nameは変更しないでRunnerのままにしておきます。
アプリ名をRunnerから変えたい場合は、Info.plistのCFBundleName(Bundle name)を変更するだけに留めておきます。
名前も変更できるようですが、自分の環境ではできませんでした。やってみたい方はこちらの記事を参考にすると良いと思います。ちなみに、ローカルでの環境別のアプリ化設定は先ほどの記事を参考にしました。
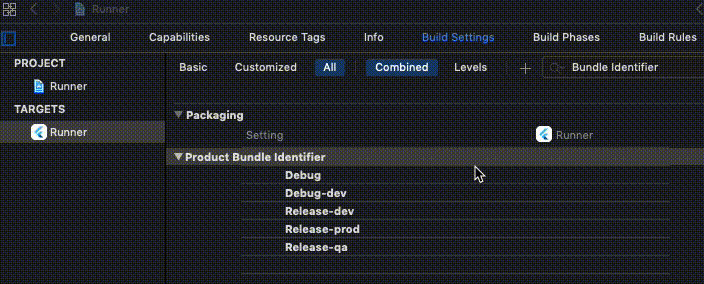
次に別アプリとしてインストールできるようにProduct Bundle Identifierを環境ごとに変えます。
環境ごとのxcconfigにPRODUCT_BUNDLE_IDENTIFIERを追記していきます。
PRODUCT_BUNDLE_IDENTIFIER=ko2ic.sample.dev
これだけだと駄目で、Build Settingsに値を削除する必要があります。
Product Bundle Identifierの値部分にカーソルを合わせてdeleteを押します。
すると~.xcconfigに記述した値が表示されます。
わかりずらいので以下を見てください。
環境ごとの設定
例えば、環境ごとに違う GoogleService-Info.plist の扱いです。
結論を言うとios開発での今まで通りのやり方で良いです。
自分の場合は、環境ごとのファイルを用意して、Build Phaseで入れる方法にしています。
具体的には、
- 以下ファイルをRunner直下におきます。
- GoogleService-Info-dev.plist
- GoogleService-Info-qa.plist
- GoogleService-Info-prod.plist
- Targets -> Build Phases で +ボタンを押下して、「New Run Script Phase」をします。

そこで以下のShellを書きます。
rm -rf "${BUILT_PRODUCTS_DIR}/${PRODUCT_NAME}.app/GoogleService-Info.plist"

echo "-----${CONFIGURATION}-----"
echo "-----${SRCROOT}-----"

if [ "${CONFIGURATION}" = "Debug" ]  || [ "${CONFIGURATION}" = "Debug-dev" ] || [ "${CONFIGURATION}" = "Release-dev" ]; then
  cp "$SRCROOT/Runner/GoogleService-Info-dev.plist" "${BUILT_PRODUCTS_DIR}/${PRODUCT_NAME}.app/GoogleService-Info.plist"
  echo "Development GoogleService-Info copied."
elif [ "${CONFIGURATION}" = "Release" ] || [ "${CONFIGURATION}" = "Debug-qa" ] || [ "${CONFIGURATION}" = "Release-qa" ]; then
  cp "$SRCROOT/Runner/GoogleService-Info-qa.plist" "${BUILT_PRODUCTS_DIR}/${PRODUCT_NAME}.app/GoogleService-Info.plist"
  echo "Integration Test GoogleService-Info copied."
elif [ "${CONFIGURATION}" = "Release-prod" ]  || [ "${CONFIGURATION}" = "Debug-prod" ]; then
  cp "$SRCROOT/Runner/GoogleService-Info-pro.plist" "${BUILT_PRODUCTS_DIR}/${PRODUCT_NAME}.app/GoogleService-Info.plist"
  echo "Production GoogleService-Info copied."
fi
Provisioning Profile
ちなみに自分の場合は、証明書やProvisioninig Profileの取得はfastlaneで以下のように行なっています。
  lane :load_certificates do
    match(type: "development", app_identifier: ["ko2ic.sample.dev"], readonly: true)
    match(type: "development", app_identifier: ["ko2ic.sample.qa"], readonly: true)
    match(type: "adhoc", app_identifier: ["ko2ic.sample.qa","ko2ic.sample"], readonly: true)
    match(type: "appstore", app_identifier: "ko2ic.sample", readonly: true)
  end
ビルド
XCodeの場合
例えば、qaバージョンで動作させたい場合は、flutterはReleaseは実機だけと動作するので、実機に繋げます。
その後、SchemeのBuild Configurationを対象のものに変えます。
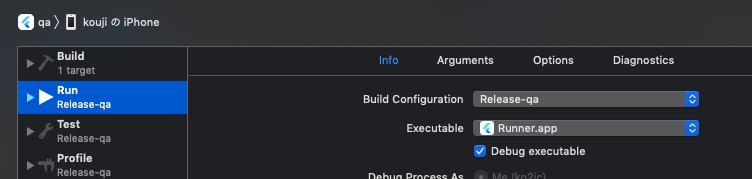
Runnerの「Targets」 -> General -> Signing(Release-qa) が、「Development ko2ic.sample.qa」になっていれば実機でビルドできます。
(Fabricなどで配信したい場合はAdHoc)
コマンドの場合
ステップが二つ必要です。
まず、以下のようにコマンドを叩いておく必要があります。
$ flutter build ios --release --no-codesign --flavor prod
その後、通常のios開発のようにビルドするだけです。
例えば、fastlaneを使って入れば、以下のように書けば良いでしょう。
これでipaファイルが出来上がります。
Fastfile
・・・
    gym(
      configuration: configuration,
      scheme: scheme,
      export_method: export_method,
      output_name: file_name,
      export_options: {
          provisioningProfiles: {
                app_identifier => "#{provisioning_profile_name} #{app_identifier}"
          }
      }
    )
・・・
Android
まずは、debug用とrelease用のkeystoreを用意して設定を書いておきましょう。(keystoreの作成は割愛)
    signingConfigs {
        develop {
            storePassword "fuga"
            keyAlias "sampleDebug"
            keyPassword "fugafuga"
            storeFile file("../debug.keystore")
        }
        release {
            storePassword "hoge"
            keyAlias "sampleRelease"
            keyPassword "hogehoge"
            storeFile file("../release.keystore")
        }
    }

     defaultConfig {
         applicationId "ko2ic.sample"
         ・・・
         signingConfig signingConfigs.develop
     }

    buildTypes {
        release {
            signingConfig signingConfigs.release
            debuggable false
            minifyEnabled true
            useProguard true
            proguardFiles getDefaultProguardFile('proguard-android-optimize.txt'), 'proguard-rules.pro'
        }
    }
それぞれの環境用のアプリ
別アプリ化
次は、productFlavorsです。
    flavorDimensions "default"

    productFlavors {
        dev {
            dimension "default"
            applicationIdSuffix ".dev"
            versionNameSuffix ".dev"
        }
        qa {
            dimension "default"
            applicationIdSuffix ".qa"
            versionNameSuffix ".qa"
        }
        prod {
            dimension "default"
        }
    }
Androidはこれだけでそれぞれ別アプリとしてできます。
環境ごとの設定
ios同様にgoogle-services.jsonの扱いです。
これも、普通のAndroid開発と同じでそれぞれのディレクトリに用意すれば良いでしょう。
- android/app/src/dev/google-services.json
- android/app/src/qa/google-services.json
- android/app/src/prod/google-services.json
ビルド
androidの場合は、以下コマンドだけでapkが作成されます。
$ flutter build apk --release --flavor prod