6月に長野県伊那市で開催された、 伊那市 LoRaWAN ハッカソン にて、LINE Messaging APIを活用したチームがあり、面白そうだなぁということで、主催者のウフルさんが提供している「enebular」でLINE Messaging APIを利用してみました。
第2回のハッカソンも参加者募集中!残り枠僅かです。(8/17現在)
第2回 伊那市 LoRaWAN ハッカソン
おことわり
以下については、説明を割愛します。
LINE Messaging APIの登録
以下のサイトを参考にLINE Messaging APIの登録を行いました。
Node-REDでLINE-Botへのメッセージを受ける
わずか5分。新LINE Messaging APIでbotを作ってみた手順全公開
LINE Messaging APIを使用したLINE Botの作り方
LINE Developerの設定については、本記事にて説明します。
enebularの登録
enebular公式サイトの「無料サインアップ」から登録してください。
https://enebular.com/
また使い方については、デベロッパーサイトをご覧ください。
https://enebular.com/developers/
1. enebularプロジェクトの作成
Get Startedを参考にプロジェクトを作成し、Flowエディター(Node-RED)を開きます。
https://enebular.com/developers/getstarted
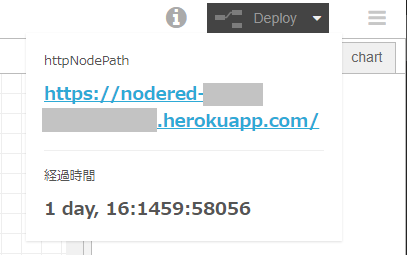
この際、Flowエディターの右上にある"i"のアイコンを選択し、デプロイ先のURL(herokuapp.com)をコピーします。
2. LINE Developerの設定
コピーしたURLをLINE Developerの Webhook URL に貼り付け、URLの後ろに /line と入力します。
あと、 Channel Access Token も控えておきます。
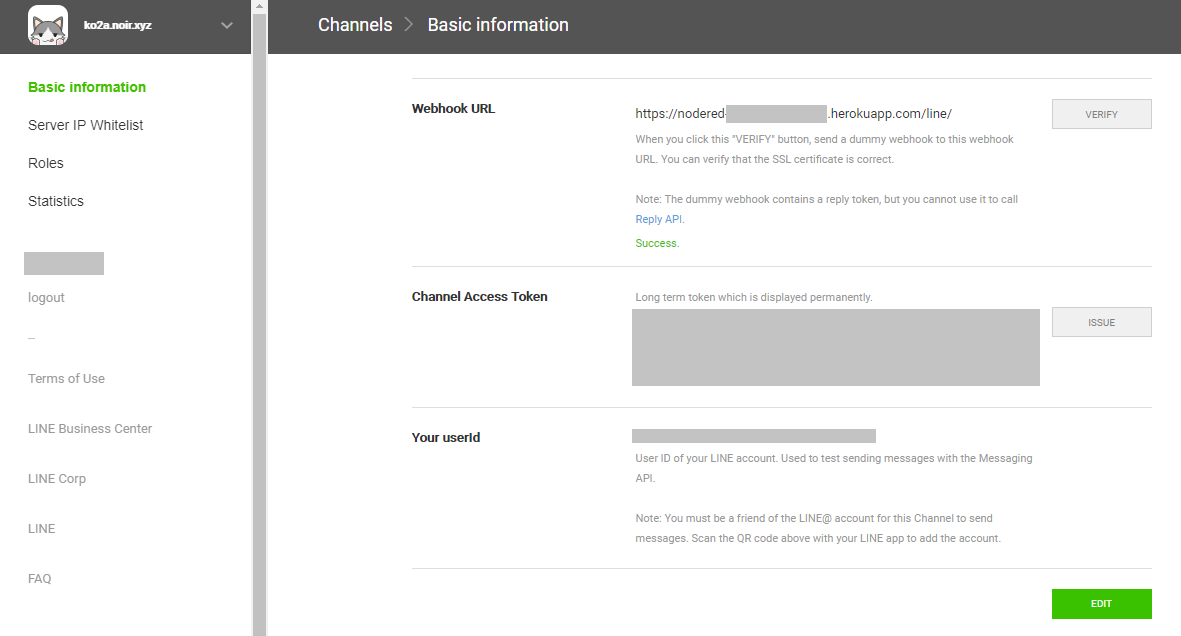
※値を変更する場合は、右下の「EDIT」を押すと編集画面になります。
3. Reply Message
3.1. enebularのFlow編集
こんな感じでFlowを並べます。
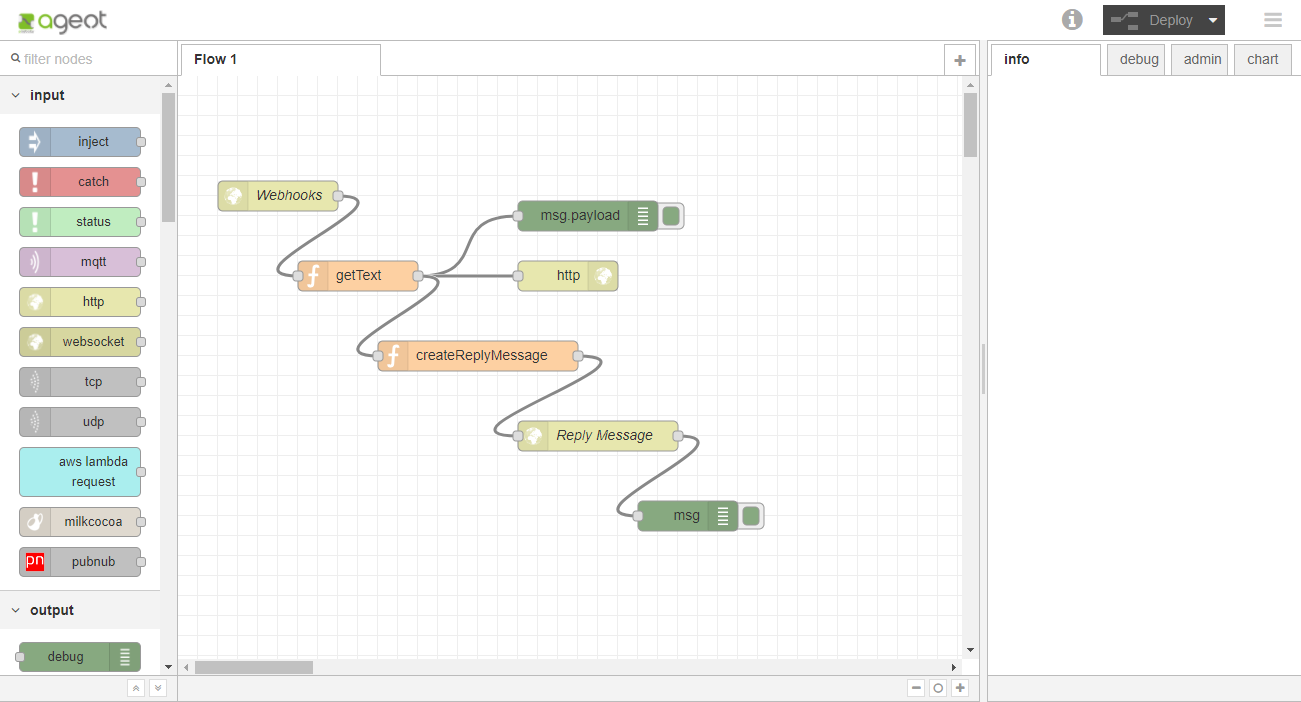
Node-REDのExportデータ
[{"id":"6a95985.59a4c68","type":"http in","z":"30d6e305.177a2c","name":"Webhooks","url":"/line","method":"post","swaggerDoc":"","x":100,"y":120,"wires":[["4eaed8ec.899898"]]},{"id":"4eaed8ec.899898","type":"function","z":"30d6e305.177a2c","name":"getText","func":"\nreturn msg;","outputs":1,"noerr":0,"x":180,"y":200,"wires":[["22a88006.1341a","d725eb8b.8a5338","89c17f59.9c48e"]]},{"id":"22a88006.1341a","type":"debug","z":"30d6e305.177a2c","name":"","active":true,"console":"false","complete":"false","x":410,"y":140,"wires":[]},{"id":"d725eb8b.8a5338","type":"http response","z":"30d6e305.177a2c","name":"","x":390,"y":200,"wires":[]},{"id":"16041714.4e2379","type":"http request","z":"30d6e305.177a2c","name":"Reply Message","method":"POST","ret":"obj","url":"https://api.line.me/v2/bot/message/reply","x":420,"y":360,"wires":[["7da1f110.9cc24"]]},{"id":"89c17f59.9c48e","type":"function","z":"30d6e305.177a2c","name":"createReplyMessage","func":"var post_request = {\n \"headers\": {\n \"content-type\": \"application/json; charset=UTF-8\",\n \"Authorization\": \" Bearer \" + \"{Channel Access Token!}\"\n },\n \"payload\": {\n \"replyToken\": msg.payload.events[0].replyToken,\n \"messages\": [\n {\n \"type\": \"text\",\n \"text\": msg.payload.events[0].message.text + \"ฅ(・ω・ฅ)\"\n }\n ]\n }\n};\n\nreturn post_request;","outputs":1,"noerr":0,"x":300,"y":280,"wires":[["16041714.4e2379"]]},{"id":"7da1f110.9cc24","type":"debug","z":"30d6e305.177a2c","name":"","active":true,"console":"false","complete":"true","x":510,"y":440,"wires":[]}]
createReplyMessageの中身はこんな感じです。
{Channel Access Token!} の箇所は各自のChannel Access Tokenの値をコピペしてください。
var post_request = {
    "headers": {
        "content-type": "application/json; charset=UTF-8",
        "Authorization": " Bearer " + "{Channel Access Token!}"
    },
    "payload": {
        "replyToken": msg.payload.events[0].replyToken,
        "messages": [
            {
                "type": "text",
                "text": msg.payload.events[0].message.text + "ฅ(・ω・ฅ)"
            }
        ]
    }
};

return post_request;
設定が終わったら、Flowエディター右上の「Deploy」を押してデプロイします。
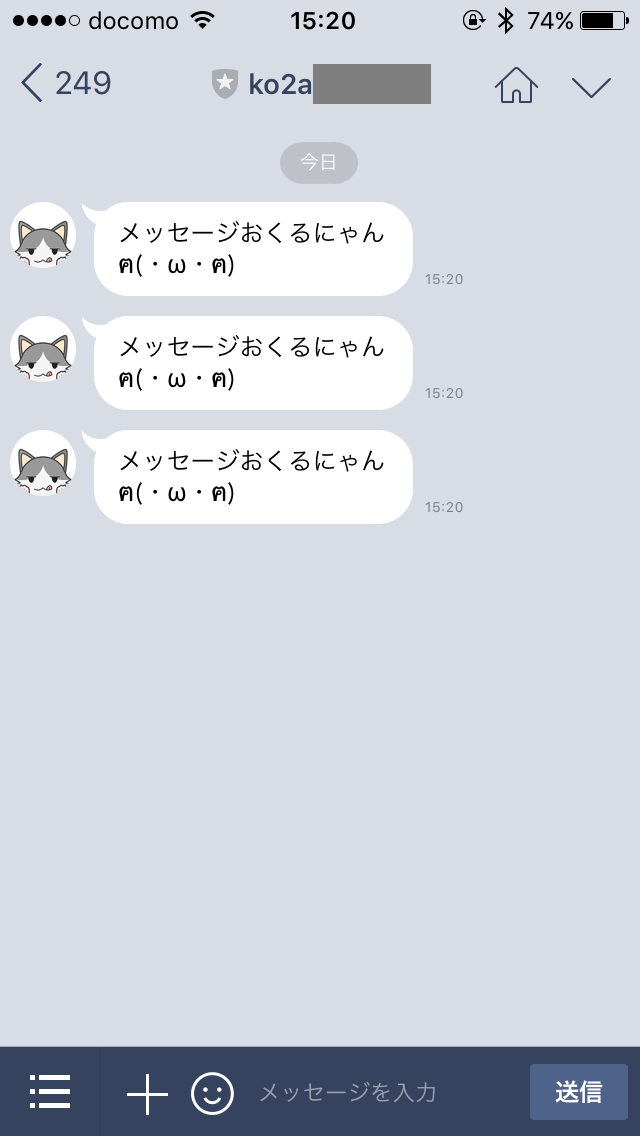
3.2. 実行結果

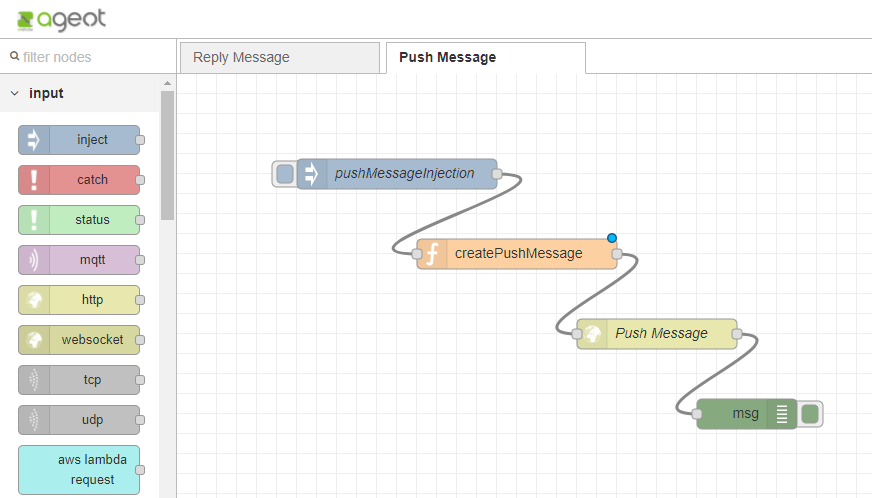
4. Push Message
4.1. enebularのFlow編集
Flowを並べます。
Node-REDのExportデータ
[{"id":"2bc64371.37505c","type":"inject","z":"e5cbd72f.e51038","name":"pushMessageInjection","topic":"","payload":"メッセージおくるにゃん","payloadType":"str","repeat":"","crontab":"","once":false,"x":220,"y":100,"wires":[["21ca9f84.4b5f3"]]},{"id":"21ca9f84.4b5f3","type":"function","z":"e5cbd72f.e51038","name":"createPushMessage","func":"var post_request = {\n \"headers\": {\n \"content-type\": \"application/json; charset=UTF-8\",\n \"Authorization\": \" Bearer \" + \"{Channel Access Token!}\"\n },\n \"payload\": {\n \"to\": \"{UserId}\",\n \"messages\": [\n {\n \"type\": \"text\",\n \"text\": msg.payload + \"ฅ(・ω・ฅ)\"\n }\n ]\n }\n};\n\nreturn post_request;","outputs":1,"noerr":0,"x":340,"y":180,"wires":[["ea9f5002.788c9"]]},{"id":"ea9f5002.788c9","type":"http request","z":"e5cbd72f.e51038","name":"Push Message","method":"POST","ret":"txt","url":"https://api.line.me/v2/bot/message/push","x":480,"y":260,"wires":[["258b38b7.d8ea18"]]},{"id":"258b38b7.d8ea18","type":"debug","z":"e5cbd72f.e51038","name":"","active":true,"console":"false","complete":"true","x":570,"y":340,"wires":[]}]
createPushMessageの中身はこんな感じです。
{Channel Access Token!} の箇所は各自のChannel Access Tokenの値をコピペしてください。
{UserId} の箇所は、メッセージを送る宛先(ユーザーID)を指定します。
※Reply Messageでデバッグ情報を見ると UserId という項目があります。
var post_request = {
    "headers": {
        "content-type": "application/json; charset=UTF-8",
        "Authorization": " Bearer " + "{Channel Access Token!}"
    },
    "payload": {
        "to": "{UserId}",
        "messages": [
            {
                "type": "text",
                "text": msg.payload + "ฅ(・ω・ฅ)"
            }
        ]
    }
};

return post_request;
設定が終わったら、Flowエディター右上の「Deploy」を押してデプロイします。
4.2. 実行結果