前回はvagrant-kvmのセットアップ方法を書きましたが、vagrant-kvmでWindowsを使ってみたいと思ったので、試してみました。
Windowsを作ったり壊したりできて便利になりましたが、KVMの場合少しステップが必要なので忘れないように。
環境
- ホストOS
- Ubuntu 14.04
- ゲストOS
- Windows 7
- KVM
- virsh 1.2.2
- Vagrant 1.6.5
- vagrant-kvm 0.1.9
前提条件
- 上記環境(他の環境では試してません)
- ホスト上でKVMのセットアップは完了している
- vagrant-kvmのセットアップは完了している。
参考
構築方法
Boxの作成
Vagrant Cloud上にWindowsのBoxを提供してくれている方がいるので、以下から適当なものを見つけてきます。
https://vagrantcloud.com/search?utf8=%E2%9C%93&sort=&provider=&q=windows
Windows 7を使いたかったので評価版のWinodws 7をインストールします。今回はlmayorga1980/windows7-sp1を利用させていただきます。
ここで、通常であれば以下のようにboxにaddします。
$ vagrant box add lmayorga1980/windows7-sp1
==> box: Loading metadata for box 'lmayorga1980/windows7-sp1'
    box: URL: https://vagrantcloud.com/lmayorga1980/windows7-sp1
This box can work with multiple providers! The providers that it
can work with are listed below. Please review the list and choose
the provider you will be working with.

1) virtualbox
2) vmware_desktop

Enter your choice: 1
==> box: Adding box 'lmayorga1980/windows7-sp1' (v0.1.0) for provider: virtualbox
    box: Downloading: https://vagrantcloud.com/lmayorga1980/boxes/windows7-sp1/versions/1/providers/virtualbox.box
==> box: Successfully added box 'lmayorga1980/windows7-sp1' (v0.1.0) for 'virtualbox'!
しかし、こうした場合vagrant mutateで以下のように怒られてしまいました。
$ vagrant mutate lmayorga1980/windows7-sp1 kvm
Vagrant-mutate can not download from Vagrant Cloud for you.
boxを変換して欲しいだけなのですが、Vagrant Cloudを見に行ってしまっているようです。
box名を変更したりしてもうまく行かなかったので、今回はとりあえずURLでboxにaddすることで回避しました。
上記のコンソール上にあるように、boxの実体は(https://vagrantcloud.com/lmayorga1980/boxes/windows7-sp1/versions/1/providers/virtualbox.box) のようなので、これをURLに指定してboxに追加します。
$ vagrant box add win7sp1 https://vagrantcloud.com/lmayorga1980/boxes/windows7-sp1/versions/1/providers/virtualbox.box
$ vagrant box list
win7sp1     (virtualbox, 0)
無事にboxに追加されました。
Boxの変換
先ほどの名前でmutateを実行します。
$ vagrant mutate win7sp1 kvm
$ vagrant box list
win7sp1     (kvm, 0)
win7sp1     (virtualbox, 0)
無事にkvmのboxが追加されていたら、あとは起動します。
Windowsの起動
普通にvagrant upすれば起動するのですが、timeoutするかもしれません。
この場合は、virt-managerなどの画面からVNCで掴めば正常に起動していることがわかると思います。
$ vagrant init win7sp1
$ vagrant up --provider=kvm
$ vagrant up --provider=kvm
Bringing machine 'default' up with 'kvm' provider...
==> default: Booting VM...
==> default: Waiting for machine to boot. This may take a few minutes...
    default: SSH address: 192.168.123.131:22
    default: SSH username: vagrant
    default: SSH auth method: private key
    default: Warning: Host unreachable. Retrying...
    default: Warning: Host unreachable. Retrying...
    (中略)
    default: Warning: Host unreachable. Retrying...
    default: Warning: Host unreachable. Retrying...
Timed out while waiting for the machine to boot. This means that
Vagrant was unable to communicate with the guest machine within
the configured ("config.vm.boot_timeout" value) time period.

If you look above, you should be able to see the error(s) that
Vagrant had when attempting to connect to the machine. These errors
are usually good hints as to what may be wrong.

If you're using a custom box, make sure that networking is properly
working and you're able to connect to the machine. It is a common
problem that networking isn't setup properly in these boxes.
Verify that authentication configurations are also setup properly,
as well.

If the box appears to be booting properly, you may want to increase
the timeout ("config.vm.boot_timeout") value.
実はこのままではネットワークが使えません。
VirtIOのドライバをインストール
上のままだとネットワークデバイスがVirtIOに指定されて起動しているのですが、ドライバが入っていないためデバイスが認識されず、インターネットに繋がりません。
そこで、VirtIOをインストールします。
以下のサイトから最新のvirioのisoを落とします。
http://alt.fedoraproject.org/pub/alt/virtio-win/latest/images/
現在はvirtio-win-0.1-81.isoでしたので、それをホストにダウンロードします。
$ wget http://alt.fedoraproject.org/pub/alt/virtio-win/latest/images/virtio-win-0.1-81.iso
次にこれらのisoをWindowsに認識させるのですが、起動しているとCDROM等のデバイスを追加できないので先にWindowsを終了します。
$ vagrant halt
Windowsが終了したら、virt-managerを開き、+Add Hardwareを押します。
開いたらStorageを押し、Device typeをIDE CDROMにし、Select managed or other existing storageを押し、先ほど落としたisoを指定します。
<br>
ト 2014-10-10 16.34.49.png](https://qiita-user-contents.imgix.net/https%3A%2F%2Fqiita-image-store.s3.amazonaws.com%2F0%2F56222%2F15b0c2e4-256d-e8f3-eabf-30c8ed15a909.png?ixlib=rb-4.0.0&auto=format&gif-q=60&q=75&s=8c6ee7833bc39ed529d767eb28f27a0b)
Finishを押したあとWindowsを起動します。
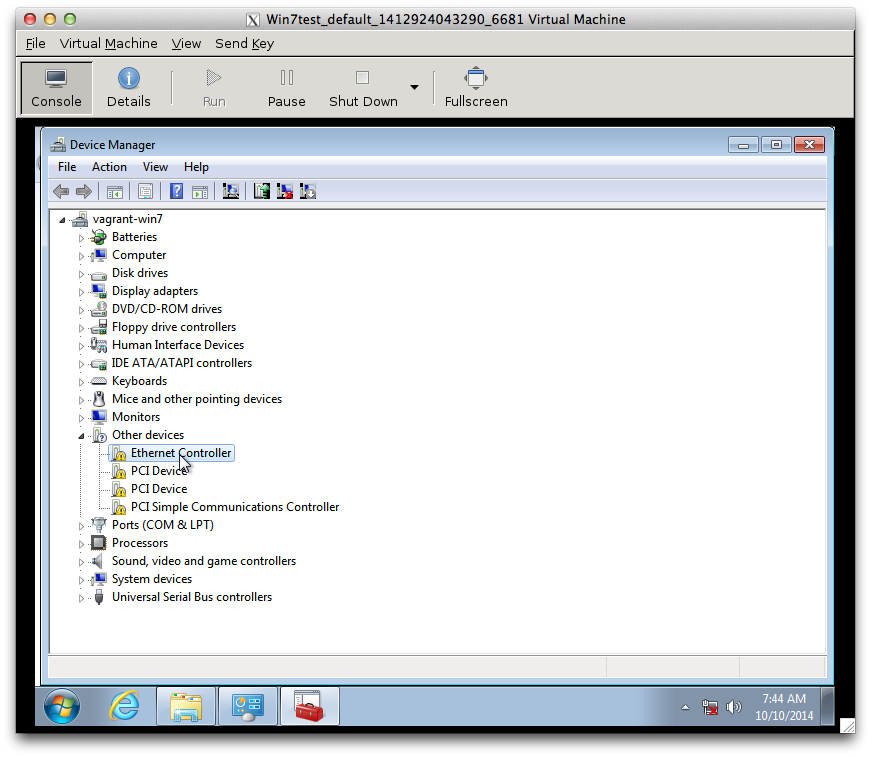
Windowsが起動したら「Control Panel」から「Device Manager」を起動します。
すると、「Other devices」のところに「Ethernet Controller」があると思います。
「Other devices」は日本語版だと「不明なデバイス」なので、ネットワークデバイスが正しく認識されていないことが分かります。

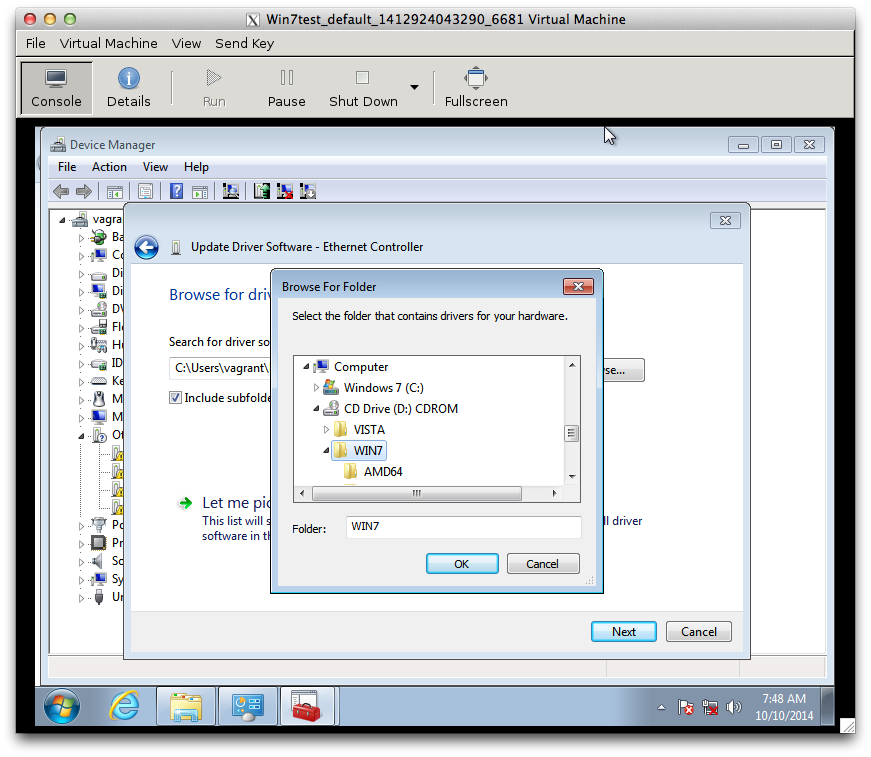
ここをクリックして上の「Update Driver Software」を押します。
「Browse my computer for driver software」を押してCDROMからWIN7を選択します。

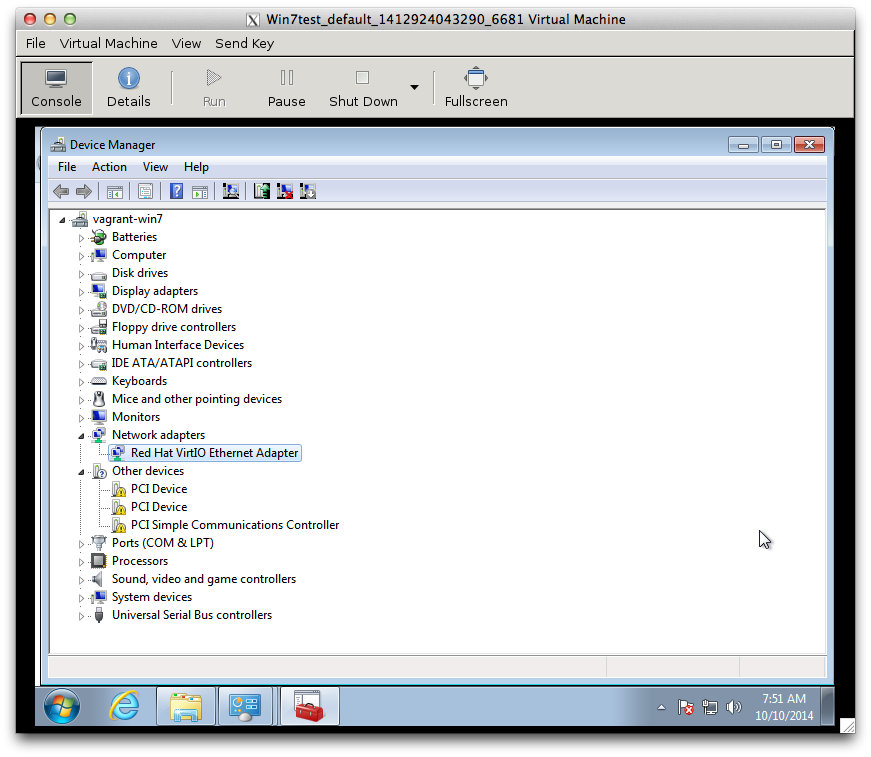
無事インストールが完了すると、下のように「Network adapters」に「Red Hat VirtIO Ethernet Adapter」が追加されます。
これでインターネットに繋がるようになるはずです。
少し面倒ですが、一度覚えればそのあと楽になるのでオススメです。
