euslispとは
euslispとはロボットプログラミングに特化したlispライクの処理系のことです。保守管理は東京大学の研究室で行われています。ROSと組み合わせることでいろいろなことができます。
euslispで7DOFロボットアーム
ロボットアームのリンクのオブジェクトを作る
euslispの処理系がインストールされていることを前提にして話をすすめます。
インストール方法に関しての詳しい情報はeuslisp tutorialをどうぞ。
コマンドライン上で下記のようにコマンドを打つとirteusglというインタプリタが起動します。
$ irteusgl
EusLisp 9.16( 1.0.11) for Linux64 created on host04.storm.ros.org(Wed Nov 11 00:20:12 UTC 2015)
1.irteusgl$
インタプリタ上で10x10x20のリンクのオブジェクトaをつくってみる
1.irteusgl$ (setq a (make-cube 10 10 20))
# <body #X52409d8 (:a 10.0 10.0 20.0) 0.0 0.0 0.0 / 0.0 0.0 0.0>
2.irteusgl$ (objects (list a))
;; (make-irtviewer) executed
(#<body #X52409d8 (:a 10.0 10.0 20.0) 0.0 0.0 0.0 / 0.0 0.0 0.0>)
3.irteusgl$
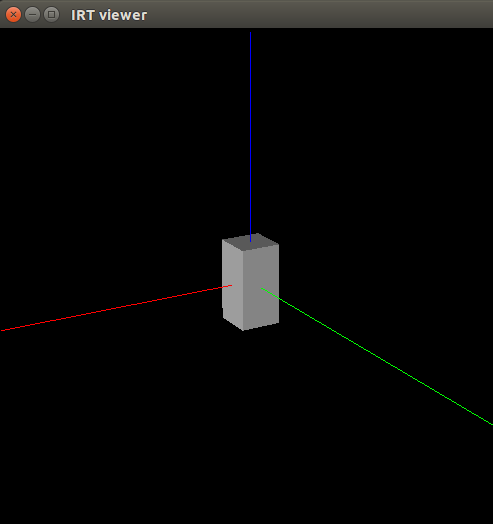
するとこのような直方体が表示されます。
これをつなげていけばロボットアームのリンクをつくることができます。
見やすいようにリンクのオブジェクトに色をつける
3.irteusgl$ (send a :set-color :red)
# f(0.996094 0.0 0.0)
4.E1-irteusgl$ (send *irtviewer* :draw-objects)
1
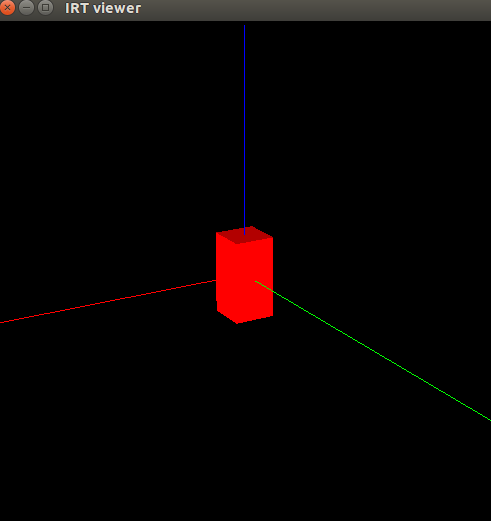
最初のコマンドでリンクのオブジェクトaの色を設定しており、次のコマンドでirtviewerを更新します。
これでリンクのオブジェクトaは赤色になります。
リンクのオブジェクトをリンクとして設定する
(setq l1 (instance bodyset-link :init (make-cascoords) :bodies (list a) :name 'l1))
上記のコードでリンクのオブジェクトaをリンクとして設定する。これによってただのオブジェクトから自分の座標系をもったリンクl1へと変わる。
リンクとリンクをつなぐ関節をつくる
上記の方法でリンクl1とリンクl2をつくる。
次にリンクl1とリンクl2をつなぐ関節j1を設定します。
(send l1 :assoc l2)
(setq j1 (instance rotational-joint :init :name 'j1 :parent-link l1 :child-link l2 :axis :x :min -100 :max 100))
上のコードではl1が親リンク、l2が子リンク、関節の回転軸のベクトルはx方向、関節の可動範囲は-100[degree] ~ 100[degree]と設定できる。
7DOFロボットアームをつくる
今まで解説したことをコツコツ繰り返していけばロボットアームができます。
7DOFのロボットアームということで8リンクを7関節でつなげればいいことがわかります。
# !/usr/bin/env irteusgl

(defclass 7dof-robot
  :super cascaded-link
  :slots (end-coords l1 l2 l3 l4 l5 l6 l7 l8 j1 j2 j3 j4 j5 j6 j7))

(defmethod 7dof-robot
  (:init ()
    (let (b)
      (send-super :init)
      ;; l8
      (setq b (make-cube 10 10 20))
      (send b :locate #f(0 0 10))
      (send b :set-color :red)
      (setq l8 (instance bodyset-link :init (make-cascoords) :bodies (list b) :name 'l8))
      (setq end-coords (make-cascoords :pos #f(0 0 20)))
      (send l8 :assoc end-coords)
      (send l8 :locate #f(0 0 4))
      ;;l7 j7
      (setq b (make-cube 10 10 4))
      (send b :locate #f(0 0 2))
      (send b :set-color :red)
      (setq l7 (instance bodyset-link :init (make-cascoords) :bodies (list b) :name 'l7))
      (send l7 :assoc l8)
      (send l7 :locate #f(0 0 4))
       ;;l6 j6
      (setq b (make-cube 10 10 4))
      (send b :locate #f(0 0 2))
      (send b :set-color :red)
      (setq l6 (instance bodyset-link :init (make-cascoords) :bodies (list b) :name 'l6))
      (send l6 :assoc l7)
      (send l6 :locate #f(0 0 100))
      ;;l5 j5
      (setq b (make-cube 10 10 100))
      (send b :locate #f(0 0 50))
      (send b :set-color :green)
      (setq l5 (instance bodyset-link :init (make-cascoords) :bodies (list b) :name 'l5))
      (send l5 :assoc l6)
      (send l5 :locate #f(0 0 100))
       ;;l4 j4
      (setq b (make-cube 10 10 100))
      (send b :locate #f(0 0 50))
      (send b :set-color :blue)
      (setq l4 (instance bodyset-link :init (make-cascoords) :bodies (list b) :name 'l4))
      (send l4 :assoc l5)
      (send l4 :locate #f(0 0 4))
      ;; l3 j3
      (setq b (make-cube 10 10 4))
      (send b :locate #f(0 0 2))
      (send b :set-color :blue)
      (setq l3 (instance bodyset-link :init (make-cascoords) :bodies (list b) :name 'l3))
      (send l3 :assoc l4)
      (send l3 :locate #f(0 0 4))
      ;; l2 j2
      (setq b (make-cube 10 10 4))
      (send b :locate #f(0 0 2))
      (send b :set-color :blue)
      (setq l2 (instance bodyset-link :init (make-cascoords) :bodies (list b) :name 'l2))
      (send l2 :assoc l3)
      (send l2 :locate #f(0 0 20))
      ;; l1 j1
      (setq b (body+ (make-cube 10 10 20 :pos #f(0 0 10)) (make-cube 300 300 2)))
      (send b :set-color :white)
      (setq l1 (instance bodyset-link :init (make-cascoords) :bodies (list b) :name 'l1))
      (send l1 :assoc l2)
      ;; joints
      (setq j1 (instance rotational-joint :init :name 'j1 :parent-link l1 :child-link l2 :axis :x :min -100 :max 100)
            j2 (instance rotational-joint :init :name 'j2 :parent-link l2 :child-link l3 :axis :y :min -60 :max 100)
            j3 (instance rotational-joint :init :name 'j3 :parent-link l3 :child-link l4 :axis :z :min -180 :max 180)
            j4 (instance rotational-joint :init :name 'j4 :parent-link l4 :child-link l5 :axis :y :min -10 :max 120)
            j5 (instance rotational-joint :init :name 'j5 :parent-link l5 :child-link l6 :axis :z :min -180 :max 100)
            j6 (instance rotational-joint :init :name 'j6 :parent-link l6 :child-link l7 :axis :x :min -10 :max 90)
            j7 (instance rotational-joint :init :name 'j7 :parent-link l7 :child-link l8 :axis :y :min -100 :max 100)
               )
      (setq links (list l1 l2 l3 l4 l5 l6 l7 l8))
      (setq joint-list (list j1 j2 j3 j4 j5 j6 j7))
      (send self :init-ending)
      self))
  (:end-coords (&rest args) (forward-message-to end-coords args))
  )

(setq r (instance 7dof-robot :init))
(objects (list r (send r :end-coords)))
(send *irtviewer* :draw-objects)
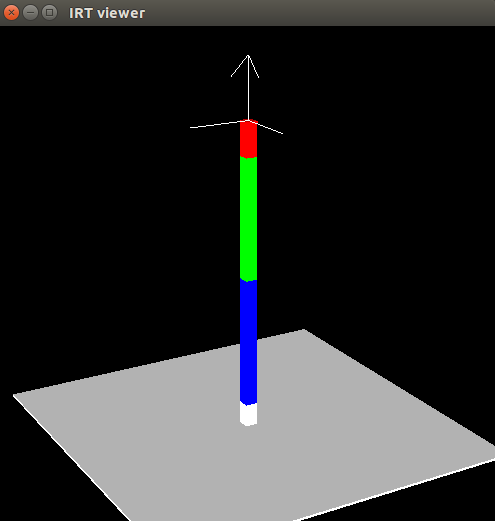
上のサンプルコードでは手先から順にl8, l7 ,l6 ,,, l1と作っていき、それぞれの間の関節をj7, j6,j5,,, j1と設定してきます。
クラス7dof-robotはcascaded-linkを継承することでロボットアームをこのように簡単に記述することができます。
end-coordsは手先の座標系(irtviewerに表示されている)のことで、この座標系をロボットアームを持って行きたい目標の座標をいれればよい。動かし方に関しては次の項で説明します。
ロボットアームを動かしてみる
(setq c (make-cascoords :pos #f(150 0 0) :rpy (float-vector 0 pi 0)))
(send r :inverse-kinematics c :link-list (send r :link-list (send r :end-coords :parent)) :move-target (send r :end-coords) :translation-axis t :rotation-axis t)
(send *irtviewer* :draw-objects)
一行目では手先座標系の目的の座標系をワールド座標系で設定します。posはXYZ位置を指定しています。rpyでZ-Y-Xオイラー角記述で姿勢を指定しています。
(send r :inverse-kinematics c :link-list (send r :link-list (send r :end-coords :parent)) :move-target (send r :end-coords) :translation-axis t :rotation-axis t)
次に逆運動学をeuslispに解いてもらいます。逆運動学が解けないような目標座標を設定するとエラーを返してくれます。
translation-axisをtにすることで与えられた位置で解を求めており、rotation-axisをtにすることで与えられた姿勢で解を求めています。この部分の制約を弱くすることで解を得やすくなります。
そして最後に三行目でirtviewerを更新します。
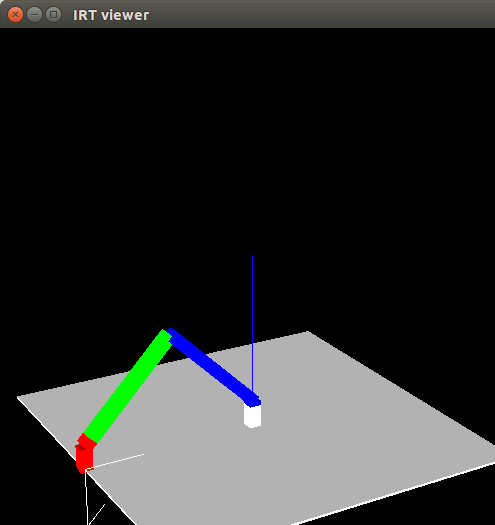
このように目的の座標系に手先を移動することが出来ました。
このときの各関節をの角度はangle-vectorを用いて得ることができます。
1.E1-irteusgl$ (send r :angle-vector)
nil
1.E1-irteusgl$ #f(0.877831 45.3083 0.046079 90.2944 -0.612726 0.67484 44.3992)
最後に
euslispでモデルをつくってロボットアームを作ってみましたが、すでに開発されているロボットモデルを使うことによって面白いロボットプログラミングができそうです。