2021/01/27現在編集中
Storyboardの削除
Storyboardはぱっと見わかりやすくて最高だとおもっていたのですが,画面が増えるにつれ重くなっていったり,いろいろなプロパティを直接Storyboardに記述することになるので後々修正が大変だったりします.なので今回はStoryboardを使わずコードとxibで作っていきます.
ということで
💡Main.storyboard はいらないので削除
💡General -> Deployment Info -> Main Interface のMainという文字列を消して空欄に
💡Info.plistのApplication Scene Manifest -> Scene Configuration -> Application Session Role -> Item -> Storyboard Name を➕➖の➖を押して削除
を行います.
▽参考文献
【Swift4】アプリの初回起動画面を storyboard ではなく xib にする
アプリ初回起動
まずアプリを立ち上げた時にユーザ登録画面に行くのかログイン画面に行くのかを分岐させます.
最初に必ずAppDelegate/SceneDelegateが呼ばれるので,そこでまずRoutingViewControllerに移動します.
今回はターゲットをiOS13以上にしたためSceneDelegateに書いていきます.
import UIKit

class SceneDelegate: UIResponder, UIWindowSceneDelegate {

    var window: UIWindow?


    func scene(_ scene: UIScene, willConnectTo session: UISceneSession, options connectionOptions: UIScene.ConnectionOptions) {
        // Use this method to optionally configure and attach the UIWindow `window` to the provided UIWindowScene `scene`.
        // If using a storyboard, the `window` property will automatically be initialized and attached to the scene.
        // This delegate does not imply the connecting scene or session are new (see `application:configurationForConnectingSceneSession` instead).
        guard let _ = (scene as? UIWindowScene) else { return }

        // RoutingViewController呼び出し
        if let windowScene = scene as? UIWindowScene {
            let window = UIWindow(windowScene: windowScene)
            window.rootViewController = UINavigationController(rootViewController: RoutingViewController.init())
            self.window = window
            window.makeKeyAndVisible()
        }
    }
以下略(変更なし)
ここでUINavigationControllerを設定することで今後画面遷移が楽チンにできるようになります!
ユーザ登録画面へ
そのRoutingViewControllerでユーザ登録画面かログイン画面かの分岐させます.今回はユーザ登録画面から作るのでひとまずユーザ登録画面に遷移するように,openLaunchScreen関数の引数に.registrationを指定しています.
import Foundation
import RxSwift

final class RoutingViewController: UIViewController {

    override func viewDidLoad() {
        // ひとまず必ずユーザ登録画面に遷移するように
        self.openLaunchScreen(launchScrenType: .registration)
    }
}

extension RoutingViewController {
    private func openLaunchScreen(launchScrenType: LaunchScreenType) {
        switch launchScrenType {
        case .login:
            // ログイン画面へ移動
            break
        case .registration:
            // ユーザ登録画面へ移動
            RegistrationViewController.start(self)
            break
        }
    }
}
ユーザ登録画面の作成
ユーザ登録画面を作ります.
新規ファイル作成からxibファイルとViewControllerを作成します.今回はRegistrationViewController.swiftとRegistrationView.xibという名前にしました.
xibとViewControllerの接続
まず最初にRegistrationViewとRegistrationVCがOutlet接続したりできるようにClassに登録します.xibを開いた時のClassのところにRegistrationViewControllerと入力します.

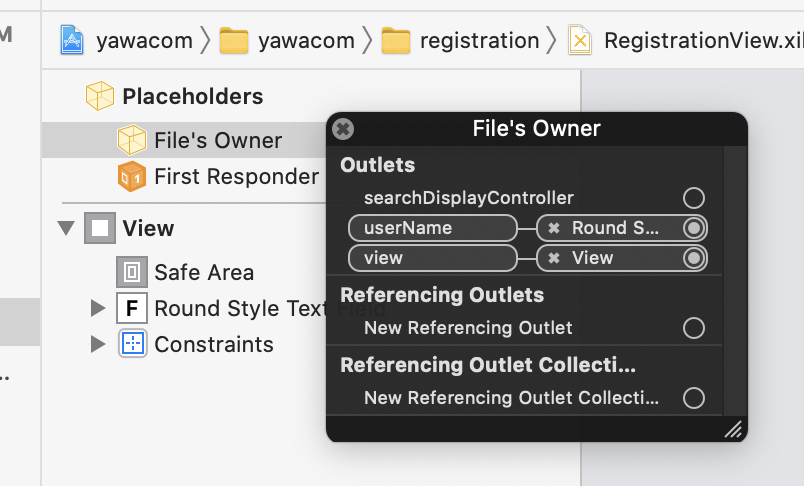
次にFile's OwnerとViewを紐付けます.Outlet接続する感じでFile's OwnerからViewに青線を持ってくると結べます.写真のview-Viewのようにつながってたらできてます!

とりあえずtextboxを置いてみる
すごい適当に置いてみました.目立つのでピンク色でど真ん中に配置しています.

コードを書く
ユーザ登録ビューを書いていきます.
さきほど配置したtextboxをuserNameという名前でOutlet接続し,viewDidLoad()で赤色にしています.ビュー全体の背景は黄緑にしています.
また,RoutingViewController.swiftで分岐する際
case .registration:
    // ユーザ登録画面へ移動
    RegistrationViewController.start(self)
とあったと思います,このstart関数をRegistrationViewController.swiftに書いていきます.
start関数ではnavigationControllerが持っているpushViewControllerというものを使い画面遷移をしています.
currentVCには元々のRoutingViewControllerが入っており,nextVCには遷移先のRegistrationViewControllerが入っています.
import Foundation
import RxSwift

final class RegistrationViewController: UIViewController {
    @IBOutlet weak var userName: UITextField!

    static func start(
        _ currentVC: UIViewController,
        animated: Bool = false
    ) {
        let nextVC = RegistrationViewController(nibName: "RegistrationView", bundle: nil)   // .initは省略可能
        currentVC.navigationController?.pushViewController(nextVC, animated: animated)
        // 上のナビゲーションバーを非表示
        currentVC.navigationController?.navigationBar.isHidden = true
    }

    override func viewDidLoad() {
        super.viewDidLoad()

        self.view.backgroundColor = .green
        userName.backgroundColor = .red
        print("レジストレーションビューコントローラー")
    }
}
するとこんな感じになります.めちゃめちゃ気持ち悪いですがわかりやすいですね!ちゃんと赤色のtextboxになっています.


ここからはデザインをいい感じに作っていきます.
コードはGitLabにあげています.