参考
前提
ここでは最も基本的なインストールプロセスを踏むため、Composerを使わずに手動でのCakeインストール・プラグインインストールを行います。
インストール
前提
VirtualBox上の仮想マシンにログインしている状態
(vagrant up; vagrant ssh; して、仮想マシンにログインしておいてください)
CakePHPの開発環境を整備
$ cd ~	# ホームディレクトリに戻る
$ wget https://github.com/cakephp/cakephp/archive/2.5.4.zip	# CakePHPのzipファイルをダウンロード
$ unzip 2.5.4.zip	# CakePHPのzipファイルを解凍(今回はcakephp-2.5.4が作られる)
$ cp -r cakephp_2.5.4 /var/www/html/cakephp_tutorial	# CakePHPをApache配下のcakephp_tutorialディレクトリへコピー
※ Gitで取得する方法もあるのですが、今回はこちらの方がわかりやすく、ハマる可能性が低いためこちらの方法を採用しています。
※ 試しにCakePHPを配置したディレクトリへブラウザからアクセスしてみましょう。まだ設定が全て終わっていないので、下記のように様々なエラーが表示されていると思います。
CakePHPのプレーンな情報をGitへInitial Commitしておく
最初期の何も手を加えていないプレーンなCakePHPのファイル群を初期コミットとしてコミットしておきます。
そうしておくことで、設定で失敗してしまった時もコミットを巻き戻してやりなおすことができます。
* Gitへの登録スタート*
$ cd /var/www/html/cakephp_tutorial	# コピーしたcakephp_tutorialディレクトリへ移動

$ git status	# gitリポジトリの状態を確認するコマンド。まだGit管理を始めていないので下記のようなエラー文が出る
fatal: Not a git repository (or any of the parent directories): .git

$ git init	# GitRepositoryをイニシャライズ
Initialized empty Git repository in /var/www/html/cakephp_tutorial/.git/

$ git status	# 初めのgit statusと下記表示内容が異なることをよく見ておいて下さい。
# On branch master
#
# Initial commit
#
# Untracked files:
#   (use "git add <file>..." to include in what will be committed)
#
#	.editorconfig
#	.gitattributes
#	.gitignore
#	.htaccess
#	.travis.yml
#	CONTRIBUTING.md
#	README.md
#	app/
#	build.properties
#	build.xml
#	composer.json
#	index.php
#	lib/
nothing added to commit but untracked files present (use "git add" to track)

$ git add .	# cakephp_turorial以下のファイルを全てGit管理ファイルにaddする

$ git status	# 上記git statusとまた、表示が変わっていることをきちんと意識して下さい。
# On branch master
#
# Initial commit
#
# Changes to be committed:
#   (use "git rm --cached <file>..." to unstage)
#
#	new file:   .editorconfig
#	new file:   .gitattributes
#	new file:   .gitignore
#	new file:   .htaccess
#	new file:   .travis.yml
#	new file:   CONTRIBUTING.md
#	new file:   README.md
#	new file:   app/.htaccess
#	new file:   app/Config/Schema/db_acl.php
...addされたファイル一覧がズラっと並ぶ

$ git commit	# ローカルリポジトリへコミット(vimなどのデフォルト設定のエディタが立ち上がるので"Initial Commit."などとコメントを入力して保存するとコミットされます)


+ Initial Commit	<----- ここにコミットメッセージを入力して保存(vimなら、「:wq」と入力)

# Please enter the commit message for your changes. Lines starting
# with '#' will be ignored, and an empty message aborts the commit.
# On branch master
#
# Initial commit
#
# Changes to be committed:
#   (use "git rm --cached <file>..." to unstage)
#
#       new file:   .editorconfig
#       new file:   .gitattributes
#       new file:   .gitignore
#       new file:   .htaccess
#       new file:   .travis.yml
#       new file:   CONTRIBUTING.md
#       new file:   README.md
#       new file:   app/.htaccess
#       new file:   app/Config/Schema/db_acl.php
#       new file:   app/Config/Schema/db_acl.sql

$ git status	# 再度これまでのstatus確認と表示内容が変わっていることを意識して下さい
# On branch master
nothing to commit (working directory clean)

$ git log	# Commit履歴を確認し、今のInitial Commitがきちんと履歴として追加されていることを確認
commit 370b9c84bc1fc394dcf76e70e5dfe77efb5886f4
Author: Daisuke Nishide <d.nishide0125@gmail.com>
Date:   Thu Oct 2 19:25:06 2014 +0800

	Initial Commit.

*コミット完了*
.htaccessファイルの有効化
$ su -	# rootユーザへ変更, パスワード入力が求められる
# cd /etc/httpd/conf
# cp httpd.conf httpd.conf.origin	# オリジナルのhttpd.confをバックアップ
# vim httpd.conf		# Apacheの設定ファイルを編集

- 338 AllowOverride None	# 338行目のNoneをAllに書換え
+ 338 AllowOverride All

# service httpd reload	# apacheに変更した設定を読み込ませる
Tmpディレクトリのパーミッションの設定変更
※パーミッションの変更のためにはルートユーザになる必要があります
$ su -	# rootユーザへ変更, パスワード入力が求められる
# cd /var/www/html/cakephp_tutorial	# cakephp_tutorialディレクトリへ移動
# chown -R apache app/tmp		# cakephpが一時ファイル保存場所として利用するディレクトリをapacheに所有者変更をする
データベース設定を行う
CakePHPのためのデータベースの準備
$ mysql -u root -p	# MySQLへログイン
Enter password:	# パスワードを入力
Welcome to the MySQL monitor.  Commands end with ; or \g.
Your MySQL connection id is 6
Server version: 5.1.73 Source distribution

Copyright (c) 2000, 2013, Oracle and/or its affiliates. All rights reserved.

Oracle is a registered trademark of Oracle Corporation and/or its
affiliates. Other names may be trademarks of their respective
owners.

Type 'help;' or '\h' for help. Type '\c' to clear the current input statement.

mysql> SHOW DATABASES;	# 現在存在するデータベースを表示
+--------------------+
| Database           |
+--------------------+
| information_schema |
| mysql              |
+--------------------+
2 rows in set (0.00 sec)


mysql> CREATE DATABASE `cakephp_tutorial`;	# cakephp_tutorial用のデータベースを'cakephp_tutorial'という名前で作成
Query OK, 1 row affected (0.00 sec)

mysql> GRANT ALL ON `cakephp_tutorial`.* to ${USERNAME}@localhost IDENTIFIED BY '*********';	# cakephp_tutorialデータベースに関する全ての権限を{$USERNAME}のユーザに付与
Query OK, 0 rows affected (0.00 sec)

mysql> FLUSH PRIVILEGES;	# 上記権限をMySQLに反映
Query OK, 0 rows affected (0.00 sec)

mysql> exit;	# MySQLを閉じる
CakePHPのデータベース設定ファイルに作成したデータベース情報を登録
参考: http://book.cakephp.org/2.0/ja/tutorials-and-examples/blog/blog.html#id3
$ cd /var/www/html/cakephp_tutorial
$ cp app/Config/database.php.default app/Config/database.php	# データベース設定ファイルの雛形ファイルを実際に利用するファイルとしてコピー
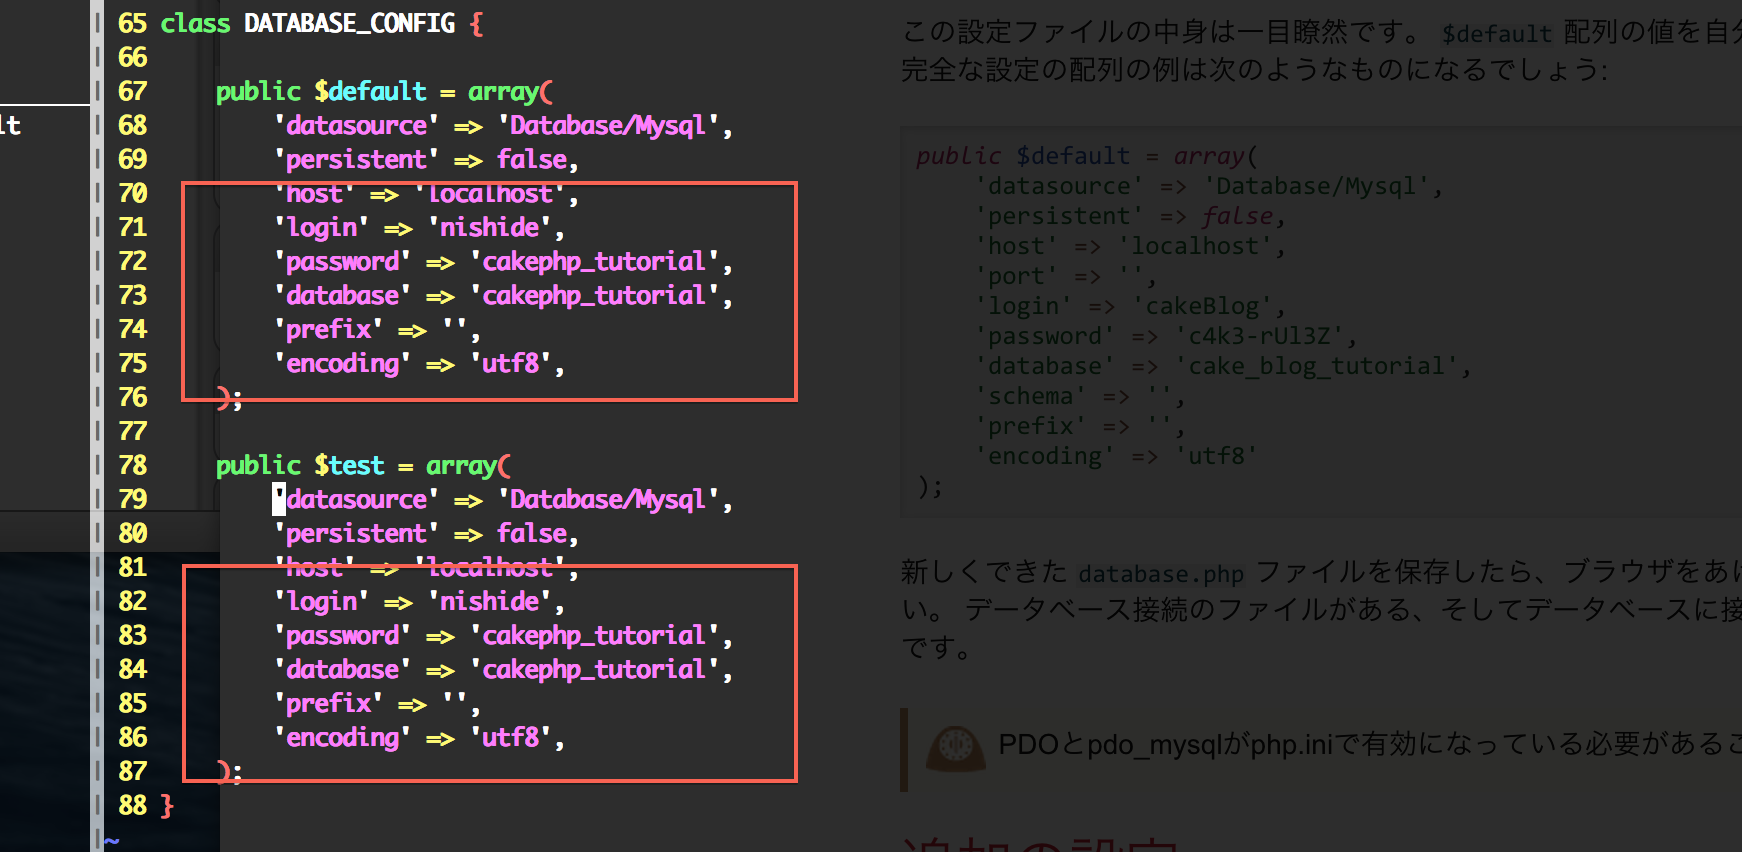
・app/Config/database.phpに先ほど作成したデータベースのユーザ・パスワードの設定を反映
・文字コードの部分のコメントアウトを削除して、'utf-8'の設定を有効にしておきましょう
Security関連のパラメータを設定
Security設定のためのパラメータを自分の独自のパラメータに設定します。
下記のスクリプトを実行して出てきたパラメータを、Security.salt等該当箇所の値に設定します。
※ これができていないと、CakePHPが正常に動作しないので必要です。
$ php -r '$num = ""; for($i=0;$i<10;++$i){$num .= rand(100,999);} echo sha1($num) . "\n";'
5504eb9efff0497faedd0b87a72101993ab45af9

$ php -r '$num = ""; for($i=0;$i<10;++$i){$num .= rand(100,999);} echo $num . "\n";'
744826721926260767876249869267
※ ここまでの設定が終わると概ねの設定が終了です。一度ブラウザからアクセスしてみると、下記のようになっているかと思います。
※ 問題がある場合、上の画像の背景がグリーンになっている部分が背景色が赤になって表示されます。例えばPHPのバージョンが5.2.8より古かった場合は、最上部の「Your version of PHP is 5.2.8 or higher.」のメッセージが赤くなり、Warning内容が表示されます。
プラグインの導入
上記までで基本的なインストールは終了していますが、「DebugKit is not installed. ...」の部分の背景色が黄色くなって、アラート表示となっています。
そのため、ここではインストールが推奨されているDebugKitをインストールすることで、プラグインの導入を体験してみます。
DebugKitの導入
参考
CakePHPサイト内での紹介
http://book.cakephp.org/2.0/ja/development/debugging.html#debug-kit
オフィシャルの導入方法
https://github.com/cakephp/debug_kit
DebugKitインストール(手動)
DebugKitを app/Plugin/ 以下に配置
$ cd ~/		# ホームディレクトリに移動
$ wget https://github.com/cakephp/debug_kit/archive/master.zip	# DebugKitをWeb上からダウンロード
$ unzip master.zip	// DebugKitを解凍します
$ cp -r debug_kit-master /var/www/html/cakephp_tutorial/app/Plugin/DebugKit	// 回答したDebugKitをCakePHPのPluginディレクトリ内にコピー
DebugKitをCakePHPが読み込むように設定
$ cd /var/www/html/cakephp_tutorial	# CakePHPのディレクトリへ移動
$ vim app/Config/bootstrap.php	# 下記の一行を追記
+ CakePlugin::load('DebugKit');
DebugKitのツールバーを導入
Debugに必要な情報をリッチに表示するためのツールバーの設定
$ vim app/Controller/AppController.php
+ public $components = array('DebugKit.Toolbar');
Debugモードを1にする
CakePHPのデフォルトのDebugモード設定はSQLのダンプとかもしてくれるが、DebugKitの機能とカニバってくるために、ここでDebugモードの設定を1に変更
$ vim app/Config/core.php
- Configure::write('debug', 2);
+ //Configure::write('debug', 2);
+ Configure::write('debug', 1);
デフォルトのSQLデバッグ表示をコメントアウト
CakePHPのデフォルトのSQLダンプを表示するView側の要素をコメントアウト
$ vim app/View/Layouts/default.ctp
- <?php echo $this->element('sql_dump'); ?>
+ <?php // echo $this->element('sql_dump'); ?>


