はじめに
私は友達とよくカードゲームで遊んでいます。ゲームをするのは楽しいですが、毎回新しいゲームが始められる前にカードを配らなければならなくてちょっとめんどくさいと思っています。カードゲームをより楽しめるようにこのディーラーボットを作ろうと思いました。
目標
スマホを使って1つのボタンを押すと、自動的に各プレイヤーに移動してカードを配ります。
ディーラーボット

ProtoPediaのページこちらです。
Githubのページこちらです。
作品の説明
構成
- ラズベリーパイ 4b
- Anker PowerCore 10000
- 単3電池 x4
- DCモーター x3
- L293Dドライバー x2
- ブレッドボードや 基板+はんだつけ
- タミヤ タンク工作基本
- 回路のケーブル
- ディーラーボットのボディを作るためのマテリアル
動き方
スマホとWIFIでFLASKのウェブアプリケーションに繋げて、ユーザーはスマホの画面で(以下の写真)1つのボタンを押すだけで、ディーラーボットが選ばれたプレイヤーに移動して適当な枚数を配ってくれます。

作り方の手順
Flask インストール
まず、ラズベリーパイに「Flask」というウェブアプリケーションライブラリをインストールしなければなりませんので、ラズベリーパイ上、ターミナルを開いて「pip install flask」を入力します。
$ pip install flask
デュアルモーター回路
インストールができたら、タイヤのデュアルモーターの回路を作ります。

Flask コード (Python)
回路を組み合わせたら、コードを書く時になりました。
モーターをコントロールするため、Flaskのウエブアプリケーションを設定します。
## IMPORT FLASK LIBRARY FOR WEBAPPLICATION
from flask import Flask, render_template

## START FLASK WEBAPPLICATION
app = Flask(__name__)

@app.route("/")
def index():
    return render_template("home.html")

app.run(debug=True, host="0.0.0.0")
User Interface コードを書く (HTML)
「 home.html 」というファイルを作って、Pythonのコードが入っているディレクトリに保存します。4人のボタンを入れました。各ボタンは自分のURLがあって、そのURLに入っている値に基づいて、どのプレイヤーに移動するのか判断できます。
<!DOCTYPE html>
<meta name="viewport" content="width=device-width, initial-scale=1.0">

<html>
    <body style="background-color:white;">

        <!-- CREATING THE BUTTONS FOR EACH PLAYER-->
                    <!-- PLAYER 1 -->
        <p style="color:red; font-size: 200%">PLAYER 1:
        <a href="http://0.0.0.0:5000/player/1/card/1">
        <button style="font-size: 150%;background-color: lightgrey">CARD</button></a>
                    <!-- PLAYER 2 -->
        <p style="color:blue; font-size: 200%">PLAYER 2:
        <a href="http://0.0.0.0:5000/player/2/card/1">
        <button style="font-size: 150%;background-color: lightgrey">CARD</button></a>
                    <!-- PLAYER 3 -->
        <p style="color:green; font-size: 200%">PLAYER 3:
        <a href="http://0.0.0.0:5000/player/3/card/1">
        <button style="font-size: 150%;background-color: lightgrey">CARD</button></a>
                    <!-- PLAYER 4 -->
        <p style="color:yellow; font-size: 200%">PLAYER 4:
        <a href="http://0.0.0.0:5000/player/4/card/1">
        <button style="font-size: 150%;background-color: lightgrey">CARD</button></a>

        <!-- CREATING THE RETURN BUTTON-->
        <p style="color:black; font-size: 200%">
        <a href="http://0.0.0.0:5000/player/0/card/0">
        <button style="font-size: 150%;background-color: lightgrey">RETURN</button></a>

    </body>
</html>
デュアルモーターのコードを書く (Python)
- ライブラリをインポート、GPIOの設定
- ピンの定義、とりあえずPWMピンの周波数を50に設定しますが、後で調整します。
- 最初のDutyCycleは0です。
- 移動する方向とスタートポジションを設定します。
## IMPORT RASPBERRY PI PINS & TIME LIBRARY
import RPi.GPIO as GPIO
from time import sleep

## SETUP INPUT/OUTPUT PINS
GPIO.setmode(GPIO.BCM)
GPIO.setwarnings(False)

## SETUP PINS FOR CATERPILLAR DUALMOTORS
engPin = [5, 6, 20, 13]
pwmPin = [19, 12]

for pin in engPin:
    GPIO.setup(pin, GPIO.OUT)
for pin in pwmPin:
    GPIO.setup(pin, GPIO.OUT)
PWM1 = GPIO.PWM(pwmPin[0], freqWheel)
PWM2 = GPIO.PWM(pwmPin[1], freqWheel)
PWM1.start(0)
PWM2.start(0)

## SET DIRECTION (WHEELS) & START-POSITION
GPIO.output(engPin[0], False)
GPIO.output(engPin[1], True)
GPIO.output(engPin[2], False)
GPIO.output(engPin[3], True)
current_position = 0
関数の定義
まず、前向きか後向きを判断した結果を引数し、タイヤの設定をします。引数が1となっている場合は前向き、0となったら後向きの設定します。
## DEFINE FUNCTION TO SET THE DIRECTION
def set_direction(direction):
    if direction == 1:
        GPIO.output(engPin[0], True)
        GPIO.output(engPin[1], False)
        GPIO.output(engPin[2], True)
        GPIO.output(engPin[3], False)
    elif direction == 0:
        GPIO.output(engPin[0], False)
        GPIO.output(engPin[1], True)
        GPIO.output(engPin[2], False)
        GPIO.output(engPin[3], True)
    else:
        print("Valid direction wasn't set")
次移動する関数を書きます。
- スタートポジションからの距離は長ければ長いほど「location」という変数の値が高くなるので、今いる場所(currentlocation)より高い値の場所(location)だと前向きの設定し、一方、currentlocationより低かったら後向きにします。
- 今いる場所から目的地までの距離を計算します。
- モーターのPWMを100%のDutyCycleにし、距離による時間を待ってモーターを止まります。
## DEFINE MOVE FUNCTION
def move(currentLocation, location):
    # If current location is less than target location: move forward
    # If current location is bigger than target location: move backwards
    if currentLocation < location:
        set_direction(1)
    else:
        set_direction(0)

    # Get the transportation range by calculating the gap between current location and target
    location = abs(location - currentLocation)
    PWM1.ChangeDutyCycle(100)
    PWM2.ChangeDutyCycle(100)
    sleep(location*2)
    PWM1.ChangeDutyCycle(0)
    PWM2.ChangeDutyCycle(0)
    sleep(0.5)
最後の移動する関数はスタートポジションに戻る関数です。
今いる場所の値を引数し、後向きを設定して移動します。
## CREATE RETURN TO STARTPOSITION FUNCTION
def reset_position(currentposition):
    set_direction(0)
    PWM1.ChangeDutyCycle(100)
    PWM2.ChangeDutyCycle(100)
    sleep(currentposition*2)
    PWM1.ChangeDutyCycle(0)
    PWM2.ChangeDutyCycle(0)
    sleep(0.5)
FLASKコード追加
移動する関数は完了したら、FLASKコードに少し追加します。
ウエブページでボタンを押すと、playerとcardの変数に値が入ります。
その値を使ってどの方向へ、どこに行くか判断して移動します。
@app.route("/player/<int:player>/card/<int:card>")
def deal(player, card):
    global current_position
    ## IF RESET-BUTTON IS PRESSED(card=0): RETURN TO START POSITION
    if card == 0:
        reset_position(currentposition)
        currentposition = 0
    ## TAKE VALUES FROM PRESSED BUTTON, MOVE TO PLAYER
    else:
        move(currentposition, player)
        current_position = player
アームモーター回路
FLASK ウエブアプリケーションと下部分 (移動する機能) が完成で、最後の部分を作ります。
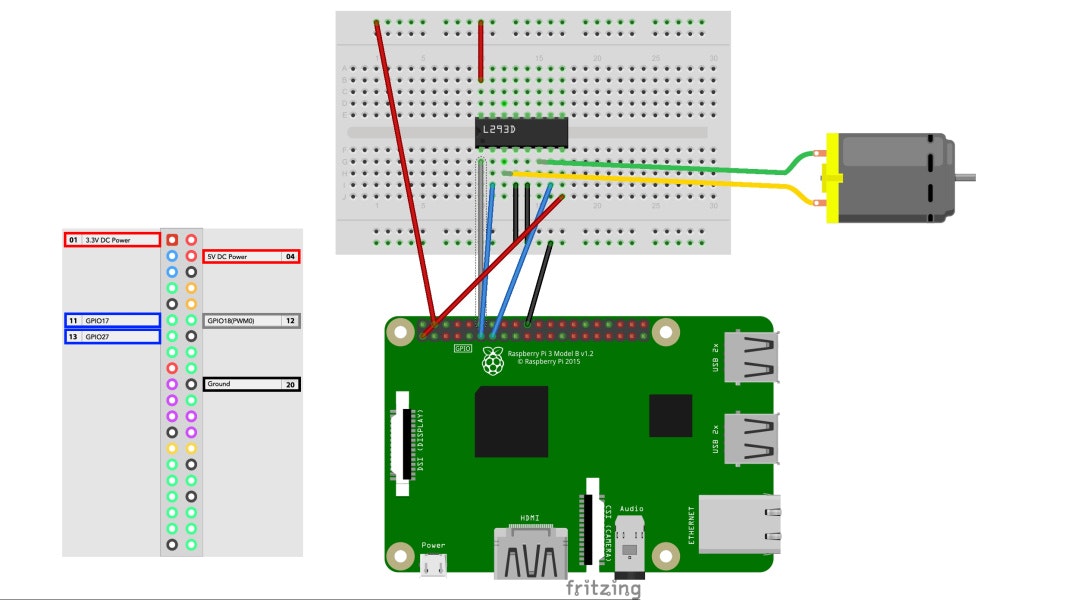
ディーラーアームのコード(Python)
SET DIRECTIONのoutputはどのようにアームを作ることによって、どれがTrueかどれがFalseか決めます。
## SETUP PINS FOR DEALERARM
armDir1 = 17
armDir2 = 27
armPWM = 18

GPIO.setup(armDir1, GPIO.OUT)
GPIO.setup(armDir2, GPIO.OUT)
GPIO.setup(armPWM, GPIO.OUT)
pwm = GPIO.PWM(armPWM, 50)
pwm.start(0)

## SET DIRECTION (ARM)
GPIO.output(armDir1, True)
GPIO.output(armDir2, False)
アームの設定が完成したら、最後のコードを追加します。
PWMのChangeDutyCycleの間にあるsleep関数の数値を上下すると、配るカードの数枚を変更できます。
@app.route("/player/<int:player>/card/<int:card>")
def deal(player, card):
    global current_position
    ## IF RESET-BUTTON IS PRESSED(card=0): RETURN TO START POSITION
    if card == 0:
        reset_position(currentposition)
        currentposition = 0
    ## TAKE VALUES FROM PRESSED BUTTON, MOVE TO PLAYER
    else:
        move(currentposition, player)
        current_position = player
-----------------------------------------------------------------
                          ↓  追加 ↓
        ## DEAL CARDS
        sleep(0.5)
        pwm.ChangeDutyCycle(80)
        sleep(0.2)
        pwm.ChangeDutyCycle(0)
        sleep(0.5)
-----------------------------------------------------------------
app.run(debug=True, host="0.0.0.0")
追加したいこと
- シャッフル機能
- Line-Reader センサー(簡単に色々なゲームのための動き方を設定できる)
- 点の登録機能
- 点を表示機能