目次
どんな記事?
クラウドコンピューティングの分野では、Amazon Web Services(AWS)が世界的に広く使われています。しかし、AWSに関する資格を取得するには、教材やトレーニングに少なからず費用がかかることが一般的です。初心者の方々にとって、このような費用はハードルとなることがあります。
私自身、エンジニアになる前にAWSのハンズオン学習をしていましたが気づかずに料金が発生しないか不安でした(某学習サイトのAWSハンズオン講座の質問欄に「課金が20万発生しました。どうすれば良いですか?」って質問があってゾッとしたことがあります![]() )
)
そこで本記事では、AWS資格対策を目指す初心者の方々が無料で手軽に学べるハンズオン学習に焦点を当てます。
具体的には、LocalStackというAWSサービスをローカル環境でエミュレートできるツールを使ってハンズオンを進めていきます。LocalStackはAWSサービスをエミュレートすることで、実際のAWS環境と同じような操作やテストを行うことができます。こちらの記事では、LocalStack 2.0のリリースとその機能の向上について詳しく紹介されています。
AWS資格対策に取り組む初心者の方々がスキルを磨く手助けとなることを願っています!
何を作るのか
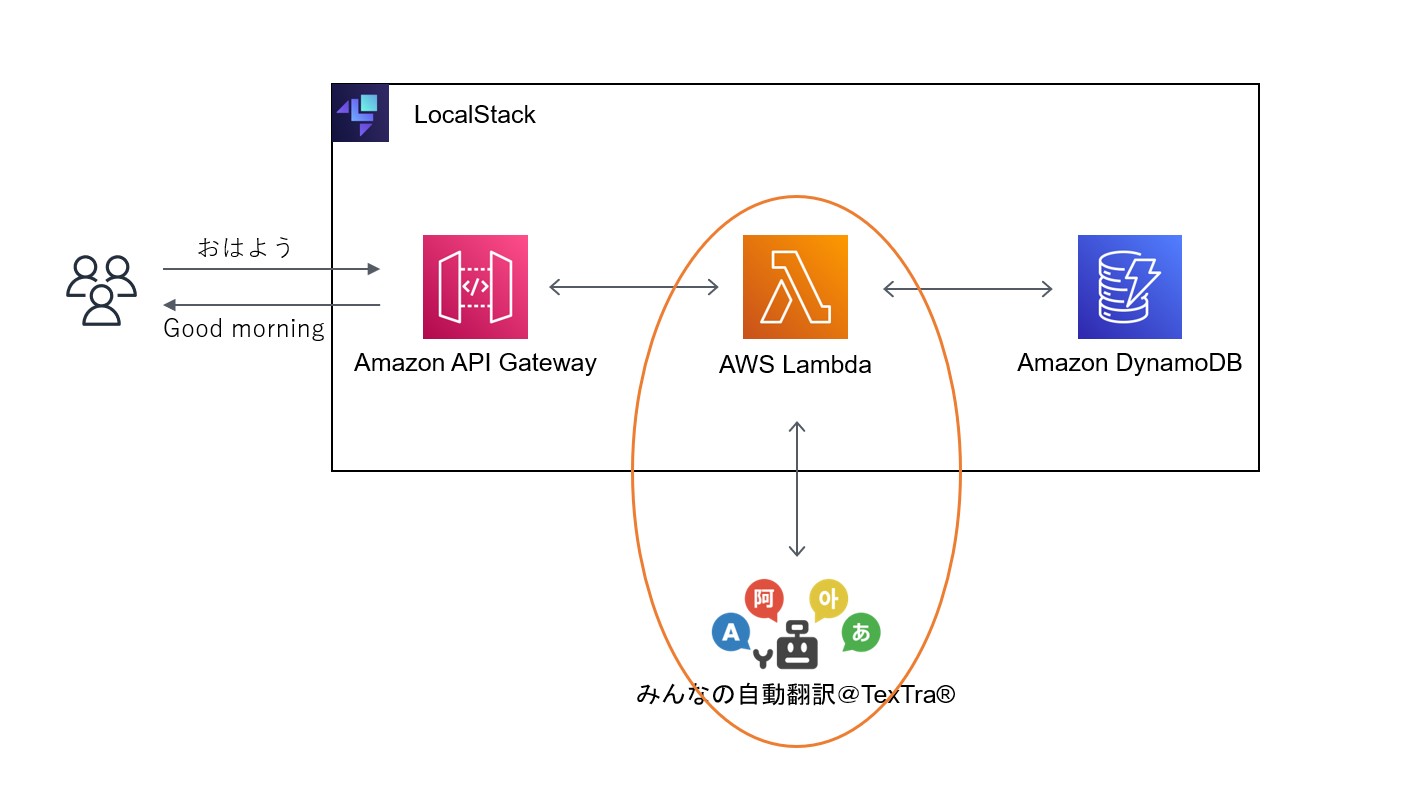
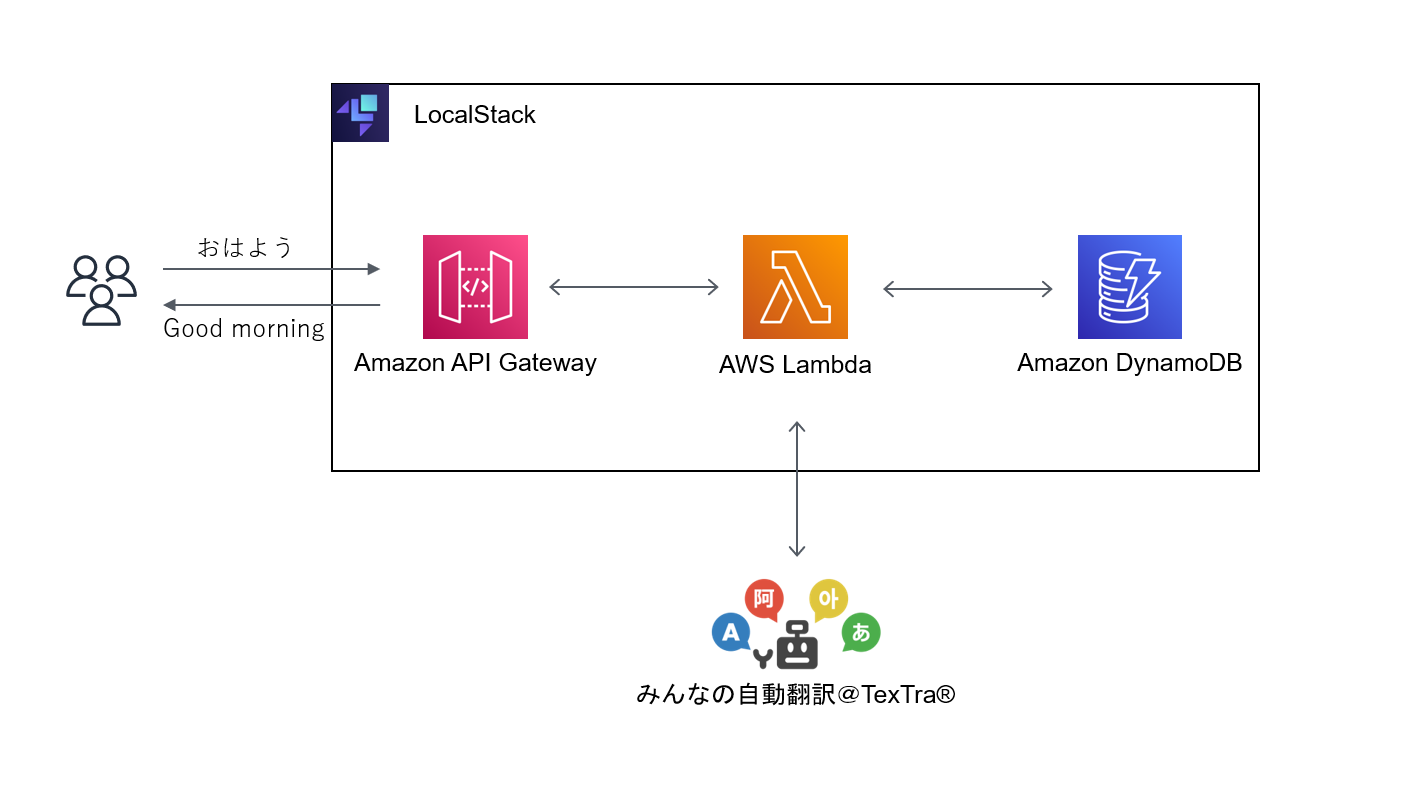 サーバーレスアーキテクチャで翻訳 Web API を構築するとほぼ同じ構成です。
これはAWSが公式で提供しているハンズオンコースです。こちらはマネージメントコンソールを使ったハンズオンですが、LocalStackではCLIで操作していきます。
CLI操作なので難しく感じると思いますが、できるだけ図解も交えながら解説していきます!
環境
私の開発環境はWSL2 Ubuntu 20.04 LTSです。WSL1ではDockerが起動しないという報告があるため、WSL2にアップデートしておくことをおすすめします。(私は始めWSL1で起動しようとしていたのでかなり苦戦しました![]() )
)
こちらの記事(WSL上でDockerを動かす際に躓いたこと)ではWSL1でもいけるようですが。。。
以下は環境の詳細です。
- Docker 23.0.4:Docker Desktop for Windowsは使わずUbuntuに直接インストールしています。
- docker-compose v1.29.2
- Python 3.8.10
- pip 23.1.1
- Visual Studio Code
※注意:環境のバージョンは記事執筆時のものです。LocalStackの最新の使用条件とは異なる場合がありますので、適宜こちらのLocalStackのインストールページを確認してください。
LocalStack環境を保存する方法
LocalStackはコンテナで起動しているため、コンテナを停止するとデータがすべて消えてしまいます。そこでLocalStack V2ではCommunity Cloud Podsという機能を使ってスナップショットを取ることができます。ぜひご利用ください。
参考:LocalStack Community Cloud Pods
手順
- LocalStack CLIのインストール
参考:LocalStack CLI Installation -
localstack pod save file://<保存先, ファイル名>でスナップショットを保存する -
localstack pod load file://<保存先, ファイル名>でスナップショットをロードする
LocalStackを起動してみよう!
まず、初めにLocalStackをインストールして起動までやってみます。インストール方法はいくつもありますが今回はdocker-composeで立ち上げます。
また、LocalStack起動後にlocalhost:4566/healthで各種サービス状況を確認してみます。
# 作業用ディレクトリ作成後に作業ディレクトリに移動
Ubuntu@dev01:~$ mkdir ./workplace && cd $_
# GithubからLocalStackをクローン
Ubuntu@dev01:~/workplace$ git clone https://github.com/localstack/localstack.git
Ubuntu@dev01:~/workplace$ ls
localstack
Ubuntu@dev01:~/workplace$ cd localstack/
# docker composeでLocalStack起動
Ubuntu@dev01:~/workplace/localstack$ sudo docker-compose up -d
Ubuntu@dev01:~/workplace/localstack$ sudo docker ps -a
CONTAINER ID   IMAGE                   COMMAND                  CREATED         STATUS                   PORTS                                                                    NAMES
843a54664031   localstack/localstack   "docker-entrypoint.sh"   3 minutes ago   Up 3 minutes (healthy)   127.0.0.1:4510-4559->4510-4559/tcp, 127.0.0.1:4566->4566/tcp, 5678/tcp   localstack_main
# jsonを整形するツールjqインストール
Ubuntu@dev01:~/workplace/localstack$ sudo apt install jq
# LocalStackの利用可能なサービス一覧を確認する
Ubuntu@dev01:~/workplace/localstack$ curl localhost:4566/health | jq
% Total    % Received % Xferd  Average Speed   Time    Time     Time  Current
                                 Dload  Upload   Total   Spent    Left  Speed
100   876  100   876    0     0   171k      0 --:--:-- --:--:-- --:--:--  171k
{
  "services": {
    "acm": "available",
    "apigateway": "available",
    "cloudformation": "available",
    "cloudwatch": "available",
    "config": "available",
    "dynamodb": "available",
    "dynamodbstreams": "available",
    "ec2": "available",
    "es": "available",
    "events": "available",
    "firehose": "available",
    "iam": "available",
    "kinesis": "available",
    "kms": "available",
    "lambda": "available",
    "logs": "available",
    "opensearch": "available",
    "redshift": "available",
    "resource-groups": "available",
    "resourcegroupstaggingapi": "available",
    "route53": "available",
    "route53resolver": "available",
    "s3": "available",
    "s3control": "available",
    "secretsmanager": "available",
    "ses": "available",
    "sns": "available",
    "sqs": "available",
    "ssm": "available",
    "stepfunctions": "available",
    "sts": "available",
    "support": "available",
    "swf": "available",
    "transcribe": "available"
  },
  "version": "2.0.3.dev"
}
AWS CLIでLambdaが実行できるか確認する
AWS CLIでは選択されたサービスとリージョンに基づいてエンドポイントURLが自動的に決まるため、LocalStackを利用する場合は--endpoint-urlで指定する必要があります。
後にAWS CLI Localをインストールしてawslcoalコマンドを使えるようにします。awslocalコマンドを使えばエンドポイントとprofileの指定を省略することができるのでAWS CLIのインストールはスキップしてもOKです。
# zip, unzipをインストール
Ubuntu@dev01:~$ sudo apt install zip unzip

# AWS CLIインストーラーをダウンロード
Ubuntu@dev01:~$ curl "https://awscli.amazonaws.com/awscli-exe-linux-x86_64.zip" -o "awscliv2.zip"
Ubuntu@dev01:~$ unzip awscliv2.zip
# AWS CLIをインストール
Ubuntu@dev01:~$ sudo ./aws/install

# AWS Credentialsを設定
Ubuntu@dev01:~$ aws configure --profile=localstack
AWS Access Key ID [None]:None
AWS Secret Access Key [None]:None
Default region name [None]: ap-notheast-1
Default output format [None]: json
こちらのページに沿ってLambda関数ファイルを作成してzipファイルにします。
# Lambdaで実行するファイルを作成する作業ディレクトリ作成して、移動
Ubuntu@dev01:~$ mkdir -p ./workplace/demo/ && cd $_
# 関数を作成する
Ubuntu@dev01:~/workplace/demo$ vi index.js
exports.handler = async function(event, context) {
          console.log("ENVIRONMENT VARIABLES\n" + JSON.stringify(process.env, null, 2))
          console.log("EVENT\n" + JSON.stringify(event, null, 2))
          return context.logStreamName
}

# 関数ファイルをデプロイパッケージにする
Ubuntu@dev01:~/workplace/demo$ zip function.zip index.js
次にlambda create-functionでzipファイルをLambdaにデプロイします。
lambda create-functionコマンドの詳細はこちらのページです。
LocalStack V1ではr1のように任意の文字列を指定できてましたが、LocalStack V2ではロールの指定はarn:aws:iam::<任意の12桁数字>:role/<任意の文字列>となります。指定されたロールの存在の確認はされないため任意でOKです。詳しくはこちらのページを参照してください。
--handlerオプションは--handler <ファイル名>.<エントリーポイントの関数名>と指定しています。
--runtimeの指定はこちらのページを参照しました。
# 作成したデプロイパッケージを使ってLambda関数を作成する
Ubuntu@dev01:~/workplace/demo$ aws --endpoint-url=http://localhost:4566 lambda create-function --function-name demo-function --zip-file fileb://function.zip --handler index.handler --runtime nodejs18.x --role arn:aws:iam::123456789012:role/lambda-demo1 --profile=localstack
{
    "FunctionName": "demo-function",
    "FunctionArn": "arn:aws:lambda:ap-northeast-1:000000000000:function:demo-function",
    "Runtime": "nodejs18.x",
    "Role": "arn:aws:iam::123456789012:role/lambda-demo1",
    "Handler": "index.handler",
    "CodeSize": 325,
    "Description": "",
    "Timeout": 3,
    "MemorySize": 128,
    "LastModified": "2023-04-23T05:57:03.340517+0000",
    "CodeSha256": "c1MYsVaMfs4+EDf4IRHEVTtsD0X6CnwxI7OE2oqwN98=",
    "Version": "$LATEST",
    "TracingConfig": {
        "Mode": "PassThrough"
    },
    "RevisionId": "a330e7cb-045e-488d-ac15-fec69a4abac2",
    "State": "Pending",
    "StateReason": "The function is being created.",
    "StateReasonCode": "Creating",
    "PackageType": "Zip",
    "Architectures": [
        "x86_64"
    ],
    "EphemeralStorage": {
        "Size": 512
    },
    "SnapStart": {
        "ApplyOn": "None",
        "OptimizationStatus": "Off"
    },
    "RuntimeVersionConfig": {
        "RuntimeVersionArn": "arn:aws:lambda:ap-northeast-1::runtime:8eeff65f6809a3ce81507fe733fe09b835899b99481ba22fd75b5a7338290ec1"
    }
}
LocalStackではLambdaをコンテナで管理しているため初めてLambdaを呼び出すときはイメージのダウンロードで時間がかかる場合あります。
# Lambdaを実行する
Ubuntu@dev01:~/workplace/demo$ aws --endpoint-url=http://localhost:4566 lambda invoke --function-name demo-function outfile --profile localstack
{
    "StatusCode": 200,
    "ExecutedVersion": "$LATEST"
}
AWS CLI Localをインストールする
AWS CLIだとエンドポイントとProfileの指定が必要なんですが、AWS CLI Localを使えば省略できるのでインストールします。
LocalStack AWS CLI - Github
# pip経由でインストールするため、まずpipインストール
Ubuntu@dev01:~/workplace/localstack$ sudo apt install python3-pip
Ubuntu@dev01:~/workplace/localstack$ pip3 install awscli-local

# awslocalコマンドが使用可能か確認
Ubuntu@dev01:~/workplace/localstack$ awslocal --version
aws-cli/2.11.15 Python/3.11.3 Linux/5.15.90.1-microsoft-standard-WSL2 exe/x86_64.ubuntu.20 prompt/off
以降はAWS CLI Local(awslcoal)を使って操作していきます。
サーバーレスアーキテクチャで翻訳Web APIを構築する

それではサーバーレスアーキテクチャで翻訳 Web API を構築するに沿って作っていきます!
- 手順
- 翻訳API呼び出すLambdaを作成する。
- みんなの自動翻訳API呼び出すLambdaを作成する(Node.js)
- Nodeをインストールする
- Lambda関数の作成、デプロイしてテスト
- API Gatewayの構築
- API Gatewayの構築
DeppL APIを呼び出すLambdaを作成する
クレカ登録でエラー出まくって挫折しました![]()
調べたところみんなの自動翻訳がとても使いやすそうだったので利用させていただきます。
みんなの自動翻訳API呼び出すLambdaを作成する(Node.js)
Node.jsでLambda関数を作成していきます。Lambdaで外部モジュールであるrequestsなどを利用したい場合は、Lambdaレイヤーを作成する必要があります。
が、、、
LocalStackではLambdaレイヤーは有償サポートのため、今回はNode.jsの標準モジュールのみで作成します!
参考:LocalStack Lambda Layers
Nodeをインストールする
こちらのページ(Node.js を Linux 用 Windows サブシステム (WSL2) にインストールする)に従ってインストールしていきます。
:::note warn
Ubuntu の apt-get コマンドを使用してインストールできる Node のバージョンは、現在期限切れになっているみたいなのでご注意ください。
Node.js を Linux 用 Windows サブシステム (WSL2) にインストールする
:::
Ubuntu@dev01:~/workplace/localstack$ cd ../
Ubuntu@dev01:~/workplace/$ mkdir ./translate-function && cd $_
Ubuntu@dev01:~/workplace/translate-function$ mkdir nodejs && cd $_
Ubuntu@dev01:~/workplace/translate-function/nodejs$ curl -o- [https://raw.githubusercontent.com/nvm-sh/nvm/master/install.sh](https://raw.githubusercontent.com/nvm-sh/nvm/master/install.sh) | bash
% Total    % Received % Xferd  Average Speed   Time    Time     Time  Current
Dload  Upload   Total   Spent    Left  Speed
100 15916  100 15916    0     0  46133      0 --:--:-- --:--:-- --:--:-- 46267
=> Downloading nvm from git to '/home/Ubuntu/.nvm'
=> Cloning into '/home/Ubuntu/.nvm'...
remote: Enumerating objects: 359, done.
remote: Counting objects: 100% (359/359), done.
remote: Compressing objects: 100% (305/305), done.
remote: Total 359 (delta 40), reused 168 (delta 28), pack-reused 0
Receiving objects: 100% (359/359), 219.46 KiB | 2.44 MiB/s, done.
Resolving deltas: 100% (40/40), done.

- (HEAD detached at FETCH_HEAD)
master
=> Compressing and cleaning up git repository

=> Appending nvm source string to /home/Ubuntu/.bashrc
=> Appending bash_completion source string to /home/Ubuntu/.bashrc
/usr/bin/env: ‘bash\r’: No such file or directory
=> Close and reopen your terminal to start using nvm or run the following to use it now:

export NVM_DIR="$HOME/.nvm"
[ -s "$NVM_DIR/nvm.sh" ] && \. "$NVM_DIR/nvm.sh"  # This loads nvm
[ -s "$NVM_DIR/bash_completion" ] && \. "$NVM_DIR/bash_completion"  # This loads nvm bash_completion

Ubuntu@dev01:~/workplace/translate-function/nodejs$ export NVM_DIR="$([ -z "${XDG_CONFIG_HOME-}" ] && printf %s "${HOME}/.nvm" || printf %s "${XDG_CONFIG_HOME}/nvm")"
 -s "$NVM_DIR/nvm.sh" ] && \. "$NVM_DIR/nvm.sh"
Ubuntu@dev01:~/workplace/translate-function/node/nodejs$ nvm install --lts
Installing latest LTS version.
Downloading and installing node v18.16.0...
Downloading https://nodejs.org/dist/v18.16.0/node-v18.16.0-linux-x64.tar.xz...
############################################################################################################# 100.0%
Computing checksum with sha256sum
Checksums matched!
Now using node v18.16.0 (npm v9.5.1)
Creating default alias: default -> lts/* (-> v18.16.0)
Ubuntu@dev01:~/workplace/translate-function/node/nodejs$ node -v
v18.16.0
Ubuntu@dev01:~/workplace/translate-function/node/nodejs$ npm -v
9.5.1
Lambda関数の作成、デプロイしてテスト
VScodeをUbuntuにリモート接続してコーディングするとスムーズです。
参考:Windows上のVS CodeでRemote-WSLを使い。WSL2のUbuntu 20.04へアクセスする。
# nodejs配下で作成していますが特に意図はありません
Ubuntu@dev01:~/workplace/translate-function/node/nodejs$ touch translate.js
const https = require("https");
const querystring = require("querystring");

const BASE_URL = "https://mt-auto-minhon-mlt.ucri.jgn-x.jp"; // 基底URL (https://xxx.jpまでを入力)
const API_KEY = "***"; // API key
const API_SECRET = "***"; // API secret
const LOGIN_ID = "***"; // ログインID
const API_NAME = "mt"; // API名 (https://xxx.jp/api/mt/generalNT_ja_en/ の場合は、"mt")
const API_PARAM = "generalNT_ja_en"; // API値 (https://xxx.jp/api/mt/generalNT_ja_en/ の場合は、"generalNT_ja_en")

const callTranslateApi = async (accessToken, input_text) => {
  const postData = querystring.stringify({
    access_token: accessToken,
    key: API_KEY, // API Key
    api_name: API_NAME,
    api_param: API_PARAM,
    name: LOGIN_ID, // ログインID
    type: "json", // レスポンスタイプ
    text: input_text, // 以下、APIごとのパラメータ
  });

  const options = {
    method: "POST",
    headers: {
      "Content-Type": "application/x-www-form-urlencoded",
      "Content-Length": postData.length,
    },
  };

  return new Promise((resolve, reject) => {
    const req = https.request(BASE_URL + "/api/", options, (res) => {
      let body = "";
      res.on("data", (chunk) => {
        body += chunk;
      });
      res.on("end", () => {
        bodyJson = JSON.parse(body);
        const output_text = bodyJson.resultset.result.text;
        resolve(output_text);
      });
    });
    req.on("error", (err) => {
      reject(err);
    });

    req.write(postData);
    req.end();
  });
};

const getAccessToken = async () => {
  const tokenData = querystring.stringify({
    grant_type: "client_credentials",
    client_id: API_KEY, // API Key
    client_secret: API_SECRET, // API secret
    urlAccessToken: BASE_URL + "/oauth2/token.php", // アクセストークン取得URI
  });

  const tokenOptions = {
    method: "POST",
    headers: {
      "Content-Type": "application/x-www-form-urlencoded",
      "Content-Length": tokenData.length,
    },
  };

  return new Promise((resolve, reject) => {
    const tokenReq = https.request(
      BASE_URL + "/oauth2/token.php",
      tokenOptions,
      (res) => {
        let body = "";
        res.on("data", (chunk) => {
          body += chunk;
        });
        res.on("end", () => {
          const accessToken = JSON.parse(body).access_token; // アクセストークン
          if (!accessToken) {
            console.error("Access token not found.");
            reject("Error");
          } else {
            resolve(accessToken);
          }
        });
      }
    );

    tokenReq.on("error", (err) => {
      reject(err);
    });
    tokenReq.write(tokenData);
    tokenReq.end();
  });
};

exports.handler = async (event, context) => {
  try {
    const INPUT_TEXT = "おはようございます。調子はどうですか";
    const accessToken = await getAccessToken();
    const OUTPUT_TEXT = await callTranslateApi(accessToken, INPUT_TEXT);

    console.log("INPUT_TEXT : " + INPUT_TEXT);
    console.log("OUTPUT_TEXT : " + OUTPUT_TEXT);

    const response = {
      statusCode: 200,
      headers: { "Content-Type": "application/json" },
      body: JSON.stringify({
        message: "success",
        OUTPUT_TEXT: OUTPUT_TEXT,
      }),
    };

    return response;
  } catch (error) {
    console.log(error.stack);
  }
};
作成したtranslate.jsをzipにしてLambda関数をデプロイします。
Ubuntu@dev01:~/workplace/translate-function/node/nodejs$ zip translate.zip translate.js
adding: translate.js (deflated 62%)
Ubuntu@dev01:~/workplace/translate-function/node/nodejs$ awslocal lambda create-function --function-name translateFunction01 --runtime nodejs18.x --handler translate.handler --zip-file fileb://translate.zip --role arn::iam::000000000000:role/demo
{
    "FunctionName": "translateFunction01",
    "FunctionArn": "arn:aws:lambda:us-east-1:000000000000:function:translateFunction01",
    "Runtime": "nodejs18.x",
    "Role": "arn::iam::000000000000:role/demo",
    "Handler": "translate.handler",
    "CodeSize": 1516,
    "Description": "",
    "Timeout": 3,
    "MemorySize": 128,
    "LastModified": "2023-05-14T01:40:23.596074+0000",
    "CodeSha256": "/GgVaQ6xCUWytX6IzPI9QMXYDMVG5FrgdvebCwmwcEo=",
    "Version": "$LATEST",
    "TracingConfig": {
        "Mode": "PassThrough"
    },
    "RevisionId": "f43c33e0-bcf0-460b-bca1-9cbdcc33efa0",
    "State": "Pending",
    "StateReason": "The function is being created.",
    "StateReasonCode": "Creating",
    "PackageType": "Zip",
    "Architectures": [
        "x86_64"
    ],
    "EphemeralStorage": {
        "Size": 512
    },
    "SnapStart": {
        "ApplyOn": "None",
        "OptimizationStatus": "Off"
    },
    "RuntimeVersionConfig": {
        "RuntimeVersionArn": "arn:aws:lambda:us-east-1::runtime:8eeff65f6809a3ce81507fe733fe09b835899b99481ba22fd75b5a7338290ec1"
    }
}
デプロイしたLambda関数はlambda list-functionsで確認できます。
参考:Lambda list-functions
Ubuntu@dev01:~/workplace/translate-function/node/nodejs$ awslocal lambda list-functions
{
    "Functions": [
        {
            "FunctionName": "translateFunction",
            "FunctionArn": "arn:aws:lambda:us-east-1:000000000000:function:translateFunction",
            "Runtime": "nodejs18.x",
            "Role": "arn::iam::000000000000:role/demo",
            "Handler": "translate.handler",
            "CodeSize": 1516,
            "Description": "",
            "Timeout": 3,
            "MemorySize": 128,
            "LastModified": "2023-05-14T01:50:32.206828+0000",
            "CodeSha256": "/GgVaQ6xCUWytX6IzPI9QMXYDMVG5FrgdvebCwmwcEo=",
            "Version": "$LATEST",
            "TracingConfig": {
                "Mode": "PassThrough"
            },
            "RevisionId": "6b458364-8281-4d8c-89b5-c58f6513a692",
            "PackageType": "Zip",
            "Architectures": [
                "x86_64"
            ],
            "EphemeralStorage": {
                "Size": 512
            },
            "SnapStart": {
                "ApplyOn": "None",
                "OptimizationStatus": "Off"
            }
        }
    ]
}
デプロイしたLambda関数を実行してみます。
参考:Lambda invoke
Ubuntu@dev01:~/workplace/translate-function/node/nodejs$ awslocal lambda invoke --function-name translateFunction outputfile.txt
{
    "StatusCode": 200,
    "FunctionError": "Unhandled",
    "ExecutedVersion": "$LATEST"
}
FunctionErrorが返ってきました🤦♂️
出力されたoutputfile.txtを確認してみます。
参考:Node.js の AWS Lambda 関数エラー
Ubuntu@dev01:~/workplace/translate-function/node/nodejs$ cat outputfile.txt
{"errorMessage":"2023-05-14T02:25:34Z fa5edebc-c824-46f0-8283-3fc8c474c438 Task timed out after 3.00 seconds"}
タイムアウトエラーになったようなのでLambda関数の実行時間を60秒にして再度実行します🚀(デフォルトの実行時間は3秒です)
使用するコマンドはupdate-function-configurationです。実行時間以外にもメモリーサイズの変更もできるので詳細は以下のページをご確認ください。
参考:Lambda update-function-configuration
Ubuntu@dev01:~/workplace/translate-function/node/nodejs$ awslocal lambda update-function-configuration --function-name translateFunction --timeout 60
{
    "FunctionName": "translateFunction",
    "FunctionArn": "arn:aws:lambda:us-east-1:000000000000:function:translateFunction",
    "Runtime": "nodejs18.x",
    "Role": "arn::iam::000000000000:role/demo",
    "Handler": "translate.handler",
    "CodeSize": 1516,
    "Description": "",
    "Timeout": 60,
    "MemorySize": 128,
    "LastModified": "2023-05-14T02:32:45.737909+0000",
    "CodeSha256": "/GgVaQ6xCUWytX6IzPI9QMXYDMVG5FrgdvebCwmwcEo=",
    "Version": "$LATEST",
    "TracingConfig": {
        "Mode": "PassThrough"
    },
    "RevisionId": "327b9f37-5db2-447d-9114-1eeb3477c11c",
    "State": "Active",
    "LastUpdateStatus": "InProgress",
    "LastUpdateStatusReason": "The function is being created.",
    "LastUpdateStatusReasonCode": "Creating",
    "PackageType": "Zip",
    "Architectures": [
        "x86_64"
    ],
    "EphemeralStorage": {
        "Size": 512
    },
    "SnapStart": {
        "ApplyOn": "None",
        "OptimizationStatus": "Off"
    },
    "RuntimeVersionConfig": {
        "RuntimeVersionArn": "arn:aws:lambda:us-east-1::runtime:8eeff65f6809a3ce81507fe733fe09b835899b99481ba22fd75b5a7338290ec1"
    }
}
Ubuntu@dev01:~/workplace/translate-function/node/nodejs$ awslocal lambda invoke --function-name translateFunction   outputfile.txt
{
    "StatusCode": 200,
    "ExecutedVersion": "$LATEST"
}
実行時間の変更すると正常に実行できたのでLambda関数で出力されるログも確認していきます。
参考:AWS Lambdaをコマンドラインから実行してログを標準出力する
Ubuntu@dev01:~/workplace/translate-function/node/nodejs$ awslocal lambda invoke --function-name translateFunction --log-type Tail outputfile.txt --query 'LogResult' | tr -d '"' | base64 -d
START RequestId: 37d137f7-7503-464c-aa84-87db0bc383e6 Version: $LATEST
2023-05-14T02:39:27.955Z        37d137f7-7503-464c-aa84-87db0bc383e6    INFO    INPUT_TEXT : おはようございます。調子は どうですか
2023-05-14T02:39:27.957Z        37d137f7-7503-464c-aa84-87db0bc383e6    INFO    OUTPUT_TEXT : Good morning. How are you?
END RequestId: 37d137f7-7503-464c-aa84-87db0bc383e6
REPORT RequestId: 37d137f7-7503-464c-aa84-87db0bc383e6  Duration: 4079.20 ms    Billed Duration: 4080 ms        Memory Size: 128 MB     Max Memory Used: 128 MB
Ubuntu@dev01:~/workplace/translate-function/node/nodejs$
API Gatewayの構築とLambdaとの連携
Lambda関数単体での実行は成功したので次にAPI Gatewayの設定へ移ります。
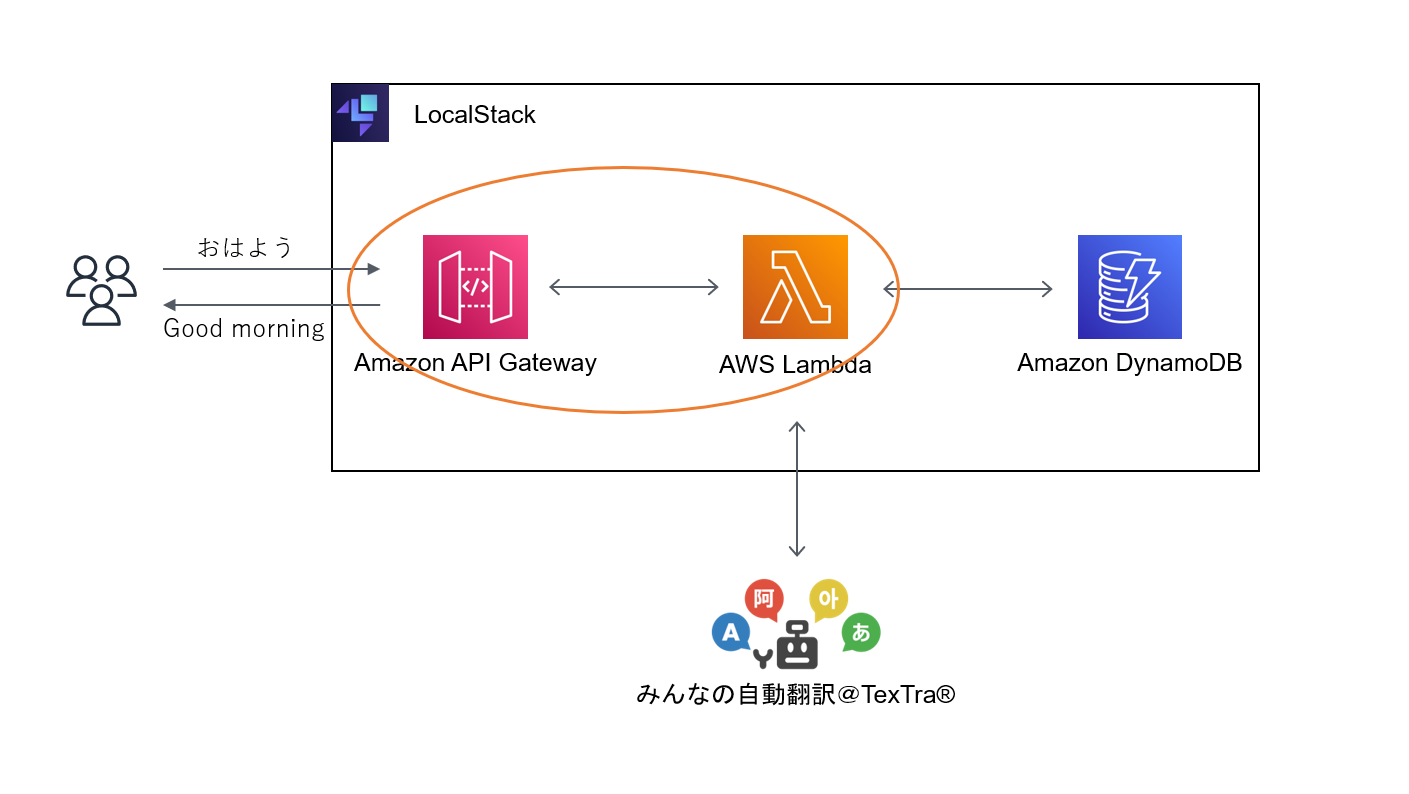
こちらが最終的に作成するAPI Gatewayの概要です😀
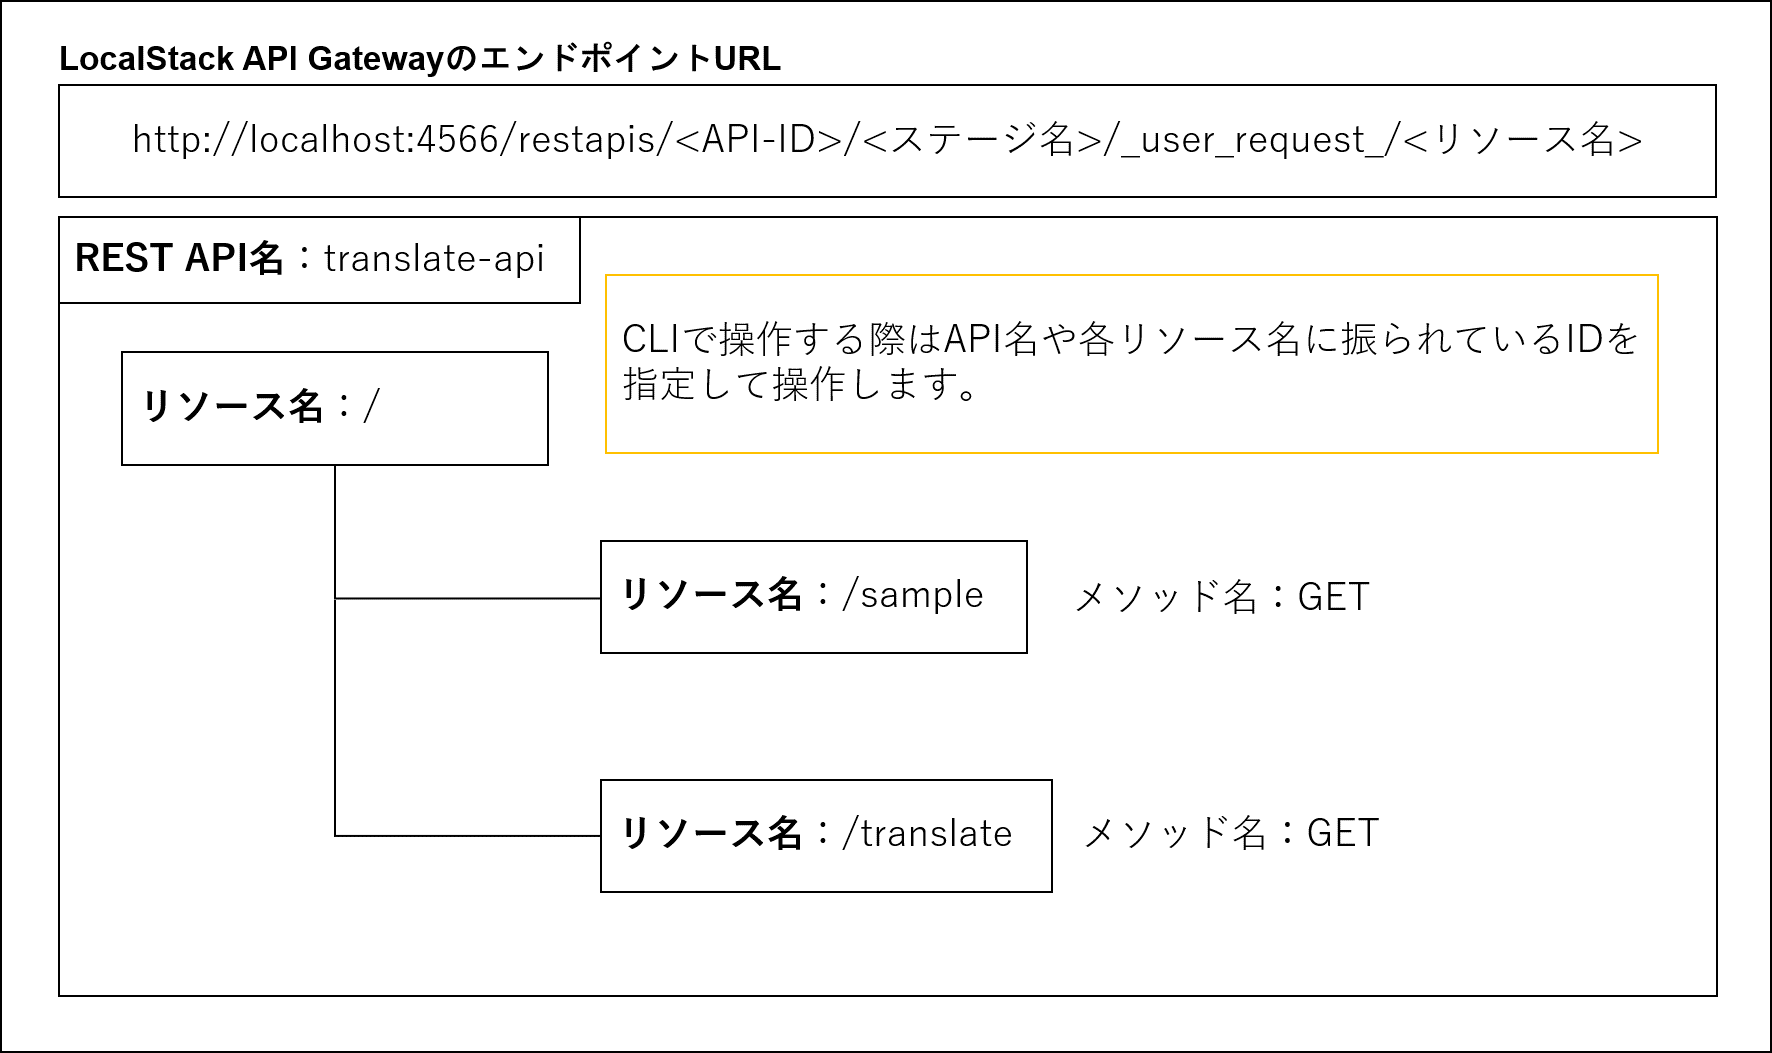
以下のBlackBeltを参考にしました🙇♂️
参考:20190514 AWS Black Belt Online Seminar Amazon API Gateway
REST APIの作成
API Gatewayで作成するコマンドはapigateway create-rest-apiです。コマンド実行後に表示されるidがAPIのIDです(リソースのIDではないのでご注意ください)
apigateway get-rest-apisコマンドでは作成したAPIを一覧で確認できるのでご活用ください。
--endpoint-configurationを指定しない場合はEDGEとなるため、ここではREGIONALを指定しています。
参考:
create-rest-api
20190514 AWS Black Belt Online Seminar Amazon API Gateway
Ubuntu@dev01:~/workplace/translate-function/node/nodejs$ awslocal apigateway create-rest-api --name translate-api --endpoint-configuration types=REGIONAL
{
    "id": "hpvqgkbms0",
    "name": "translate-api",
    "createdDate": "2023-05-14T12:30:39+09:00",
    "apiKeySource": "HEADER",
    "endpointConfiguration": {
        "types": [
            "REGIONAL"
        ]
    },
    "disableExecuteApiEndpoint": false
}
Ubuntu@dev01:~/workplace/translate-function/node/nodejs$ awslocal apigateway get-rest-apis
{
    "items": [
        {
            "id": "hpvqgkbms0",
            "name": "translate-api",
            "createdDate": "2023-05-14T12:30:39+09:00",
            "apiKeySource": "HEADER",
            "endpointConfiguration": {
                "types": [
                    "REGIONAL"
                ]
            },
            "disableExecuteApiEndpoint": false
        }
    ]
}
テストリソースの作成
リソースの作成にはAPI ID、どこに追加するか指定するための親リソースIDが必要になります。
apigateway get-resources --rest-api-id <API ID>コマンドでリソースの一覧を確認することができます。
# API IDを確認する
Ubuntu@dev01:~/workplace/translate-function/node/nodejs$ awslocal apigateway get-rest-apis
{
    "items": [
        {
            "id": "hpvqgkbms0",
            "name": "translate-api",
            "createdDate": "2023-05-14T12:30:39+09:00",
            "apiKeySource": "HEADER",
            "endpointConfiguration": {
                "types": [
                    "REGIONAL"
                ]
            },
            "disableExecuteApiEndpoint": false
        }
    ]
}
リソースIDを確認します。API作成後は/リソースが作成されます。新しいリソースは/リソース配下に作ることになります。
# リソースIDを確認する
Ubuntu@dev01:~/workplace/translate-function/node/nodejs$ awslocal apigateway get-resources --rest-api-id hpvqgkbms0
{
    "items": [
        {
            "id": "55ezw5mmr6",
            "path": "/"
        }
    ]
}
次にapigateway create-resourceコマンドを使って、テスト用の/sampleリソースを作成します。
/配下に作成するため--parent-idには/のリソースIDを指定しています。
Ubuntu@dev01:~/workplace/translate-function/node/nodejs$ awslocal apigateway create-resource --rest-api-id hpvqgkbms0 --parent-id 55ezw5mmr6 --path-part sample
{
    "id": "zqgeelqr0b",
    "parentId": "55ezw5mmr6",
    "pathPart": "sample",
    "path": "/sample"
}
Ubuntu@dev01:~/workplace/translate-function/node/nodejs$ awslocal apigateway get-resources --rest-api-id hpvqgkbms0
{
    "items": [
        {
            "id": "55ezw5mmr6",
            "path": "/"
        },
        {
            "id": "zqgeelqr0b",
            "parentId": "55ezw5mmr6",
            "pathPart": "sample",
            "path": "/sample"
        }
    ]
}
apigateway put-methodコマンドで/sampleリソースにGETメソッドを追加します。
参考:API Gateway put-method
# API IDを確認する
Ubuntu@dev01:~/workplace/translate-function/node/nodejs$  awslocal apigateway get-rest-apis
{
    "items": [
        {
            "id": "hpvqgkbms0",
            "name": "translate-api",
            "createdDate": "2023-05-14T12:30:39+09:00",
            "apiKeySource": "HEADER",
            "endpointConfiguration": {
                "types": [
                    "REGIONAL"
                ]
            },
            "disableExecuteApiEndpoint": false
        }
    ]
}
# GETメソッドの追加
Ubuntu@dev01:~/workplace/translate-function/node/nodejs$ awslocal apigateway put-method  --rest-api-id hpvqgkbms0 --resource-id zqgeelqr0b --http-method GET --authorization-type NONE
{
    "httpMethod": "GET",
    "authorizationType": "NONE",
    "apiKeyRequired": false
}

# /sampleリソースにGETメソッドが追加できたことを確認する
Ubuntu@dev01:~/workplace/translate-function/node/nodejs$  awslocal apigateway get-resources --rest-api-id hpvqgkbms0
{
    "items": [
        {
            "id": "55ezw5mmr6",
            "path": "/"
        },
        {
            "id": "zqgeelqr0b",
            "parentId": "55ezw5mmr6",
            "pathPart": "sample",
            "path": "/sample",
            "resourceMethods": {
                "GET": {
                    "httpMethod": "GET",
                    "authorizationType": "NONE",
                    "apiKeyRequired": false,
                    "methodResponses": {}
                }
            }
        }
    ]
}
これでクライアントから/sampleリソースへGETメソッドをリクエストできます。次に統合リクエスト(API Gatewayからバックエンドへのリクエストを定義、バックエンドを指定できる)をput-integrationコマンドで設定します。ここではいったんテストのため--typeをMOCKとしてレスポンスを固定します。
参考:
API Gateway put-integration
API 統合リクエストの基本タスク
Windowsコマンドプロンプトでは引用符をエスケープする必要があります。詳細は以下のページです。
参考:AWS CLI での文字列への引用符の使用
Ubuntu@dev01:~/workplace/translate-function/node/nodejs$ awslocal apigateway put-integration --rest-api-id hpvqgkbms0 --resource-id zqgeelqr0b --http-method GET --type MOCK --request-template '{"application/json" : "{\"report_id\": \"1\", \"report_title\": \"Hello World\"}"}'
{
    "type": "MOCK",
    "requestParameters": {},
    "requestTemplates": {
        "application/json": "{\"report_id\": \"1\", \"report_title\": \"Hello World\"}"
    },
    "cacheNamespace": "zqgeelqr0b",
    "cacheKeyParameters": []
}
デプロイする前にapigateway test-invoke-methodコマンドでテストします🧪
Ubuntu@dev01:~/workplace/translate-function/node/nodejs$ awslocal apigateway test-invoke-method --rest-api-id hpvqgkbms0 --resource-id zqgeelqr0b --http-method GET | jq .
{
  "status": 200,
  "body": "{\"report_id\": \"1\", \"report_title\": \"Hello World\"}",
  "headers": {
    "Host": "localhost:4566",
    "Accept-Encoding": "identity",
    "Content-Type": "application/json",
    "User-Agent": "aws-cli/2.11.15 Python/3.11.3 Linux/5.15.90.1-microsoft-standard-WSL2 exe/x86_64.ubuntu.20 prompt/off command/apigateway.test-invoke-method",
    "Accept": "application/json",
    "X-Amz-Date": "20230514T113523Z",
    "Authorization": "AWS4-HMAC-SHA256 Credential=test/20230514/us-east-1/apigateway/aws4_request, SignedHeaders=accept;content-type;host;x-amz-date, Signature=37de1d70843bf497460854f3f549fec76ee7ebf947b9d545f7b8847c70da07cc",
    "Content-Length": "2",
    "x-localstack-tgt-api": "apigateway",
    "x-moto-account-id": "000000000000",
    "X-Forwarded-For": "172.20.0.1, localhost:4566",
    "x-localstack-edge": "http://localhost:4566"
  }
}
apigateway create-deploymentコマンドでステージ(ここではdev)を作成してAPIを公開します。
参考:API create-deployment
# API IDを確認
Ubuntu@dev01:~/workplace/translate-function/node/nodejs$ awslocal apigateway get-rest-apis
{
    "items": [
        {
            "id": "hpvqgkbms0",
            "name": "translate-api",
            "createdDate": "2023-05-14T12:30:39+09:00",
            "apiKeySource": "HEADER",
            "endpointConfiguration": {
                "types": [
                    "REGIONAL"
                ]
            },
            "disableExecuteApiEndpoint": false
        }
    ]
}
Ubuntu@dev01:~/workplace/translate-function/node/nodejs$ awslocal apigateway create-deployment --rest-api-id hpvqgkbms0 --stage-name dev
{
    "id": "yxoalhr8v5",
    "createdDate": "2023-05-14T20:31:55+09:00"
}
デプロイが完了したのでAPIをたたいてレスポンスが返ってくるか確認します。
LocalStackのAPI Gatewayのデフォルトのエンドポイントはhttp://localhost:4566/restapis/<API-ID>/<ステージ名>/_user_request_/<リソース名>となります。
参考:LocalStack Amazon API Gateway
Ubuntu@dev01:~/workplace/translate-function/node/nodejs$ curl -X GET http://localhost:4566/restapis/hpvqgkbms0/dev/_user_request_/sample
{"report_id": "1", "report_title": "Hello World"}
translateリソースの作成
それではAPIのテスト実行もてきたのでtranslateリソースの作成に移ります!
Ubuntu@dev01:~/workplace/translate-function/node/nodejs$ awslocal apigateway create-resource --rest-api-id hpvqgkbms0 --parent-id 55ezw5mmr6 --path-part translate
{
    "id": "2ebfoxwva3",
    "parentId": "55ezw5mmr6",
    "pathPart": "translate",
    "path": "/translate"
}
Ubuntu@dev01:~/workplace/translate-function/node/nodejs$ awslocal apigateway put-method --rest-api-id hpvqgkbms0 -
-resource-id 2ebfoxwva3 --http-method GET --authorization-type NONE
{
    "httpMethod": "GET",
    "authorizationType": "NONE",
    "apiKeyRequired": false
}
リソースにGETメソッドを追加します。ここで--request-parametersコマンドでinput_textパラメータを受け入れるようにします。
参考:API Gateway --request-parameters
Ubuntu@dev01:~/workplace/translate-function/node/nodejs$ awslocal apigateway put-method  --rest-api-id hpvqgkbms0
--resource-id 2ebfoxwva3 --http-method GET --authorization-type NONE  --request-parameters "{\"method.request.querystrin
g.input_text\": true}"
{
    "httpMethod": "GET",
    "authorizationType": "NONE",
    "apiKeyRequired": false,
    "requestParameters": {
        "method.request.querystring.input_text": true
    }
}
次に統合リクエストの設定をします。ここでバックエンドをLambdaに統合するため--type AWS_PROXYを、統合したいLambdaのARNを--uriで指定します。
参考:API Gateway put-integration --type
Lambdaを指定するオプションコマンドは--uriです。値はarn:aws:apigateway:us-east-1:lambda:path/2015-03-31/functions/<FunctionARN>/invocationsとLocalStackでは決まっています。
参考:LocalStack API Gateway --uri
# 統合したいLambda関数のARNを確認します
Ubuntu@dev01:~/workplace/translate-function/node/nodejs$  awslocal lambda get-function --function-name translateFunction
{
    "Configuration": {
        "FunctionName": "translateFunction",
        "FunctionArn": "arn:aws:lambda:us-east-1:000000000000:function:translateFunction",
        "Runtime": "nodejs18.x",
        "Role": "arn::iam::000000000000:role/demo",
        "Handler": "translate.handler",
        "CodeSize": 1504,
        "Description": "",
        "Timeout": 60,
        "MemorySize": 128,
        "LastModified": "2023-05-14T02:39:20.431503+0000",
        "CodeSha256": "GQG2B5diM6Pe1+yZ7MkxoINkq25iX07DF1d/Co9WZpM=",
        "Version": "$LATEST",
        "TracingConfig": {
            "Mode": "PassThrough"
        },
        "RevisionId": "9d5a5a51-dcaa-49f1-8103-a0fb39964d59",
        "State": "Active",
        "LastUpdateStatus": "Successful",
        "PackageType": "Zip",
        "Architectures": [
            "x86_64"
        ],
        "EphemeralStorage": {
            "Size": 512
        },
        "SnapStart": {
            "ApplyOn": "None",
            "OptimizationStatus": "Off"
        },
        "RuntimeVersionConfig": {
            "RuntimeVersionArn": "arn:aws:lambda:us-east-1::runtime:8eeff65f6809a3ce81507fe733fe09b835899b99481ba22fd75b5a7338290ec1"
        }
    },
    "Code": {
        "RepositoryType": "S3",
        "Location": "http://s3.localhost.localstack.cloud:4566/awslambda-us-east-1-tasks/snapshots/000000000000/translateFunction-e510ad6d-bc56-4bb9-bf13-b21b2ed9dcd6?AWSAccessKeyId=000000000000&Signature=aKGyEdrwShjbF6AQIuWyuu5ufTg%3D&Expires=1684073259"
    }
}
Ubuntu@dev01:~/workplace/translate-function/node/nodejs$ awslocal apigateway put-integration --rest-api-id hpvqgkbms0 --resource-id 2ebfoxwva3 --http-method GET --integration-http-method GET --type AWS_PROXY --uri arn:aws:apigateway:us-east-1:lambda:path/2015-03-31/functions/arn:aws:lambda:us-east-1:000000000000:function:translateFunction/invocations
{
    "type": "AWS_PROXY",
    "httpMethod": "GET",
    "uri": "arn:aws:apigateway:us-east-1:lambda:path/2015-03-31/functions/arn:aws:lambda:us-east-1:000000000000:function:translateFunction/invocations",
    "requestParameters": {},
    "cacheNamespace": "2ebfoxwva3",
    "cacheKeyParameters": []
}
Lambda関数でもパラメータを受け取れるよう修正を加えます。(https://maku.blog/p/5mv5dkt/)
const https = require("https");
const querystring = require("querystring");

const BASE_URL = "https://mt-auto-minhon-mlt.ucri.jgn-x.jp"; // 基底URL (https://xxx.jpまでを入力)
const API_KEY = "***"; // API key
const API_SECRET = "***"; // API secret
const LOGIN_ID = "***"; // ログインID
const API_NAME = "mt"; // API名 (https://xxx.jp/api/mt/generalNT_ja_en/ の場合は、"mt")
const API_PARAM = "generalNT_ja_en"; // API値 (https://xxx.jp/api/mt/generalNT_ja_en/ の場合は、"generalNT_ja_en")

const callTranslateApi = async (accessToken, input_text) => {
  const postData = querystring.stringify({
    access_token: accessToken,
    key: API_KEY, // API Key
    api_name: API_NAME,
    api_param: API_PARAM,
    name: LOGIN_ID, // ログインID
    type: "json", // レスポンスタイプ
    text: input_text, // 以下、APIごとのパラメータ
  });

  const options = {
    method: "POST",
    headers: {
      "Content-Type": "application/x-www-form-urlencoded",
      "Content-Length": postData.length,
    },
  };

  return new Promise((resolve, reject) => {
    const req = https.request(BASE_URL + "/api/", options, (res) => {
      let body = "";
      res.on("data", (chunk) => {
        body += chunk;
      });
      res.on("end", () => {
        bodyJson = JSON.parse(body);
        const output_text = bodyJson.resultset.result.text;
        resolve(output_text);
      });
    });
    req.on("error", (err) => {
      reject(err);
    });

    req.write(postData);
    req.end();
  });
};

const getAccessToken = async () => {
  const tokenData = querystring.stringify({
    grant_type: "client_credentials",
    client_id: API_KEY, // API Key
    client_secret: API_SECRET, // API secret
    urlAccessToken: BASE_URL + "/oauth2/token.php", // アクセストークン取得URI
  });

  const tokenOptions = {
    method: "POST",
    headers: {
      "Content-Type": "application/x-www-form-urlencoded",
      "Content-Length": tokenData.length,
    },
  };

  return new Promise((resolve, reject) => {
    const tokenReq = https.request(
      BASE_URL + "/oauth2/token.php",
      tokenOptions,
      (res) => {
        let body = "";
        res.on("data", (chunk) => {
          body += chunk;
        });
        res.on("end", () => {
          const accessToken = JSON.parse(body).access_token; // アクセストークン
          if (!accessToken) {
            console.error("Access token not found.");
            reject("Error");
          } else {
            resolve(accessToken);
          }
        });
      }
    );

    tokenReq.on("error", (err) => {
      reject(err);
    });
    tokenReq.write(tokenData);
    tokenReq.end();
  });
};

exports.handler = async (event, context) => {
  try {
    let message = "failed...";
    let output_text = "none";
    if (event.queryStringParameters !== null) {
      const INPUT_TEXT = event.queryStringParameters.input_text;
      const accessToken = await getAccessToken();
      output_text = await callTranslateApi(accessToken, INPUT_TEXT);
      message = "success";
      console.log("INPUT_TEXT : " + INPUT_TEXT);
    }
    console.log("output_text : " + output_text);

    const response = {
      statusCode: 200,
      headers: { "Content-Type": "application/json" },
      body: JSON.stringify({
        message: message,
        output_text: output_text,
      }),
    };

    return response;
  } catch (error) {
    console.log(error.stack);
  }
};
修正したtranslate.jsをzipにして、lambda update-function-codeコマンドでtranslateFunctionを更新します。
参考:Lambda update-function-code
Ubuntu@dev01:~/workplace/translate-function/node/nodejs$ zip translate.zip translate.js
updating: translate.js (deflated 62%)
Ubuntu@dev01:~/workplace/translate-function/node/nodejs$ awslocal lambda update-function-code --function-name translateFunction --zip-file fileb://translate.zip
    "Description": "",
    "Timeout": 60,
    "MemorySize": 128,
    "LastModified": "2023-05-14T15:05:13.069049+0000",
    "CodeSha256": "HnS2h+dTY1696Pz9BVMmS+qrC4cLpG5Lls2kruAKWNQ=",
    "Version": "$LATEST",
    "TracingConfig": {
        "Mode": "PassThrough"
    },
    "RevisionId": "6b97a5ef-763d-462a-85f3-4a3b89346e1a",
    "State": "Active",
    "LastUpdateStatus": "InProgress",
    "LastUpdateStatusReason": "The function is being created.",
    "LastUpdateStatusReasonCode": "Creating",
    "PackageType": "Zip",
    "Architectures": [
        "x86_64"
    ],
    "EphemeralStorage": {
        "Size": 512
    },
    "SnapStart": {
        "ApplyOn": "None",
        "OptimizationStatus": "Off"
    },
    "RuntimeVersionConfig": {
        "RuntimeVersionArn": "arn:aws:lambda:us-east-1::runtime:8eeff65f6809a3ce81507fe733fe09b835899b99481ba22fd75b5a7338290ec1"
    }
}
次にブラウザで確認してみます👀

これでAPI GatewayとLambdaの連携が完了しました👍
DynamoDBの構築
DynamoDBのテーブルを作成します
-
--attribute-definitionsでは属性とその属性のタイプを指定します。下記のコードでは属性名timestampでタイプが文字列です。 -
--key-schemaではプライマリーを構成する属性を指定します(--attribute-definitionsで指定している中から選択します)下記のコードではtimestamp属性をパーティションキーと指定しています。
参考:DynamoDB create-table
--billing-modeを指定しない場合はデフォルトでPROVISIONEDになるためReadCapacityUnits, WriteCapacityUnitsを指定しないといけません。
参考:読み取り/書き込みキャパシティモード
Ubuntu@dev01:~/workplace/translate-function/node/nodejs$ awslocal dynamodb create-table --table-name translate-history --attribute-definitions AttributeName=timestamp,AttributeType=S --key-schema AttributeName=timestamp,KeyType=HASH --billing-mode PAY_PER_REQUEST
{
    "TableDescription": {
        "AttributeDefinitions": [
            {
                "AttributeName": "timestamp",
                "AttributeType": "S"
            }
        ],
        "TableName": "translate-history",
        "KeySchema": [
            {
                "AttributeName": "timestamp",
                "KeyType": "HASH"
            }
        ],
        "TableStatus": "ACTIVE",
        "CreationDateTime": "2023-05-20T17:29:44.130000+09:00",
        "ProvisionedThroughput": {
            "LastIncreaseDateTime": "1970-01-01T09:00:00+09:00",
            "LastDecreaseDateTime": "1970-01-01T09:00:00+09:00",
            "NumberOfDecreasesToday": 0,
            "ReadCapacityUnits": 0,
            "WriteCapacityUnits": 0
        },
        "TableSizeBytes": 0,
        "ItemCount": 0,
        "TableArn": "arn:aws:dynamodb:us-east-1:000000000000:table/translate-history",
        "TableId": "d7231038-ef8f-4b49-a830-1d2b616b8978",
        "BillingModeSummary": {
            "BillingMode": "PAY_PER_REQUEST",
            "LastUpdateToPayPerRequestDateTime": "2023-05-20T17:29:44.130000+09:00"
        }
    }
}
CLIから項目を追加して確認してみます
put-itemで項目を追加して、scanでテーブル内のすべての項目を確認します。
参考:
DynamoDB put-item
DynamoDB scan
Ubuntu@dev01:~/workplace/translate-function/node/nodejs$ awslocal dynamodb put-item --table-name translate-history --item "{\"timestamp\":{\"S\":\"203505082144\"},\"input_text\":{\"S\":\"おはようございます\"},\"output_text\":{\"S\":\"Good morning\"}}"
Ubuntu@dev01:~/workplace/translate-function/node/nodejs$ awslocal dynamodb scan --table-name translate-history
{
    "Items": [
        {
            "input_text": {
                "S": "おはようございます"
            },
            "timestamp": {
                "S": "203505082144"
            },
            "output_text": {
                "S": "Good morning"
            }
        }
    ],
    "Count": 1,
    "ScannedCount": 1,
    "ConsumedCapacity": null
}
LambdaとDynamoDBを連携
LambdaからDynamoDBへ項目を追加できるようLambda関数の修正をします![]()
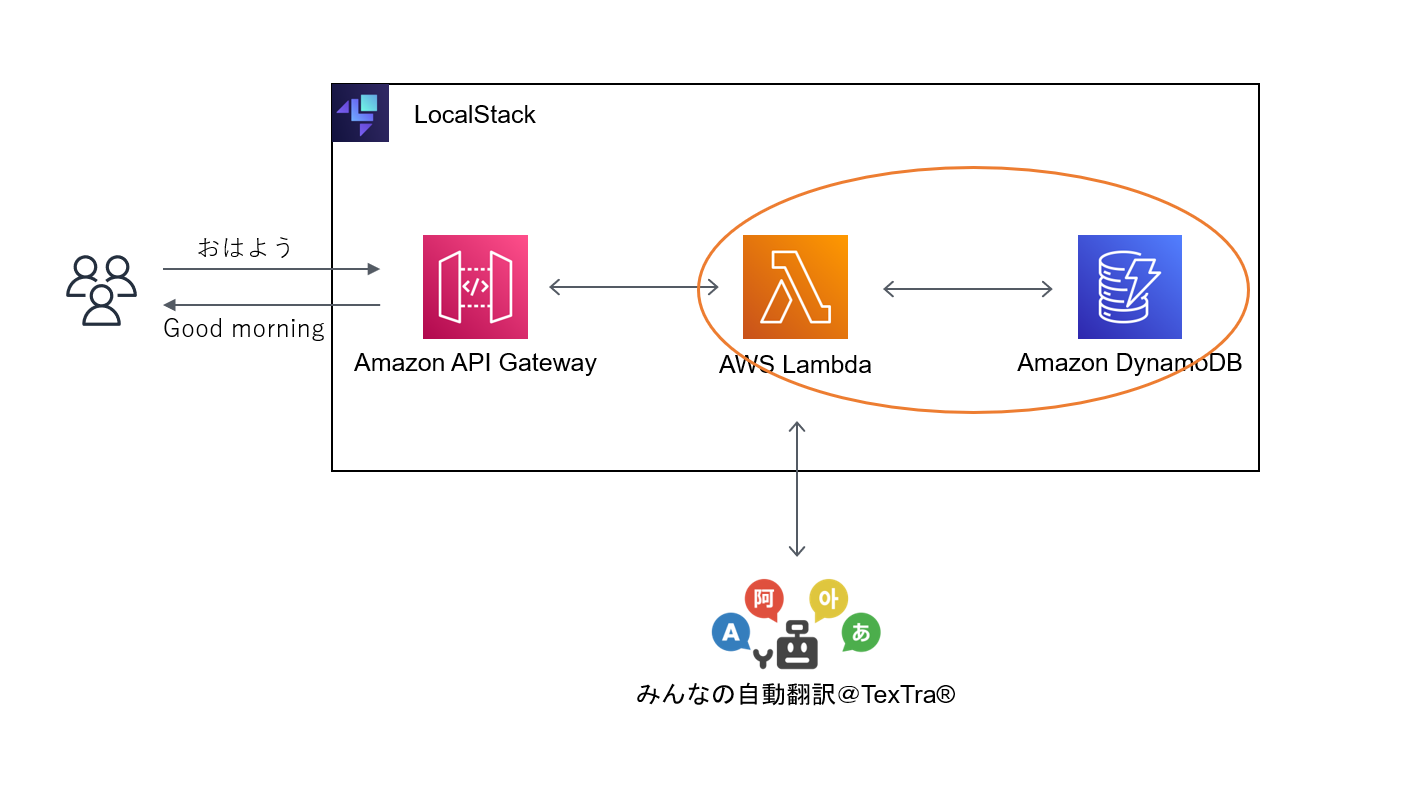
参考:
DynamoDB を Node.js で操作する(SDK ver.3 の場合)
@aws-sdk/client-dynamod PutItemCommand
LocalStackでAWS SDKを使用する場合はエンドポイントhttp://${LOCALSTACK_HOSTNAME}:${EDGE_PORT}の指定が必要です。以下のコードではDynamoDBClientの箇所で指定しています。
参考:LocalStack Transparent Endpoint Injection
const https = require("https");
const querystring = require("querystring");
const { DynamoDBClient, PutItemCommand } = require("@aws-sdk/client-dynamodb");

const BASE_URL = "https://mt-auto-minhon-mlt.ucri.jgn-x.jp"; // 基底URL (https://xxx.jpまでを入力)
const API_KEY = "***"; // API key
const API_SECRET = "***"; // API secret
const LOGIN_ID = "***"; // ログインID
const API_NAME = "mt"; // API名 (https://xxx.jp/api/mt/generalNT_ja_en/ の場合は、"mt")
const API_PARAM = "generalNT_ja_en"; // API値 (https://xxx.jp/api/mt/generalNT_ja_en/ の場合は、"generalNT_ja_en")

const callTranslateApi = async (accessToken, input_text) => {
  const postData = querystring.stringify({
    access_token: accessToken,
    key: API_KEY, // API Key
    api_name: API_NAME,
    api_param: API_PARAM,
    name: LOGIN_ID, // ログインID
    type: "json", // レスポンスタイプ
    text: input_text, // 以下、APIごとのパラメータ
  });

  const options = {
    method: "POST",
    headers: {
      "Content-Type": "application/x-www-form-urlencoded",
      "Content-Length": postData.length,
    },
  };

  return new Promise((resolve, reject) => {
    const req = https.request(BASE_URL + "/api/", options, (res) => {
      let body = "";
      res.on("data", (chunk) => {
        body += chunk;
      });
      res.on("end", () => {
        bodyJson = JSON.parse(body);
        const output_text = bodyJson.resultset.result.text;
        resolve(output_text);
      });
    });
    req.on("error", (err) => {
      reject(err);
    });

    req.write(postData);
    req.end();
  });
};

const getAccessToken = async () => {
  const tokenData = querystring.stringify({
    grant_type: "client_credentials",
    client_id: API_KEY, // API Key
    client_secret: API_SECRET, // API secret
    urlAccessToken: BASE_URL + "/oauth2/token.php", // アクセストークン取得URI
  });

  const tokenOptions = {
    method: "POST",
    headers: {
      "Content-Type": "application/x-www-form-urlencoded",
      "Content-Length": tokenData.length,
    },
  };

  return new Promise((resolve, reject) => {
    const tokenReq = https.request(
      BASE_URL + "/oauth2/token.php",
      tokenOptions,
      (res) => {
        let body = "";
        res.on("data", (chunk) => {
          body += chunk;
        });
        res.on("end", () => {
          const accessToken = JSON.parse(body).access_token; // アクセストークン
          if (!accessToken) {
            console.error("Access token not found.");
            reject("Error");
          } else {
            resolve(accessToken);
          }
        });
      }
    );

    tokenReq.on("error", (err) => {
      reject(err);
    });
    tokenReq.write(tokenData);
    tokenReq.end();
  });
};

const callDynamoDB = async (input_text, output_text) => {
  const dynamoConfig = {
    endpoint: `http://${process.env["LOCALSTACK_HOSTNAME"]}:${process.env["EDGE_PORT"]}`,
    region: "us-east-1",
  };
  const dynamoDBClient = new DynamoDBClient(dynamoConfig);

  const createdAt = new Date().toLocaleDateString("ja-JP", {
    year: "numeric",
    month: "2-digit",
    day: "2-digit",
  });

  const putItemCommand = new PutItemCommand({
    TableName: "translate-history",
    Item: {
      timestamp: { S: createdAt },
      input_text: { S: input_text },
      output_text: { S: output_text },
    },
  });
  await dynamoDBClient.send(putItemCommand);
};
exports.handler = async (event, context) => {
  try {
    let message = "failed...";
    let output_text = "none";
    if (event.queryStringParameters !== null) {
      const INPUT_TEXT = event.queryStringParameters.input_text;
      const accessToken = await getAccessToken();
      output_text = await callTranslateApi(accessToken, INPUT_TEXT);
      message = "success";
      await callDynamoDB(INPUT_TEXT, output_text);
    }

    const response = {
      statusCode: 200,
      headers: { "Content-Type": "application/json" },
      body: JSON.stringify({
        message: message,
        output_text: output_text,
      }),
    };

    return response;
  } catch (error) {
    console.log(error.stack);
  }
};
修正したLambda関数をzipにしてデプロイします。
Ubuntu@dev01:~/workplace/translate-function/node/nodejs$ zip translate.zip translate.js
Ubuntu@dev01:~/workplace/translate-function/node/nodejs$ awslocal lambda update-function-code --function-name translateFunction --zip-file fileb://translate.zip
{
    "FunctionName": "translateFunction",
    "FunctionArn": "arn:aws:lambda:us-east-1:000000000000:function:translateFunction",
    "Runtime": "nodejs18.x",
    "Role": "arn::iam::000000000000:role/demo",
    "Handler": "translate.handler",
    "CodeSize": 3500,
    "Description": "",
    "Timeout": 60,
    "MemorySize": 128,
    "LastModified": "2023-05-20T09:39:03.989290+0000",
    "CodeSha256": "eXu7kuOEmiXkW5T85scNKFpH9a2akXman1OxKFjxNWk=",
    "Version": "$LATEST",
    "TracingConfig": {
        "Mode": "PassThrough"
    },
    "RevisionId": "61d78423-094c-4bc6-a242-7b55f891e4fa",
    "State": "Active",
    "LastUpdateStatus": "InProgress",
    "LastUpdateStatusReason": "The function is being created.",
    "LastUpdateStatusReasonCode": "Creating",
    "PackageType": "Zip",
    "Architectures": [
        "x86_64"
    ],
    "EphemeralStorage": {
        "Size": 512
    },
    "SnapStart": {
        "ApplyOn": "None",
        "OptimizationStatus": "Off"
    },
    "RuntimeVersionConfig": {
        "RuntimeVersionArn": "arn:aws:lambda:us-east-1::runtime:8eeff65f6809a3ce81507fe733fe09b835899b99481ba22fd75b5a7338290ec1"
    }
}
API Gateway, Lambda, 翻訳API, DynamoDBが連携されているか確認する
ブラウザからAPIをたたいてみます。

最後にDynamoDBに履歴が登録されているか確認します。
Ubuntu@dev01:~/workplace/translate-function/node/nodejs$ awslocal dynamodb scan --table-name translate-history
{
    "Items": [
        {
            "input_text": {
                "S": "おはようございます"
            },
            "timestamp": {
                "S": "203505082144"
            },
            "output_text": {
                "S": "Good morning"
            }
        },
        {
            "input_text": {
                "S": "これでハンズオンは完了です"
            },
            "timestamp": {
                "S": "2023/05/20"
            },
            "output_text": {
                "S": "This completes the hands-on."
            }
        }
    ],
    "Count": 2,
    "ScannedCount": 2,
    "ConsumedCapacity": null
}
DynamoDBに履歴が保存されていることが確認できました!
おめでとうございます🔥
終わり
【AWS資格対策】お金をかけずにハンズオンで学ぶAWS入門#1【初心者向け】をお読みいただき、ありがとうございました!これで本記事のハンズオンは終了です![]()
AWS資格取得を目指す方々にとって、役立つ情報源となることを願っています🙏
