これはMovable Type Advent Calendar 2019の10日目の記事です。
今回は、MTを使用していて気になったとある仕様について、カスタマイズで何とかしてみようという内容になります。
その「とある仕様」とは…
アセット選択ダイアログの一覧にサムネイルが表示されない
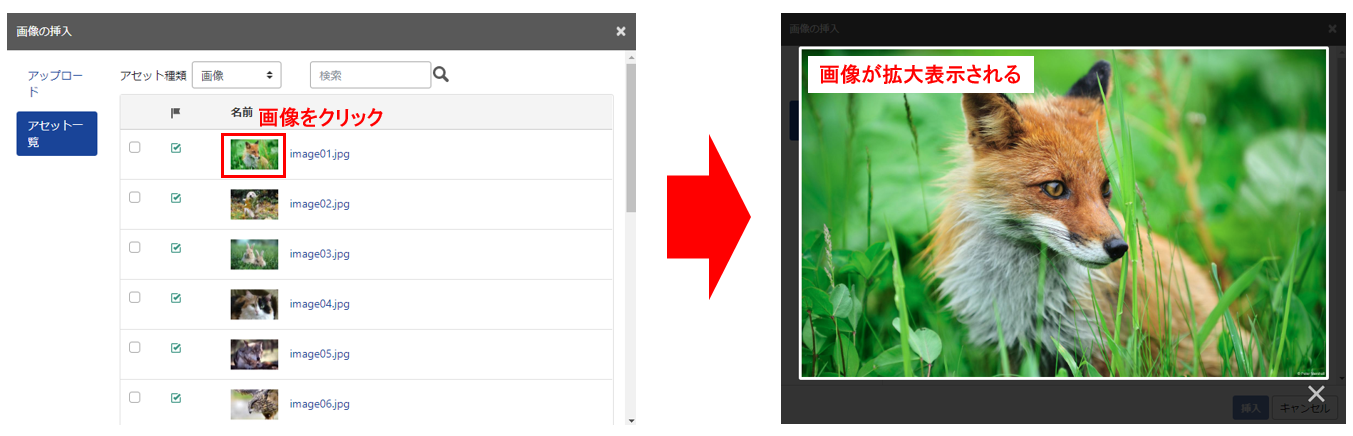
リッチテキストエディタの「画像の挿入」機能などで目にするアセット選択ダイアログ。
ユーザーはダイアログに表示された一覧から画像を選択するのですが、
一覧に表示されている情報は画像の名前のみとなっており、肝心のサムネイルが表示されていません。

名前の部分をクリックするとサムネイルを表示できますが、
一つ一つ名前をクリックして目当ての画像を探し回るのは手間も時間も掛かり、ストレスが溜まる…。
そんな経験をしているユーザーは少なくないと思います。
ちなみに
MT7で追加された「ブロックエディタ」機能を使用して画像を挿入する場合は、
WordPressライクなUIで画像を選択できるようになっています。

今後のアップデートで、どこからでもこの新UIが使えるようになるといいなぁ…と思いつつ、
今回は、旧来のUIでも一覧にサムネイルを表示する方法をご紹介します。
必要なもの
- MTAppjQueryプラグイン
管理画面のカスタマイズを行う上で欠かせないプラグイン。
MT6の場合はv1系、MT7の場合はv2系でないと動作しないためご注意ください。
実装方法
※解説は後述します。
まず、MTAppjQueryのuser.jsに下記のコードを追加して保存します。
if(mtappVars.mode == 'dialog_asset_modal' || mtappVars.mode == 'list_asset'){
  const target = $('table.listing-table')[0];
  const insertThumbnailImages = function(){
    $(target).find('td.cb').each(function(){
      let thumbnail_content = '';
      let thumbnail_src_url = $.parseJSON($(this).children('input[type="hidden"][id^="asset-"]').val()).preview_url;
      if(typeof thumbnail_src_url !== "undefined"){
        thumbnail_content = '<img src="'+thumbnail_src_url+'" draggable="false" />';
      }
      $(this).siblings('td.asset-label').prepend('<div class="asset-table-thumbnail">'+thumbnail_content+'</div>');
    });
  };
  const observer = new MutationObserver(insertThumbnailImages);
  observer.observe(target, { childList : true });
  insertThumbnailImages();
}
続いて、user.cssに下記のコードを追加して保存します。
div.asset-table-thumbnail {
  display : inline-block;
  position : relative;
  vertical-align : middle;
  margin-right : 10px;

  /* サムネイル画像の表示サイズ */
  width : 60px;
  height : 40px;
}
div.asset-table-thumbnail img {
  position : absolute;
  top : 50%;
  left : 50%;
  transform : translateY(-50%) translateX(-50%);
  max-width : 100%;
  max-height : 100%;
}
以上です。上記のコードでMT6,MT7どちらでも動作します。
適用後の一覧画面は次のようになります。
名前の横にサムネイル画像が表示され、分かり易くなりました。

サムネイルの表示サイズを変えたい場合は、
上記user.cssのwidth,height(コメントを入れている部分)の値を変更してください。
ちなみにMT6でEnableUploadCompatを有効にしている場合でもきちんと動作します。
解説
アセット選択ダイアログの各アセットの<td class="cb">内にはhidden属性のinput要素が入っており、
ここにアセットの詳細な情報がJSON形式で格納されています。

JSONを見やすく整形すると次のようになります。
{
  "Actual Dimensions": "1920 x 1200 ピクセル",
  "URL": "http://www.test.com/image01.jpg",
  "class": "image",
  "ext": "jpg",
  "file_name": "image01.jpg",
  "file_size": "227.6 KB",
  "image_dimensions": "1920 x 1200 ピクセル",
  "image_height": "1200",
  "image_width": "1920",
  "mime_type": "image/jpeg",
  "name": "image01.jpg",
  "preview_height": 75,
  "preview_height_offset": 22,
  "preview_url": "http://www.test.com/assets_c/2019/12/image01-thumb-120xauto-42.jpg",
  "preview_width": 120,
  "preview_width_offset": 0,
  "thumbnail_height": 60,
  "thumbnail_height_offset": 0,
  "thumbnail_url": "http://www.test.com/assets_c/2019/12/image01-thumb-60x60-42.jpg",
  "thumbnail_width": 60,
  "thumbnail_width_offset": 0,
  "url": "http://www.test.com/image01.jpg",
  "タグ": "",
  "名前": "image01.jpg",
  "場所": "/var/sites/test/htdocs/image01.jpg",
  "実サイズ": "1920 x 1200 ピクセル",
  "説明": ""
}
"preview_url"にサムネイル画像のURLが格納されています。
("thumbnail_url"もサムネイル画像のURLですが、こちらは正方形にトリミングされています。)
ここまで分かれば実装は簡単です。
先程user.jsに入力したコードは
- JSONをパース
-
"preview_url"の値を取り出す - imgタグを生成
という流れで、各アセットのサムネイル画像を表示する処理を行っています。
なお、ダイアログ上でアセットを検索したりページ送りをした際に一覧のテーブルが更新されるため、
その都度サムネイルを表示しなおすようにMutationObserverでテーブルの変化を監視しています。
応用編
先程のJSONには、サムネイルのURL以外にも様々な情報が格納されています。
これらを使って、例えば次のような事ができます。
応用1.Lightboxで元画像を表示する
JSONの"URL"には、元画像のURLが格納されています。
"URL": "http://www.test.com/image01.jpg"
システムのMTAppjQueryプラグインの設定にてLightboxのライブラリを読み込み、
user.jsのコードを下記のように変更する事で、
サムネイルをクリックした際に元画像がモーダル表示されるようになります。
if(mtappVars.mode == 'dialog_asset_modal' || mtappVars.mode == 'list_asset'){
  const target = $('table.listing-table')[0];
  const insertThumbnailImages = function(){
    $(target).find('td.cb').each(function(){
      let thumbnail_content = '';
      let thumbnail_data = $.parseJSON($(this).children('input[type="hidden"][id^="asset-"]').val());
      let thumbnail_src_url = thumbnail_data.preview_url;
      let thumbnail_fullsize_url = thumbnail_data.url;
      if(typeof thumbnail_src_url !== "undefined"){
        thumbnail_content = '<a href="'+thumbnail_fullsize_url+'" rel="lightbox" draggable="false"><img src="'+thumbnail_src_url+'" draggable="false" /></a>';
      }
      $(this).siblings('td.asset-label').prepend('<div class="asset-table-thumbnail">'+thumbnail_content+'</div>');
    });
  };
  const observer = new MutationObserver(insertThumbnailImages);
  observer.observe(target, { childList : true });
  insertThumbnailImages();
}
適用後:
応用2.画像以外のファイルは種別に応じたアイコンを表示する
画像についてはサムネイルを表示できるようになりましたが、
画像以外のアセットはJSONに"preview_url"が存在しないため、このままだと何も表示されません。
せっかくなので、これらも分かりやすい見た目にしてみましょう。
JSONの"mime_type"には、アセットの種別を示すMIMEタイプの情報が格納されています。
"mime_type": "image/jpeg"
"mime_type": "application/pdf"
これを活用し、
"preview_url"がundefinedの場合は"mime_type"を確認して、
ファイルの種別に応じたアイコンを表示するようにします。
下記はPDFファイル,Wordファイル,Excelファイルに対応した例です。
if(mtappVars.mode == 'dialog_asset_modal' || mtappVars.mode == 'list_asset'){
  const target = $('table.listing-table')[0];
  const insertThumbnailImages = function(){
    $(target).find('td.cb').each(function(){
      let thumbnail_content = '';
      let thumbnail_data = $.parseJSON($(this).children('input[type="hidden"][id^="asset-"]').val());
      let thumbnail_src_url = thumbnail_data.preview_url;
      let thumbnail_fullsize_url = thumbnail_data.url;
      let thumbnail_mime_type = thumbnail_data.mime_type;
      if(typeof thumbnail_src_url !== "undefined"){
        thumbnail_content = '<a href="'+thumbnail_fullsize_url+'" rel="lightbox" draggable="false"><img src="'+thumbnail_src_url+'" draggable="false" /></a>';
      }else{
        switch(thumbnail_mime_type){
          case 'application/pdf': // pdf
            thumbnail_src_url = '/images/pdf_icon.png';
            break;
          case 'application/vnd.openxmlformats-officedocument.wordprocessingml.document': // docx
          case 'application/msword': // doc
            thumbnail_src_url = '/images/word_icon.png';
            break;
          case 'application/vnd.openxmlformats-officedocument.spreadsheetml.sheet': // xlsx
          case 'application/vnd.ms-excel': // xls
            thumbnail_src_url = '/images/excel_icon.png';
            break;
        }
        if(typeof thumbnail_src_url !== "undefined"){
          thumbnail_content = '<img src="'+thumbnail_src_url+'" draggable="false" />';
        }
      }
      $(this).siblings('td.asset-label').prepend('<div class="asset-table-thumbnail">'+thumbnail_content+'</div>');
    });
  };
  const observer = new MutationObserver(insertThumbnailImages);
  observer.observe(target, { childList : true });
  insertThumbnailImages();
}
適用後:

ファイルの種別が一目で分かるようになりました。
最後に
方法を考えるにあたり、はじめはData API必須かな…と思っていましたが、
意外にもシンプルな方法で実現できました。
サムネイルが見えるとアセット挿入機能が格段に使い易くなります。是非お試しください。