Jenkinsユーザ・カンファレンス2015で @nobuoka さんが発表されていた、
開発中の機能やUI/UXの検証環境を手軽に動かしたい をJenkins+Dockerでやってみました

概要
- http://${branchname}.feature.example.com で各コンテナにアクセスできるようにする
- DockerホストはJenkinsのスレーブノードとして登録することでJenkinsからDockerを操作できるようにする
- 各コンテナは3000番ポート(webrickのデフォルトポート)を公開する
- webrickを起動するのみでsshdなど他のサービスは基本的には立ち上げない
- サブドメインと各コンテナ(の公開ポート)の解決にはhttpdを利用する
- 元の資料ではPlackを使っていたけど私は馴染みがないのでhttpdでやる
- ポートフォワーディングの待ち受けポートの取得にはDockerAPIを利用する
- AWSのRoute53を使い*.feature.example.comへのリクエストが特定のサーバ(Dockerホスト)に辿り着くようにする
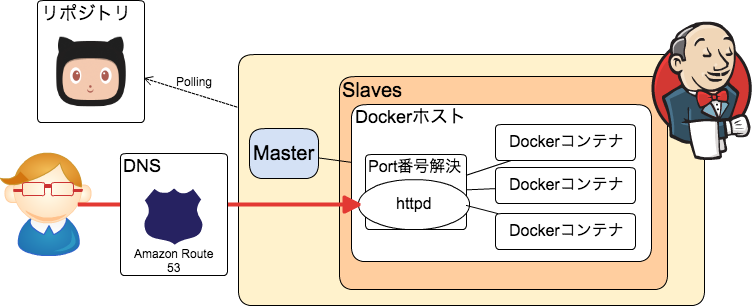
動作イメージ
やってることは単純です
- 【開発者】featureブランチへのgit push
- jenkinsがpollingして変更を検知
- 【Jenkins】Dockerコンテナを起動
- 【Jenkins】httpdに起動したDockerコンテナへのProxyを追加
対象
- アプリ
- Railsアプリ
- webサーバはなんでもよいのでwebrick
- DBはsqlite3を想定します
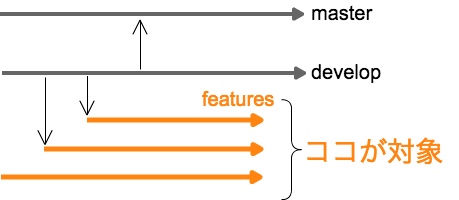
- 対象ブランチ
- git-flowブランチモデル
環境
- ホスト ... AmazonLinux
- コンテナ ... AmazonLinux
作業内容
Route53(DNS)の設定
- Route53はワイルドカードエントリをサポートするのでその設定を行います
- 事前にドメインを取得してください
- ドメインを持ってない方は無料で使用できるドメインもあるので調べてみてください
- DockerホストのPublicIPなどを設定します
- こちらなどで設定については説明されてます
Dockerホスト(Jenkinsスレーブ)の設定
- jenkins用に jenkins アカウントを用意しているものとします
1) Dockerの準備
other_args="-H tcp://0.0.0.0:4243 -H unix:///var/run/docker.sock"
- 上記はhttpでAPIを使わない場合は不要です
- unixドメインソケットを使うやり方もあるようです
2) baseイメージの作成
- 都度全てをビルドすると時間がかかるので、ある程度のパッケージ/gemなどを入れたイメージを用意します
- 事前にgithubに登録している鍵をgithub_keyという名前でカレントディレクトリに配置しておきます
- 以下に載せるDockerfileは参考程度に見てください
- イメージ名はloca/app_baseという名前にしておきます
Dockerfile
FROM local/amzn
MAINTAINER kmats
# githubの鍵配置
RUN mkdir -p /root/.ssh
RUN chmod 700 /root/.ssh
COPY github_key /root/.ssh/github_key
RUN chmod 600 /root/.ssh/github_key
RUN echo -e "Host github.com\n\
  User git\n\
  Hostname ssh.github.com\n\
  Port 443\n\
  IdentityFile ~/.ssh/github_key\n\
  StrictHostKeyChecking no" >> ~/.ssh/config
RUN chmod 600 /root/.ssh/config
# パッケージのインストール
RUN yum update -y
RUN yum install -y wget curl sudo net-tools git libxslt-devel libxml2-devel patch libyaml-devel libffi-devel glibc-headers autoconf gcc-c++ glibc-devel patch readline-devel zlib-devel openssl-devel automake libtool bison make bzip2 sqlite
# Ruby(rvm)のインストール
RUN gpg2 --keyserver hkp://keys.gnupg.net --recv-keys D39DC0E3
RUN curl -L https://get.rvm.io | bash -s stable
RUN /bin/bash -l -c "rvm install 2.2.0"
RUN /bin/bash -l -c "rvm use 2.2.0 --default"
# アプリの配置
RUN mkdir -p /var/app/
WORKDIR /var/app/
RUN git clone git@github.com:kmats/appname.git #<=適宜設定する
RUN /bin/bash -l -c "bundle install"
RUN /bin/bash -l -c "rake db:setup"
# script.shはあとで用意する
ENTRYPOINT /bin/bash -l -c "sh script.sh"
$ sudo docker build -t local/app_base .
3) httpdの準備
$ sudo yum install -y httpd
- 各feature毎にProxyの設定を書いたファイルを配置するので、ディレクトリを作ります
$ sudo mkdir /etc/httpd/conf.d/proxy_includes/
$ sudo chmod 777 /etc/httpd/conf.d/proxy_includes/ #<=手抜き
- httpd.confに以下の行を追加します
$ diff /etc/httpd/conf/httpd.conf{.default,}
353a354,363
>
> NameVirtualHost *:80
> Include conf.d/proxy_includes/*.include
>
4) ttyなしでsudo出来るようにする
- dockerコマンドやサービスの再起動を行う際にはsudoを利用します
- ttyなしでsudoできるようこちらの記事に倣いましょう
$ sudo visudo
- Defaults    requiretty
+ # Defaults    requiretty
+ Defaults:jenkins !requiretty
+ jenkins ALL=(ALL) NOPASSWD:ALL
Jenkinsの設定
- Dockerホストはスレーブとして登録しているものとします
a) featureブランチをpollingする
- ソースコード管理>Git から対象のリポジトリを指定します
- このときBranches to buildは
*/feature/*とします - ビルド・トリガ>SCMをポーリング からスケジュールを設定すると良いでしょう
b) ブランチ名から branchname を取得する
以下の様なシェルスクリプトでも取得できます
BRANCHNAME=${GIT_BRANCH#*/*/}
- あとの処理でも使えるように環境変数としてインジェクトしておきます
c) Dockerfileを作成、実際に起動するコンテナイメージをビルドする
- シェルの実行 でビルドします
### Dockerfile作成, Dockerイメージ作成
cat << _EOT_ > Dockerfile
FROM local/app_base
WORKDIR /var/app/appname/
RUN echo -e "#!/bin/bash\\n\\
git pull\\n\\
git checkout feature/${BRANCHNAME}\\n\\
bundle install\\n\\
bundle exec rake db:migrate\\n\\
bundle exec rake db:seed\\n\\
bundle exec rails s" > script.sh
_EOT_

sudo docker build -t local/app:${BRANCHNAE} .
d) Dockerコンテナの起動、httpdの設定
- これで最後です
- Execute Ruby Script でやります
### Dockerコンテナ起動, httpdの設定
require 'json'
require 'open-uri'
module Docker
  class AppContainer
    def initialize(branchname)
      @cid = `sudo docker run -i -t -p 3000 -d local/app:#{branchname}`.strip
    end
    def public_port(private_port)
      information['NetworkSettings']['Ports']["#{private_port}/tcp"].first['HostPort']
    end
    private
    def information
      @information ||= JSON.parse(open("http://localhost:4243/containers/#{@cid}/json").read)
    end
  end
end

RAILS_PORT = 3000
container = Docker::AppContainer.new(ENV['BRANCHNAME'])
port = container.public_port(RAILS_PORT)
File.open("/etc/httpd/conf.d/proxy_includes/#{ENV['BRANCHNAME']}.include", 'w') do |f|
  f.write <<-__EOF__
<VirtualHost *:80>
  ServerName #{ENV['BRANCHNAME']}.feature.example.com
  ProxyPreserveHost on
  ProxyPass        / http://localhost:#{port}/
  ProxyPassReverse / http://localhost:#{port}/
</VirtualHost>
  __EOF__
end
system("sudo /etc/init.d/httpd restart")
- 以上でコンテナが立ち上がりWebアプリにアクセスできるようになっているはずです
- お疲れ様でした!
課題
- 今回はとりあえずデプロイまで全てDockerfileでやりましたが、chef/puppetやcapistranoなどを使って実際のサーバを構築するように作っても良いと思います
- 更にserverspecなどで環境のテストもやってみたいですね
- これだけだとコンテナが増え続けるのでそちらの管理も必要になります
所感
- Dockerはとても便利!
- Dockerfileだけで大抵のことはできちゃうけど他のツールも連携させたい
コード沢山書いたけどコピペミスってたり直し間違えたところがありそうで先にゴメンナサイしておきます、見つけた場合はコメント等でお知らせください