Node.jsとExpressでサーバー側のシステムを開発していたのですが、Nest.jsと言うサーバー側のフルスタックフレームワークがあることを知り、乗り換えることにしました。
メリットとデメリット
どんなものにも、メリットとデメリットがあります。自分にとって「メリット>デメリット」となったら採用する価値が出てきます。
私が感じたNest.jsのメリットとデメリットは以下の通りです。
メリット
- Angular風なので、クライアントにAngularを採用するのであれば、同じような考え方で開発することができる
- TypeScriptで開発しやすい
- 予め以下のような構成でシステムを作ることができ、メンテナンス性が向上する(人による実装方法の違いをある程度抑制できる)
- controller
- filter
- guard
- interceptor
- interface
- middleware
- module
- pipe
- provider
- resolver
- service
- テストが容易なコードが書ける
- nest cliでコードのひな形を作成できる(テストコードも作成できる)
- Passport、GraphQL、TypeORMなどをサポートしている
- ドキュメントが充実している(但し、英語)
デメリット
- 日本語の情報が少ない
NestJSのインストール
NestJSはnpmパッケージとして提供されています。インストールは以下のようにします。
npm install @nestjs/cli -g
まずやってみる
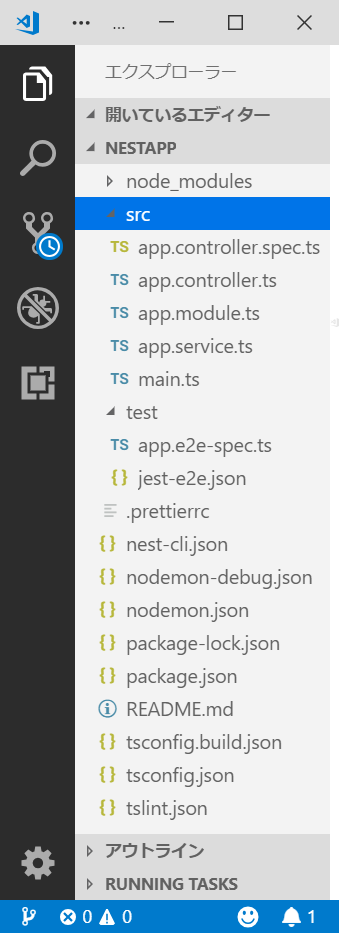
nest cliでプロジェクトを作成します。
以下のようにコマンドを起動するといくつかの質問があり、それに答えていくとプロジェクトが作成できます。
nest new プロジェクト名
どうでしょう?Angularっぽいでしょ?
フォルダ構成を決める
これから作成するシステムのフォルダ構成を決める必要があります。
よくあるパターンは、エンティティ(モデル)、サービス、コントローラ単位でフォルダを分けます。なんとなく、それがシンプルでいいのかと思ったのですが、nest cliでソースコードを作ると、そういうフォルダ構成にできそうにありません。
例えば、Userサービスを作成するために、以下のコマンドを実行します。
nest g service User
すると、srcフォルダにUserと言うフォルダができ、その中にコードが生成されます。
では、フォルダ指定すればいいのかと思い、以下のようにコマンドを実行します。
nest g service services/User
今度は、srcフォルダにservicesというフォルダができ、さらにUserというフォルダができて、その中にコードが生成されます。
結論
「NestJSは、オブジェクト単位でフォルダを構成する」
では、Userに関するコードを作って見ましょう
必要なコードの種類は、module、entity、service、controller、interfaceです。
REST APIではなく、GraphQLを採用する場合は、controllerは必要ありません。
Userインターフェースの作成
以下のコマンドで、Userインターフェースのひな形を作成します。
nest g interface User/User
Userフォルダにuser.interface.tsができますので、必要なユーザ属性を追加します。
export interface IUser {
    id: string;
    name: string;
    kana: string;
    email: string;
    postcode: string;
    address: string;
    phone: string;
    password: string;
    admin: boolean;
    createdAt: Date;
    updatedAt: Date;
}
Userエンティティの作成
以下のコマンドで、Userエンティティのひな形を作成します。
nest g class User/User
Userフォルダにuser.entity.tsができますので、必要なメンバーを追加します。
下記コードは、ORMにTypeORMを使っていますので、そのためのデコレーターが付いています。
import 'reflect-metadata';

import { Entity, Column, PrimaryGeneratedColumn, PrimaryColumn, CreateDateColumn, UpdateDateColumn } from 'typeorm';
import { IUser } from './user.interface';

@Entity()
export class User implements IUser {
    @PrimaryGeneratedColumn('uuid')
    id: string;

    @Column()
    name: string;

    @Column()
    kana: string;

    @PrimaryColumn()
    email: string;

    @Column()
    postcode: string;

    @Column()
    address: string;

    @Column()
    phone: string;

    @Column()
    password: string;

    @Column()
    admin: boolean;

    @CreateDateColumn()
    createdAt: Date;

    @UpdateDateColumn()
    updatedAt: Date;
}
Userサービスの作成
Userオブジェクトに対して様々な操作を行うサービスクラスを作成します。
以下のコマンドでUserサービスのひな形が作成できます。
nest g service User
今回は、Eメールアドレス指定でユーザ情報を検索する(findByEMail)と、ユーザを追加する(add)を実装します。
import { Injectable } from '@nestjs/common';
import { InjectRepository } from '@nestjs/typeorm';
import { Repository } from 'typeorm';
import * as bcrypt from 'bcrypt';

import { User } from './user.entity';

@Injectable()
export class UserService {
    constructor(
        @InjectRepository(User)
        private readonly userRepository: Repository<User>
    ) {}

    // 指定されたEメールアドレスのユーザを検索する
    findByEmail(_email: string): Promise<User> {
        return new Promise((resolve, reject) => {
            this.userRepository.findOne({ email: _email })
                .then((user: User) => {
                    resolve(user);
                });
        });
    }

    // ユーザを追加する
    add(user: User): Promise<User> {
        this.findByEmail(user.email)
        .then((currentUser: User) => {
            if (currentUser !== undefined) {
                return currentUser;
            }
            else {
                return new Promise((resolve, reject) => {
                    if (currentUser === undefined) {
                        // パスワードをハッシュ化する
                        user.password = this.getPasswordHash(user.password);
                        // ユーザ情報を設定する
                        this.userRepository.save<User>(user)
                        .then((result: User) => {
                            resolve(result);
                        })
                        .catch((err: any) => {
                            reject(err);
                        });
                    }
                });
            }
        })
        .catch((err: any) => {
             throw err;
        });
        return undefined;
    }

    // パスワードをハッシュ化する
    private getPasswordHash(_password: String) {
        const saltRounds: number = 10;
        const salt: string = bcrypt.genSaltSync(saltRounds);
        return bcrypt.hashSync(_password, salt);
    }
}
Userモジュールを作成
最後にUserの構成を設定するUserモジュールの作成です。
以下のコマンドで、Userモジュールのひな形を作成できます。
nest g module User
user.module.tsを以下のように実装します。
このコードもORMにTypeORMを使っていますので、それらしい実装が入っています。
import { Module } from '@nestjs/common';
import { TypeOrmModule } from '@nestjs/typeorm';

import { UserService } from './user.service';
import { User } from './user.entity';

@Module({
    imports: [ TypeOrmModule.forFeature([User]) ],
    providers: [ UserService ],
    controllers: [  ],
    exports: [ UserService ]
})
export class UserModule {}
Userモジュールの登録
最後に、srcフォルダにあるapp.module.tsに、UserModuleとUserServiceを登録します。
import { Module } from '@nestjs/common';
import { UserService } from './user/user.service';
import { UserModule } from './user/user.module';

@Module({
  imports: [
    UserModule
  ],

  providers: [
    UserService
  ],

  controllers: [
  ]
})
export class AppModule {}
}
ざっと、これで実装完了です。
