概要
iOSアプリのプロジェクトにおいてPDCAを素早く回すためには、アプリ内に表示する要素や並びを
アプリの外から柔軟に変更できるようにすると良いです。
そこで今回はTableViewを扱う上で柔軟に要素を並び替え、どの要素がユーザーに取って重要であるか?の
テストを回しやすくするような仕組みを考えます。
今回、プロジェクトでやりたいことを仮で想定し、その仕様に沿います。
プロジェクトでやりたいこと
あるプロジェクトではアプリ上で本を売ることができる。
今回は、本を探す画面のUIを改善したい。
プロジェクト内で、本を探す上で「ランキング」と「おすすめ情報」どちらが目につきやすい場所におくべきか意見が割れた。
そこで実際にリリースし、CTRを見比べ、CTRが悪いものを見えにくい場所に下げるようにすることにした。
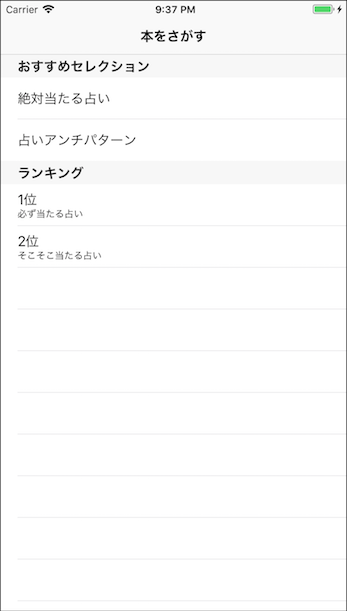
想定するUI
実装の前提
・サーバー側からセクションの位置を自由に変えられるようにする
・セクションの中のCellのデザインをデータの内容に寄ってセクションごとに変える
→ランキングは順位を出したい
実装の考え方
セクションの位置を自由に変えたり、データの内容によってCellを変えたい場合には
tableViewのIndexPath.sectionやIndexPath.rowを固定値で持ってしまうと
サーバー側でデータを変えた時に正しく表示できなくなってしまいます。
// データの内容によってCellを変えたくても以下の実装をしてしまうと変えられない

func tableView(_ tableView: UITableView, cellForRowAt indexPath: IndexPath) -> UITableViewCell {
    if indexPath.section == 0 { // ここを固定値で持ってしまうと順番を逆にした時に期待した結果にならない
        return RankingCell()
    } else {
        return Recommend()
    }
}
そこで、indexPathに依存せずに、データの内容を見て振る舞いを変えられるようにする必要があります。
そこで、セクションごとにデータの内容を定義し、その定義に乗っ取って振る舞いを変えられるようにします。
データの順番は、サーバー側で制御します。
今回は、以下のようなデータを返すように作ります。
{
    "sections": [ // sections内の順番をサーバー側で変更することで順番を変える
        {
            "items": [
                {
                    "title": "絶対当たる占い",
                    "url": "https:~~"
                },
                {
                    "title": "占いアンチパターン",
                    "url": "https:~~"
                }
            ],
            "sectionTitle": "おすすめセレクション",
            "sectionType": "recommend"
        },
        {
            "items": [
                {
                    "rank": "1",
                    "title": "必ず当たる占い"
                },
                {
                    "rank": "2",
                    "title": "そこそこ当たる占い"
                }
            ],
            "sectionTitle": "ランキング",
            "sectionType": "ranking"
        }
    ]
}
実装
1.セクションと表示内容を構造体で定義する
TableViewでのセクションを定義します。
この構造体には、セクションのタイトルと、表示する内容をもたせます。
表示する内容は、今回「ランキング」と「おすすめ」があるのでそれをEnumで定義します。
また、それぞれの表示要素も構造体で定義しておきます。
それぞれ内容がシンプルなので、クラスではなく構造体で定義します。
struct Section {
    enum Item {
        case ranking(element: Ranking)
        case recommend(element: Recommend)
    }

    let title: String
    let items: [Item]

    subscript(index: Int) -> Item {
        return items[index]
    }

    func itemCount() -> Int {
        return items.count
    }
}

struct Ranking {
    let title: String
    let rank: String
}

struct Recommend {
    let title: String
    let url: String
}
2.データを取得し、tableViewに表示するデータを作る
APIからデータを取得し、Sectionの配列を作ります。
細かいコード(オプショナルのアンラップ部分など)は今回はスキップし、大筋の部分だけ書きます。
func makeSections() -> [Section] {
    let json = decodeJson(getJson()) // jsonを取得し、辞書型として扱えるようにする
    let sections = json["sections"]

    return sections.map { { (section) -> Section in
        let title = data["sectionTitle"]
        let items = data["items"]

        var sectionItems: [Section.Item] = []

        if sectionType == "ranking" {
            // セクションのデータの中身の違いは、enumを使うことで吸収する
            sectionItems = items.map { Section.Item.ranking(element: Ranking(title: $0["title"], rank: $0["rank"])) }
        } else if sectionType == "recommend" {
            sectionItems = items.map { Section.Item.recommend(element: Recommend(title: $0["title"], url: $0["url"])) }
        }

        return Section(title: sectionTitle, items: sectionItems)
    }
}
これで、無事にSectionの配列を生成することができました。
3.データをtableViewに流し込む
データの準備ができれば、あとはいつも通りtableViewを生成して完成です。
func tableView(_ tableView: UITableView, cellForRowAt indexPath: IndexPath) -> UITableViewCell {

    // こうすることで中身がItem型になる
    switch sections[indexPath.section][indexPath.row] {

    // item型は値付きのenumで判別出来るのでそれを利用する
    case let .ranking(element: ranking):
        let cell = UITableViewCell.init(style: .subtitle, reuseIdentifier: nil)
        cell.textLabel?.text = ranking.rank + "位"
        cell.detailTextLabel?.text = ranking.title
        return cell

    case let .recommend(element: recommend):
        let cell = UITableViewCell()
        cell.textLabel?.text = recommend.title
        return cell
    }

    return UITableViewCell()
}

func tableView(_ tableView: UITableView, heightForRowAt indexPath: IndexPath) -> CGFloat {
    return 50
}

func numberOfSections(in tableView: UITableView) -> Int {
    return sections.count
}

func tableView(_ tableView: UITableView, numberOfRowsInSection section: Int) -> Int {
    return sections[section].itemCount()
}

func tableView(_ tableView: UITableView, titleForHeaderInSection section: Int) -> String? {
    return sections[section].title
}

func tableView(_ tableView: UITableView, didSelectRowAt indexPath: IndexPath) {
    switch sections[indexPath.section][indexPath.row] {
    case let .ranking(element: ranking):
        print("ランキングが押された")
    case let .recommend(element: recommend):
        print("おすすめが押された")
    }
}
ポイントは、cellForRowAtでindexPathの固定値を持っていないことです。
データの中身をあらかじめ定義した型かどうかを見ることで、データによって振る舞いを変えることができます。
こうすることで、同じtableView内にそれぞれのデータに適したcellのUIを流し込みつつ、
順番を入れ替えられるようにもなりました。
また、データの中身を見て押された時の挙動も変更できるので、例えばおすすめを押されたらWebViewを開くが、
ランキングが押された時はネイティブの画面を出す、などもできます。
まとめ
ユーザーにとって何が重要か?の仮説はユーザーに問うことで価値がわかるので、
なるべくその仮説検証のスピードをあげていくことがプロダクトにとって非常に重要です。
その上で、なるべくアプリ内で閉じた実装にするのではなく、
変更できるポイントをサーバーサイドにもたせて置くとスピード感を持ってPDCAを回していけます。
今回の例だとセクションは2つでしたが、これが4つ、5つ、
またcellの数も大量になってくるのであれば、より効果を発揮すると思います。
最後に
今回紹介した方法は実装の1つの例なので、他にもこんなやり方があっておすすめだよ、などあれば
ぜひコメントいただけますと幸いです。
