今回紹介するのは
今回の記事では、ユーザープロフィール画像のデフォルト表示と、その画像を任意の画像に変更する機能について紹介します。SNSでよくある機能ですね。
この記事ひとつで、
・プロフィール画像のデフォルト表示
・任意のプロフィール画像の登録、編集、表示機能
上記を実装することができます。
環境
$ composer -V
Composer version 2.0.11 2021-02-24 14:57:23

$ php artisan -V
Laravel Framework 6.20.44
はじめに
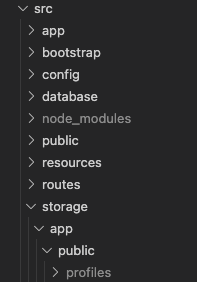
1. 2つのpublicディレクトリ
まずは、大元となる画像アップロード機能の説明から入ります。
画像の保存は、ユーザーの名前を保存したりするのとは違って少し複雑です。
よく見てみると、publicディレクトリが2つあるんですよねえ。
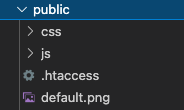
分かりやすくするため、上にあるpublicディレクトリを上のpublic、下にあるpublicディレクトリを下のstorage/app/publicと呼ぶことにします。(ややこしいから注意)
上のpublicが公開ディレクトリ、下のstorage/app/publicが非公開ディレクトリとなっています。公開ディレクトリは誰でもアクセス可能でセキュリティが弱いので、画像を保存する際は、非公開ディレクトリである下のstorage/app/publicに保存します。
公開ディレクトリ(上のpublic)からは読み込みができても、非公開ディレクトリ(下のstorage/app/public)からは直接読み込みができません。ならどうするか。
2. シンボリックリンク
それを解決するのがシンボリックリンクです。コマンドは
$ php artisan storage:link
これを実行すると、上のpublic下にstorageファイルが作成され、上のpublic/storageと下のstorage/app/publicとの間にリンクができます。
要するにシンボリックリンクを貼ることで、上のpublic/storage(公開ディレクトリ)から、下のstorage/app/public(非公開ディレクトリ)を覗き見ることが可能になったわけです。
結論としては、
1. 画像の保存は下のstorage/app/public(非公開ディレクトリ)に。
2. シンボリックリンクを貼って、上のpublic/storage(公開ディレクトリ)経由で下のstorage/app/public(非公開ディレクトリ)の画像を読み込む。
が画像アップロードの基本的な手法になります。
実装
今回はユーザーアイコンのデフォルト表示、編集(登録)機能を想定しています。
1. 下準備
・デフォルト画像の作成
まずは、デフォルトで表示するための画像を作ります。
自分は下記のサイトでオリジナルを作成しました。
出来上がった画像をPCに保存して、上のpublic下に移動させます。
画像のdefault.pngがそれです。
・Migrationファイル
Migrationファイルに以下を追加します。
public function up()
    {
        Schema::create('users', function (Blueprint $table) {

            //省略

            $table->string('profile_image')->nullable()->comment('プロフィール画像'); //この行を追加
        });
    }
なぜ
->nullable()
なのかは5. View(表示画面) で説明します。
2. Form(編集画面)
<form method="POST" action="{{ route( 'user.update', Auth::user() )}}" enctype="multipart/form-data">
    @csrf
    @method('PATCH')

    //省略

    <div class="form-group">
        <label for="profile-image">
            @if ($user->profile_image === null)
               <img class="rounded-circle" src="{{ asset('default.png') }}" alt="プロフィール画像" width="100" height="100">
            @else
               <img class="rounded-circle" src="{{ Storage::url($user->profile_image) }}" alt="プロフィール画像" width="100" height="100">
            @endif
            <input id="profile-image" name="profile_image" type="file" class="form-control @error('profile-image') is-invalid @enderror" style="display:none;" value="" accept="image/png, image/jpeg">
        </label>
        @error('profile-image')
            <span class="invalid-feedback" role="alert">
                <strong>{{ $message }}</strong>
            </span>
        @enderror
    </div>

    //省略

</form>
ここで重要な部分は
・formタグのenctype="multipart/form-data"
・inputタグのtype="file"、accept="image/*"
です。一つずつ説明していきます。
・enctype="multipart/form-data"
複数の種類のデータ(テキスト、ファイルなど)を一度に扱える形式で、フォームで画像を扱う時には必須。
・type="file"
画像なので、file形式を指定。
・accept="image/*"
選択できるファイルの形式を制限できる。今回は画像ファイルのみに制限。
@if ($user->profile_image === null)
   <img class="rounded-circle" src="{{ asset('default.png') }}" alt="プロフィール画像" width="100" height="100">
@else
   <img class="rounded-circle" src="{{ Storage::url($user->profile_image) }}" alt="プロフィール画像" width="100" height="100">
@endif
ここは5.View(表示画面) と同じなので、そこで説明します。
3. Routing
Route::resource('user', 'UserController', ['only' => ['edit', 'update']]);
ここは人によって違うかもですが、UserControllerのupdateアクションに渡すルーティングが記載されていれば問題ないです。
4. Controller
public function update(Request $request, $id)
    {

        //バリデーションは省略

        // リクエストデータ (全て)を取得し、$updateUserに代入
        $updateUser = $request->all();

        // プロフィール画像の変更があった場合
        if ($request->profile_image != null) {
            // storeメソッドで一意のファイル名を自動生成しつつstorage/app/public/profilesに保存し、そのファイル名(ファイルパス)を$profileImagePathとして生成
            $profileImagePath = $request->profile_image->store('public/profiles');
            // $updateUserのprofile_imageカラムに$profileImagePath(ファイルパス)を保存
            $updateUser['profile_image'] = $profileImagePath;
        }

        // ログイン中のユーザの情報を取得し、$loginUserに代入
        $loginUser = Auth::user();
        // $updateUserのデータを受け取り、データベースへ保存
        $loginUser->fill($updateUser)->save();

        return redirect()->route('user.show', Auth::user());
    }
コメントアウトである程度説明していますが、重要な部分だけ詳しく説明します。
// storeメソッドで一意のファイル名を自動生成しつつstorage/app/public/profilesに保存し、そのファイル名(ファイルパス)を$profileImagePathとして生成
$profileImagePath = $request->profile_image->store('public/profiles');
$request->profile_imageは送信されてきた画像データです。これをstoreメソッドを使って下のstorage/app/public/profiles(非公開ディレクトリ)に保存しつつ、一意のIDをファイル名(ファイルパス)として生成します。
このとき、profilesディレクトリは下のstorage/app/public下に自動で作成されます。
生成されたファイルパスを変数$profileImagePathの値とします。
// $updateUserのprofile_imageカラムに$profileImagePath(ファイルパス)を保存
$updateUser['profile_image'] = $profileImagePath;
変数$updateUserのprofile_imageカラムに$profileImagePath(ファイルパス)を保存します。
5. View(表示画面)
プロフィール画像が登録されていない時はデフォルト画像であるdefault.pngを表示、登録(編集)されている時はその画像を表示するようにします。
<div>
    @if ($user->profile_image === null)
       <img class="rounded-circle" src="{{ asset('default.png') }}" alt="プロフィール画像" width="100" height="100">
    @else
       <img class="rounded-circle" src="{{ Storage::url($user->profile_image) }}" alt="プロフィール画像" width="100" height="100">
    @endif
</div>
1. 下準備 のMigrationファイルへのカラム追加の際に->nullable()としたのは、プロフィール画像が登録されている時とされていない時(profile_imageカラムがnullであるのか、nullでないのか)をif文で分岐するためです。
・画像が登録されていない時
<img class="rounded-circle" src="{{ asset('default.png') }}" alt="プロフィール画像" width="100" height="100">
・src="{{ asset('default.png') }}"
asset()関数を使い、publicディレクトリ配下の素材(ここではdefault.png)へのURLを生成します。それをsrc="{{ }}"で読み込んで表示させます。
・画像が登録されている時
<img class="rounded-circle" src="{{ Storage::url($user->profile_image) }}" alt="プロフィール画像" width="100" height="100">
・src="{{ Storage::url($user->profile_image) }}"
url()メソッドは指定したファイルのURLを取得することができる方法で、Storage::url()で外部からアクセス可能なURLを取得することができます。それをsrc="{{ }}"で読み込んで表示させます。
終わりに
以上が、ユーザーのプロフィール画像の表示、編集(登録)機能になります。
この通りにコードを書いてうまく実装できなかった場合は気軽にご質問ください。
参考記事
Qiita:Laravel5.8 画像アップロード機能を仕組みから理解する
Qiita:Laravelで画像ファイルを保存したい
Qiita:input type="file"のaccept属性がかなり使える
Qiita:【Laravel】画面に画像を表示する方法。assetsの使い方とurlヘルパ関数との違いについて。
Laravel Storageでファイル操作マスター

