このエントリは、Node-RED Advent Calendar 2015の20日目のエントリーです。
今年はPaaSが一気にブレークしましたね。しかし、インフラエンジニア(私は既にエンジニアではないんですが・・)としては、どうしてもPaaSを構成する環境に目がいってしまいます。Node-REDに関しても同じなのですが、インフラエンジニアの端くれとしては、まずは黙ってNode-REDの簡単に環境を作ってみたいと思います!といっても、とってもシンプルな環境で恥ずかしいのですが。本当はもう少しいけてるNodeを入れたり、自作のNodeも作って育てたいのですが、それはまた今度できればということで(笑
では、MQTT(Mosquitto)、MongoDBが入ったNode-REDの環境をさくっと作ってみましょう
まず、クラウドでも、PC(WindowsやMac)でも、Raspberry Piでもいいのですが、Node-REDの環境を作る箱を用意します。今回はSoftLayerを使います。また、ウェブポータルからつくると時間がかかるので、コマンドラインでさくっと作りたいと思います。
SoftLayerのアカウントを用意
- このあたりを参考に作成してください。
- http://www.ibm.com/cloud-computing/jp/ja/softlayer_freecloud.html
- http://www.slideshare.net/kkitase/softlayer-latest-updates-at-fukuoka-meetup
SoftLayer CLIクライアント(slcli)のインストール
- 私の環境はMacですので、異なる方は適宜調整ください。
- まず、自分のPC(私の場合はMac)に、SoftLayer CLIクライアントを入れます。
- APIKeyは、SoftLayerのウェブポータルから確認してください。
作業手順
$ yum install -y git python python-setuptools
$ git clone https://github.com/softlayer/softlayer-python.git
$ cd softlayer-python
$ python setup.py install
$ slcli setup
Username [hogehoge]:
API Key or Password [hogehogehogehoge]:
Endpoint (public|private|custom) [public]:
Timeout [0]:
:..............:..................................................................:
:         name : value                                                            :
:..............:..................................................................:
:     Username : hogehoge                                                        :
:      API Key : hogehogehogehogehoge :
: Endpoint URL : https://api.softlayer.com/xmlrpc/v3.1/                           :
:      Timeout : not set                                                          :
:..............:..................................................................:
Are you sure you want to write settings to "/Users/hogehoge/.softlayer"? [Y/n]: y
仮想サーバー作成
- 必要に応じて、SSH公開鍵はあらかじめSoftLayerで登録しておいてください。
slcli sshkeyで登録されている公開鍵を確認できます。 -
slcli vs createでサーバーを作成できます。オプションはslcli vs create-optionsで確認できます。今回は、サンノゼのデータセンターに、1仮想コア、1Gメモリ、CentOS 6、時間課金の仮想サーバーを作成します。 - 最後に
--testオプションをつけて実行すると、実際にサーバーを作成せず確認できます。 - プロビジョニングスクリプト(初期構成スクリプト)を用意しましたので活用ください。
-
slcli vs listでサーバーのステータスを確認できます。 - サーバーが作成されたら、
actionになにも表示されなくなります。(数分かかります)
作業手順
$ slcli sshkey list
:........:........................:.................................................:.......:
:   id   :         label          :                   fingerprint                   : notes :
:........:........................:.................................................:.......:
: 999999 :      hogehoge          : 99:99:99:99:99:99:99:99:99:99:99:99:99:99:99:99 :   -   :
:........:........................:.................................................:.......:
$ slcli vs create \
--cpu=1 --memory=1024 --os=CENTOS_6_64 --billing=hourly --datacenter=sjc01 \
--disk=25 --hostname=nodered3 --domain=handson.jp \
--postinstall=https://raw.githubusercontent.com/kkitase/softlayer-provisioning-script/master/centos-nodered \
--key <sshkey> --test
:.......................................................:......:
:                                                  Item : cost :
:.......................................................:......:
:                                      1 x 2.0 GHz Core : 0.02 :
:                                                  1 GB : 0.01 :
:                 CentOS 6.x - Minimal Install (64 bit) : 0.00 :
:                                         25 GB (LOCAL) : 0.00 :
:                               Reboot / Remote Console : 0.00 :
:              10 Mbps Public & Private Network Uplinks : 0.00 :
:                                        0 GB Bandwidth : 0.00 :
:                                          1 IP Address : 0.00 :
:                                             Host Ping : 0.00 :
:                                      Email and Ticket : 0.00 :
:                                Automated Notification : 0.00 :
: Unlimited SSL VPN Users & 1 PPTP VPN User per account : 0.00 :
:           Nessus Vulnerability Assessment & Reporting : 0.00 :
:                                     Total hourly cost : 0.03 :
:.......................................................:......:
 -- ! Prices reflected here are retail and do not take account level discounts and are not guaranteed.
$ slcli vs create \
--cpu=1 --memory=1024 --os=CENTOS_6_64 --billing=hourly --datacenter=sjc01 \
--disk=25 --hostname=nodered --domain=handson.jp \
--postinstall=https://raw.githubusercontent.com/kkitase/softlayer-provisioning-script/master/centos-nodered \
--key <sshkey>
This action will incur charges on your account. Continue? [y/N]: y
:.........:......................................:
:    name : value                                :
:.........:......................................:
:      id : 99999999                             :
: created : 2015-12-20T08:27:14+09:00            :
:    guid : 99999999-9999-9999-9999-999999999999 :
:.........:......................................:
$ slcli vs list
:..........:..........:................:................:............:.............:
:    id    : hostname :   primary_ip   :   backend_ip   : datacenter :    action   :
:..........:..........:................:................:............:.............:
: 14729479 : noderede :       -        :       -        :     -      : Assign Host :
:..........:..........:................:................:............:.............:
$ slcli vs list
:..........:..........:................:................:............:........:
:    id    : hostname :   primary_ip   :   backend_ip   : datacenter : action :
:..........:..........:................:................:............:........:
: 99999999 : nodered  : 999.999.999.99 : 10.999.999.999 :   scj01    :   -    :
:..........:..........:................:................:............:........:
作成したサーバーにアクセスします。
- サーバーが作成されても、しばらくプロビジョニングスクリプトは実行中ですので、ログインした時に下記のメッセージがでるまでは、ログアウトして作業しないでください。
$ ssh root@ipアドレス
****************************************************************************
  Provisioning was successful
  1) Start mosquitto: /usr/sbin/mosquitto and
     Subscribe and send msg: mosquitto_pub -d -t hello -m Hello world
  2) Comment out bindIp in /etc/mongod.conf and
     restart mongod: service mongod restart
  3) Start node-red: node-red and access http://<IP>:1880
****************************************************************************
MongoDBの設定
必要時応じて、リモートからMongoDBに接続できるようにします
$ vi /etc/mongod.conf
下記をコメントアウト
#  bindIp: 127.0.0.1  # Listen to local interface only, comment to listen on all interfaces.
$ service mongod restart
これで、MongoDB、MQTTゲートウェイ付きの環境ができあがりました。詳細を知りたい方は下記のスクリプトを参照ください。
Node-REDを利用
- Node-REDに関する説明は Node-REDについて を参考にしてください。
- ブラウザを起動して、http://(ipaddress):1880 にアクセスして、Node-REDを楽しみましょう!
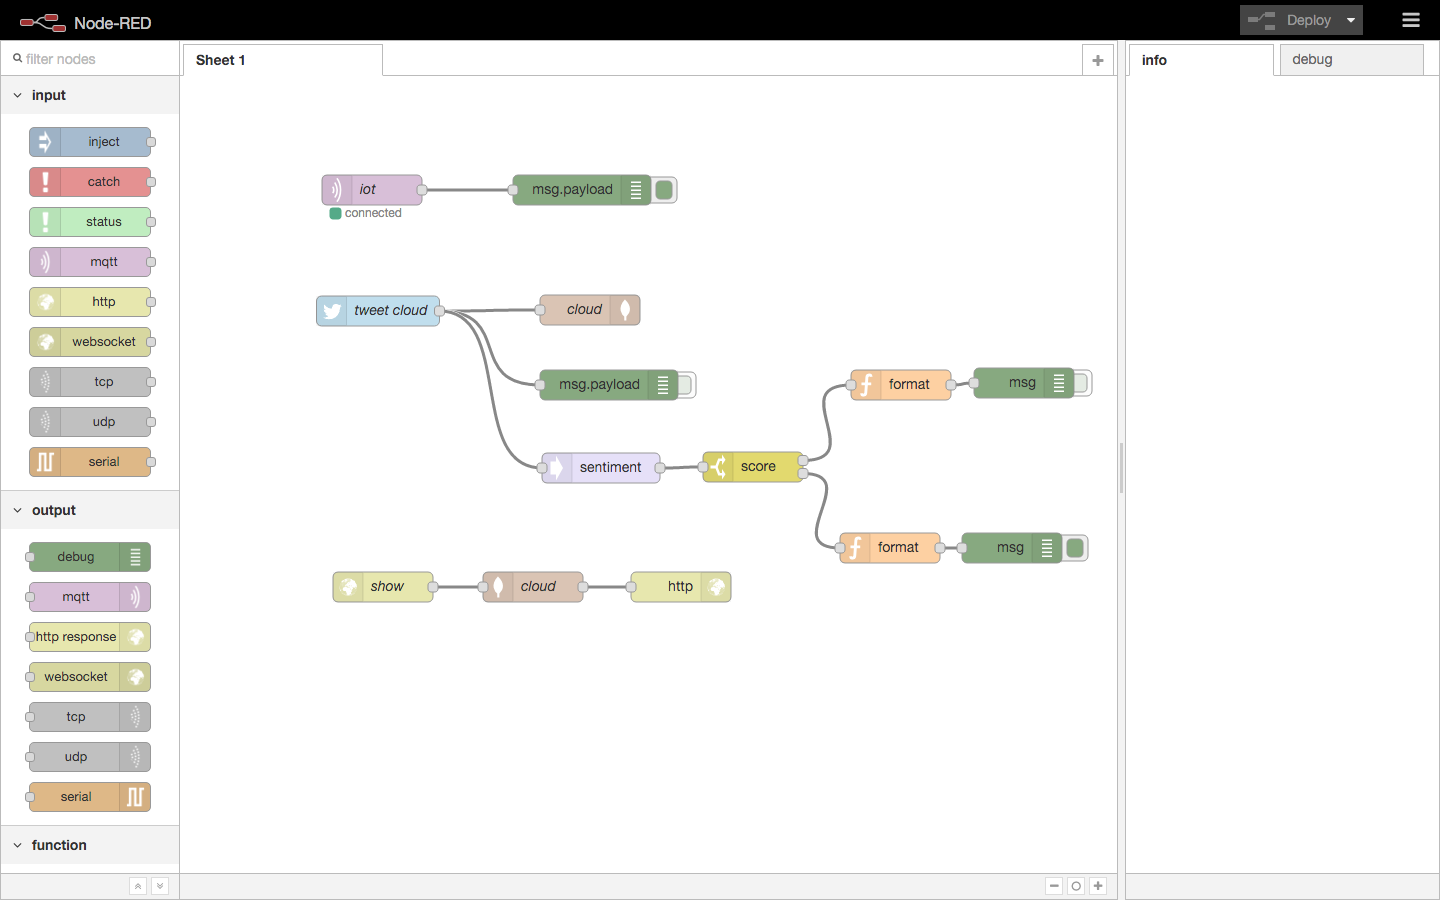
Flowのインポート
- 作成したNode-RED環境に下記の簡単なFlowをImportして、MQTT、MongoDBのIPアドレスやTwitterのアカウントを変更すれば、利用できます。
[{"id":"1ab80a01.e547f6","type":"mqtt-broker","z":"626bd57d.9d942c","broker":"127.0.0.1","port":"1883","clientid":"","usetls":false,"verifyservercert":true,"compatmode":true,"keepalive":"15","cleansession":true,"willTopic":"","willQos":"0","willRetain":"false","willPayload":"","birthTopic":"","birthQos":"0","birthRetain":"false","birthPayload":""},{"id":"8d120694.72edf8","type":"mongodb","z":"626bd57d.9d942c","hostname":"127.0.0.1","port":"27017","db":"tweet2","name":"tweet2"},{"id":"258f959.fda706a","type":"twitter in","z":"626bd57d.9d942c","twitter":"","tags":"cloud","user":"false","name":"tweet cloud","topic":"tweets","x":198,"y":235,"wires":[["6d4b6e18.92b49","a7cd30cf.5832d","c6205c37.39dfa"]]},{"id":"6d4b6e18.92b49","type":"mongodb out","z":"626bd57d.9d942c","mongodb":"8d120694.72edf8","name":"cloud","collection":"cloud","payonly":false,"upsert":false,"multi":false,"operation":"store","x":410,"y":234,"wires":[]},{"id":"a7cd30cf.5832d","type":"debug","z":"626bd57d.9d942c","name":"","active":false,"console":"false","complete":"false","x":429,"y":309,"wires":[]},{"id":"d827b393.27d85","type":"mqtt in","z":"626bd57d.9d942c","name":"iot","topic":"hello","broker":"1ab80a01.e547f6","x":192,"y":114,"wires":[["921b5cef.6de4a"]]},{"id":"921b5cef.6de4a","type":"debug","z":"626bd57d.9d942c","name":"","active":true,"console":"false","complete":"false","x":402,"y":114,"wires":[]},{"id":"acce4311.5331c","type":"mongodb in","z":"626bd57d.9d942c","mongodb":"8d120694.72edf8","name":"cloud","collection":"cloud","operation":"find","x":353,"y":511,"wires":[["d4a66472.2b5998"]]},{"id":"d4a66472.2b5998","type":"http response","z":"626bd57d.9d942c","name":"","x":501,"y":511,"wires":[]},{"id":"f0b0955e.0f4f68","type":"http in","z":"626bd57d.9d942c","name":"show","url":"/show","method":"get","swaggerDoc":"","x":203,"y":511,"wires":[["acce4311.5331c"]]},{"id":"c6205c37.39dfa","type":"sentiment","z":"626bd57d.9d942c","name":"","x":421,"y":392,"wires":[["23f716d1.dc08ea"]]},{"id":"23f716d1.dc08ea","type":"switch","z":"626bd57d.9d942c","name":"score","property":"sentiment.score","rules":[{"t":"gt","v":"0"},{"t":"lte","v":"0"}],"checkall":"true","outputs":2,"x":573,"y":391,"wires":[["a4718efc.5b8e7"],["b1deedc2.4e211"]]},{"id":"34a41fbe.cb5be","type":"debug","z":"626bd57d.9d942c","name":"","active":false,"console":"false","complete":"true","x":844,"y":307,"wires":[]},{"id":"805df1cd.7fa21","type":"debug","z":"626bd57d.9d942c","name":"","active":true,"console":"false","complete":"true","x":832,"y":472,"wires":[]},{"id":"a4718efc.5b8e7","type":"function","z":"626bd57d.9d942c","name":"format","func":"msg = {\n \"score\": msg.sentiment.score,\n \"topic\": msg.topic,\n \"text\": msg.payload,\n \"lang\": msg.lang\n};\n\nreturn msg;","outputs":1,"noerr":0,"x":721,"y":309,"wires":[["34a41fbe.cb5be"]]},{"id":"b1deedc2.4e211","type":"function","z":"626bd57d.9d942c","name":"format","func":"msg = {\n \"score\": msg.sentiment.score,\n \"topic\": msg.topic,\n \"text\": msg.payload,\n \"lang\": msg.lang\n};\n\nreturn msg;","outputs":1,"noerr":0,"x":710,"y":472,"wires":[["805df1cd.7fa21"]]},{"id":"48597c7.fb7a684","type":"comment","z":"626bd57d.9d942c","name":"MQTTサブスクライバ","info":"MQTTクライアントからメッセージを送信してください。\n例)mosquitto_pub -d -t hello -m \"Hello world\"","x":150,"y":64,"wires":[]}]
このFlowは主に下記の処理を行います。
- MQTTのテスト
- Twitterの検索データをオープンソースの分析ツールSentimentで判断
- Twitterの検索データをMongoDBにストア
コミュニティ
Node-REDユーザー会、SoftLayerユーザー会、Bluemixユーザー会などに入っておくと有用な情報を入手することができますので、是非登録しておきましょう。
- Node-RED User Group Japan
- SoftLayerユーザー会
- Web
- Bluemixユーザー会
参考情報
- Node Red in 5 minutes
- Wiring the Internet of Things with Node-RED
- IBM Bluemix Tutorial - Getting Twitter Messages and Saving to MongoDB using Bluemix v2.0
- Build A Translation REST API With Watson, Node-RED, and Bluemix