Androidで独自のViewを描く
(当記事はJetPack Compose は使ってません)
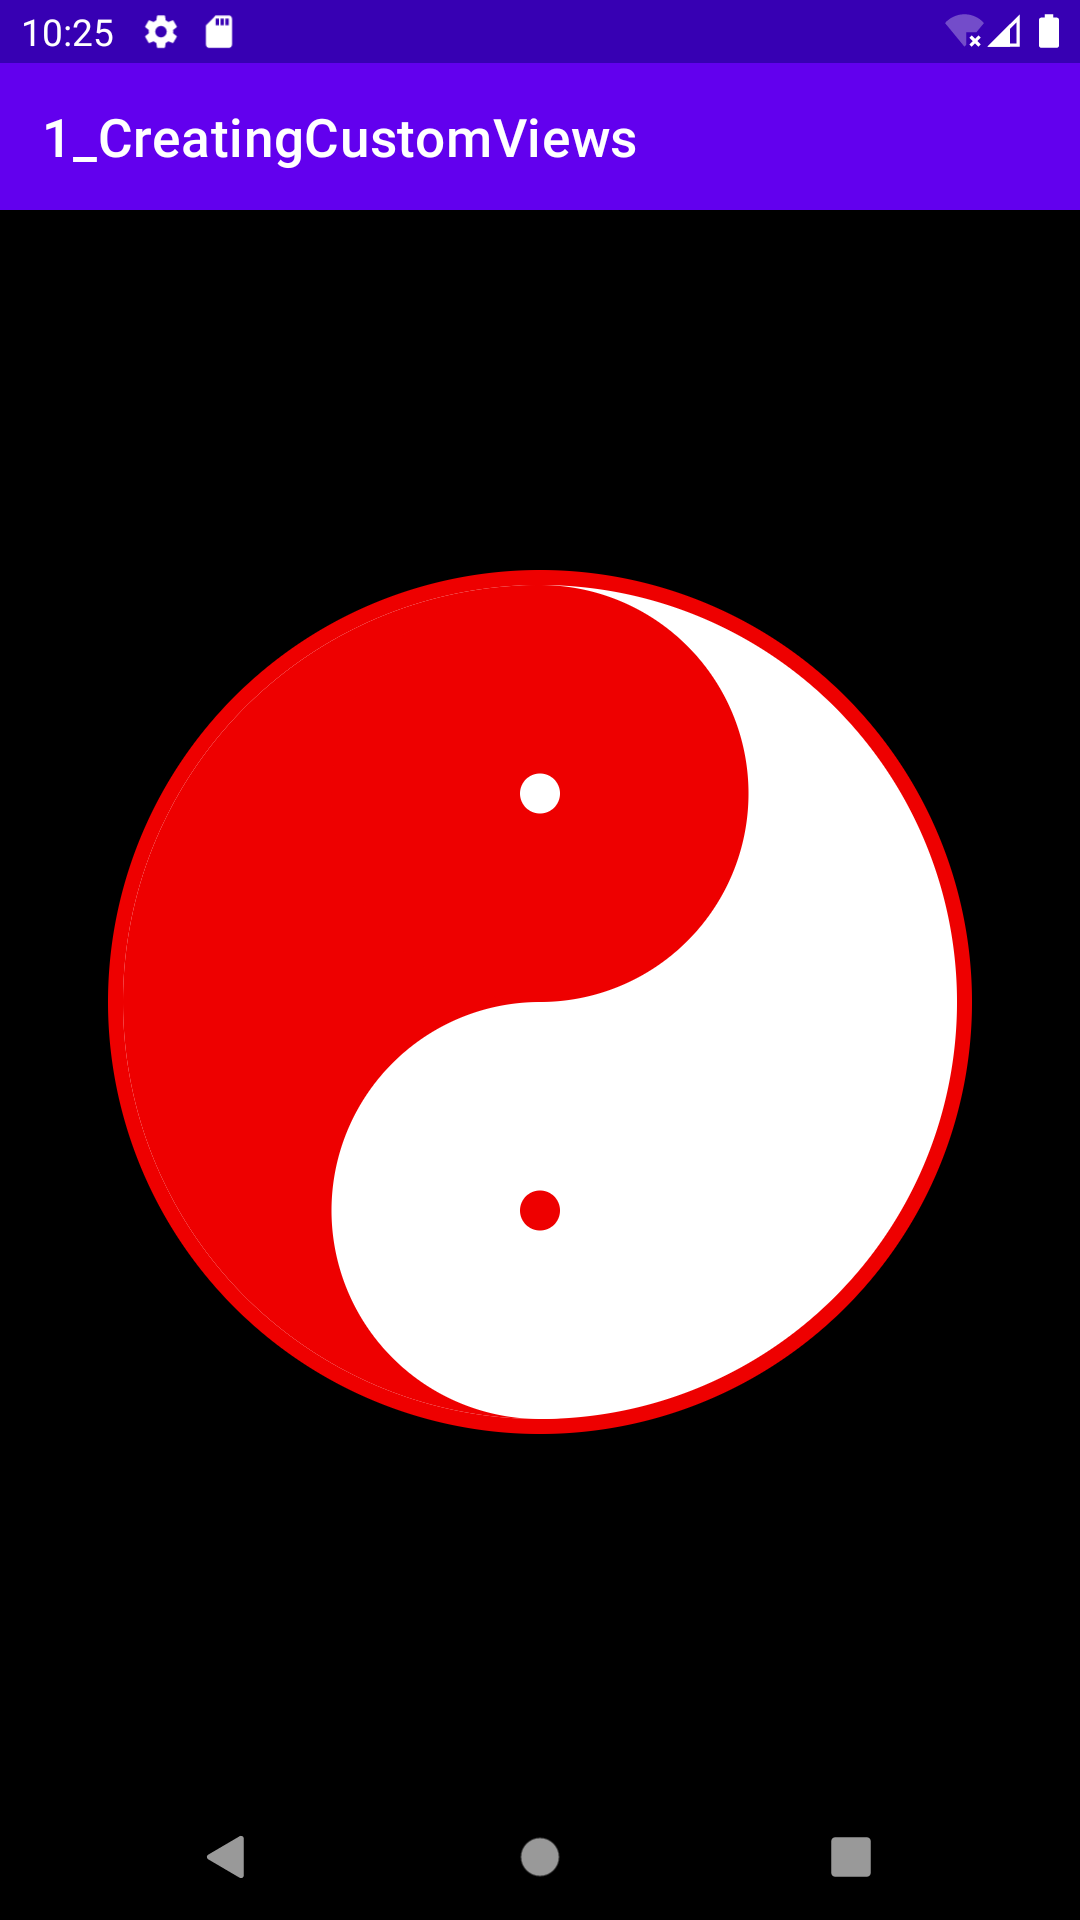
円と半円を組み合わせて以下を作ります。
手順
- Viewを継承したカスタムクラスを作成
- onDraw(canvas) をオーバーロード
- canvasを組み合わせ、欲しいViewを描く ←メイン
- ( Layoutファイルに1を配置 )
1 Viewを継承したカスタムクラスを作成
class Onmyoudama @JvmOverloads constructor(
    context: Context, attrs: AttributeSet? = null, defStyleAttr: Int = 0
) : View(context, attrs, defStyleAttr)
※JvmOverloadsは自動でパラメータを設定してくれます。
Class : View を書いて、右クリック→Jvm~~を選択。
2 onDraw(canvas) をオーバーロード
override fun onDraw(canvas: Canvas?) {
        super.onDraw(canvas)
....
}
onDraw内に外観を描いていきます。
3 canvasを組み合わせ、欲しいViewを描く
Canvas :公式
The Canvas class holds the "draw" calls. To draw something, you need 4 basic components: A Bitmap to hold the pixels, a Canvas to host the draw calls (writing into the bitmap), a drawing primitive (e.g. Rect, Path, text, Bitmap), and a paint (to describe the colors and styles for the drawing).
描画用のクラス。各関数は基本的に4つのパラメータを渡して描画すると書いてある。
onDrawのパラメータとして渡されるCanvasでViewの外観を描いていきます。
今回使ったのは円と半円を描く関数です。
- canvas.drawCircle で円を描く
- canvas.drawArc で半円を描く
- 組み合わせる
の3ステップです。
canvas.drawCircle で円を描く
public void drawCircle (float cx,
                float cy,
                float radius,
                Paint paint)
x,y 座標、半径、Paintオブジェクトを渡します。
※Paint はViewのスタイルを定義するオブジェクトです。
例えば円を描くなら
canvas.drawCircle(baseX, baseY, radius, paint.apply { color = redColor })

オフセット分縮めて、白い円を描けば枠線が表現できます。
 val mainRadius = radius - OFFSET
it.drawCircle(baseX, baseY, mainRadius, paint.apply { color = whiteColor })

canvas.drawArc で半円を描く
楕円を描く関数drawArcで半円を表現します。
public void drawArc (RectF oval,
                float startAngle,
                float sweepAngle,
                boolean useCenter,
                Paint paint)

※RectF(left, top, right, bottom) 矩形の4つの座標
userSenter : 描かれた弧を塗りつぶすときに始点と終点を直線で結ぶか、中心で結ぶ範囲を塗りつぶすかを設定します。
val rectF = RectF(left, top, right, bottom)
canvas.drawArc(rectF, 90f, 180f, true,  paint.apply { color = redColor })
事前に定義しておいたRectFの座標を使って、90→180度に子を描きます。UserSenterはTrueにすることで中心を結ぶ範囲が塗りつぶされます。

組み合わせる
あとは、サイズの違う円を置していくだけです。
// 上の中円と小円
canvas.drawCircle(baseX ,topMiddleCircleY , middleCircleRadius, paint.apply { color = redColor })
canvas.drawCircle(baseX, topMiddleCircleY, 20.0f, paint.apply { color = whiteColor })

// 下の中円と小円
canvas.drawCircle(baseX, bottomMiddleCircleY, middleCircleRadius, paint.apply { color = whiteColor })
canvas.drawCircle(baseX, bottomMiddleCircleY, 20.0f, paint.apply { color = redColor })
4 Layoutファイルに定義
これは書くだけです。
<com.example.a1_creatingcustomviews.Onmyoudama
        android:id="@
...
/>
以上。
注意点
- onDraw内に重い処理は書かない
画面更新のたびにonDrawが呼ばれます。以下公式。
For performance reasons and to avoid visual glitches, you should do as little work as possible in onDraw(). In particular, don't place allocations in onDraw(), because allocations may lead to a garbage collection that may cause a visual stutter.
終わり
Glipにて、円を切り取る方法は浮かんでますがちょっとはまったのでこっちの方法になりました。
JetPackCompose版もそのうち
参考
・公式ドキュメント Codelab
・https://tech.recruit-mp.co.jp/mobile/remember_canvas1/