本記事の目的
本記事は、Oracle Graph Server and Clientをインストールする手順を説明するために作成しました。
実際にローカルファイルからグラフデータを読み込んで、可視化するまでの手順をご紹介します。
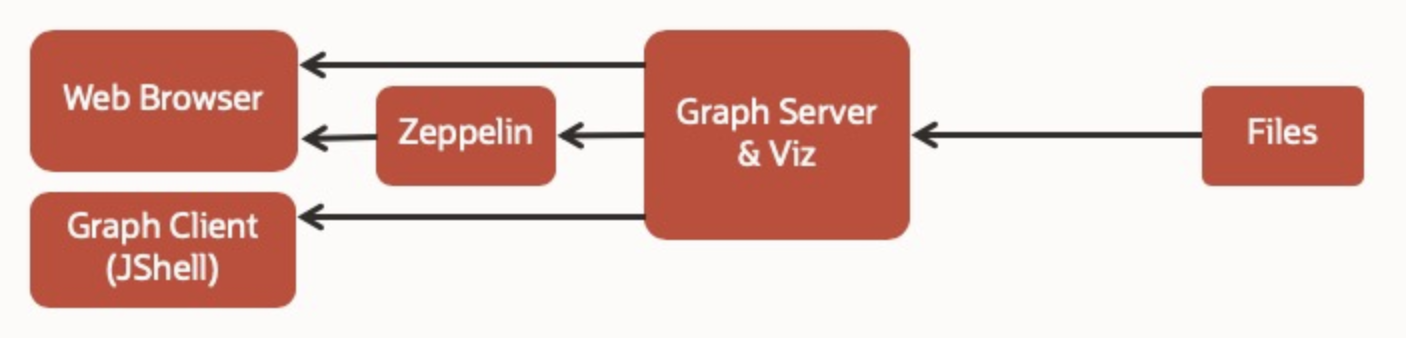
今回作成する構成を図示すると以下のようになります。
前提条件
今回使用する環境情報は以下の通りです。
- クライアント側
・Linux等UnixベースのOS / Mac OS / Windows
・Oracle JDK 11
(Developer's Guideより)
[oracle@localhost ~]$ cat /etc/redhat-release
Red Hat Enterprise Linux Server release 7.6 (Maipo)
$ java -version
java version "11.0.7" 2020-04-14
Java(TM) SE Runtime Environment (build 14.0.1+7)
Java HotSpot(TM) 64-Bit Server VM (build 14.0.1+7, mixed mode, sharing)
- サーバー側
・Oracle Linux 6 or 7 x64 or a similar Linux distribution such as RedHat
・Oracle JDK 8
(Developer's Guideより)
[oracle@localhost ~]$ cat /etc/redhat-release
Red Hat Enterprise Linux Server release 7.6 (Maipo)
[oracle@localhost ~]$ java -version
java version "1.8.0_201"
Java(TM) SE Runtime Environment (build 1.8.0_201-b09)
Java HotSpot(TM) 64-Bit Server VM (build 25.201-b09, mixed mode)
その他、以下の前提条件があります。
- PGフォーマットでグラフを作成する場合、データベースの初期化パラメータMAX_STRING_SIZEがENABLEDになっていること
- データベースの初期化パラメータNLS_NCHAR_CHARACTER_SETがAL16UTF16になっていること
- プロパティ・グラフスキーマを使用する場合、Oracle Partitioningオプションが必要になります。ライセンスに関しては、こちらをご覧ください。
手順
1. Oracle Graph Server and Clientのダウンロード
1-1. OTNからOracle Graph Serverをダウンロードする
こちらからOracle Graph Server and Clientをダウンロードします。
2. Graph Serverインストール
Graph Serverのインストール手順を紹介します。
2-1. rpmファイルをサーバーにscpする
rpmファイルをサーバーにscpします。
(サーバーの/tmpにscpします)
scp oracle-graph-20.1.0.x86_64.rpm <Username>@<サーバーのIPアドレス>:/tmp
2-2. rootユーザでパッケージをインストールする
2-1でscpしたrpmパッケージをインストールします。
サーバーにsshログイン
ssh -l <Username> <IPアドレス> -p 22
ssh -l oracle localhost -p 22
oracle@localhost's password: <Passwordを入力>
Last login: Sat Apr 18 01:02:33 2020 from gateway
[oracle@localhost ~]$
rootユーザとしてrpmパッケージをインストール
[oracle@localhost ~]$ sudo rpm -i /tmp/oracle-graph-20.1.0.x86_64.rpm
[sudo] oracle のパスワード:<Passwordを入力>
2-3. rootユーザでインストールに使用するユーザを追加します。
今回は、OSユーザoracleをグループoraclegraphに追加します。
[oracle@localhost ~]$ sudo usermod -aG oraclegraph oracle
[oracle@localhost ~]$ groups oracle
oracle : oinstall wheel dba vboxsf oraclegraph
OSユーザoracleがグループoraclegraphに追加されました。
グループoraclegraphは、rpmパッケージのインストール時に自動的に作成されますので、そのグループにユーザを追加する必要があります。
設定を有効化するために、oracleユーザとして再度ログインし直す必要があります。
2-4./etc/oracle/graph直下のconfigファイルを編集する
oraclegraphグループに追加したユーザ(ここではoracle)で、以下のファイルを編集します。
-server.conf
検証用途等で手軽に試す場合は、TLS通信を無効化するために、以下のパラメータをfalseにします。
- "enable_tls"
- "enable_client_authentication"
[oracle@localhost ~]$ cat /etc/oracle/graph/server.conf
{
  "port": 7007,
  "enable_tls":false,
  "enable_client_authentication":false,
  "working_dir": "/opt/oracle/graph/pgx/tmp_data"
}
pgx.conf
Documentationを参考にして、以下のパラメータを変更します。
・allow_local_file_system => trueに変更
・datasource_dir_whitelist => ローカルファイルのグラフデータを配置するディレクトリを指定(arrayで入力)
[oracle@localhost ~]$ cat /etc/oracle/graph/pgx.conf
{
  "allow_idle_timeout_overwrite": true,
  "allow_local_filesystem": true,
  "allow_task_timeout_overwrite": true,
  "datasource_dir_whitelist":["/opt/oracle/graph/graph_data"],
  "enable_gm_compiler": true,
  "enterprise_scheduler_config": {
    "analysis_task_config": {
      "priority": "MEDIUM",
      "weight": "<no-of-CPUs>",
      "max_threads": "<no-of-CPUs>"
    },
    "fast_analysis_task_config": {
      "priority": "HIGH",
      "weight": 1,
      "max_threads": "<no-of-CPUs>"
    },
    "num_io_threads_per_task": "<no-of-CPUs>"
  },
  "preload_graphs": [],
  "max_active_sessions": 1024,
  "max_queue_size_per_session": -1,
  "max_snapshot_count": 0,
  "memory_cleanup_interval": 600,
  "path_to_gm_compiler": null,
  "release_memory_threshold": 0.85,
  "session_idle_timeout_secs": 14400,
  "session_task_timeout_secs": 0,
  "strict_mode": true,
  "in_place_update_consistency_model" : "ALLOW_INCONSISTENCIES",
  "graph_algorithm_language": "JAVA",
  "java_home_dir": "<system-java-home-dir>"
}}
2-5. PGXをサーバーモードで起動
oraclegraphグループに追加したユーザ(ここではoracle)で、PGXをサーバーモードで起動します。
[oracle@localhost ~]$ sh /opt/oracle/graph/pgx/bin/start-server
[oracle@localhost ~]$ sh /opt/oracle/graph/pgx/bin/start-server
4 18, 2020 3:22:58 午前 org.apache.coyote.AbstractProtocol init
情報: Initializing ProtocolHandler ["http-nio-7007"]
4 18, 2020 3:22:58 午前 org.apache.catalina.core.StandardService startInternal
情報: Starting service [Tomcat]
4 18, 2020 3:22:58 午前 org.apache.catalina.core.StandardEngine startInternal
情報: Starting Servlet engine: [Apache Tomcat/9.0.24]
4 18, 2020 3:23:03 午前 org.apache.catalina.startup.ContextConfig getDefaultWebXmlFragment
情報: No global web.xml found
4 18, 2020 3:23:04 午前 org.apache.jasper.servlet.TldScanner scanJars
情報: At least one JAR was scanned for TLDs yet contained no TLDs. Enable debug logging for this logger for a complete list of JARs that were scanned but no TLDs were found in them. Skipping unneeded JARs during scanning can improve startup time and JSP compilation time.
4 18, 2020 3:23:26 午前 org.apache.jasper.servlet.TldScanner scanJars
情報: At least one JAR was scanned for TLDs yet contained no TLDs. Enable debug logging for this logger for a complete list of JARs that were scanned but no TLDs were found in them. Skipping unneeded JARs during scanning can improve startup time and JSP compilation time.
SLF4J: Class path contains multiple SLF4J bindings.
SLF4J: Found binding in [jar:file:/opt/oracle/graph/pgx/tmp_data/pgx_server9006022144811375207/ROOT/WEB-INF/lib/log4j-slf4j-impl-2.11.2.jar!/org/slf4j/impl/StaticLoggerBinder.class]
SLF4J: Found binding in [jar:file:/opt/oracle/graph/pgx/server/lib/log4j-slf4j-impl-2.11.2.jar!/org/slf4j/impl/StaticLoggerBinder.class]
SLF4J: See http://www.slf4j.org/codes.html#multiple_bindings for an explanation.
SLF4J: Actual binding is of type [org.apache.logging.slf4j.Log4jLoggerFactory]
4 18, 2020 3:23:49 午前 org.apache.coyote.AbstractProtocol start
情報: Starting ProtocolHandler ["http-nio-7007"]
PGXサーバーは、7007番ポートで接続を待っている状態です。
3. クライアントから接続
クライアントからの接続手順を紹介します。
3-1. jshellを使用してPGXサーバーに接続する
jshellでpgxサーバーに接続するには、Oracle JDK 11で接続する必要があります。
今回は、同一マシンでPGXサーバーにアクセスするため、クライアント用の環境変数ファイル(ここでは~/.pgxclientenv)を用意しておきます。
[oracle@localhost bin]$ cat ~/.pgxclientenv
export PATH
export JAVA_HOME=/usr/java/jdk-11.0.7
$ pwd
/Users/user/oracle-graph-client-20.1.0

$ source ~/.pgxclientenv

$ ./bin/opg-jshell -b http://localhost:7007
For an introduction type: /help intro
Oracle Graph Server Shell 20.1.0
PGX server version: 19.4.0 type: SM
PGX server API version: 3.6.0
PGQL version: 1.2
Variables instance, session, and analyst ready to use.
opg-jshell>
PGXサーバーへ接続ができました!
4.PGQLの実行
試しにPGQLを実行してみます。
今回は、ローカルファイルからグラフを読み込み、可視化してみます。
サンプルデータは、こちらを使用します。
[oracle@localhost ~]$ more /opt/oracle/graph/graph_data/all.pgx.nodes
101,age,2,,10,
101,location,1,Boston,,
101,name,1,John,,
101,type,1,customer,,
102,gender,1,F,,
102,name,1,Mary,,
102,type,1,customer,,
103,location,1,Boston,,
103,name,1,Jill,,
103,type,1,customer,,
104,name,1,Todd,,
104,student,1,true,,
104,type,1,customer,,
・・・
[oracle@localhost ~]$ more /opt/oracle/graph/graph_data/all.pgx.edges
1,201,101,owned_by,since,1,2015-10-04,,
2,202,102,owned_by,since,1,2012-09-13,,
3,203,103,owned_by,since,1,2016-02-04,,
4,204,104,owned_by,since,1,2018-01-05,,
5,103,104,parent_of,%20,,,,
6,201,301,purchased,amount,2,,800,
7,201,302,purchased,amount,2,,15,
8,202,301,purchased,amount,2,,150,
9,202,302,purchased,amount,2,,20,
10,202,304,purchased,amount,2,,10,
11,203,301,purchased,amount,2,,350,
12,203,302,purchased,amount,2,,20,
13,203,303,purchased,amount,2,,15,
・・・
[oracle@localhost ~]$ cat /opt/oracle/graph/graph_data/all.pgx.json
{
  "vertex_uri_list": [
    "all.pgx.nodes"
  ],
  "edge_uri_list": [
    "all.pgx.edges"
  ],
  "format": "flat_file",
  "node_id_type": "integer",
  "edge_label": true,
  "vertex_props": [
    {
      "name": "type",
      "type": "string"
    },
    {
      "name": "name",
      "type": "string"
    },
    {
      "name": "age",
      "type": "integer"
    },
    {
      "name": "location",
      "type": "string"
    },
    {
      "name": "gender",
      "type": "string"
    },
    {
      "name": "student",
      "type": "string"
    },
    {
      "name": "account_no",
      "type": "string"
    },
    {
      "name": "balance",
      "type": "integer"
    }
  ],
  "edge_props": [
    {
      "name": "since",
      "type": "string"
    },
    {
      "name": "amount",
      "type": "integer"
    },
    {
      "name": "date",
      "type": "string"
    }
  ],
  "separator": ",",
  "loading": {
    "load_edge_label": true
  }
}
[oracle@localhost bin]$ ./opg-jshell -b http://localhost:7007
グラフデータを読み込ませます。
opg-jshell> var g = session.readGraphWithProperties("/opt/oracle/graph/graph_data/all.pgx.json")
g ==> PgxGraph[name=all.pgx,N=15,E=24,created=1587777248009]
opg-jshell> g.publish()
今回読み込んだグラフを可視化してみます。可視化には、Graph Visualization Application (GraphViz)を使用します。
Graph Serverが起動している状態のまま、http://<サーバのIPアドレス>:7007/ui にアクセスしてください。

サンプルグラフが可視化できました!
まとめ
今回は、Graph Server and Client をStand alone構成でインストールし、実際にローカルファイルからグラフデータを読み込んで、可視化するまでの手順をご紹介しました。
次回は、データベースからグラフデータを読み込む手順をご紹介したいと思います。
参考
リファレンス
jshellコマンドの使用法
jshellの使い方に困った場合は、以下のコマンドで使用法を確認できます。
opg-jshell> /help
|  Java言語の式、文または宣言を入力します。
|  または、次のコマンドのいずれかを入力します:
|  /list [<name or id>|-all|-start]
|  	入力したソースをリストします
|  /edit <name or id>
|  	ソース・エントリを編集します
|  /drop <name or id>
|  	ソース・エントリを削除します
|  /save [-all|-history|-start] <file>
|  	ファイルにスニペット・ソースを保存します
|  /open <file>
|  	ソースの入力としてファイルを開きます
|  /vars [<name or id>|-all|-start]
|  	宣言された変数およびその値をリストします
|  /methods [<name or id>|-all|-start]
|  	宣言されたメソッドおよびその署名をリストします
|  /types [<name or id>|-all|-start]
|  	型宣言をリストします
|  /imports
|  	インポートされたアイテムをリストします
|  /exit [<integer-expression-snippet>]
|  	jshellツールを終了します
|  /env [-class-path <path>] [-module-path <path>] [-add-modules <modules>] ...
|  	評価コンテキストを表示または変更します
|  /reset [-class-path <path>] [-module-path <path>] [-add-modules <modules>]...
|  	jshellツールをリセットします
|  /reload [-restore] [-quiet] [-class-path <path>] [-module-path <path>]...
|  	リセットして関連する履歴をリプレイします -- 現在または以前(-restore)
|  /history [-all]
|  	入力した内容の履歴
|  /help [<command>|<subject>]
|  	jshellツールの使用方法に関する情報を取得します
|  /set editor|start|feedback|mode|prompt|truncation|format ...
|  	構成情報を設定します
|  /? [<command>|<subject>]
|  	jshellツールの使用方法に関する情報を取得します
|  /!
|  	最後のスニペットを再実行します -- /help rerunを参照してください
|  /<id>
|  	IDまたはID範囲でスニペットを再実行します -- /help rerunを参照してください
|  /-<n>
|  	n回前のスニペットを再実行します -- /help rerunを参照してください
|
|  詳細は、'/help'の後にコマンドまたはサブジェクトの名前を続けて
|  入力してください。
|  たとえば、'/help /list'または'/help intro'などです。サブジェクト:
|
|  intro
|  	jshellツールの概要
|  keys
|  	readlineに似た入力編集の説明
|  id
|  	スニペットIDの宣言とそれらの使用方法
|  shortcuts
|  	スニペットおよびコマンドの補完、情報アクセス、および自動コード生成
|  	のキーストロークの説明
|  context
|  	/env /reloadおよび/resetの評価コンテキスト・オプションの説明
|  rerun
|  	前に入力したスニペットを再評価する方法の説明