そろそろ何か新しい言語を習得しようかなと思っていたので、WindowsでVSCodeを使ってRust開発を始めてみます。
すぐに飽きて辞めてしまうかもしれないので開発環境はDocker上に用意しましょう。バックエンドはWSL2です。そのあたりはもう既に設定されているということにしてください。
| 環境 | バージョン |
|---|---|
| Windows 10 Pro | 19041.264 |
| Docker Desktop | 2.3.0.3 (45519) |
| Visual Studio Code | 1.46.0-insider |
Dockerイメージを作る
公式のイメージがdockerhubにあるようなので、それをベースにしましょう。ちゃんとalpineベースのイメージも提供されています。良いですね。
$ docker pull rust:1.44.0-alpine3.11
$ docker run -it --rm rust:1.44.0-alpine3.11 /bin/ash
# rustc --version
rustc 1.44.0 (49cae5576 2020-06-01)
# exit
後々バージョンアップしたり環境を再構築したりするのが楽になるので、面倒でも最初からDockerfileを書きます。内容が落ち着くまではイメージサイズとかメンテナンス性とかは一切気にせず、ひたすらRUN文を末尾に追記していく方が効率的です。Dockerの方で勝手にキャッシュを使ってよしなにやってくれるはずです。
FROM rust:1.44.0-alpine3.11

# Install fundamental tools
RUN apk add --no-cache bash docker-cli git tree
Rustのことはまだ何も分からないので、ひとまず絶対あったほうがいいものだけインストールします。必要になったものはあとから追記してリビルドしていく感じです。一旦ビルドできることを確認しておきましょう。
$ docker build -t rustdev:local --quiet .
sha256:a9a0e7f99804225df8c841899f442a4133f37e7f99431bcc7c3f677372ca68f5
$ docker run -it --rm rustdev:test /bin/bash
# cat /etc/alpine-release
3.11.6
# exit
$ docker rm rustdev:test
Development Containerを設定する
VSCodeを使ってコンテナ上で開発するにはRemote - Containers拡張を使うのですが、これにはDevelopment containerという機能がついてきます。devcontainer.jsonで色々設定してやることで、コンテナ上の開発環境を使いながらローカルで開発しているのと(ほとんど)まったく同じことができるようになります。以下の拡張がローカルにインストールされていることを確認しておきましょう。
devcontainer.jsonは.devcontainer/以下に作成する必要があります。先程のDockerfileを直接使うことはもうないので、同じディレクトリの下に移動させてしまいましょう。以下のようなファイル構成になっているはずです。
.
└── .devcontainer
    ├── Dockerfile
    └── devcontainer.json
{
  "$schema": "https://raw.githubusercontent.com/microsoft/vscode/main/extensions/configuration-editing/schemas/devContainer.schema.generated.json",
  "name": "rustdevcontainer",
  "dockerFile": "Dockerfile",
  "extensions": [
  ],
  "settings": {
    "terminal.integrated.shell.linux": "/bin/bash",
    "terminal.integrated.shellArgs.linux": []
  }
}
$schemaがあるとVSCodeが入力中に正しい候補を補完してくれますが、別になくても動きます。extensionsにはこのワークスペースにインストールしたい(グローバルに使えない)拡張を、settingsにはエディタ設定を追加していきます。ひとまずシェルの設定だけしておきましょう。
コマンドパレット (Ctrl+Shift+P) の Remote-Containers: Open Folder in Container... から先程作成した .devcontainer/ のあるディレクトリを開くと、イメージが作成されてDevelopment containerが起動します。

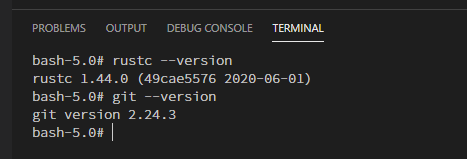
ターミナル (Ctrl+Shift+` ) を開いて確認してみましょう。

良さそうですね。今後イメージをリビルド(して再起動)するには、同じくコマンドパレットから Remote-Containers: Rebuild Container を実行します。
Rust向けのVSCode拡張をインストールして Hello World
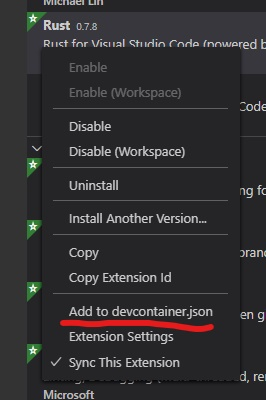
拡張はとりあえずRustがあれば良いみたいです。Marketplaceからインストールしたあと、コンテキストメニューから devcontainer.json に追記しておきます。

Hello World のコードは公式 (The Rust Programming Language) を参照します。
fn main() {
    println!("Hello, world!")
}
コードを書いていたら通知がでました。どうやら拡張を動かすためにいくつかパッケージをインストールしなければいけないようです。

拡張のページによれば、Rustup さえあればあとはよしなにインストールしてくれるみたいです。.devcontainer/Dockerfile の末尾に以下を追記します。
# Required for Rust VScode extension
RUN apk add --no-cache rustup
Remote-Containers: Rebuild Container で再構築して、先程の通知から他に必要なパッケージをインストールします。
> Executing task: rustup component add rust-analysis --toolchain 1.45.2-x86_64-unknown-linux-musl <

info: downloading component 'rust-analysis'
info: installing component 'rust-analysis'
info: Defaulting to 500.0 MiB unpack ram

Terminal will be reused by tasks, press any key to close it.

> Executing task: rustup component add rust-src --toolchain 1.45.2-x86_64-unknown-linux-musl <

info: downloading component 'rust-src'
info: installing component 'rust-src'
info: Defaulting to 500.0 MiB unpack ram

Terminal will be reused by tasks, press any key to close it.

> Executing task: rustup component add rls --toolchain 1.45.2-x86_64-unknown-linux-musl <

info: downloading component 'rls'
info: installing component 'rls'
info: Defaulting to 500.0 MiB unpack ram

Terminal will be reused by tasks, press any key to close it.
色々とインストールされたみたいです。さっそく先程のコードを実行してみましょう。
# rustc main.rs
# ./main
Hello, world!
今日はひとまずここまでです。おつかれさまでした。