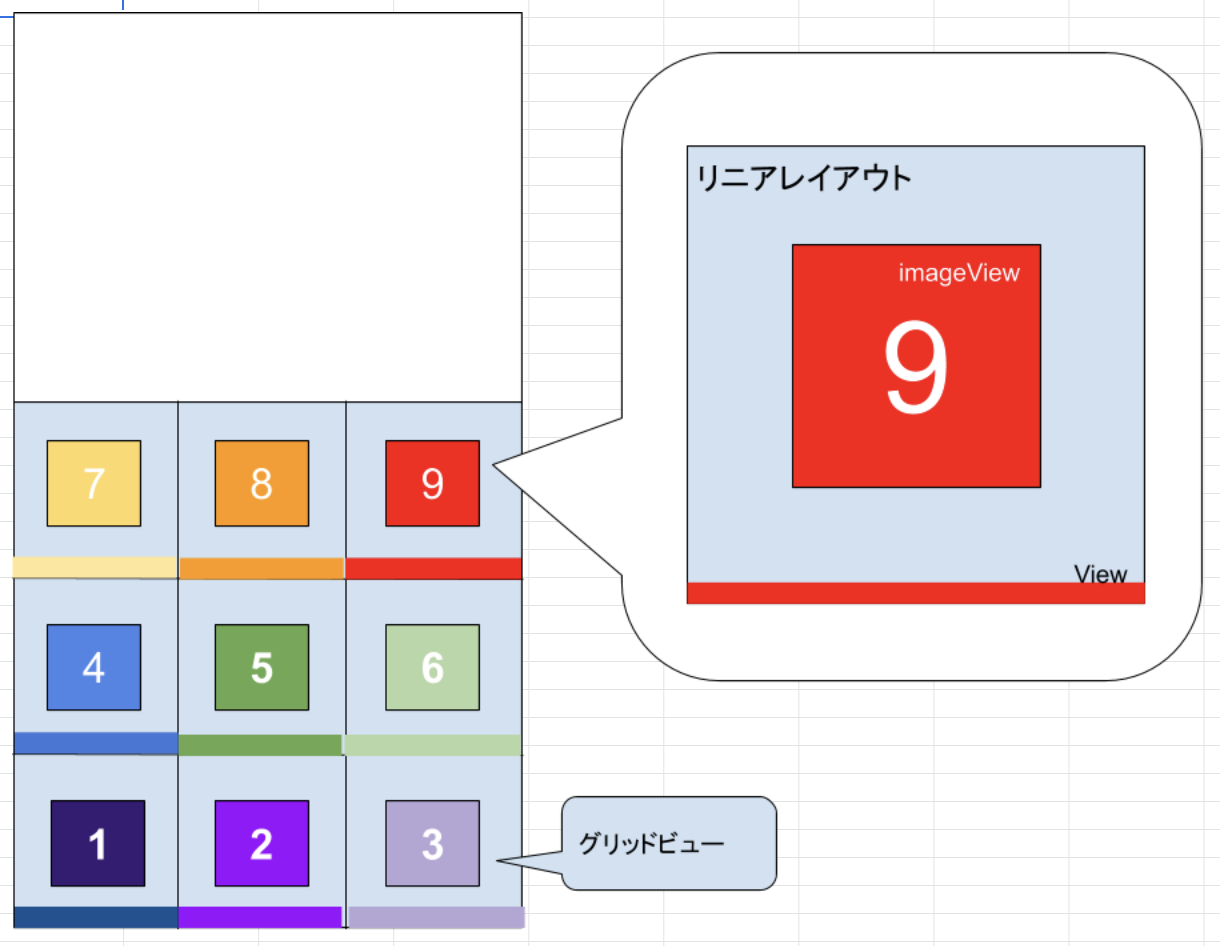
つくりたい画面のイメージ
- 電卓みたいなものだとおもってください。
書いてあること
- 画像の1マスをcustomviewで実装します。
- xmlは最低限で、主にソースコード上で描画していきます。
- center(中央揃え)、bottom(赤い下線)の書き方の備忘録です。
必要なもの
- fragment_main.xml
- item_gridview.xml
- customGridView.kt(kotlinクラス)
1. activity_main.xml
fragment_main.xml
<?xml version="1.0" encoding="utf-8"?>
<LinearLayout xmlns:android="http://schemas.android.com/apk/res/android"
    android:layout_width="match_parent"
    android:layout_height="match_parent"
    android:orientation="vertical">
    <!-- 画面上部の白い部分を5割で書いています -->
    <RelativeLayout
        android:layout_width="match_parent"
        android:layout_height="0dp"
        android:layout_weight="5">
    </RelativeLayout>
    <!-- 画面下部のグリッドビューを5割で書いています -->
    <FrameLayout
        android:layout_width="wrap_content"
        android:layout_height="0dp"
        android:layout_weight="5">
        <!-- 画面を均等に3等分したいので、numColumns="3"としています -->
        <GridView
            android:id="@+id/main_grid"
            android:layout_width="match_parent"
            android:layout_height="match_parent"
            android:numColumns="3"></GridView>
    </FrameLayout>
</LinearLayout>
2. item_gridview.xml
item_gridview.xml
<?xml version="1.0" encoding="utf-8"?>
<FrameLayout xmlns:android="http://schemas.android.com/apk/res/android"
    android:layout_width="match_parent"
    android:layout_height="match_parent">
    <!-- 1マスの大枠を作成 -->
    <jp.co.hoge.views.GridCustomView
        android:id="@+id/custom_view"
        android:layout_width="match_parent"
        android:layout_height="match_parent"
        android:focusable="false"
        android:focusableInTouchMode="false"
        android:layout_gravity="center"></jp.co.hoge.views.GridCustomView>
</FrameLayout>
3. customGridView.kt(kotlinクラス)
customGridView.kt
class GridCustomView @JvmOverloads constructor(
context: Context, attrs: AttributeSet? = null, defStyleAttr: Int = 0
) : LinearLayout(context, attrs, defStyleAttr) {
@SuppressLint("ResourceAsColor", "NewApi")
fun initView(imageHeight: Int) {
// カスタムビューの縦幅
val height = (imageHeight / 3) - ((imageHeight * 0.016).roundToInt())
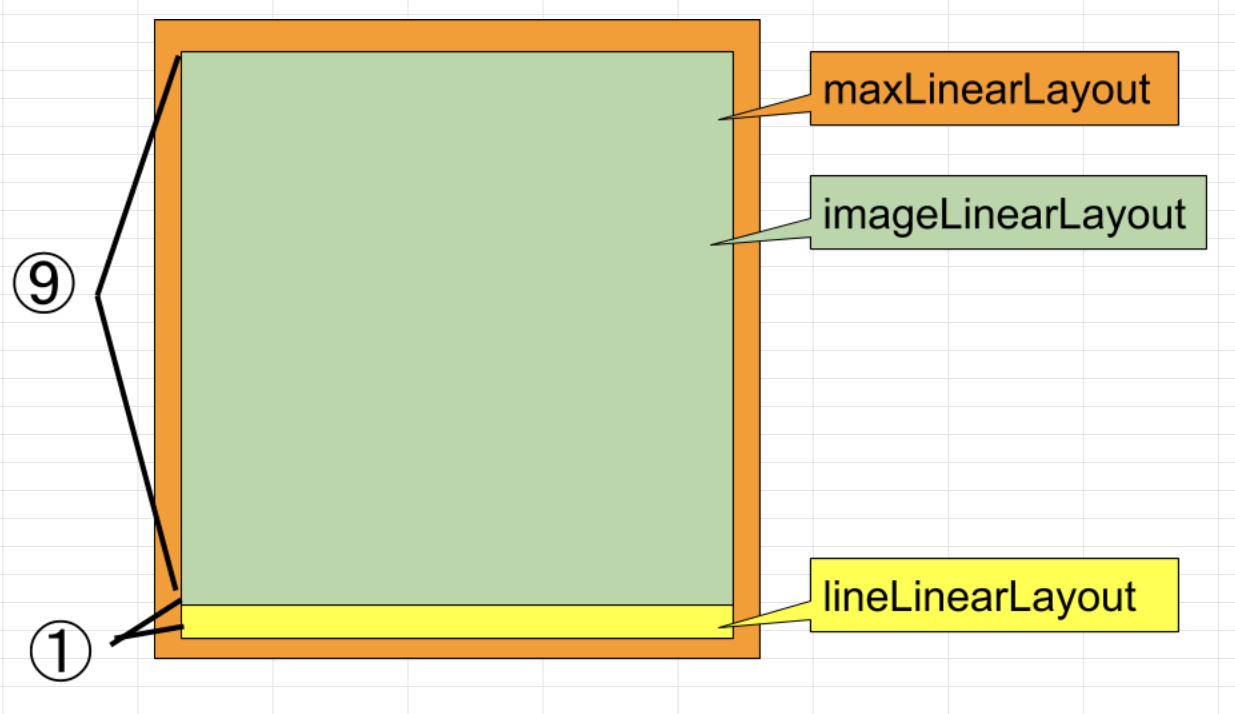
// maxLinearLayoutのサイズ
val maxLinearParam = FrameLayout.LayoutParams(
FrameLayout.LayoutParams.MATCH_PARENT,
height
)
// weight9:1が指定できないので、高さをそれぞれ近しい値で割って、領域を確保しています
// imageLinearLayoutのサイズ
val imageLinearLayoutParam = FrameLayout.LayoutParams(
FrameLayout.LayoutParams.MATCH_PARENT,
(height * 0.96).roundToInt()
)
// lineLinearLayoutのサイズ
val lineLinearLayoutParam = FrameLayout.LayoutParams(
FrameLayout.LayoutParams.MATCH_PARENT,
(height * 0.04).roundToInt()
)
// 画像のサイズ
val imageParam = FrameLayout.LayoutParams(height / 2, height / 2)
// 下線Viewのサイズ
val bottomViewParam = FrameLayout.LayoutParams(
FrameLayout.LayoutParams.MATCH_PARENT,
FrameLayout.LayoutParams.MATCH_PARENT
)
// bottomViewParam.setMargins(0,0,0,0)は実数つかったり、無理やり比率指定になってしまう。。。
// maxLineaLayout
val maxLinearLayout = LinearLayout(context)
maxLinearLayout.layoutParams = maxLinearParam
maxLinearLayout.orientation = VERTICAL
maxLinearLayout.setHorizontalGravity(CENTER)
// imageLinearLayoutのサイズ
val imageLinearLayout = LinearLayout(context)
imageLinearLayout.layoutParams = imageLinearLayoutParam
imageLinearLayout.setVerticalGravity(CENTER)
imageLinearLayout.setHorizontalGravity(CENTER)
// lineLinearLayoutのサイズ
val lineLinearLayout = LinearLayout(context)
lineLinearLayout.layoutParams = lineLinearLayoutParam
// ImageView(9番の画像を表示、ほんとはEnumつくるとベスト)
val imageView = ImageView(context)
imageView.setImageResource(R.drawable.9)
imageView.layoutParams = imageParam
// 下線View
val bottomView = View(context)
bottomView.setBackgroundColor(context.resources.getColor(R.color.9))
bottomView.layoutParams = bottomViewParam
// ここでセットするのを忘れてしまうと、描画されないので注意する。
imageLinearLayout.addView(imageView)
lineLinearLayout.addView(bottomView)
maxLinearLayout.addView(imageLinearLayout)
maxLinearLayout.addView(lineLinearLayout)
this.addView(maxLinearLayout)
}
xmlで描画したViewの高さと幅を、Fragmentで書き換える方法
- imageviewの大きさを、端末の大きさによって動的に変化させたいときにつかいました。
activity_main.xml
<?xml version="1.0" encoding="utf-8"?>
<LinearLayout xmlns:android="http://schemas.android.com/apk/res/android"
    android:layout_width="match_parent"
    android:layout_height="match_parent">
            <ImageView
                android:id="@+id/image_view"
                android:layout_width="wrap_content"
                android:layout_height="wrap_content"
                android:layout_gravity="center"></ImageView>
</LinearLayout>
MainActivity.kt
        // onCreateのなかです。
        val imageView = view.findViewById(R.id.image_view)
        val param = this.height / 3
        val imageParam = FrameLayout.LayoutParams(param, param)
        // layoutParamをセットするとxmlで設定した中央揃えが無効になるので、再度ここで設定します。
        imageParam.gravity = CENTER
        imageView.layoutParams = imageParam