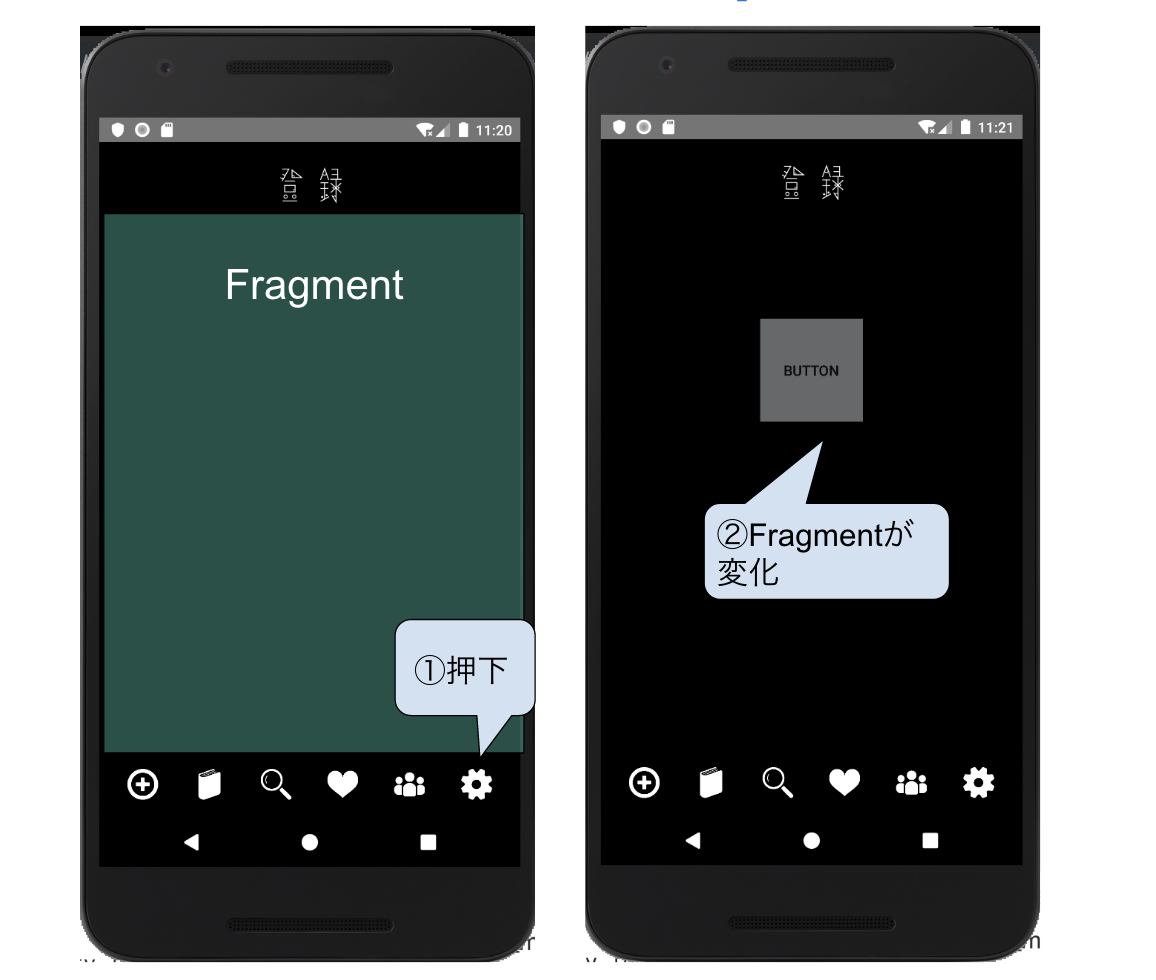
実現したいこと
- MainActivityのボタンを押下すると、
Fragmentで複数の画面表示をすることができる。

必要なもの
- MainActivity.java
- activity_main.xml
- MainFragment.java
- fragment_main.xml
※4種類の画面を表示したい場合は、
fragmentHoge.xmlを4個、HogeFragment.xmlを4個作る必要がある。
1.MainActivity.java
MainActivity.java
public class MainActivity extends AppCompatActivity {

    public static Intent getStartIntent(LoginActivity loginActivity) {
        return new Intent(loginActivity, MainActivity.class);
    }

    @Override
    protected void onCreate(Bundle savedInstanceState) {
        super.onCreate(savedInstanceState);
        setContentView(R.layout.activity_main);

    Button button = findViewById(R.id.main_button);
        //ボタンが押下されたら、Frgmentを表示する
        main_button.setOnClickListener(new View.OnClickListener() {
            @Override
            public void onClick(View v) {
                //fragmentを呼びだす
                // Fragmentを作成します
                MainFragment fragment = new MainFragment();
                // Fragmentの追加や削除といった変更を行う際は、Transactionを利用します
                FragmentTransaction transaction = getSupportFragmentManager().beginTransaction();
                // 新しく追加を行うのでaddを使用します
                transaction.add(R.id.fragment_layout, fragment);
                // 最後にcommitを使用することで変更を反映します
                transaction.commit();
            }
        });
    }
}
2.activity_main.xml
- activity_main.xmlの中にFragmentの領域をとっておく。
activity_main.xml
<FrameLayout
                android:id="@+id/fragment_layout"
                android:layout_width="match_parent"
                android:layout_height="match_parent"></FrameLayout>
3.MainFragment.java
MainFragment.java
public class MainFragment extends Fragment {

    private TextView mTextView;

    @Override
    public View onCreateView(LayoutInflater inflater, ViewGroup container,
                             Bundle savedInstanceState) {

        // 画面初期化処理
        final View inflate = inflater.inflate(R.layout.fragment_main, container, false);
        TextView titleText = inflate.findViewById(R.id.textView);
        Button button = inflate.findViewById(R.id.button);
        return inflate;
    }

}
4.fragment_main.xml
fragment_main.xml
<?xml version="1.0" encoding="utf-8"?>
<android.support.constraint.ConstraintLayout xmlns:android="http://schemas.android.com/apk/res/android"
    android:layout_width="match_parent"
    android:layout_height="match_parent">

    <LinearLayout
        android:layout_width="match_parent"
        android:layout_height="match_parent"
        android:orientation="vertical">

        <TextView
            android:id="@+id/textView"
            android:layout_width="100dp"
            android:layout_height="100dp"
            android:layout_gravity="center"
            android:text="button" />

        <Button
            android:id="@+id/button"
            android:layout_width="100dp"
            android:layout_height="100dp"
            android:layout_gravity="center"
            android:background="@color/gauge_init_color"
            android:text="button" />

    </LinearLayout>
</android.support.constraint.ConstraintLayout>
- 参考サイト: