プレミアム音声サービス NowVoice
NowVoiceのAndroidアプリ開発を担当しているkiyoです。
先日のDroidokaigi2021では、Jetpack Composeに関するセッションが多かったですね!
この記事では、もしも既存のアプリ(xml)をJetpackComposeで書き換えることになった場合に、ハマりそうなポイントをまとめてみました。
完成形
ソースコードはGitHubにて公開しています。
※一部デザインや数値を変更して実装しています
https://github.com/kiy0ta/NV
← NowVoiceアプリ(xml)
→ 今回実装したもの(Jetpack Compose)

目次
- 角丸をパーセントで指定する
- Imageを丸く切り抜いて表示する
- Imageのtintを変更する
- 画面全体にグラデーションをかける
1. 角丸をパーセントで指定する
角丸の枠線を実装する場合、Textに border.RoundedCornerShape() を指定します。
塗りつぶしの場合は、Textに background. RoundedCornerShape() を指定します。
RoundedCornerShape() は、パーセントを指定するので、
RoundedCornerShape(50) とは50dpではなく50%という意味になります。
@Composable
fun ButtonItem(text: String) {
    Text(
        text = text,
        modifier = Modifier
            .border(
                width = 2.dp,
                color = colorResource(id = R.color.red),
                shape = RoundedCornerShape(50) //これ
            )
            .background(
                color = Color.Transparent
            )
            .padding(vertical = 8.dp, horizontal = 16.dp),
        color = colorResource(id = R.color.red),
        fontSize = 14.sp,
        fontWeight = FontWeight.Bold
    )
}
2. Imageを丸く切り抜いて表示する
既存のxml実装の一部ではGlideや、CircleImageViewライブラリを使用していたんですが、
Jetpack Composeでは Modifier.clip(CircleShape) で指定できます。
rectangleやCutCornerShapeなど詳細についてはこちらをご確認ください。
Image(
       painter = painterResource(id = R.drawable.ic_face),
       contentDescription = null,
       modifier = Modifier.clip(CircleShape) //これ
     )
3. Imageのtintを変更する
今回アイコンはいらすとやさんとICOOON MONOさんを利用したのですが、
ICOOON MONOでSVGで書き出したアイコンをVector Assetで読み込むとグレーに。。
今回の実装はサンプルなので、 tint で赤色を設定しました。

Image(
      painter = painterResource(id = R.drawable.ic_comment),
      contentDescription = null,
      modifier = Modifier.padding(..),
      colorFilter = ColorFilter.tint(colorResource(id = R.color.red))//これ
     )
disableのアイコン表示やテキスト表示も同様の方法で、tint、color、alphaの設定ができます。
4. 画面全体にグラデーションをかける
Jetpack ComposeはBoxでもColumnでもグラデーションをかけることができるのですが、
今回はColumnにかける場合と、LazyColumnにかける場合の注意点について書いていきます。
4-1. Column + linearGradient
この方法が一番NowVoiceアプリに近かったので、今回の実装では Column+linearGradient を使用しています。
今回はLazyColumnの領域以外にもグラデーションをかけたかったので、
Boxを使用して背景画像とitemの間にグラデーションを追加しました。
Column(
       modifier = Modifier
           .fillMaxSize()
           .background(
              Brush.linearGradient( //これ
                 colors = listOf(Color.Green, Color.Yellow,Color.Blue),
                 start = Offset.Zero, end = Offset.Infinite
           )
       )
)
4-2. LazyColumn + drawWithContent
この方法のいい所は、LazyColumnのitemの領域だけにグラデーションをかけてくれることです。
デメリットとしては、 drawWithContent をかけるとitemの上に色が被ってしまい、
itemのUIが見辛くなってしまうことです。
@Composable
fun PostItems() {
    LazyColumn(modifier = Modifier
        .drawWithContent { // これ
            val colors = listOf(Color.Transparent, Color.Black)
            drawContent()
            drawRect(
                brush = Brush.verticalGradient(colors),
                blendMode = BlendMode.DstIn// DstOutの場合は引数の2番目の色が上に来る
            )
        }) {
        items(10) { _ ->
            PostItem()
        }
    }
}
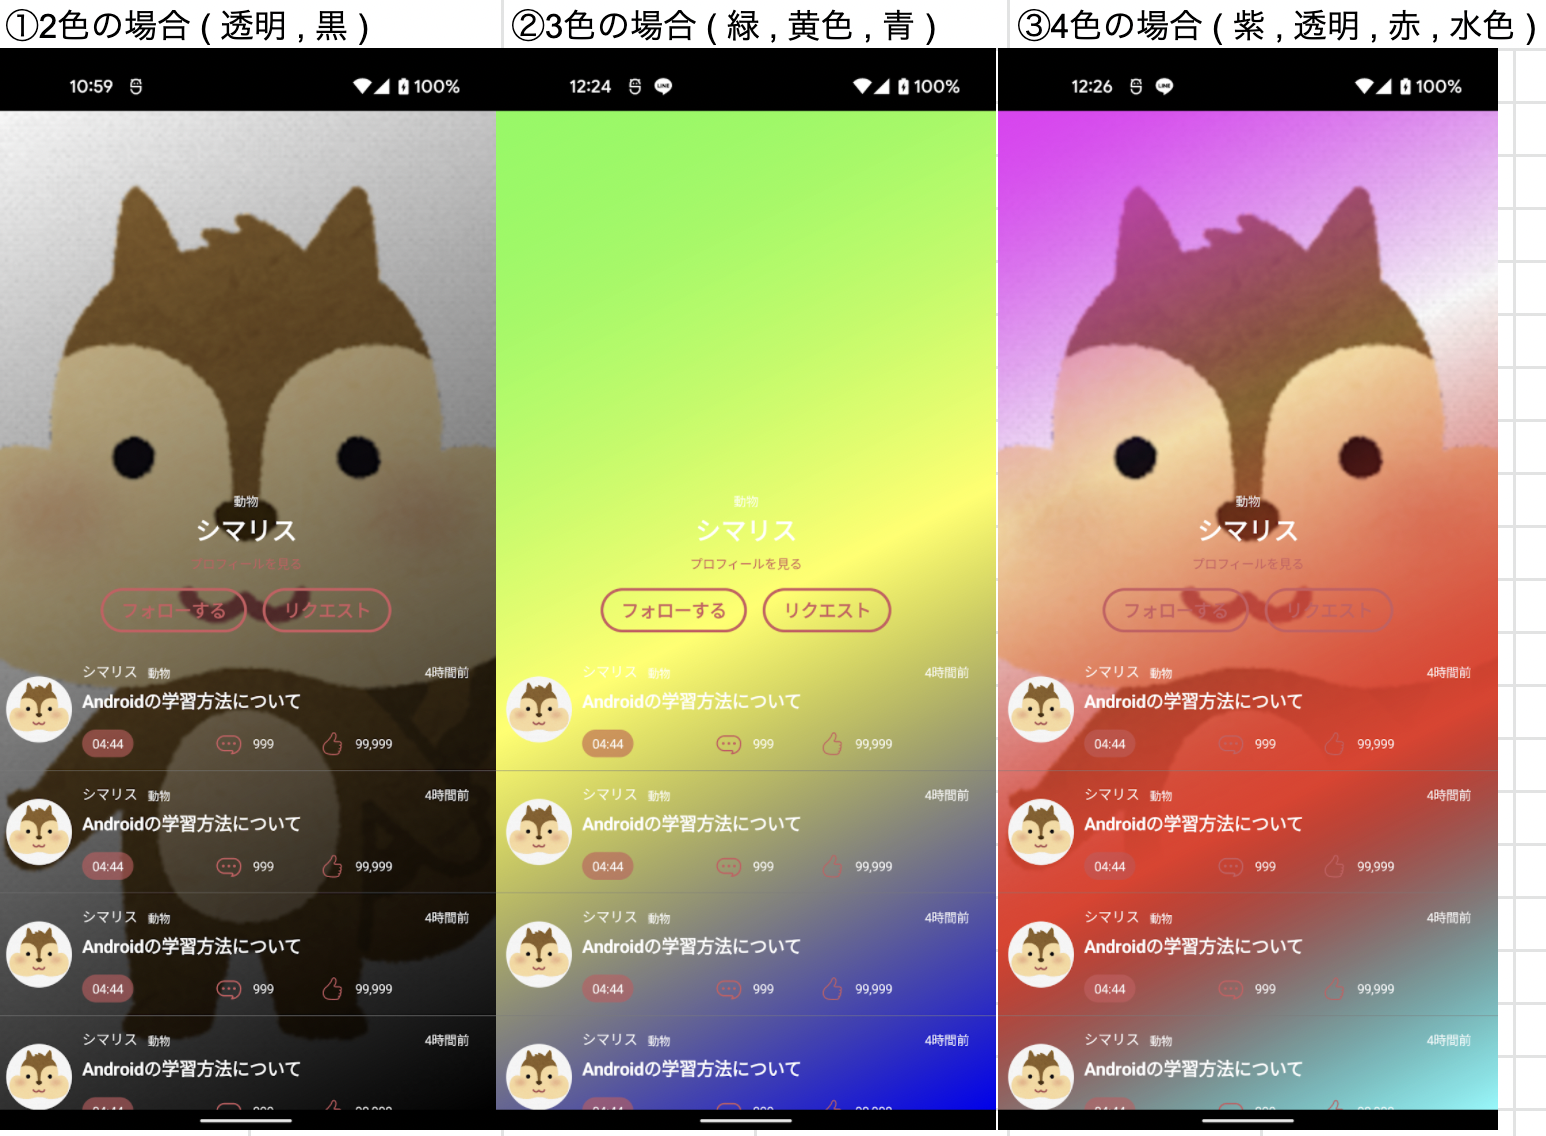
今回の上が透明、下が黒のグラデーションを実装する場合は、どちらかの方法で実装が可能です。
① BlendMode.DstIn + listOf(Color.Transparent, Color.Black)
② BlendMode.DstOut + listOf(Color.Black, Color.Transparent)
※引数が逆になる
また、 val colors = listOf() は、複数色設定することができます。
val colors = listOf(Color.Transparent,Color.Black)
val colors = listOf(Color.Green, Color.Yellow,Color.Blue)
val colors = listOf(Color.Magenta, Color.Transparent,Color.Red,Color.Cyan)
さいごに
運動通信社は
「日本を世界が憧れるスポーツ大国にする」というビジョンを達成するべく、
一緒に働く仲間を募集しています!
ぜひ、一緒にAndroidアプリを作りませんか?
https://sportsbull.jp/about/#recruit
参考
- https://y-anz-m.blogspot.com/2021/05/jetpack-compose.html
- https://y-anz-m.blogspot.com/2021/04/compose-icon-clickable-iconbutton.html
- http://y-anz-m.blogspot.com/2021/05/jetpack-compose-disabled-image-text.html
- https://blog.bam.tech/developer-news/detect-instagram-like-gestures-with-jetpack-compose
- https://www.py4u.net/discuss/703937


