概要
UIViewControllerAnimatedTransitioningを使うと簡単に画面遷移アニメーションを作れます。
まず、UIViewControllerAnimatedTransitioningプロトコルを適用したクラスを作ります(これが画面遷移の実装内容となります)。
ポイントだけ以下に示します。
class Animator: NSObject, UIViewControllerAnimatedTransitioning {

    func transitionDuration(transitionContext: UIViewControllerContextTransitioning) -> NSTimeInterval {
        // アニメーションの時間(duration)を返します。
        return 1.0
    }

    func animateTransition(transitionContext: UIViewControllerContextTransitioning) {
    	// ここでアニメーションの具体的な内容を書きます。
    	let fromVC = transitionContext.viewControllerForKey(UITransitionContextFromViewControllerKey)
        let toVC = transitionContext.viewControllerForKey(UITransitionContextToViewControllerKey)

        UIView.animateWithDuration(transitionDuration(transitionContext), delay: 0, options: .CurveEaseInOut, animations: { () -> Void in
             // アニメーションの具体的な内容
        }) { (finished) -> Void in
            // 完了後の処理
            transitionContext.completeTransition(true)
        }
    }
}
そして、 遷移先 のViewControllerでUIViewControllerTransitioningDelegateを適用し、以下のように書くと自作の画面遷移ができるようになります(UINavigationControllerを使わない場合)。
class SecondViewController: UIViewController, UIViewControllerTransitioningDelegate {
	let kAnimator = Animator()

    override func viewDidLoad() {
        super.viewDidLoad()

        self.transitioningDelegate = self // delegateにselfを設定
    }

    override func didReceiveMemoryWarning() {
        super.didReceiveMemoryWarning()
    }

    @IBAction func buttonTapped(sender: UIButton) {
        dismissViewControllerAnimated(true, completion: nil)
    }


    // MARK: - UIViewControllerTransitioningDelegate

    func animationControllerForPresentedController(presented: UIViewController, presentingController presenting: UIViewController, sourceController source: UIViewController) -> UIViewControllerAnimatedTransitioning? {
    	// この画面に遷移してくるときに呼ばれるメソッド
        return kAnimator
    }

    func animationControllerForDismissedController(dismissed: UIViewController) -> UIViewControllerAnimatedTransitioning? {
    	// この画面から遷移元に戻るときに呼ばれるメソッド
        return kAnimator
    }
}
UINavigationControllerを使うときは 遷移元 のViewControllerに以下のように書くと遷移できます。
class ViewController: UIViewController {
    let kAnimationController = FadeAnimationController()
    override func viewDidLoad() {
        super.viewDidLoad()
    }

    override func didReceiveMemoryWarning() {
        super.didReceiveMemoryWarning()
    }

    func navigationController(navigationController: UINavigationController, animationControllerForOperation operation: UINavigationControllerOperation, fromViewController fromVC: UIViewController, toViewController toVC: UIViewController) -> UIViewControllerAnimatedTransitioning? {
        return kAnimationController
    }
}
例
上のテンプレートに沿って、実際にpush(show)のような簡単な画面遷移を実装してみます。
class Animator: NSObject, UIViewControllerAnimatedTransitioning {
    let kMovedDistance: CGFloat = 70.0 // 遷移元のviewのずれる分の距離
    let kDuration = 0.3
    var presenting = false // 遷移するときtrue(戻るときfalse)

    func transitionDuration(transitionContext: UIViewControllerContextTransitioning) -> NSTimeInterval {
        return kDuration
    }

    func animateTransition(transitionContext: UIViewControllerContextTransitioning) {
        let fromVC = transitionContext.viewControllerForKey(UITransitionContextFromViewControllerKey)
        let toVC = transitionContext.viewControllerForKey(UITransitionContextToViewControllerKey)

        // 遷移するときと戻るときとで処理を変える
        if presenting {
            presentTransition(transitionContext, toView: toVC!.view, fromView: fromVC!.view)
        } else {
            dismissTransition(transitionContext, toView: toVC!.view, fromView: fromVC!.view)
        }
    }

    // 遷移するときのアニメーション
    func presentTransition(transitionContext: UIViewControllerContextTransitioning, toView: UIView, fromView: UIView) {
        let containerView = transitionContext.containerView()
        containerView.insertSubview(toView, aboveSubview: fromView) // toViewの下にfromView

        // 遷移先のviewを画面の右側に移動させておく。
        toView.frame = CGRectOffset(toView.frame, containerView.frame.size.width, 0)

        UIView.animateWithDuration(transitionDuration(transitionContext), delay: 0.05, options: .CurveEaseInOut, animations: { () -> Void in
            // 遷移元のviewを少し左へずらし、alpha値を下げて少し暗くする。
            fromView.frame = CGRectOffset(fromView.frame, -self.kMovedDistance, 0)
            fromView.alpha = 0.7

            // 遷移先のviewを画面全体にはまるように移動させる。
            toView.frame = containerView.frame
        }) { (finished) -> Void in
            fromView.frame = CGRectOffset(fromView.frame, self.kMovedDistance, 0) // 元の位置に戻す
            transitionContext.completeTransition(true)
        }
    }

    // 戻るときのアニメーション
    func dismissTransition(transitionContext: UIViewControllerContextTransitioning, toView: UIView, fromView: UIView) {
        let containerView = transitionContext.containerView()
        containerView.insertSubview(toView, belowSubview: fromView) // fromViewの下にtoView

        // 上と逆のことをする。
        toView.frame = CGRectOffset(toView.frame, -kMovedDistance, 0)

        UIView.animateWithDuration(transitionDuration(transitionContext), delay: 0, options: .CurveEaseInOut, animations: { () -> Void in
            fromView.frame = CGRectOffset(fromView.frame, containerView.frame.size.width, 0)
            toView.frame = CGRectOffset(toView.frame, self.kMovedDistance, 0)
            toView.alpha = 1.0
        }) { (finished) -> Void in
            transitionContext.completeTransition(true)
        }
    }
}
この例では、フラグを使って遷移するときと戻るときとでアニメーションを変化させています。
そのため、遷移先のviewでは以下のように、フラグを操作します。
...

// MARK: - UIViewControllerTransitioningDelegate

    func animationControllerForPresentedController(presented: UIViewController, presentingController presenting: UIViewController, sourceController source: UIViewController) -> UIViewControllerAnimatedTransitioning? {
        kAnimator.presenting = true // 遷移してくるときにtrueにする

        return kAnimator
    }

    func animationControllerForDismissedController(dismissed: UIViewController) -> UIViewControllerAnimatedTransitioning? {
        kAnimator.presenting = false // 遷移元に戻るときにfalseにする

        return kAnimator
    }
}
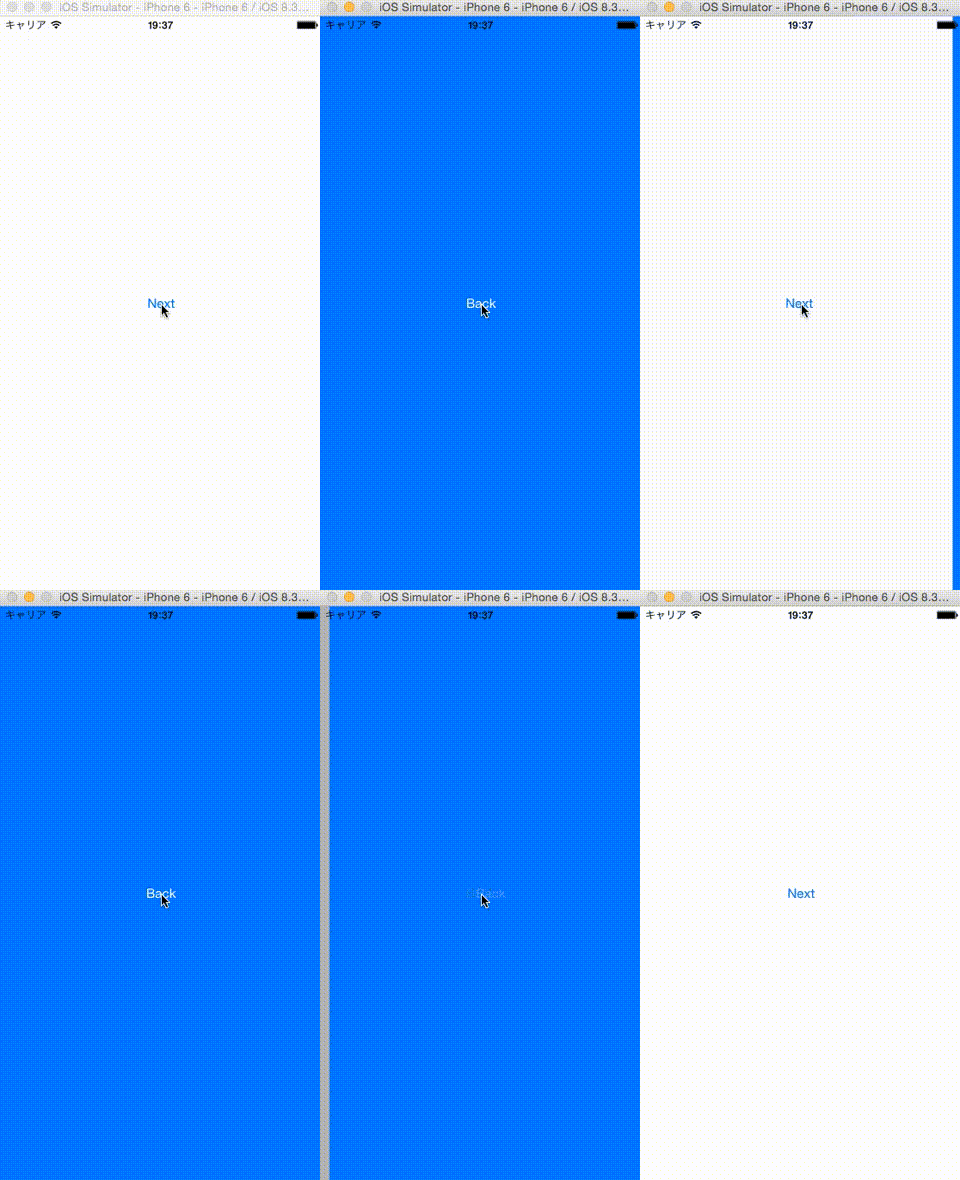
このようにすると、以下のようにシンプルな画面遷移になります。
上で作成したものはGitHubにあげてあります。
