IoT 界隈ではおなじみの MQTT プロトコルが TouchDesigner099 からサポートされ、MQTT Client DAT の機能が追加されたのでさっそく試してみた。
試してみるのにあたり、こちら のサイトが大変参考になった。
TouchDesigner を操作するインターフェイスはボリューム抵抗とスライド抵抗で、Raspberry Pi に mcp3008 (10bit 8ch ADコンバータ) を SPI 接続し、mcp3008 にボリューム抵抗とスライド抵抗を接続し、Node-RED (npm コマンドで mcp3008 ノードを追加) で mcp3008 のデータ値 (厳密には mcp3008 に接続された抵抗に掛かる電圧値) を読み出して MQTT Broker へ送信 (Publish) する実装例であった。
今回は操作するインターフェイスをボリューム抵抗のみとし、ESP8266 を使用して実装を行うこととした。
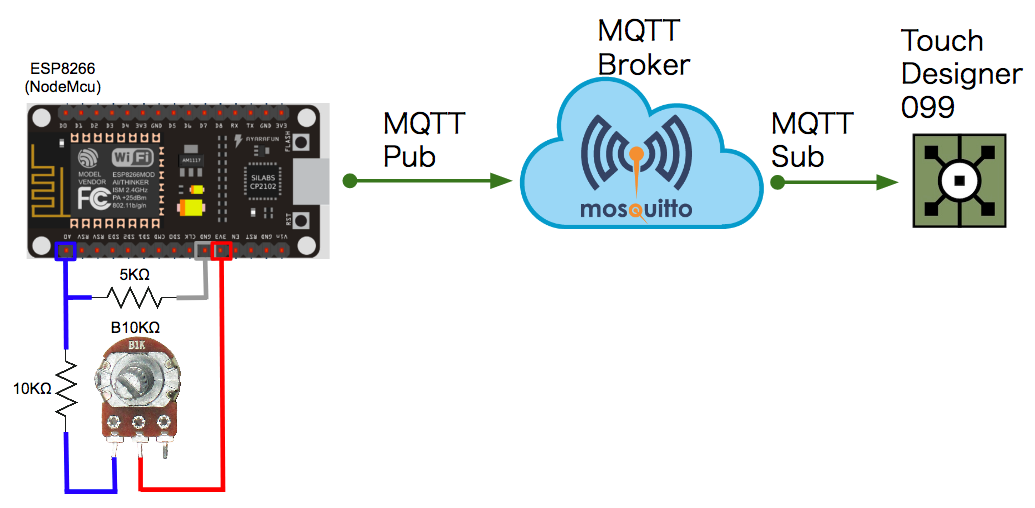
接続構成・配線図
ESP8266 に接続されたボリューム抵抗を回すと MQTT Broker 経由で TouchDesigner へ値が入力される構成とした。
ESP8266 (MQTT Publish)
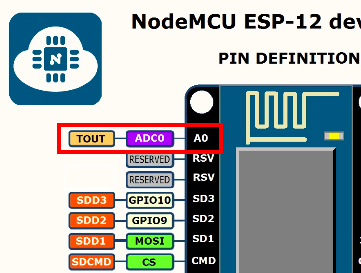
ESP8266 で AD 変換をする方法については こちら を参考にした。
A0 ピン (TOUT ピン) を使った AD 変換は、0.0V ~ 1.0V の範囲で 10 bit の分解能を持って計測する事ができるとのこと。
上記のように抵抗 (5KΩ, 10KΩ, B10KΩ) を配線し、ボリューム抵抗を回すと0.6V 〜 1.0V の範囲で電圧が変化することをテスターで確認できた ( ESP8266 で 207 〜 334 の範囲で値が変化することを確認できた) ため、これを -0.5 〜 0.5 の範囲へ値を正規化して MQTT Broker へ入力することとした。
MQTT Broker
MQTT Broker を導入する方法については こちら を参考にした。
今回は Mac へ Homebrew を使って Mosquitto をインストールした。
起動
$ mosquitto

1522681098: mosquitto version 1.4.14 (build date 2017-10-22 16:34:22+0100) starting
1522681098: Using default config.
1522681098: Opening ipv6 listen socket on port 1883.
1522681098: Opening ipv4 listen socket on port 1883.
ESP8266 または TouchDesigner から接続されるとログが出力される。
1522681155: New connection from 172.30.16.177 on port 1883.
1522681155: New client connected from 172.30.16.177 as ESP8266_Client (c1, k30).

1522664940: New connection from 172.30.16.178 on port 1883.
1522664940: New client connected from 172.30.16.178 as TD_76858_4338_19 (c1, k50).
MQTT Publish (接続試験)
$ mosquitto_pub -h 172.30.16.179 -t "/pishield/chan6" -m "0.1" -q 0

$ mosquitto_pub -h 172.30.16.179 -t "/pishield/chan7" -m "0.2" -q 0
MQTT Subscribe (接続試験)
$ mosquitto_sub -h 172.30.16.179 -t "/pishield/chan6" -q 0
0.1

$ mosquitto_sub -h 172.30.16.179 -t "/pishield/chan7" -q 0
0.2
TouchDesigner099 (MQTT Subscribe)
TouchDesigner099 のダウンロードは こちら 。
TouchDesigner のインストール方法、基本的な操作方法については こちら が大変参考になった。
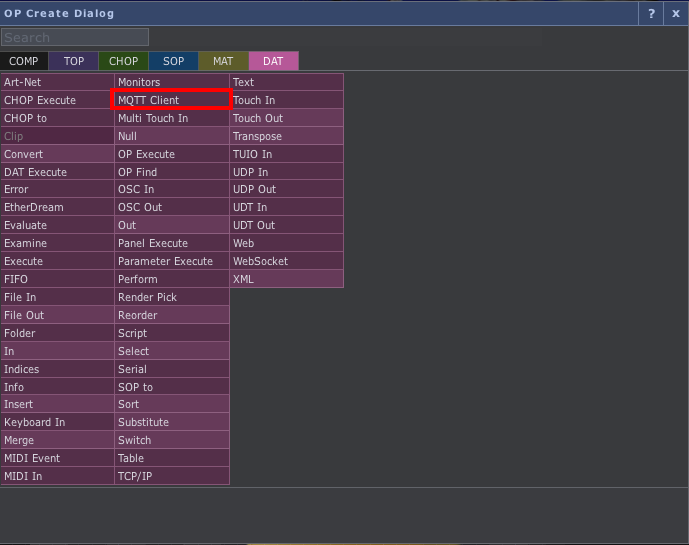
OP Create ダイアログボックスの DAT Operator タブの中から MQTT Client を選択する。
MQTT Client Operator のパラメータウィンドウで Connect -> Network Address に MQTT Broker の IP アドレスを設定する。
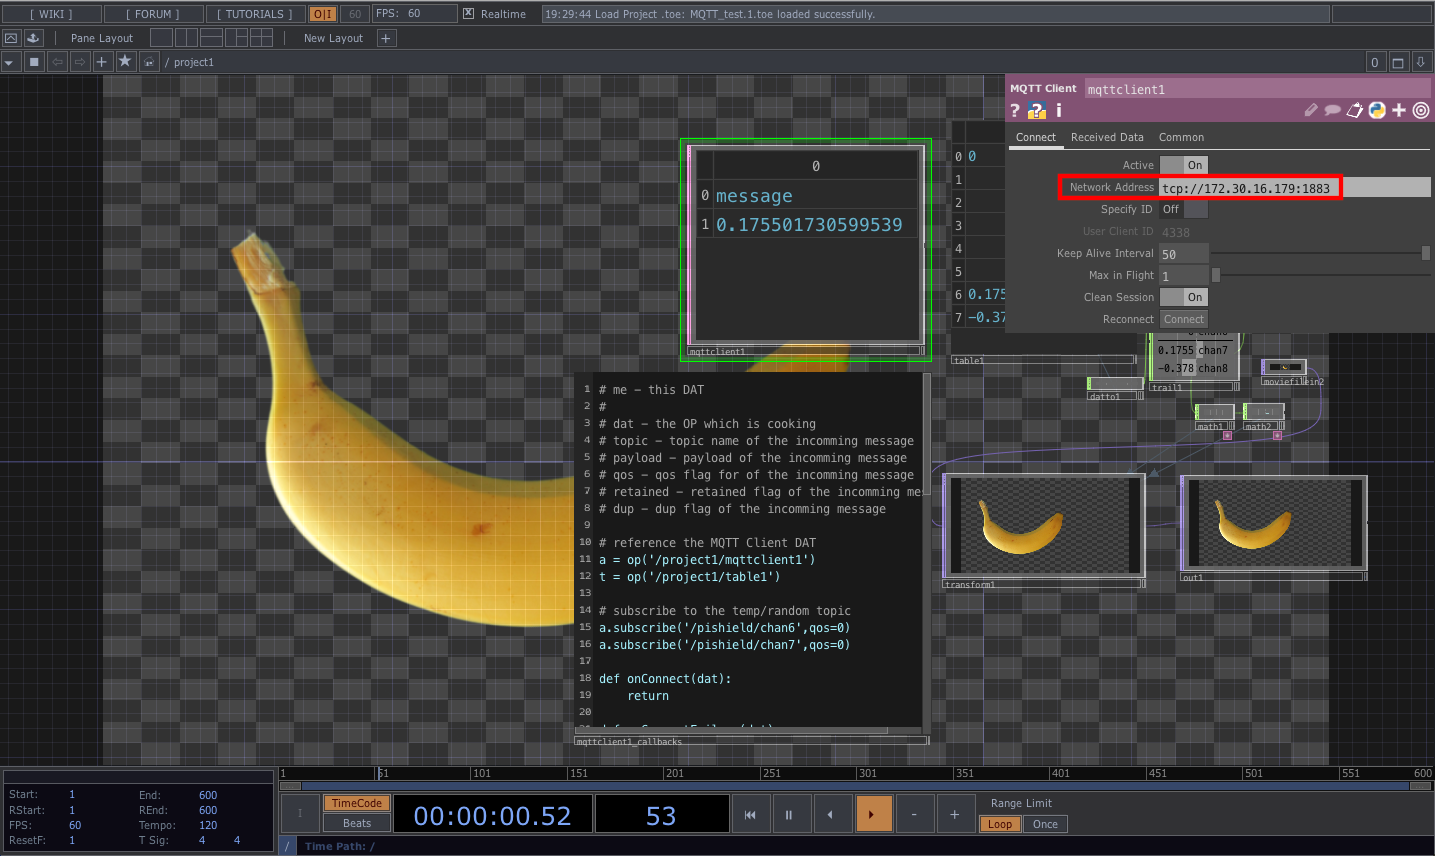
MQTT Client Operator の callbacks の内容 (Python script) はこちら。
# me - this DAT
#
# dat - the OP which is cooking
# topic - topic name of the incomming message
# payload - payload of the incomming message
# qos - qos flag for of the incomming message
# retained - retained flag of the incomming message
# dup - dup flag of the incomming message

# reference the MQTT Client DAT
a = op('/project1/mqttclient1')
t = op('/project1/table1')

# subscribe to the temp/random topic
a.subscribe('/pishield/chan6',qos=0)
a.subscribe('/pishield/chan7',qos=0)

def onConnect(dat):
	return

def onConnectFailure(dat):
	return

def onConnLost(dat):
	return

def onSubscribe(dat):
	print('subscribed!', dat)
	return

def onSubscribeFailure(dat):
	return

def onUnsubscribe(dat):
	return

def onUnsubscribeFailure(dat):
	return

def onPublish(dat):
	return

def onMessage(dat, topic, payload, qos, retained, dup):
	print('received message ', payload)
	if (topic == '/pishield/chan6'):
		t[6,0] = float(payload)
	if (topic == '/pishield/chan7'):
		t[7,0] = float(payload)
	return
ソースコード
TouchDesigner のサンプルファイルは こちら 。
ESP8266 のサンプルコードは こちら 。
# include <ESP8266WiFi.h>
# include <PubSubClient.h>

extern "C" {
  #include "user_interface.h"
}

# define WLAN_SSID       ""  // Wi-Fi SSID
# define WLAN_PASS       ""  // Wi-Fi Password

// const char *mqtt_host = "";  // MQTT Host
byte ip[] = {172, 30, 16, 179};  // MQTT IP Address
const char *mqtt_topic = "/pishield/chan6"; // MQTT Topic (chan6 = rotation)
// const char *mqtt_topic = "/pishield/chan7"; // MQTT Topic (chan7 = horizontal move)

// ClientID
const char *mqtt_client = "ESP8266_MQTT_Client";

void callback(char* topic, byte* payload, unsigned int length) {
  // handle message arrived
}

WiFiClient wclient;
// PubSubClient client(mqtt_host, 1883, callback, wclient);  // MQTT Host
PubSubClient client(ip, 1883, callback, wclient);  // MQTT IP Address

void setupWiFi() {
  Serial.println();
  Serial.print("Connecting to ");
  Serial.println(WLAN_SSID);
  WiFi.begin(WLAN_SSID, WLAN_PASS);
  while (WiFi.status() != WL_CONNECTED) {
    delay(500);
    Serial.print(".");
  }
  Serial.println();
  Serial.println("WiFi connected");
  Serial.println("IP address: ");
  Serial.println(WiFi.localIP());
}

void setup() {
  pinMode(15, OUTPUT);  // for Wio-Node
  digitalWrite(15, 1);  // for Wio-Node
  Serial.begin(115200);
  setupWiFi();
}

void loop() {
  if (WiFi.status() != WL_CONNECTED) {
    setupWiFi();
  }
  if (WiFi.status() == WL_CONNECTED) {
    if (!client.connected()) {
      Serial.println("Connecting to MQTT server");
      if (client.connect(mqtt_client)) {
        Serial.println("Connected to MQTT server");
      } else {
        Serial.println("Could not connect to MQTT server");
      }
    }
    Serial.print("Publishing: ");
    int value = system_adc_read();
    Serial.println("Value: " + String(value));
    // normalize: Y = (X - Xmin) / (Xmax - Xmin) => 0 - 1
    float f = (float(value) - 207) / (334 - 207) - 0.5;
    // cast float => char
    char s[8];
    dtostrf(f, 2, 5, s);
    Serial.println("Value: " + String(value) + ", " + s);
    client.publish(mqtt_topic, s);
    if (client.connected()) {
      client.loop();
    }
  }
  delay(100);
}
まとめ
身近な IoT デバイスと TouchDesigner が組み合わさることによってノード系ビジュアルプログラミングの "よさみ" が深くなれば幸いです。


