こんにちは。ざっきーと申します。
IoTLT Advent Calendar 2017の 4日目を担当します。
最近、LINE Wave、Google Home、Amazon Echo など各社からスマートスピーカーが続々と発売されて気になっているのですが、Wave は先行体験版を入手済 (2017年8月31日時点)で音楽専門スピーカーと化し、Amazonからは未だ招待メールが届かず (2017年12月3日時点)、Google Home は期間限定で半額セールをやっていたので、つい手が伸びてしまうなど。

販売店員さんにいただいたカタログのページをめくってみると、部屋の照明をコントロールすることができるようで、昔買って使用していなかった Philips Hue (現在は第三世代で、手元にあるのは第一世代) があったなぁーと思い出し、早速取り出して接続させてみるなど。
※ https://en.wikipedia.org/wiki/Philips_Hue
第一世代: 2012年10月29日
第二世代: 2015年10月4日
第三世代: 2016年10月2日
(Google Homeのカタログ)

(第一世代Philips Hue ハブと電球 x 3)

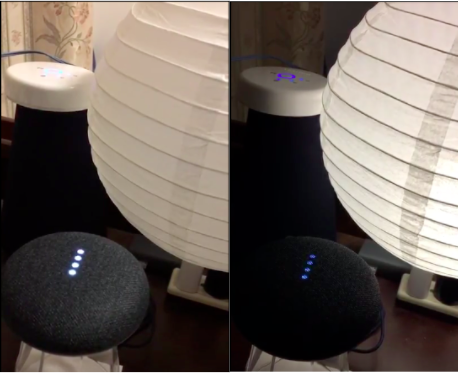
(Google Home miniとリンクさせてみた。WAVEの上にハブが置かれているのはご愛嬌。:-p)
点ける: https://youtu.be/CDZ70n6eJDY
消す: https://youtu.be/fBn3JcjAnnY
Philips Hue Bridge
Philips Hue は SDK や API が公開されているので 3rd Party によるアプリが開発されている。
https://developers.meethue.com/
今回は Philips Hue を操作するクライアントの話では無く、ESP8266 を Hue Bridge に見立てて Hue アプリやスマートスピーカーから ESP8266 (正確には ESP8266 に接続された LED) を操作する試みである。
https://github.com/probonopd/ESP8266HueEmulator/
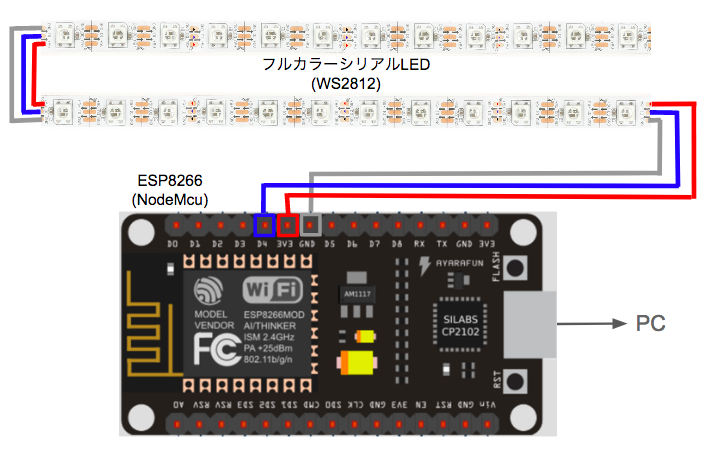
接続構成
ESP8266 (図中では NodeMcu) にフルカラーシリアル LED(WS2812) を接続するだけなので、至ってシンプルである。
インストール手順
Arduino IDEのインストール、起動、ESP8266 ボード設定まで済ませる。
また、下記ディレクトリで git コマンドで必要なライブラリをインストールする。
ディレクトリ名: /Users/ユーザ名/Documents/Arduino/libraries
(コマンド)
git clone https://github.com/Makuna/NeoPixelBus.git
git clone https://github.com/interactive-matter/aJson.git
git clone https://github.com/PaulStoffregen/Time.git
git clone https://github.com/gmag11/NtpClient.git
ディレクトリ名: /Users/ユーザ名/Documents/Arduino
(コマンド)
git clone https://github.com/probonopd/ESP8266HueEmulator.git
定義ファイル変更箇所
ディレクトリ名: /Users/ユーザ名/Documents/Arduino/libraries/aJson
ファイル名: aJSON.h
#define PRINT_BUFFER_LEN 4096 256 → 4,096へ変更する。
ディレクトリ名: /Users/ユーザ名/Documents/Arduino/ESP8266HueEmulator/ESP8266HueEmulator
ファイル名: LightService.h
#define MAX_LIGHT_HANDLERS 2 ライトの数を定義 (デフォルト: 2個。個数を増やしたい場合は変更する。)
スケッチ
ソースコードはこちら。(ESP8266_Hue.ino)
https://github.com/kitazaki/ESP8266_Hue/
下記のディレクトリへ配置する。
ディレクトリ名: /Users/ユーザ名/Documents/Arduino/ESP8266HueEmulator/ESP8266HueEmulator/
ソースコードで設定する必要があるのは主に 2 箇所。
・Wi-Fiの設定
const char* ssid = ""; Wi-FiのSSIDを設定
const char* password = ""; Wi-Fiのパスワードを設定
・フルカラーシリアルLED(WS2812)の設定
#define NUM_PIXELS_PER_LIGHT 10 LEDの総数 ÷ ライトの数 (ex. 10 = pixelCount ÷ MAX_LIGHT_HANDLERS)
#define pixelCount 20 LEDの総数
#define pixelPin 2 LEDを接続するPIN番号 (ex. D4 = IO2)
// Emulate Philips Hue Bridge and switch NeoPixels //

# include <ESP8266WiFi.h>
# include <ESP8266mDNS.h>
# include <WiFiUdp.h>
# include <ArduinoOTA.h>
# include <TimeLib.h>
# include <NtpClientLib.h>
# include <NeoPixelBus.h>
# include <NeoPixelAnimator.h>
# include "LightService.h"
# include <ESP8266WebServer.h>
# include "SSDP.h"
# include <aJSON.h>  // change to "#define PRINT_BUFFER_LEN 4096" of aJSON.h in libraries

// Wi-Fi Setting
const char* ssid = "";
const char* password = "";

// NeoPixels Setting
# define NUM_PIXELS_PER_LIGHT 5  // LEDs per emulated bulb
# define pixelCount 20  // Number of total LEDs (ex. Number of bulbs = pixelCount / NUM_PIXELS_PER_LIGHT )
# define pixelPin 2  // GPIO2

RgbColor red = RgbColor(COLOR_SATURATION, 0, 0);
RgbColor green = RgbColor(0, COLOR_SATURATION, 0);
RgbColor white = RgbColor(COLOR_SATURATION);
RgbColor black = RgbColor(0);

NeoPixelBus<NeoGrbFeature, NeoEsp8266Uart800KbpsMethod> strip(MAX_LIGHT_HANDLERS * NUM_PIXELS_PER_LIGHT, pixelPin);
NeoPixelAnimator animator(MAX_LIGHT_HANDLERS * NUM_PIXELS_PER_LIGHT, NEO_MILLISECONDS); // NeoPixel animation management object
LightServiceClass LightService;

HsbColor getHsb(int hue, int sat, int bri) {
  float H, S, B;
  H = ((float)hue) / 182.04 / 360.0;
  S = ((float)sat) / COLOR_SATURATION;
  B = ((float)bri) / COLOR_SATURATION;
  return HsbColor(H, S, B);
}

class PixelHandler : public LightHandler {
  private:
    HueLightInfo _info;
    int16_t colorloopIndex = -1;
  public:
    void handleQuery(int lightNumber, HueLightInfo newInfo, aJsonObject* raw) {
      // define the effect to apply, in this case linear blend
      HslColor newColor = HslColor(getHsb(newInfo.hue, newInfo.saturation, newInfo.brightness));
      HslColor originalColor = strip.GetPixelColor(lightNumber);
      _info = newInfo;

      // cancel colorloop if one is running
      if (colorloopIndex >= 0) {
        animator.StopAnimation(colorloopIndex);
        colorloopIndex = -1;
      }
      if (newInfo.on) {
        if (_info.effect == EFFECT_COLORLOOP) {
          //color loop at max brightness/saturation on a 60 second cycle
          const int SIXTY_SECONDS = 60000;
          animator.StartAnimation(lightNumber, SIXTY_SECONDS, [ = ](const AnimationParam & param) {
            // save off animation index
            colorloopIndex = param.index;

            // progress will start at 0.0 and end at 1.0
            float currentHue = newColor.H + param.progress;
            if (currentHue > 1) currentHue -= 1;
            HslColor updatedColor = HslColor(currentHue, newColor.S, newColor.L);
            RgbColor currentColor = updatedColor;

            for(int i=lightNumber * NUM_PIXELS_PER_LIGHT; i < (lightNumber * NUM_PIXELS_PER_LIGHT) + NUM_PIXELS_PER_LIGHT; i++) {
              strip.SetPixelColor(i, updatedColor);
            }

            // loop the animation until canceled
            if (param.state == AnimationState_Completed) {
              // done, time to restart this position tracking animation/timer
              animator.RestartAnimation(param.index);
            }
          });
          return;
        }
        AnimUpdateCallback animUpdate = [ = ](const AnimationParam & param)
        {
          // progress will start at 0.0 and end at 1.0
          HslColor updatedColor = HslColor::LinearBlend<NeoHueBlendShortestDistance>(originalColor, newColor, param.progress);

          for(int i=lightNumber * NUM_PIXELS_PER_LIGHT; i < (lightNumber * NUM_PIXELS_PER_LIGHT) + NUM_PIXELS_PER_LIGHT; i++) {
            strip.SetPixelColor(i, updatedColor);
          }
        };
        animator.StartAnimation(lightNumber, _info.transitionTime, animUpdate);
      }
      else {
        AnimUpdateCallback animUpdate = [ = ](const AnimationParam & param)
        {
          // progress will start at 0.0 and end at 1.0
          HslColor updatedColor = HslColor::LinearBlend<NeoHueBlendShortestDistance>(originalColor, black, param.progress);

          for(int i=lightNumber * NUM_PIXELS_PER_LIGHT; i < (lightNumber * NUM_PIXELS_PER_LIGHT) + NUM_PIXELS_PER_LIGHT; i++) {
            strip.SetPixelColor(i, updatedColor);
          }
        };
        animator.StartAnimation(lightNumber, _info.transitionTime, animUpdate);
      }
    }

    HueLightInfo getInfo(int lightNumber) { return _info; }
};

void setup() {
//  pinMode(15, OUTPUT);  // wio-node
//  digitalWrite(15, 1);  // wio-node

  // this resets all the neopixels to an off state
  strip.Begin();
  strip.Show();

  // Show that the NeoPixels are alive
  delay(120); // Apparently needed to make the first few pixels animate correctly
  Serial.begin(115200);

  WiFi.mode(WIFI_STA);
  WiFi.begin(ssid, password);
  infoLight(white);

  while (WiFi.status() != WL_CONNECTED) {
    infoLight(red);
    delay(500);
    Serial.print(".");
  }

  // Port defaults to 8266
  // ArduinoOTA.setPort(8266);

  // Hostname defaults to esp8266-[ChipID]
  // ArduinoOTA.setHostname("myesp8266");

  // No authentication by default
  // ArduinoOTA.setPassword((const char *)"123");

  ArduinoOTA.onStart([]() {
    Serial.println("Start");
  });
  ArduinoOTA.onEnd([]() {
    Serial.println("\nEnd");
  });
  ArduinoOTA.onProgress([](unsigned int progress, unsigned int total) {
    Serial.printf("Progress: %u%%\r", (progress / (total / 100)));
  });
  ArduinoOTA.onError([](ota_error_t error) {
    Serial.printf("Error[%u]: ", error);
    if (error == OTA_AUTH_ERROR) Serial.println("Auth Failed");
    else if (error == OTA_BEGIN_ERROR) Serial.println("Begin Failed");
    else if (error == OTA_CONNECT_ERROR) Serial.println("Connect Failed");
    else if (error == OTA_RECEIVE_ERROR) Serial.println("Receive Failed");
    else if (error == OTA_END_ERROR) Serial.println("End Failed");
  });
  ArduinoOTA.begin();

  // Sync our clock
  NTP.begin("pool.ntp.org", 0, true);

  // Show that we are connected
  infoLight(green);
  pinMode(LED_BUILTIN, OUTPUT);     // Initialize the LED_BUILTIN pin as an output
  digitalWrite(LED_BUILTIN, HIGH);  // Turn the LED off by making the voltage HIGH

  LightService.begin();

  // setup pixels as lights
  for (int i = 0; i < MAX_LIGHT_HANDLERS && i < pixelCount; i++) {
    LightService.setLightHandler(i, new PixelHandler());
  }

  // We'll get the time eventually ...
  if (timeStatus() == timeSet) {
    Serial.println(NTP.getTimeDateString(now()));
  }
}

void loop() {
  ArduinoOTA.handle();

  LightService.update();

  static unsigned long update_strip_time = 0;  //  keeps track of pixel refresh rate... limits updates to 33 Hz
  if (millis() - update_strip_time > 30)
  {
    if ( animator.IsAnimating() ) animator.UpdateAnimations();
    strip.Show();
    update_strip_time = millis();
  }
}

void infoLight(RgbColor color) {
  // Flash the strip in the selected color. White = booted, green = WLAN connected, red = WLAN could not connect
  for (int i = 0; i < pixelCount; i++)
  {
    strip.SetPixelColor(i, color);
    strip.Show();
    delay(10);
    strip.SetPixelColor(i, black);
    strip.Show();
  }
}
実際に使用した感想
Google Home アプリから ESP8266 (「hue emulator」という名称で表示される) を検索し、デバイス登録しようとすると、残念ながら MY Hue (https://account.meethue.com) へ登録できずにエラーとなった。(正規の製品ではないので、当然と言えば当然だが..)
※ 本家でも issue に上がっているのでそのうち解決されることを期待。
https://github.com/probonopd/ESP8266HueEmulator/issues/62
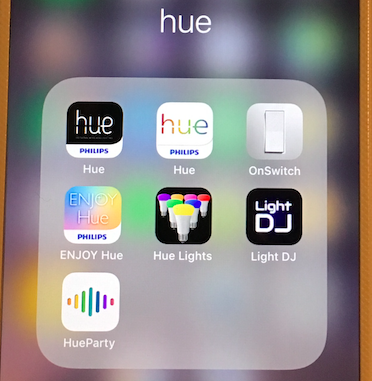
ただし、既存の hue アプリ (第一世代 hue アプリ、第二世代 hue アプリ、OnSwitch、ENJOY Hue、Hue Lights、Light DJ、HueParty など) は問題なくデバイス登録でき正常に動作してよかった。
Hue Lights アプリのアニメーション: https://youtu.be/Lp300iRnAyc
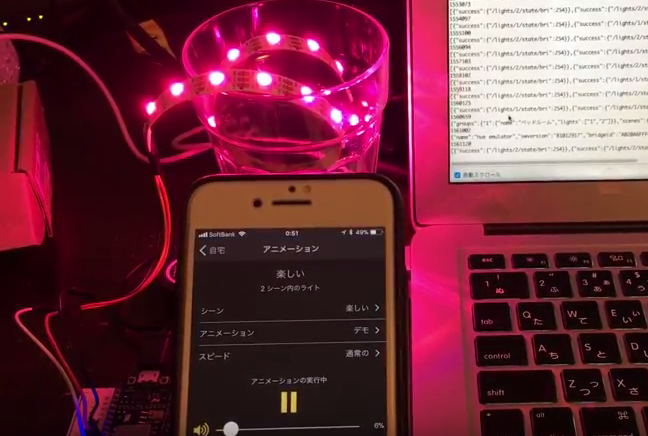
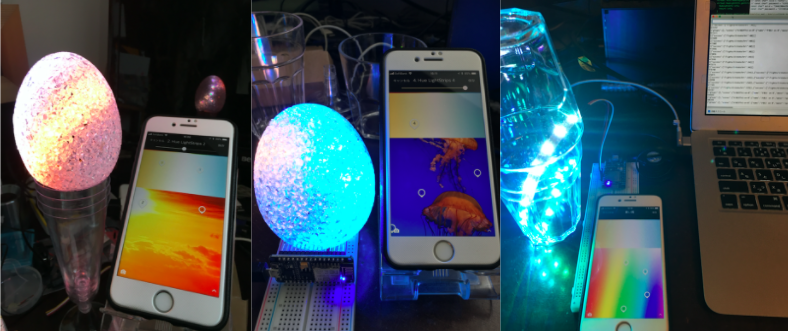
たまご型ライトや、グラスをピカらせたらエモくなった!
Hue アプリのエコビジネスに少しでもお役に立てたら幸いです。