はじめに
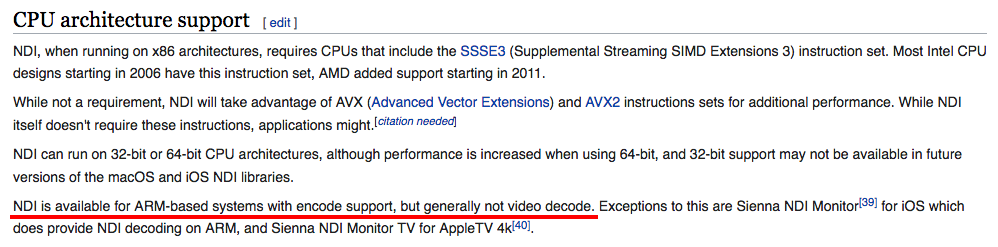
ARM デバイスでは NDI 送信 (Encode) はできるが、NDI 受信 (Decode) はできないと認識していたのですが、いつの間にかできるようになっていました。
(引用)
https://en.wikipedia.org/wiki/Network_Device_Interface
これまでの経緯
2018 年 12 月 4 日 IoTLT Advent Calendar 2018 の 4日目の記事を担当。
FFmpeg 3.4 で NDI をサポートしたというニュースを見つけて試してみることにしました。
https://www.newtek.com/blog/ffmpeg-3-4-adds-ndi-io/
2018 年 12 月 18 日時で NDI® Version 3.8 SDK がリリースされましたが状況は同じでした。
2020 年 4 月 29 日 GW アドベントカレンダー「配信系」の記事を兼ねて Raspberry Pi 4 に対応する記事を執筆。NDI SDK LINUX のバージョンは 4.5 でした。
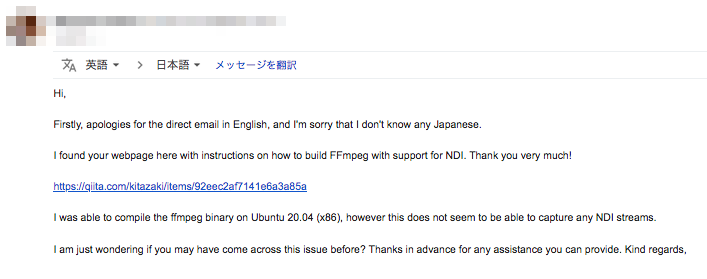
2020 年 6 月 14 日 Qiita の記事に関する質問をメールでいただきました。
環境
- Raspberry Pi 4
- Raspberry Pi OS (32bit 版)
- 2020-05-27-raspios-buster-armhf.zip (OS イメージファイル)
従来とおり SD カードで試しました。 - NDI SDK LINUX 4.5
- 2020-05-27-raspios-buster-armhf.zip (OS イメージファイル)
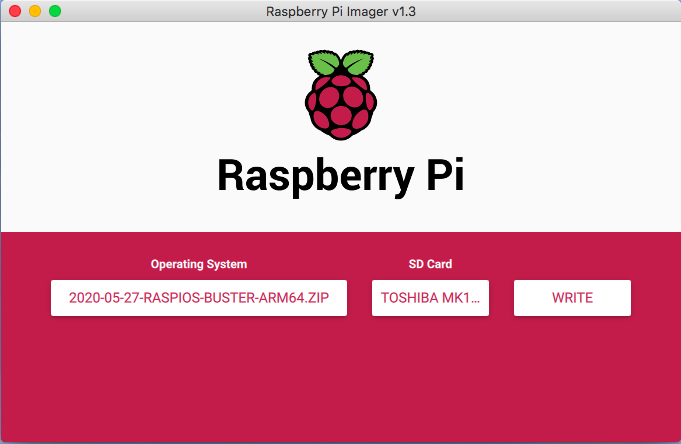
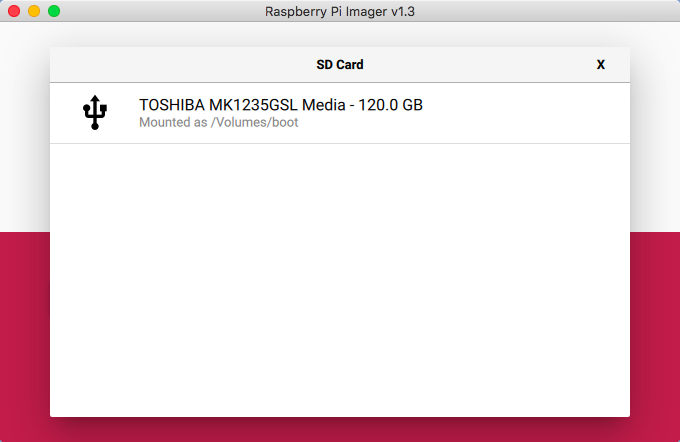
- Raspberry Pi OS (64bit 版)
- 2020-05-27-raspios-buster-arm64.zip (OS イメージファイル)
USB ブートで 2.5inch HDD で試しました。 - NDI EDK 4.5
- 2020-05-27-raspios-buster-arm64.zip (OS イメージファイル)
※ 64 bit版 Raspberry Pi OS はまだ β 版ですが、標準で USB ブートに対応しているため、合わせて動作確認してみました。Raspberry Pi Imager で SD カードの代わりに USB 接続 2.5inch HDD を選択して書き込めば OK です。
- NDI ソース
- JustWifiCam (iOS)
- NDIHX Camera (iOS)
- Sienna NDI Signal Generator (macOS)
- NDI Tools (NDI Test Pattern) (Windows 10)
ndi_record コマンド
ARM で NDI を受信できるようになったのでは?!と思ったきっかけは NDI SDK LINUX (ARM 32bit)、NDI EDK(Embedded Developer Kit) (ARM 64bit) に含まれるサンプルプログラム (バイナリ形式) に含まれる ndi_record コマンドが動作したことです。
ndi_record コマンドは NDI ソースを MOV 形式でファイルに保存するコマンドです。
(32bit 版)
$ mkdir NDI
$ cd NDI
$ wget http://new.tk/NDISDKLINUX
$ mv NDISDKLINUX InstallNDISDK_v4_Linux.tar.gz
$ tar xvzf InstallNDISDK_v4_Linux.tar.gz
$ InstallNDISDK_v4_Linux.sh
$ cd NDI\ SDK\ for\ Linux/bin/arm-rpi3-linux-gnueabihf
(64bit 版)
$ mkdir NDIE
$ cd NDIE
$ wget http://new.tk/NDISDKE
$ mv NDISDKE InstallNDISDK_v4_Linux_Embedded.tar.gz
$ tar xvzf InstallNDISDK_v4_Linux_Embedded.tar.gz
$ sh InstallNDISDK_v4_Linux_Embedded.sh
$ cd NDI\ SDK\ for\ Linux/bin/aarch64-newtek-linux-gnu
ndi_record コマンドを実行します。
$ ls
ndi-directory-service
ndi-record
$ ./ndi-record
NDI Stream Record v1.10
(c)2019-2020 NewTek, inc.

This app is used to capture compressed NDI frames and write it to a file in '.mov' format.

Options:
  -help : This will display this message.
  -i "NDI Name" : Specify the name of the NDI source to capture.
  -u "URL" : This is the url of the NDI source, if you wish to have the recording start slighty quicker. This is an optional flag.
  -o "File Name" : Specify the name of the file to write.
  -noautostart : Specify this flag if you do not wish to start recording immediately.
                 If used, you should then pass <start/> command to start recording.
  -nothumbnail : Specify this flag to disable writing preview streams. By default, this is always true.
  -noautochop : Specify this flag to not generate unique filenames and don't autochop. By default, this is always true.

Examples:
Application.NDIRecording -i "My Source (Channel 1)" -o "Test" -nothumbnail -noautochop
NDI ソース名と MOV 出力ファイル名を指定して ndi_record コマンドを実行します。
NDI ソース名は NDI ライブラリを組み込んだ ffmpeg コマンドで確認することができます。
$ ffmpeg -f libndi_newtek -find_sources 1 -i dummy
ffmpeg version 3e08234 Copyright (c) 2000-2019 the FFmpeg developers
  built with gcc 8 (Raspbian 8.3.0-6+rpi1)
  configuration: --enable-nonfree --enable-libndi_newtek --extra-cflags=-I/usr/include/ndi/ --extra-ldflags=-L/usr/include/ndi/ --enable-libx264 --enable-gpl
  libavutil      56. 14.100 / 56. 14.100
  libavcodec     58. 18.100 / 58. 18.100
  libavformat    58. 12.100 / 58. 12.100
  libavdevice    58.  3.100 / 58.  3.100
  libavfilter     7. 16.100 /  7. 16.100
  libswscale      5.  1.100 /  5.  1.100
  libswresample   3.  1.100 /  3.  1.100
  libpostproc    55.  1.100 / 55.  1.100
[libndi_newtek @ 0x2a753f0] Found 1 NDI sources:
[libndi_newtek @ 0x2a753f0]     'IXRS (JustWifiCam)'    '192.168.0.105:5961'
dummy: Immediate exit requested

$ ./ndi-record -i 'IXRS (JustWifiCam)' -o "Test" -nothumbnail -noautochop
NDI Stream Record v1.10
(c)2019-2020 NewTek, inc.

[10:35:10.311]: <record_started filename="Test.mov" filename_pvw="" frame_rate_n="25" frame_rate_d="1" xres="1280" yres="720"/>
[10:35:10.766]: <recording no_frames="11" timecode="57107161760" vu_dB="-48.758300" start_timecode="57103161760"/>
[10:35:11.214]: <recording no_frames="22" timecode="57111561760" vu_dB="-43.334913"/>
[10:35:11.653]: <recording no_frames="33" timecode="57115961760" vu_dB="-46.090677"/>
[10:35:12.101]: <recording no_frames="44" timecode="57120361760" vu_dB="-47.150596"/>
# [Ctrl] + C で停止

$ ls
Test.mov
Test.mov.ndi
ndi-directory-service
ndi-record
保存された Test.mov ファイルは vlc コマンドで確認することができます。
$ vlc Test.mov

ffplay コマンド
ffplay コマンドで NDI ソースの映像をリアルタイムで表示することができます。
ffplay コマンドは SDL2 ライブラリがインストールされていれば ffmpeg のビルドで一緒に作成されます。
SDL2 ライブラリの導入は apt コマンドでインストールできます。
$ sudo apt install libsdl2-dev libsdl2-image-dev libsdl2-ttf-dev libsdl2-mixer-dev xorg-dev
SDL2 ライブラリをビルドする場合は以下の手順でインストールできます。
$ curl -LO https://www.libsdl.org/release/SDL2-2.0.12.tar.gz
$ tar xvzf SDL2-2.0.12.tar.gz
$ cd SDL2-2.0.12
$ ./configure
$ make
$ sudo make install
ffmpeg のビルド手順は以下のページに記載しています。
(参考)
https://qiita.com/kitazaki/items/eeb710a78c657024f844
https://qiita.com/kitazaki/items/8b1f730903d3a62025e9
ffplay コマンドの実行
$ ./ffplay -f libndi_newtek -i 'IXRS (JustWifiCam)'
ffplay version 3e08234 Copyright (c) 2003-2019 the FFmpeg developers
  built with gcc 8 (Raspbian 8.3.0-6+rpi1)
  configuration: --enable-nonfree --enable-libndi_newtek --extra-cflags=-I/usr/include/ndi/ --extra-ldflags=-L/usr/include/ndi/ --enable-libx264 --enable-gpl
  libavutil      56. 14.100 / 56. 14.100
  libavcodec     58. 18.100 / 58. 18.100
  libavformat    58. 12.100 / 58. 12.100
  libavdevice    58.  3.100 / 58.  3.100
  libavfilter     7. 16.100 /  7. 16.100
  libswscale      5.  1.100 /  5.  1.100
  libswresample   3.  1.100 /  3.  1.100
  libpostproc    55.  1.100 / 55.  1.100
[libndi_newtek @ 0xaec005f0] DTS 214205 < 503938 out of order=0/0
Input #0, libndi_newtek, from 'IXRS (JustWifiCam)':q=    0B f=0/0
  Duration: N/A, start: 0.050394, bitrate: 369345 kb/s
    Stream #0:0: Audio: pcm_s16le, 44100 Hz, 1 channels, s16, 705 kb/s
    Stream #0:1: Video: rawvideo (UYVY / 0x59565955), uyvy422(progressive), 1280x720 [SAR 1:1 DAR 16:9], 368640 kb/s, 25 fps, 25 tbr, 10000k tbn
fd=   2 aq=    0KB vq=    0KB sq=    0B f=160/160
# [Ctrl] + C で停止します。

$ ./ffplay -f libndi_newtek -i 'IXRS (NDI HX Camera)'
ffplay version 3e08234 Copyright (c) 2003-2019 the FFmpeg developers
  built with gcc 8 (Raspbian 8.3.0-6+rpi1)
  configuration: --enable-nonfree --enable-libndi_newtek --extra-cflags=-I/usr/include/ndi/ --extra-ldflags=-L/usr/include/ndi/ --enable-libx264 --enable-gpl
  libavutil      56. 14.100 / 56. 14.100
  libavcodec     58. 18.100 / 58. 18.100
  libavformat    58. 12.100 / 58. 12.100
  libavdevice    58.  3.100 / 58.  3.100
  libavfilter     7. 16.100 /  7. 16.100
  libswscale      5.  1.100 /  5.  1.100
  libswresample   3.  1.100 /  3.  1.100
  libpostproc    55.  1.100 / 55.  1.100
Input #0, libndi_newtek, from 'IXRS (NDI HX Camera)':    0B f=0/0
  Duration: N/A, start: 0.000000, bitrate: 3982017 kb/s
    Stream #0:0: Audio: pcm_s16le, 44100 Hz, 1 channels, s16, 705 kb/s
    Stream #0:1: Video: rawvideo (UYVY / 0x59565955), uyvy422(progressive), 3840x2160 [SAR 1:1 DAR 16:9], 3981312 kb/s, 30 tbr, 10000k tbn
aq=  120KB vq=    0KB sq=    0B f=185/185
# [Ctrl] + C で停止します。
