前書き
XikeStor SKS8300-8Xは、10GbpsのSFP+ポートを8ポート有している安価なL3スイッチです。私は、OEMでJT-COMから販売されているJT-S508CL-8SをAliexpressにて約1万円で購入しました。信じられない値段ですね。ONTiのONT-S508CL-8S等もおそらく同型機だと思われます。
JT-S508CL-8Sの特徴として、下記が挙げられます。
- SKS-8300-8Xよりも新しいと思われるファームウェアを搭載している
- できることはSKS-8300-8Xと変わらないと思われる
- OpenWRTが対応したため(ポーティング作業者に感謝)、標準ファームウェアと置き換えてL3ルータ化を目指せる
標準ファームウェアを使うことによる危険性も払拭できないので、速やかにOpenWRTを導入して、L3のルータとして動作させると共に、多少なりとも安全に使えるようになることを目指します(安全というのはあくまでも気持ちの問題です)。
なお、国内販売品ではないため、ACアダプタにPSEマークは付いていませんでした。Amazonで汎用のPSEマークがついているACアダプタ(12V 2A センタープラス プラグ外径5.5mm 内径2.1mm)を購入して使用しております。
設定に使ったホストはWindows 11 PCです。ホストとポート1をAOCケーブルで接続しました。ポート8は現在使っているルータに接続しております。また、Tera Termでコンソールにシリアル接続してコマンドを投入します。

参考にしたページ
Disclaimer
本記事を参考にした結果機器が動作しなくなったり不具合が生じても一切の責任を負いません。
また、無線LANデバイスを搭載した機器にOpenWRTを適用することにより、電波法違反となる信号を発生させてしまう可能性があるなど、取り扱いには専門的な知識が求められます。法令を遵守し、違法状態となる運用を絶対に行わないようにしてください。
※今回取り扱っている機器には、そもそも無線LANデバイスが搭載されていません。
導入前の環境
初期状態でのコンフィグは下記の通りです。
runnning-config
Switch#show running-config
!
no service password-encryption
!
hostname Switch
sysLocation Default
sysContact Default
!
multi config access
!
username admin privilege 15 password 7 xxxxxxxx
!
authentication line console login local
!
!
!

!
!
!
!
!
!
!
!
!
!
vlan 1
!
Interface Ethernet1/0/1
!
Interface Ethernet1/0/2
!
Interface Ethernet1/0/3
!
Interface Ethernet1/0/4
!
Interface Ethernet1/0/5
!
Interface Ethernet1/0/6
!
Interface Ethernet1/0/7
!
Interface Ethernet1/0/8
!
interface Vlan1
 ip address 192.168.2.1 255.255.255.0
!
no login
!
end
TFTPの環境構築
ホストのIPアドレスを192.168.2.36に設定します。これは、後述するTFTPでファイル転送を行う際、SKS8300-8Xの標準状態でのTFTPサーバのIPアドレスを192.168.2.36と想定しているためです。
SolarWinds TFTPサーバのインストール
操作しているWindowsにTFTPをインストールします。
Windows Firewallで、SolarWinds TFTPサーバの通信を許可します。

OpenWRTのバイナリを入手する
本体にマージされたおかげで、自分でOpwnWRTのバイナリをビルドする必要がなくなりました。本当にありがたい。
SKS-8300-8Xのinitramfsイメージとsquashfsイメージの両方をダウンロードします。そしてinitramfsイメージをTFTPサーバのルートディレクトリ(デフォルトではC:\TFTP-ROOT)に配置します。
後継機(?)のSKS-8310-8Xにもポートされました。冷却性能が改善されている模様ですので、余裕があればこちらを購入したほうがよいかもしれません。
https://github.com/openwrt/openwrt/pull/19782
UbootのCLIに入る
電源を入れたのち、すぐにCtrl-Bを押すとUbootのメニューが表示されます。
Uboot メインメニュー
Switch#System is initializing...
**************************************************
WINBOND/
Net Initialization Completed
U-boot version: V2.00
Hit Ctrl+B to stop autoboot:  0

###########################################
######## Uboot for Flash Main Menu ########
###########################################
 [1] Enable Network On
 [2] Config Ethernet Environment Variables
 [3] Ping Host IP Address
 [4] Running the System Kernel image
 [5] Burn the production firmware Bin
 [6] Set Serail Number&System CPU MAC&Software License
 [7] Set Serail Number&System CPU MAC
 [8] Perform Reset of the Uboot
 [9] Show Uboot Saved Info
 [a] Set Fiber ports(1-8) to fiber10G
 [b] Set Fiber ports(1-8) to fiber1G
Enter your selection:
ここで、Ctrl-Fを押して、パスワードの代わりにdiagshell_unipoe_envと入れると、ベンダーCLIが表示されます。更に、debug_unish_envと入れると、UbootのCLIに移行します。
Enter the password:(1-32 characters)
********************(diagshell_unipoe_envと入れる)
Please wait for PHY init-time ...

Boot#debug_unish_env
RTL9300#
ここでポート1を有効化しておきます。
rtk 10g 0 fiber10g (1000Mであればfiber1gとしましょう)
rtk ext-devInit 0
rtk ext-pinset 2 0 (tx-disableをlowにするそうです)
RTL9300# rtk 10g 0 fiber10g
10gMedia set Unit 0 Port 0
RTL9300# rtk ext-devInit 0
devAddress:     0

RTL9300# rtk ext-pinSet 2 0
pin2:   0
initramfsでの起動
OpenWRTのinitramfsは、フラッシュメモリにインストールせず、RAM上で展開される実行環境です。
TFTPでinitramfsバイナリを転送する
RTL9300# tftpboot 0x82000000 openwrt-realtek-rtl930x-xikestor_sks8300-8x-initramfs-kernel.bin
Using rtl9300#0 device
TFTP from server 192.168.2.36; our IP address is 192.168.2.1
Filename 'openwrt-realtek-rtl930x-xikestor_sks8300-8x-initramfs-kernel.bin'. Size is 0x1129c00 Bytes = 17.2 MB
Load address: 0x82000000
Loading: #################################################################
         #################################################################
         #################################################################
         #################################################################
         #################################################################
         #################################################################
         #################################################################
         ################
done
Bytes transferred = 6903402 (69566a hex)
initramfsをブートする
TFTPでバイナリファイルを転送できたら、このイメージでブートします。
RTL9300#bootm
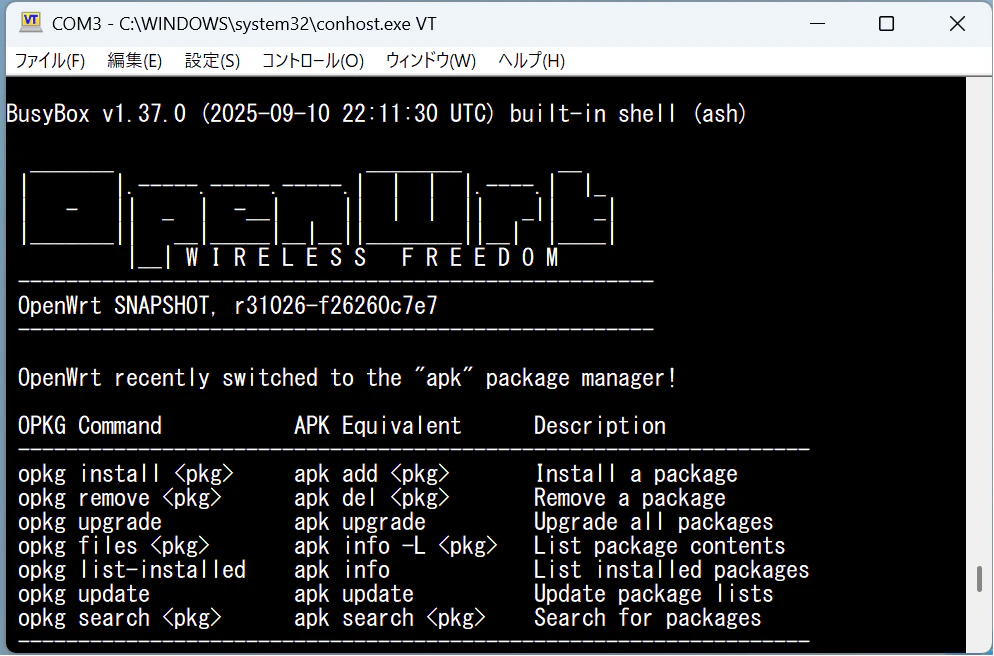
およそ90秒ほどで、BusyBoxのシェルが起動します。
BusyBox v1.37.0 (2025-09-10 22:11:30 UTC) built-in shell (ash)

  _______                     ________        __
 |       |.-----.-----.-----.|  |  |  |.----.|  |_
 |   -   ||  _  |  -__|     ||  |  |  ||   _||   _|
 |_______||   __|_____|__|__||________||__|  |____|
          |__| W I R E L E S S   F R E E D O M
 -----------------------------------------------------
 OpenWrt SNAPSHOT, r31026-f26260c7e7
 -----------------------------------------------------
=== WARNING! =====================================
There is no root password defined on this device!
Use the "passwd" command to set up a new password
in order to prevent unauthorized SSH logins.
--------------------------------------------------

 OpenWrt recently switched to the "apk" package manager!

 OPKG Command           APK Equivalent      Description
 ------------------------------------------------------------------
 opkg install <pkg>     apk add <pkg>       Install a package
 opkg remove <pkg>      apk del <pkg>       Remove a package
 opkg upgrade           apk upgrade         Upgrade all packages
 opkg files <pkg>       apk info -L <pkg>   List package contents
 opkg list-installed    apk info            List installed packages
 opkg update            apk update          Update package lists
 opkg search <pkg>      apk search <pkg>    Search for packages
 ------------------------------------------------------------------

For more https://openwrt.org/docs/guide-user/additional-software/opkg-to-apk-cheatsheet

root@OpenWrt:~#
元のファームウェアを保存する
特にOEM機だと、ファームウェアのダウンロード先が見つからないことも多いです。そのため、initramfsで起動されたシェルを使って、フラッシュメモリ内のファームウェアを保存しておきます。
まずはMTDレイアウトを見てみます。
root@OpenWrt:~# cat /proc/mtd
dev:    size   erasesize  name
mtd0: 00100000 00010000 "u-boot"
mtd1: 00030000 00010000 "board-info"
mtd2: 000d0000 00010000 "syslog"
mtd3: 01e00000 00010000 "firmware"
mtd4: 00800000 00010000 "kernel"
mtd5: 01600000 00010000 "rootfs"
root@OpenWrt:~#
erasesizeが0x10000ということです。つまり64KiBということがわかりましたので、ddのブロックサイズには64Kを指定してやります。
root@OpenWrt:~# cd /tmp
root@OpenWrt:/tmp# for i in 0 1 2 3 4 5; do dd bs=64K if=/dev/mtdblock$i of=mtdblock$
i.bin; gzip mtdblock$i.bin; done
16+0 records in
16+0 records out
3+0 records in
3+0 records out
13+0 records in
13+0 records out
480+0 records in
480+0 records out
128+0 records in
128+0 records out
352+0 records in
352+0 records out
ファイルを確認します。
root@OpenWrt:/tmp# ls -lg mtd*gz
-rw-r--r--    1 root        327576 Jan  1 00:17 mtdblock0.bin.gz
-rw-r--r--    1 root          1744 Jan  1 00:17 mtdblock1.bin.gz
-rw-r--r--    1 root          7654 Jan  1 00:17 mtdblock2.bin.gz
-rw-r--r--    1 root      15117587 Jan  1 00:18 mtdblock3.bin.gz
-rw-r--r--    1 root       6191464 Jan  1 00:18 mtdblock4.bin.gz
-rw-r--r--    1 root       8925301 Jan  1 00:19 mtdblock5.bin.gz
これで無事にMTD領域のバックアップが取れたと思われますので、ホストに転送して保存します。が、OpwnWRTのBusyBoxにtftpコマンドがないみたいです。sshコマンドは動くので、ホストにSSHサーバをインストールします。
以降では、ホストのWindows PowerShellを使ってSSHサーバを起動します。

PS C:\WINDOWS\system32> Add-WindowsCapability -Online -Name OpenSSH.Server~~~~0.0.1.0
Path          :
Online        : True
RestartNeeded : False

PS C:\WINDOWS\system32> Start-Service sshd

PS C:\WINDOWS\system32> New-LocalUser -Name "username" -Password(ConvertTo-SecureString -String "password" -AsPlainText -Force)
Name Enabled Description
---- ------- -----------
username True

PS C:\WINDOWS\system32> if (!(Get-NetFirewallRule -Name "OpenSSH-Server-In-TCP" -ErrorAction SilentlyContinue | Select-Object Name, Enabled)) {
    Write-Output "Firewall Rule 'OpenSSH-Server-In-TCP' does not exist, creating it..."
    New-NetFirewallRule -Name 'OpenSSH-Server-In-TCP' -DisplayName 'OpenSSH Server (sshd)' -Enabled True -Direction Inbound -Protocol TCP -Action Allow -LocalPort 22
} else {
    Write-Output "Firewall rule 'OpenSSH-Server-In-TCP' has been created and exists."
}
Firewall rule 'OpenSSH-Server-In-TCP' has been created and exists.

PS C:\WINDOWS\system32>
なお、OpwnWRTのinitramfsで起動すると、IPアドレスは192.168.1.1になります。そのため、ホストのネットワークアダプタのIPアドレスを192.168.1.2に設定して以降の作業を行います。
また、「識別されていないネットワーク」をプライベートネットワークにすることがWindows11の「設定」ではできなかったので、同様に
PS C:\WINDOWS\system32 > Get-NetConnectionProfile

PS C:\WINDOWS\system32> Set-NetConnectionProfile -InterfaceIndex インタフェースインデックス番号 -NetworkCategory Private
としました。これでホストのOpenSSHサーバにファイルをPUTできるようになりました。
root@OpenWrt:/tmp# scp mtdblock0.bin.gz username@192.168.1.2:
一応ファイルが壊れていないか、md5sumで元ファイルと転送ファイルのハッシュを比較しておきます。全部一致したのでたぶん安心。
ついでに、sysupgradeのファイルをGETしておきます。
root@OpenWrt:/tmp# scp username@192.168.1.2:openwrt-realtek-rtl930x-xikestor_sks8300
-8x-squashfs-sysupgrade.bin .
OpwnWRTのsquashfsイメージをフラッシュメモリに書き込む
では、満を持してsysupgradeします。
mtdのfirmwareを消去してから、先ほど転送したsquashfs-sysupgrade.binを書き込みます。
root@OpenWrt:/tmp# mtd erase firmware
Unlocking firmware ...
Erasing firmware ...

root@OpenWrt:/tmp# sysupgrade -n -v openwrt-realtek-rtl930x-xikestor_sks8300-8x-
squashfs-sysupgrade.bin
成功していれば、再起動の後、フラッシュメモリからOpwnWRTが起動します。
mtdレイアウトを確認すると、新しくrootfs_data(mtd6)という領域が確保されていることがわかります。
root@OpenWrt:~# cat /proc/mtd
dev:    size   erasesize  name
mtd0: 00100000 00010000 "u-boot"
mtd1: 00030000 00010000 "board-info"
mtd2: 000d0000 00010000 "syslog"
mtd3: 01e00000 00010000 "firmware"
mtd4: 00800000 00010000 "kernel"
mtd5: 01600000 00010000 "rootfs"
mtd6: 013e0000 00010000 "rootfs_data"
パッケージをインストール
CLIでは辛いので、GUIであるLuCIを入れます。
まず、適切にネットワーク接続ができるように設定します。LANインタフェースのIPアドレス、DNS、デフォルトゲートウェイを設定します。
config interface 'lan'
        option device 'switch.1'
        option proto 'static'
        list ipaddr '192.168.1.1/24'
        option ip6assign '60'
        option dns '192.168.1.254'
        option gateway '192.168.1.254'
その後、apkコマンドでアップデートを実施します。
root@OpenWRT:~# apk update
root@OpenWRT:~# apk upgrade
root@OpenWrt:~# apk add luci luci-i18n-base-ja
これで無事にブラウザ経由でログインできるようになりました!

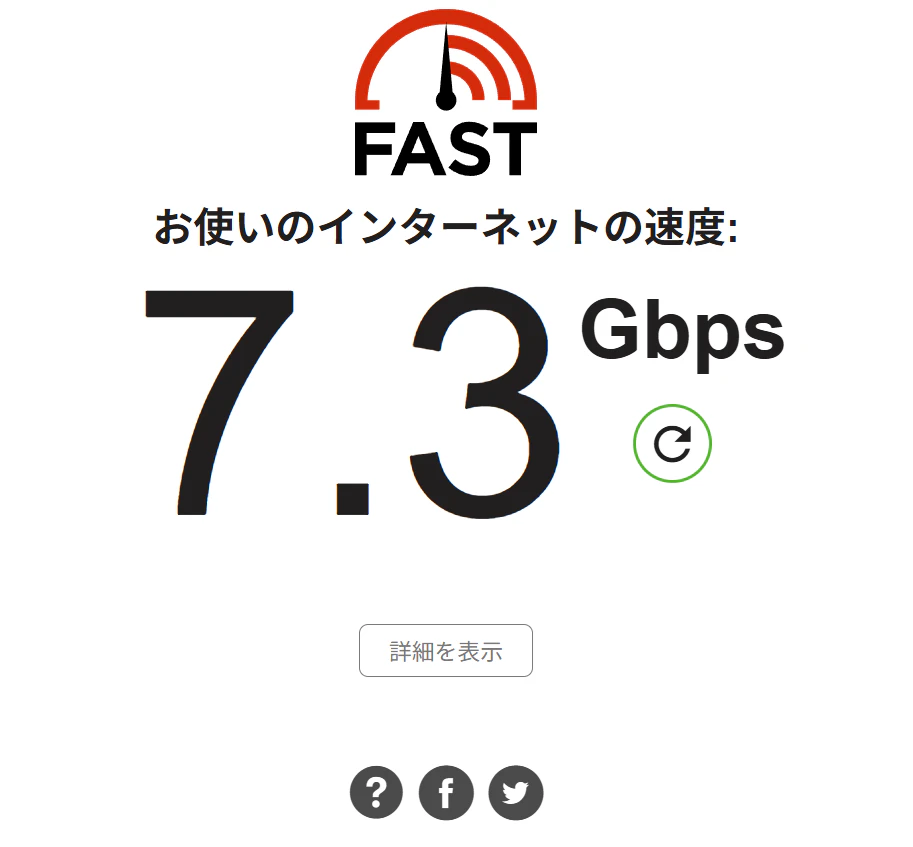
動作確認
本機経由でFast.comを読み込んでみました。
次回予告
- 自宅ネットワークのルータを本機に置き換えてみる
- WANインタフェースの作成, WAN6インタフェースの作成ができるか確認してみる
- MAP-Eの適用