はじめに
こんにちわ、北千住デザインと申します。フリーランスとしてUnityでARアプリを作ってます。
先日、iOS13と共にARKit3が公開されました。そのひとつにピープルオクルージョン(他ではセグメンテーションと呼ばれることも多いです)という機能があります。ARKitではオクルージョンのために使うことを想定しているようですが、画像エフェクトにも使えます。私はこの機能を使って、フィルターアプリMEISAIを制作しています。
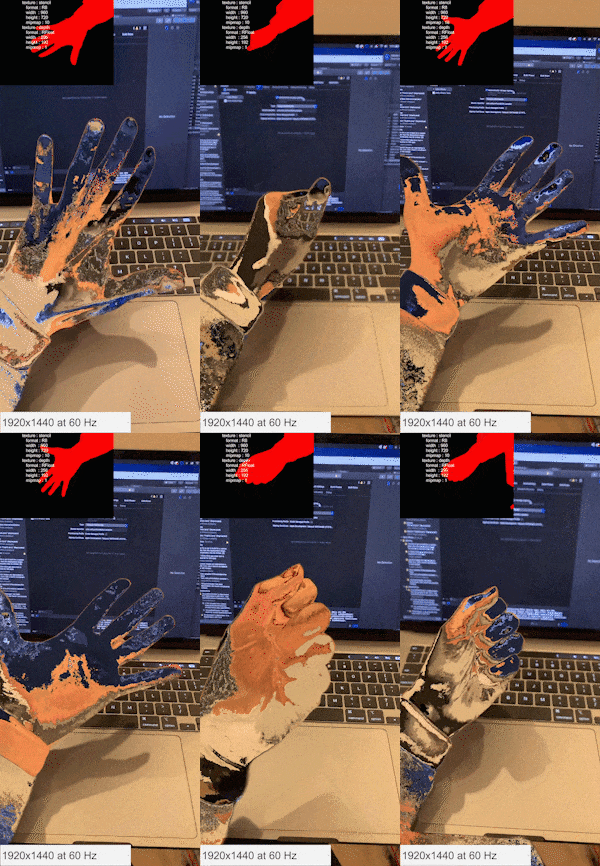
そのアプリ内のエフェクトの一つ(仮に光学迷彩エフェクトと呼んでます)の作り方を解説します。やり方は比較的簡単ですが、見たことのないエフェクトになってると思うので是非ごらんください![]()
A new AR effects app "MEISAI" was released☺️
— Kitasenju Design (@kitasenjudesign) September 28, 2019
こんな光学迷彩みたいなエフェクトも作れます☺️
👉 https://t.co/CebLlcEGdF
This app works only on iPhone XR/XS/11+iOS13. but it’s free.#MEISAI #AR #ARKit #ARFoundation #MadeWithUnity #iOS13 pic.twitter.com/NdWskWsGKg
UnityでARKit3を使う
Unityで手っ取り早くARKitを利用するには、ARFoundationというARKitやARCoreのラッパーみたいなやつを使う必要があります。こちらにサンプルが公開 されてるので、これのHumanSegmentationImagesというシーンにコードを追加していきます。
今回のサンプルのリポジトリはこちらです。
https://github.com/kitasenjudesign/ARFoundationMeisaiDemo
作ったシーンやコードは主にAssets/MEISAI/にアップしてます。MITライセンスです。
人物のシルエットを赤くする
ポストエフェクトによって人物を赤くしてみます。
まずポストエフェクト用に、人物のシルエット(humanStencilTexture)をシェーダーに渡します。
using UnityEngine;
using UnityEngine.XR.ARFoundation;

public class PostEffect : MonoBehaviour
{

    [SerializeField] private Shader _shader;
    [SerializeField] private AROcclusionManager occlusionManager;
    private Material _material;

    void Awake()
    {
        _material = new Material(_shader);
    }

    void OnRenderImage(RenderTexture source, RenderTexture destination)
    {
        if(occlusionManager!=null){
            _material.SetTexture("_StencilTex",occlusionManager.humanStencilTexture);
        }
        Graphics.Blit(source, destination, _material);
    }

}
次にhumanStencilTextureを使って、シルエットを塗り潰します。しかしhumanStencilTextureを利用する際、一つ問題があります。humanStencilTextureとカメラから得られるテクスチャのサイズや角度が違うため、UVを補正する必要があるんです。
以下の例は、スマホを縦持ちし(portrait)、カメラからの映像のテクスチャが1920x1440のとき、正しくなるように補正しています。
Shader "StencilSample"
{
    Properties
    {
        _MainTex ("_MainTex", 2D) = "white" {}
        _StencilTex ("_StencilTex", 2D) = "white" {}

    }
    SubShader
    {
        // No culling or depth
        Cull Off ZWrite Off ZTest Always

        Pass
        {
            CGPROGRAM
            #pragma vertex vert
            #pragma fragment frag

            #include "UnityCG.cginc"

            struct appdata
            {
                float4 vertex : POSITION;
                float2 uv : TEXCOORD0;
            };

            struct v2f
            {
                float2 uv : TEXCOORD0;
                float4 vertex : SV_POSITION;
            };

            v2f vert (appdata v)
            {
                v2f o;
                o.vertex = UnityObjectToClipPos(v.vertex);
                o.uv = v.uv;
                return o;
            }

            sampler2D _MainTex;
            sampler2D _StencilTex;

            float2 GetStencilUV( float2 uv ){

                float2 stencilUV = float2(
                    1-uv.y,
                    1-uv.x
                );

                float camTexWidth = 1920;
                float camTexHeight = 1440;
                float aspect = (camTexWidth/camTexHeight) / (_ScreenParams.y/_ScreenParams.x);

                stencilUV.y = stencilUV.y * aspect + (1-aspect)/2;

                return stencilUV;

            }

            fixed4 frag (v2f i) : SV_Target
            {
                fixed4 col = tex2D(_MainTex, i.uv);
                fixed4 stencil = tex2D(_StencilTex, GetStencilUV(i.uv));//UVを補正

                return lerp( col, fixed4(1,0,0,1), stencil.r);

            }
            ENDCG
        }
    }
}
ノイズ関数とカメラの色を利用し光学迷彩を作る
前述の例をもとに、シェーダーでエフェクトとアニメーションを加えます。
金属や水なんかは鏡面反射や屈折なんかによってその材質感が現れます。ここでは擬似的に鏡面反射や屈折のようなエフェクトを作ることで、光学迷彩っぽいエフェクトを作っています。
これはAfterEffectでいうディスプレイスメントマップフィルタというテクニックで、テクスチャの色に従ってUVを変位させています。ここでは、カメラからのテクスチャの色とノイズ関数を使うことによって、人物の特徴をなんとなく保持しつつ、金属のような水のような質感を作り出します。ノイズ関数はこちらを使わせていただきました。
Shader "MEISAI"
{
    Properties
    {
        _MainTex ("_MainTex", 2D) = "white" {}
        _StencilTex ("_StencilTex", 2D) = "white" {}
    }
    SubShader
    {
        // No culling or depth
        Cull Off ZWrite Off ZTest Always

        Pass
        {
            CGPROGRAM
            #pragma vertex vert
            #pragma fragment frag

            #include "UnityCG.cginc"
            #include "./noise/SimplexNoise3D.hlsl"

            struct appdata
            {
                float4 vertex : POSITION;
                float2 uv : TEXCOORD0;
            };

            struct v2f
            {
                float2 uv : TEXCOORD0;
                float4 vertex : SV_POSITION;
            };

            v2f vert (appdata v)
            {
                v2f o;
                o.vertex = UnityObjectToClipPos(v.vertex);
                o.uv = v.uv;
                return o;
            }

            sampler2D _MainTex;
            sampler2D _StencilTex;

            float2 GetStencilUV( float2 uv ){

                float2 stencilUV = float2(
                    1-uv.y,
                    1-uv.x
                );

                float camTexWidth = 1920;
                float camTexHeight = 1440;
                float aspect = (camTexWidth/camTexHeight) / (_ScreenParams.y/_ScreenParams.x);

                stencilUV.y = stencilUV.y * aspect + (1-aspect)/2;

                return stencilUV;

            }

            fixed4 frag (v2f i) : SV_Target
            {

                fixed4 camCol = tex2D(_MainTex, i.uv);

                //ノイズ関数と色を基に変異させる。数値は適当
                float2 displacedUV = float2(
                    0.5 * snoise(float3(i.uv.x+camCol.r*2.0,i.uv.y+camCol.g*2.0, _Time.y*0.3)),
                    0.5 * snoise(float3(i.uv.x+camCol.g*2.0,i.uv.y+camCol.b*2.0, _Time.y*0.4))
                );
                displacedUV = frac( i.uv + displacedUV );

                fixed4 displacedCol = tex2D(_MainTex, displacedUV);

                fixed4 stencil = tex2D(_StencilTex, GetStencilUV(i.uv));

                return lerp( camCol, displacedCol, stencil.r);

            }
            ENDCG
        }
    }
}
おわりに
セグメンテーションとシェーダーを組み合わせることで、様々なエフェクトを作ることができます。最初、試しにシェーダーでアニメーションさせてみたとき、思った以上に面白くてびっくりしたので、ぜひやってみてください。
最後にセグメンテーションを用いた応用例をもう一つ紹介しておくと、人物からパーティクルが出るようなエフェクトも作ることができます。このやり方はまた機会があれば書きたいと思います。このエフェクトはMEISAIでも試せますので使ってみてください![]()
ARISE大盛況で東大の稲見教授とEnhance水口さんのラストセッションも始まった!
— KAJI / MESON CEO 😎 (@kajikent) November 30, 2019
(フィルターはPORTALの演出周りの実装をしてくれていて今日登壇してくれた北千住さんのMEISAIアプリ)#ARISE pic.twitter.com/pPgrG14QrN
metome x Kitasenju Design & Kaiware Style
— MUROI(ムロイ)@岩本町芸能社er (@ion_muroi) December 4, 2019
ほんまチャネルきてよかった pic.twitter.com/HfpBFAN64P

