はじめに
Ansibleには様々なラインナップがありますが、Automation ControllerやAWXがWeb GUIやREST API経由で操作出来るのに対し、Ansible Coreはコマンドライン経由での操作となります。
既にAnsible Coreを導入している場合、利用範囲拡大に伴い、他のシステムとAPI連携出来ないことが課題になるケースもあると思い、REST API経由で操作できるようにしてみました。
今回試した操作対象機器(Managed node)はCisco CSR1000v(IOS-XE)です。
Ansibleのインストール
CentOSのPython3.xの仮想環境(venv)に、以下をインストールしました。
pyATSはCisco機器のshowコマンド出力結果のパース(構文解析)、FlaskはAPIサーバ構築に必要なパッケージです。
$ pip install ansible
$ pip install paramiko
$ pip install pyats[full]
$ pip install flask
$ pip install Flask-HTTPAuth
$ ansible --version
ansible [core 2.11.12]
(省略)
Inventoryファイル
対象機器として、Cisco DevNet SandboxのCSR1000v 17.3.1を利用させて頂きました。
IOS XE on CSR - Latest Code AlwaysOn
[cisco]
csr1000v-1 ansible_host=sandbox-iosxe-latest-1.cisco.com ansible_user=developer ansible_password=XXXXXX

[cisco:vars]
ansible_connection=ansible.netcommon.network_cli
ansible_network_os=cisco.ios.ios
Playbook
show versionコマンドの実行結果をpyATSでパースし、型番やバージョン等を構造化データで取得するPlaybookです。
---

- hosts: cisco
  gather_facts: no

  tasks:
    - name: issue show version
      ansible.netcommon.cli_parse:
        command: "show version"
        parser:
          name: ansible.netcommon.pyats
Playbook実行
REST APIの場合、レスポンスデータをJSON形式にすることで、その後のAPIクライアント側でのデータ処理が容易になります。
一方Playbook実行結果は、デフォルトではテキスト形式で出力されるため、REST API対応の事前準備としてJSON形式で出力してみます。
具体的には、ansible-playbookコマンドの前に、CallbackプラグインをJSONに指定する環境変数ANSIBLE_STDOUT_CALLBACK=jsonを付与します。
$ ANSIBLE_STDOUT_CALLBACK=json ansible-playbook -i inventory_devnet_csr.ini playbook_get_inventory.yml
実行結果を見ると、冒頭で[DEPRECATION WARNING]が出ています。Pythonバージョンが古いのが原因ですね。
その後はJSONデータが大量に出力されています。欲しいのはshowコマンドをパースした結果("parsed"の中身)ですが、パース前の結果("stdout"の中身)や、リスト形式に変換した結果("stdout_lines"の中身)もあります。
最後に、対象機器毎のok/changed/failures等のカウントも出ています("stats"の中身)。
[DEPRECATION WARNING]: Ansible will require Python 3.8 or newer on the controller starting with Ansible 2.12. Current version: 3.X.X
(default, May  2 2019, 20:40:44) [GCC 4.8.5 20150623 (Red Hat 4.8.5-36)]. This feature will be removed from ansible-core in version
2.12. Deprecation warnings can be disabled by setting deprecation_warnings=False in ansible.cfg.
(省略)
{
    "custom_stats": {},
    "global_custom_stats": {},
    "plays": [
        {
            "play": {
                "duration": {
                    "end": "2022-12-10T06:27:53.053417Z",
                    "start": "2022-12-10T06:27:29.534216Z"
                },
                "id": "000c29c8-132f-e4f6-f5db-000000000006",
                "name": "cisco"
            },
            "tasks": [
                {
                    "hosts": {
                        "csr1000v-1": {
                            "_ansible_no_log": false,
                            "action": "ansible.netcommon.cli_parse",
                            "changed": false,
                            "parsed": {
                                "version": {
                                    "chassis": "CSR1000V",
                                    "chassis_sn": "XXXXXX",
                                    "compiled_by": "mcpre",
                                    "compiled_date": "Wed 12-Aug-20 00:16",
                                    "copyright_years": "1986-2020",
                                    "curr_config_register": "0x2102",
                                    "disks": {
                                        "bootflash:.": {
                                            "disk_size": "6188032",
                                            "type_of_disk": "virtual hard disk"
                                        }
                                    },
                                    "hostname": "STOYANTESTHOSTNAME",
                                    "image_id": "X86_64_LINUX_IOSD-UNIVERSALK9-M",
                                    "image_type": "production image",
                                    "label": "RELEASE SOFTWARE (fc3)",
                                    "last_reload_reason": "reload",
                                    "license_level": "ax",
                                    "license_type": "N/A(Smart License Enabled)",
                                    "location": "Amsterdam",
                                    "main_mem": "715705",
                                    "mem_size": {
                                        "non-volatile configuration": "32768",
                                        "physical": "3978420"
                                    },
                                    "next_reload_license_level": "ax",
                                    "number_of_intfs": {
                                        "Gigabit Ethernet": "3"
                                    },
                                    "os": "IOS-XE",
                                    "platform": "Virtual XE",
                                    "processor_type": "VXE",
                                    "returned_to_rom_by": "reload",
                                    "rom": "IOS-XE ROMMON",
                                    "router_operating_mode": "Autonomous",
                                    "rtr_type": "CSR1000V",
                                    "system_image": "bootflash:packages.conf",
                                    "uptime": "5 hours, 55 minutes",
                                    "uptime_this_cp": "5 hours, 56 minutes",
                                    "version": "17.3.1a",
                                    "version_short": "17.3",
                                    "xe_version": "17.03.01a"
                                }
                            },
                            "stdout": "Cisco IOS XE Software, Version 17.03.01a\nCisco IOS Software [Amsterdam], Virtual XE Software (X86_64_LINUX_IOSD-UNIVERSALK9-M), Version 17.3.1a, RELEASE SOFTWARE (fc3)\nTechnical Support: http://www.cisco.com/techsupport\nCopyright (c) 1986-2020 by Cisco Systems, Inc.\nCompiled Wed 12-Aug-20 00:16 by mcpre\n\n\nCisco IOS-XE software, Copyright (c) 2005-2020 by cisco Systems, Inc.\nAll rights reserved.  Certain components of Cisco IOS-XE software are\nlicensed under the GNU General Public License (\"GPL\") Version 2.0.  The\nsoftware code licensed under GPL Version 2.0 is free software that comes\nwith ABSOLUTELY NO WARRANTY.  You can redistribute and/or modify such\nGPL code under the terms of GPL Version 2.0.  For more details, see the\ndocumentation or \"License Notice\" file accompanying the IOS-XE software,\nor the applicable URL provided on the flyer accompanying the IOS-XE\nsoftware.\n\n\nROM: IOS-XE ROMMON\n\nSTOYANTESTHOSTNAME uptime is 5 hours, 55 minutes\nUptime for this control processor is 5 hours, 56 minutes\nSystem returned to ROM by reload\nSystem image file is \"bootflash:packages.conf\"\nLast reload reason: reload\n\n\n\nThis product contains cryptographic features and is subject to United\nStates and local country laws governing import, export, transfer and\nuse. Delivery of Cisco cryptographic products does not imply\nthird-party authority to import, export, distribute or use encryption.\nImporters, exporters, distributors and users are responsible for\ncompliance with U.S. and local country laws. By using this product you\nagree to comply with applicable laws and regulations. If you are unable\nto comply with U.S. and local laws, return this product immediately.\n\nA summary of U.S. laws governing Cisco cryptographic products may be found at:\nhttp://www.cisco.com/wwl/export/crypto/tool/stqrg.html\n\nIf you require further assistance please contact us by sending email to\nexport@cisco.com.\n\nLicense Level: ax\nLicense Type: N/A(Smart License Enabled)\nNext reload license Level: ax\n\nThe current throughput level is 1000 kbps \n\n\nSmart Licensing Status: UNREGISTERED/No Licenses in Use\n\ncisco CSR1000V (VXE) processor (revision VXE) with 715705K/3075K bytes of memory.\nProcessor board ID XXXXXX\nRouter operating mode: Autonomous\n3 Gigabit Ethernet interfaces\n32768K bytes of non-volatile configuration memory.\n3978420K bytes of physical memory.\n6188032K bytes of virtual hard disk at bootflash:.\n\nConfiguration register is 0x2102",
                            "stdout_lines": [
                                "Cisco IOS XE Software, Version 17.03.01a",
                                "Cisco IOS Software [Amsterdam], Virtual XE Software (X86_64_LINUX_IOSD-UNIVERSALK9-M), Version 17.3.1a, RELEASE SOFTWARE (fc3)",
                                "Technical Support: http://www.cisco.com/techsupport",
                                "Copyright (c) 1986-2020 by Cisco Systems, Inc.",
                                "Compiled Wed 12-Aug-20 00:16 by mcpre",
                                "",
                                "",
                                "Cisco IOS-XE software, Copyright (c) 2005-2020 by cisco Systems, Inc.",
                                "All rights reserved.  Certain components of Cisco IOS-XE software are",
                                "licensed under the GNU General Public License (\"GPL\") Version 2.0.  The",
                                "software code licensed under GPL Version 2.0 is free software that comes",
                                "with ABSOLUTELY NO WARRANTY.  You can redistribute and/or modify such",
                                "GPL code under the terms of GPL Version 2.0.  For more details, see the",
                                "documentation or \"License Notice\" file accompanying the IOS-XE software,",
                                "or the applicable URL provided on the flyer accompanying the IOS-XE",
                                "software.",
                                "",
                                "",
                                "ROM: IOS-XE ROMMON",
                                "",
                                "STOYANTESTHOSTNAME uptime is 5 hours, 55 minutes",
                                "Uptime for this control processor is 5 hours, 56 minutes",
                                "System returned to ROM by reload",
                                "System image file is \"bootflash:packages.conf\"",
                                "Last reload reason: reload",
                                "",
                                "",
                                "",
                                "This product contains cryptographic features and is subject to United",
                                "States and local country laws governing import, export, transfer and",
                                "use. Delivery of Cisco cryptographic products does not imply",
                                "third-party authority to import, export, distribute or use encryption.",
                                "Importers, exporters, distributors and users are responsible for",
                                "compliance with U.S. and local country laws. By using this product you",
                                "agree to comply with applicable laws and regulations. If you are unable",
                                "to comply with U.S. and local laws, return this product immediately.",
                                "",
                                "A summary of U.S. laws governing Cisco cryptographic products may be found at:",
                                "http://www.cisco.com/wwl/export/crypto/tool/stqrg.html",
                                "",
                                "If you require further assistance please contact us by sending email to",
                                "export@cisco.com.",
                                "",
                                "License Level: ax",
                                "License Type: N/A(Smart License Enabled)",
                                "Next reload license Level: ax",
                                "",
                                "The current throughput level is 1000 kbps ",
                                "",
                                "",
                                "Smart Licensing Status: UNREGISTERED/No Licenses in Use",
                                "",
                                "cisco CSR1000V (VXE) processor (revision VXE) with 715705K/3075K bytes of memory.",
                                "Processor board ID XXXXXX",
                                "Router operating mode: Autonomous",
                                "3 Gigabit Ethernet interfaces",
                                "32768K bytes of non-volatile configuration memory.",
                                "3978420K bytes of physical memory.",
                                "6188032K bytes of virtual hard disk at bootflash:.",
                                "",
                                "Configuration register is 0x2102"
                            ]
                        }
                    },
                    "task": {
                        "duration": {
                            "end": "2022-12-10T06:27:53.053417Z",
                            "start": "2022-12-10T06:27:29.982151Z"
                        },
                        "id": "000c29c8-132f-e4f6-f5db-000000000008",
                        "name": "issue show version"
                    }
                }
            ]
        }
    ],
    "stats": {
        "csr1000v-1": {
            "changed": 0,
            "failures": 0,
            "ignored": 0,
            "ok": 1,
            "rescued": 0,
            "skipped": 0,
            "unreachable": 0
        }
    }
}
Flaskによる簡易APIサーバ構築
ここからが本題のREST API対応です。Ansible/Flaskをインストールしたサーバに、以下のPythonコードを格納の上実行します。
(1) ユーザ認証
今回はBasic認証を使っています。ユーザ名test、パスワードpasswordでのAPIアクセスを許可しています。(簡易的な実装で、セキュリティ面は考慮していないです。)
import json
import os
import re
import subprocess

from flask import Flask, jsonify, request
from flask_httpauth import HTTPBasicAuth

app = Flask(__name__)
auth = HTTPBasicAuth()
users = {
    "test": "password"
}

# ユーザ認証
@auth.verify_password
def authenticate(username, password):
    if username and password:
        if username in users and password == users[username]:
            return True
(2) Ansibleバージョン取得API(GET)
以下のURIでGETリクエストを送信すると、Ansibleバージョンが返ってくるAPIを作成してみます。
http://<AnsibleのIPアドレス>:100080/api/system/version
まずsubprocess.run()でansible --versionコマンドを実行します。続いて、標準出力結果res.stdoutに対し、re.search()で正規表現ベースの検索を行い、バージョン情報のみを返します。
処理に失敗した場合は、エラーメッセージ{"error": "Fail to get the output"}を返します。
# Ansibleバージョン取得API(GET)
@app.route("/api/system/version", methods=["GET"])
@auth.login_required
def get_version():
    try:
        res = subprocess.run(["ansible", "--version"], stdout=subprocess.PIPE, stderr=subprocess.PIPE, encoding='utf-8')
        m = re.search(r'^ansible\s(.*)', res.stdout)
        return jsonify({"version": m.group(1)})
    except:
        return jsonify({"error": "Fail to get the output"})
(3) Playbook実行API(POST)
続いて、以下のURIでPOSTリクエストを送信すると、ボディ内で指定したInventoryファイル、Playbookを実行するAPIを作成してみます。
http://<AnsibleのIPアドレス>:100080/api/playbook/run
まずsubprocess.run()でansible-playbookコマンドを実行します。ここで、Callbackプラグインの環境変数は、仮引数envの中で指定します。
標準出力結果res.stdoutとして先ほどの長いJSONデータ、標準エラー出力結果res.stderrとして[DEPRECATION WARNING]の文字列データが出力されますので、それらを一つのJSONデータ[{<標準出力>}, {標準エラー出力}]にまとめて返します。
処理に失敗した場合は、エラーメッセージ{"error": "Fail to get the output"}を返します。
# Playbook実行API(POST)
@app.route("/api/playbook/run", methods=["POST"])
@auth.login_required
def run_playbook():
    try:
        my_env = os.environ.copy()
        my_env["ANSIBLE_STDOUT_CALLBACK"] = "json"

        res = subprocess.run(["ansible-playbook", "-i", request.json["inventory"], request.json["playbook"]],
            env=my_env, stdout=subprocess.PIPE, stderr=subprocess.PIPE, encoding='utf-8')

        stdout_dict = json.loads(res.stdout)
        data = json.dumps([stdout_dict, {"stderr": res.stderr}], indent=2)
        return data
    except:
        return jsonify({"error": "Fail to get the output"})

# TCPポート100080で待ち受け
if __name__ == '__main__':
    app.run(debug=True, host='0.0.0.0', port=10080)
(4) Pythonコード実行
最後に、以下コマンドでAPIサーバを起動します。
ここも簡易的な実装のため、事前にPython仮想環境のアクティベーション、Inventory/Playbook実行ディレクトリへの移動を行った上で、Pythonコードを実行する手順にしています。
実行すると、Pythonコードの一番下のapp.run()により、他の機器からのAPIアクセスをTCP10080番で待ち受けるようになります。
$ source <作成したvenv>/bin/activate
$ cd <Inventory/Playbook実行ディレクトリ>
$ python ansible_api.py
 * Serving Flask app 'ansible_api' (lazy loading)
 * Environment: production
   WARNING: This is a development server. Do not use it in a production deployment.
   Use a production WSGI server instead.
 * Debug mode: on
 * Running on all addresses.
   WARNING: This is a development server. Do not use it in a production deployment.
 * Running on http://192.168.XX.XX:10080/ (Press CTRL+C to quit)
 * Restarting with stat
 * Debugger is active!
 * Debugger PIN: 908-605-438
すべてのPythonコード
import json
import os
import re
import subprocess

from flask import Flask, jsonify, request
from flask_httpauth import HTTPBasicAuth

app = Flask(__name__)
auth = HTTPBasicAuth()
users = {
    "test": "password"
}

# Basic認証
@auth.verify_password
def authenticate(username, password):
    if username and password:
        if username in users and password == users[username]:
            return True

# Ansibleバージョン取得API(GET)
@app.route("/api/system/version", methods=["GET"])
@auth.login_required
def get_version():
    try:
        res = subprocess.run(["ansible", "--version"], stdout=subprocess.PIPE, stderr=subprocess.PIPE, encoding='utf-8')
        m = re.search(r'^ansible\s(.*)', res.stdout)
        return jsonify({"version": m.group(1)})
    except:
        return jsonify({"error": "Fail to get the output"})

# Playbook実行API(POST)
@app.route("/api/playbook/run", methods=["POST"])
@auth.login_required
def run_playbook():
    try:
        my_env = os.environ.copy()
        my_env["ANSIBLE_STDOUT_CALLBACK"] = "json"

        res = subprocess.run(["ansible-playbook", "-i", request.json["inventory"], request.json["playbook"]],
            env=my_env, stdout=subprocess.PIPE, stderr=subprocess.PIPE, encoding='utf-8')

        stdout_dict = json.loads(res.stdout)
        data = json.dumps([stdout_dict, {"stderr": res.stderr}], indent=2)
        return data
    except:
        return jsonify({"error": "Fail to get the output"})

# TCPポート100080で待ち受け
if __name__ == '__main__':
    app.run(debug=True, host='0.0.0.0', port=10080)
API実行
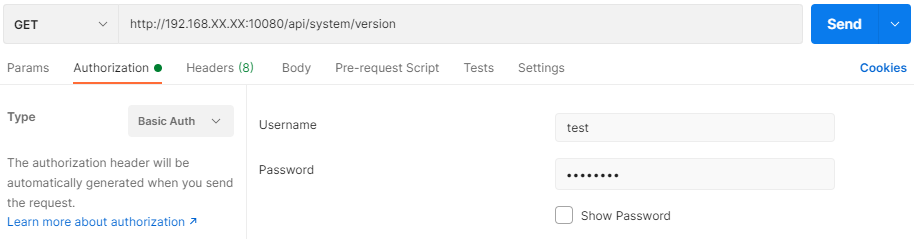
(1) PostmanからAnsibleバージョン取得
実際には外部の運用システムからの実行を想定していますが、今回はWindows PCにインストールしたPostmanから実行してみます。
まず画面上のGETメソッド選択、URI入力を行います。続いて、AuthorizationタブでTypeBasic Authを選択し、UsernameとPasswordを入力します。最後にSendボタンをクリックします。
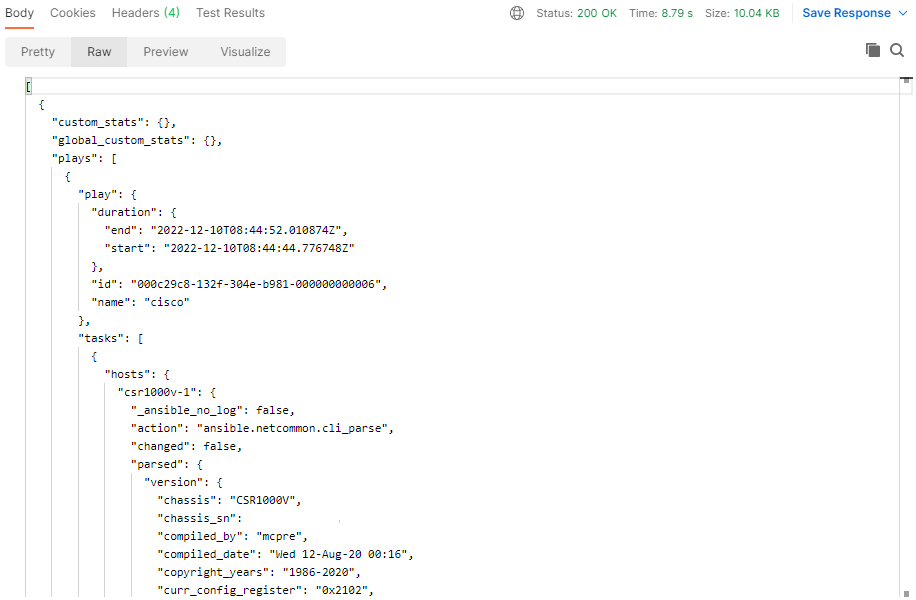
実行結果は以下の通りです。バージョン情報がJSON形式で表示されていることが分かります。

(2) PostmanからPlaybook実行
まず画面上のPOSTメソッド選択、URI入力を行います。(1)と同様、AuthorizationタブでTypeBasic Authを選択し、UsernameとPasswordを入力します。続いてBodyタブのrawを選択し、以下のInventory/Playbook情報を入力します。最後にSendボタンをクリックします。

実行結果は以下の通りです。途中までですが、showコマンドをパースした結果("parsed"の中身)を含むJSONデータが表示されていることが分かります。
(3) Python requestsからPlaybook実行
最後に、PythonからAPIを実行し、パースした結果だけを取得するコードを作成してみます。
具体的にはrequests.post()で(2)と同様のリクエストを送信し、ステータスコードが200であれば、レスポンスデータからパース結果を抽出してPrint出力します。
import json
import requests
from requests.auth import HTTPBasicAuth

url = "http://192.168.XX.XX:10080/api/playbook/run"
headers = {"Content-Type": "application/json"}
basic = HTTPBasicAuth("test", "password")
body = {"inventory": "inventory_devnet_csr.ini", "playbook": "playbook_get_inventory.yml"}

response = requests.post(url, headers=headers, auth=basic, json=body)

if response.status_code == 200:
    data = response.json()
    parsed_data = data[0]["plays"][0]["tasks"][0]["hosts"]["csr1000v-1"]["parsed"]
    print(json.dumps(parsed_data, indent=2))
else:
    print("Connection Error")
実行結果は以下の通りです。
>python ansible_get_inventory.py
{
  "version": {
    "chassis": "CSR1000V",
    "chassis_sn": "XXXXXX",
    "compiled_by": "mcpre",
    "compiled_date": "Wed 12-Aug-20 00:16",
    "copyright_years": "1986-2020",
    "curr_config_register": "0x2102",
    "disks": {
      "bootflash:.": {
        "disk_size": "6188032",
        "type_of_disk": "virtual hard disk"
      }
    },
    "hostname": "csr1000v-1",
    "image_id": "X86_64_LINUX_IOSD-UNIVERSALK9-M",
    "image_type": "production image",
    "label": "RELEASE SOFTWARE (fc3)",
    "last_reload_reason": "reload",
    "license_level": "ax",
    "license_type": "N/A(Smart License Enabled)",
    "location": "Amsterdam",
    "main_mem": "715705",
    "mem_size": {
      "non-volatile configuration": "32768",
      "physical": "3978420"
    },
    "next_reload_license_level": "ax",
    "number_of_intfs": {
      "Gigabit Ethernet": "3"
    },
    "os": "IOS-XE",
    "platform": "Virtual XE",
    "processor_type": "VXE",
    "returned_to_rom_by": "reload",
    "rom": "IOS-XE ROMMON",
    "router_operating_mode": "Autonomous",
    "rtr_type": "CSR1000V",
    "system_image": "bootflash:packages.conf",
    "uptime": "2 hours, 34 minutes",
    "uptime_this_cp": "2 hours, 36 minutes",
    "version": "17.3.1a",
    "version_short": "17.3",
    "xe_version": "17.03.01a"
  }
}
最後に
一応動作することは確認出来ましたが、実環境では認証やセキュリティ、可用性を考慮した実装が必要かと思います。
またAnsibleにこだわらなければ、APIクライアントから(Ansibleではなく)NAPALM、Netmiko、ncclient、Python requests経由で(REST API非対応の)NW機器を操作出来るOSSが公開されているので、そちらを使っても良いかも知れません。
netpalm - The Open API Platform for Network Devices