こんにちは、こんばんは、kitakkunです。
大学の研究テーマの関係でKotlinのコンパイラプラグインを作ることになり、相当苦労したのでまとめたいと思います。
情報源が全部英語だったので100%正しい理解ができている保証はありませんが、Kotlin Compiler Pluginを作ろうと思っている方の一助になれば幸いです。
記事の更新情報
- 2023/12/19: プラグインを実際に適用し動作を確認するdemoプロジェクトにて、buildscriptではなくpluginsブロックでプラグインを適用するように変更を入れました。変更内容はこちらのPRをご覧ください。
Kotlinのコンパイラ拡張手段
Kotlinのコンパイラに独自処理を追加したい場合、大きく次の2つのアプローチがあります。
- KSP(Kotlin Symbol Processing)
- Kotlin Compiler Plugin
※厳密にはKaptも選択肢にありますが、Kaptは現在メンテナンスモードなのでアノテーション処理用途ならばKSPを使う方が好ましいと思われます。
KSP と Kotlin Compiler Plugin の違い
KSPとKotlin Compiler Pluginでは、実装難易度とできることの範囲が異なります。
簡単にざっくり説明すると、下の表のようになります。
| KSP | Kotlin Compiler Plugin | |
|---|---|---|
| 実装難易度 | 低い | 高い |
| 制約 | コード生成のみで改変は不可 | 特になし(おそらく) |
この記事では実装難易度がとても高いが柔軟に色々できるKotlin Compiler Pluginに関して説明します。
Kotlinコンパイラの仕組み(飛ばしてもヨシッ)
Kotlinのコンパイラが一体どんな仕組みで動いているのかについて簡単に説明します。
(間違っているとこあったら優しく教えて欲しいです・・)
ここで紹介していることの全てはこちらにあります。Amandaさんに圧倒的感謝 ![]()
コンパイラ概略
Kotlinのコンパイラは大きく2つの部分に分かれています。
- Frontend
- Backend
Frontend では主にソースコードの解析を、Backend では出力先プラットフォームの違いの吸収やプログラムの最適化などを行います。
Frontend コンパイラは K1 と K2 で若干挙動に違いがあり、
K1 では PSI(Program Structure Interface) と BindingContext が、
K2 では FIR(Frontend Intermediate Representation) が出力されます。
K1 Frontend
K2 Frontend
Frontend コンパイラ詳細
Frontend でのソースコード解析の流れについて軽くまとめます。次のような関数定義を考えます。
fun two() = 2
1. ソースコード→トークン
最初に行われるのは、ソースコードのトークン化です。
fun two() = 2 は次のようにトークン分割され KtToken の列となります。
-
fun:KtModifierKeywordToken.FUN_KEYWORD -
(:KtToken.Identifier -
):KtSingleValueToken.LPAR -
=:KtSingleValueToken.RPAR -
2:KtToken.Identifier
※実際には空白もトークンとして処理されますがノイズになるので省略しています。
2. トークン → AST(抽象構文木)
次に、トークンがASTへと変換されます。
3. AST → PSI(Program Structure Interface)
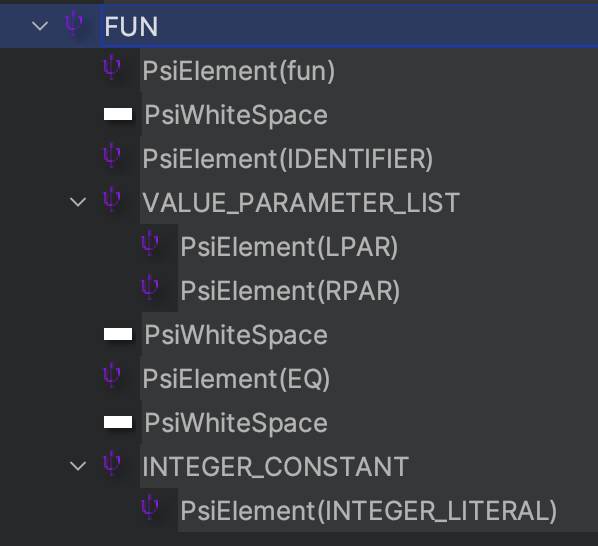
ASTになったら、今度はASTがPSIに変換されます。PSIはIntelliJで扱いやすい構文モデルと考えるとわかりやすいかも(厳密には正しくない気がしますが)
PsiViewer という IntelliJ プラグインを入れて確認するとこんな感じになっています(WhiteSpaceもちゃんと存在しています)。
4(K1). BindingContext を生成し PSI と共に backendコンパイラ へ渡す
K1 では、この後 BindingContext という参照解決マップのようなもの(?)を生成し backend コンパイラに渡すようです。
4(K2). RawFIRを生成 → FIRに変換 → backendコンパイラに渡す
K2 では、一旦 PSI を RawFIR に変換したのち、参照解決を行い FIR を生成します。同様に backend コンパイラに FIR を渡します。
Backend コンパイラ概要
Backend は Frontendコンパイラ から渡ってくる PSI + BindingContext または FIR を IR に変換し、出力ターゲットの違いの解決やプログラムの最適化を行うそうです。
詳しいことはあんまり理解していないので、この程度にとどめておきます。
Kotlin Compiler Pluginの実装方法
いよいよお待ちかねのプラグイン実装方法です。プラグインの実装方法に関しては少々古いですが、こちらのセッションを参考にしました。結構古いので、ちょっとAPIが変わってて大変でした。
多少の差異はあれど、導入資料としてはかなり役立ったのでKevinさんにも感謝してもしきれません...!! ![]()
プラグインの構造
Kotlin では通常 Gradle をビルドツールとして使いますので、Gradle プラグイン側の実装と Kotlin コンパイラ側の実装に分かれます。
以下はセッションで紹介されているプラグインの構造になります。
しかし、2023年10月現在では構成や命名に若干の変化があり正確には以下の図のようになるはずです。
以後、最新の状況に合わせて自分なりに解釈したプラグイン開発方法を紹介しますので、
セッション動画とは若干の差異が生じます。ご注意ください。
実装するコンパイラプラグインの仕様
早く実装したいという気持ちを抑えて、どんなものを作ろうとしてるか軽く説明させてください。
@HogeAnnotation
fun main() {}
↓
fun main() {
    val startTime = System.currentTimeMillis()
    println(startTime)
}
コンパイル時に自動でこれをやるイメージです!
そして、Gradle側では、
configure<MyPlugin> {
    enabled = true
    annotations = listOf("HogeAnnotation")
}
のようなオプションが指定できて、enabledでコンパイラの処理の有効無効を切り替え、annotationsに指定したアノテーションのついた関数が処理対象となります。
手を動かした方が理解も進むし楽しいので、早速作りましょう。
Gradle Plugin の実装
まず最初に、Gradle側から作っていきます。
settings.gradle.kts を書こう
settings.gradle.kts の役割は、プロジェクト全体で共通のGradle設定を記述することです。
主にリポジトリのダウンロード元と適用するプラグインのバージョンを設定します。
pluginManagement {
    repositories {
        mavenCentral()
    }
    plugins {
        kotlin("jvm") version "1.9.0" apply false
        kotlin("kapt") version "1.9.0" apply false
    }
}

dependencyResolutionManagement {
    repositories {
        mavenCentral()
    }
}
build.gradle.kts を書こう
gradle-plugin/build.gradle.kts を作成します。kaptを使っているのは auto-service という自動でMETA_INF に必要なファイルを生成してくれるライブラリを使うためです(kspにならないかな・・)。
plugins {
    kotlin("jvm")
    kotlin("kapt")
    `java-gradle-plugin`
}

gradlePlugin {
    plugins {
        create("myPlugin") {
            id = "com.example.my-plugin"
            implementationClass = "com.example.MyPlugin"  // 次のステップで実装
        }
    }
}

dependencies {
    implementation(kotlin("stdlib", "1.9.0"))
    implementation("org.jetbrains.kotlin:kotlin-gradle-plugin-api:1.9.0")

    compileOnly("com.google.auto.service:auto-service:1.1.1")
    kapt("com.google.auto.service:auto-service:1.1.1")
}
com.example.MyPlugin が KotlinCompilerPluginSupportPluginの実装クラスとなります。
忘れずにsettings.gradle.ktsにモジュールの定義を追加しておきます。
include(":gradle-plugin")
KotlinCompilerPluginSupportPlugin を実装しよう
続けて、MyPlugin.kt を実装します。
package com.example

import com.google.auto.service.AutoService
import org.gradle.api.Project
import org.gradle.api.provider.Provider
import org.jetbrains.kotlin.gradle.plugin.KotlinCompilation
import org.jetbrains.kotlin.gradle.plugin.KotlinCompilerPluginSupportPlugin
import org.jetbrains.kotlin.gradle.plugin.SubpluginArtifact
import org.jetbrains.kotlin.gradle.plugin.SubpluginOption

@Suppress("unused")
@AutoService(KotlinCompilerPluginSupportPlugin::class)  // 忘れずにつけよう。META_INFに追加しなきゃいけないファイルを自動生成してくれる。
class MyPlugin : KotlinCompilerPluginSupportPlugin {
    // プラグイン適用時の処理
    // extension(プラグインの設定項目)をgradleに追加する
    override fun apply(target: Project) {
        target.extensions.create(
            "myPlugin",
            MyPluginExtension::class.java,
        )
    }

    // プラグインが適用可能かどうか
    override fun isApplicable(kotlinCompilation: KotlinCompilation<*>): Boolean {
        return kotlinCompilation.project.plugins.hasPlugin(MyPlugin::class.java)
    }

    // プラグインをコンパイルに適用する処理
    // extensionで設定された項目をコンパイラに伝える
    override fun applyToCompilation(kotlinCompilation: KotlinCompilation<*>): Provider<List<SubpluginOption>> {
        val extension = kotlinCompilation.project.extensions.findByType(MyPluginExtension::class.java) ?: MyPluginExtension()
        if (extension.enabled && extension.annotations.isEmpty()) {
            error("MyPlugin is enabled but no annotations are specified.")
        }

        val annotationOptions = extension.annotations.map {
            SubpluginOption(key = "myPluginAnnotation", value = it)
        }
        val enabledOption = SubpluginOption(
            key = "enabled",
            value = extension.enabled.toString(),
        )
        return kotlinCompilation.target.project.provider {
            listOf(enabledOption) + annotationOptions
        }
    }

    // プラグインのIDを返す
    override fun getCompilerPluginId(): String {
        return "my-plugin"
    }

    // Kotlinコンパイラプラグインの実装部アーティファクトを返す
    override fun getPluginArtifact(): SubpluginArtifact {
        return SubpluginArtifact(
            groupId = "com.example.my-plugin",
            artifactId = "kotlin-plugin",  // 次のステップで作るよ!
            version = "1.0.0",
        )
    }
}
package com.example

// data classではなくopen classであることに注意してください
// demo実行時に次のようなエラーが出たらおそらくそれが原因です。
// Caused by: org.gradle.api.reflect.ObjectInstantiationException: Could not create an instance of type com.example.MyPluginExtension.
open class MyPluginExtension {
    var enabled: Boolean = true
    var annotations: List<String> = emptyList()
}
Gradle側はここまで!こうしてみると結構簡単に見えますがここに辿り着くまで長かったのです・・ ![]() 。
。
Kotlin Compiler Plugin の実装
build.gradle.kts を書こう
kotlin-plugin/build.gradle.ktsを書きます。
plugins {
    kotlin("jvm")
    kotlin("kapt")
}

dependencies {
    implementation("org.jetbrains.kotlin:kotlin-stdlib:1.9.0")
    implementation("org.jetbrains.kotlin:kotlin-compiler-embeddable:1.9.0")

    compileOnly("com.google.auto.service:auto-service:1.1.1")
    kapt("com.google.auto.service:auto-service:1.1.1")
}
こちらも忘れずにsettings.gradle.ktsにモジュールの定義を追加しておきます。
include(":gradle-plugin")
CommandLineProcessor でコマンドライン引数を処理しよう
package com.example

import com.google.auto.service.AutoService
import org.jetbrains.kotlin.compiler.plugin.AbstractCliOption
import org.jetbrains.kotlin.compiler.plugin.CliOption
import org.jetbrains.kotlin.compiler.plugin.CommandLineProcessor
import org.jetbrains.kotlin.compiler.plugin.ExperimentalCompilerApi
import org.jetbrains.kotlin.config.CompilerConfiguration
import org.jetbrains.kotlin.config.CompilerConfigurationKey

@OptIn(ExperimentalCompilerApi::class)
@AutoService(CommandLineProcessor::class)
class MyCommandLineProcessor : CommandLineProcessor {
    companion object {
        val KEY_ENABLED = CompilerConfigurationKey.create<Boolean>("my-plugin-enabled")
        val KEY_ANNOTATIONS = CompilerConfigurationKey.create<List<String>>("my-plugin-annotations")
    }

    override val pluginId: String = "my-plugin"
    override val pluginOptions: Collection<AbstractCliOption> = listOf(
        CliOption(
            optionName = "enabled",
            valueDescription = "true|false",
            description = "Whether MyPlugin is enabled or not.",
        ),
        CliOption(
            optionName = "myPluginAnnotation",
            valueDescription = "annotation",
            description = "Annotation to be processed by MyPlugin.",
            allowMultipleOccurrences = true,
        ),
    )

    override fun processOption(
        option: AbstractCliOption,
        value: String,
        configuration: CompilerConfiguration,
    ) = when (option.optionName) {
        "enabled" -> configuration.put(KEY_ENABLED, value.toBoolean())
        "myPluginAnnotation" -> configuration.appendList(KEY_ANNOTATIONS, value)
        else -> error("Unexpected config option ${option.optionName}")
    }
}
CompilerPluginRegistrar で独自処理を登録しよう
CompilerPluginRegistrarは、コマンドライン引数に応じてExtensionを登録するのが役割となります。
-
enabledがfalseなら何も登録しない -
enabledがtrueにも関わらずannotationsが空リストだったらエラーを吐く -
enabledがtrueかつannotationsが1つ以上の要素を持つなら独自のExtensionクラスを登録する
という感じで実装してみましょう。
package com.example

import com.google.auto.service.AutoService
import org.jetbrains.kotlin.backend.common.extensions.IrGenerationExtension
import org.jetbrains.kotlin.compiler.plugin.CompilerPluginRegistrar
import org.jetbrains.kotlin.compiler.plugin.ExperimentalCompilerApi
import org.jetbrains.kotlin.config.CompilerConfiguration

@Suppress("unused")
@OptIn(ExperimentalCompilerApi::class)
@AutoService(CompilerPluginRegistrar::class)
class MyCompilerRegistrar : CompilerPluginRegistrar() {
    // For now, not intended to support K2.
    override val supportsK2: Boolean get() = false

    override fun ExtensionStorage.registerExtensions(configuration: CompilerConfiguration) {
        if (configuration[MyCommandLineProcessor.KEY_ENABLED] == false) {
            return
        }

        val annotations = configuration[MyCommandLineProcessor.KEY_ANNOTATIONS]
            ?: error("MyPlugin is enabled but no annotations are specified.")
        // MyIrGenerationExtension は次のステップで実装
        IrGenerationExtension.registerExtension(MyIrGenerationExtension(annotations))
    }
}
IrGenerationExtension で独自のIR変換処理を実装しよう
今回は、バックエンドでFIRからIRへの変換処理に介入してメソッド内部を改変するのが主な目的なので、IrGenerationExtensionを拡張します。generateでIrModuleFragment型の引数を受け取っていますが、これは単にソースファイルを束ねているコンテナです。具体的には以下のような構造を取ります。
IrModuleFragment に対して独自のTranformerをかませてあげれば独自のIR変換処理を注入することができます。実装は以下のようになります。
package com.example

import org.jetbrains.kotlin.backend.common.IrElementTransformerVoidWithContext
import org.jetbrains.kotlin.backend.common.extensions.FirIncompatiblePluginAPI
import org.jetbrains.kotlin.backend.common.extensions.IrGenerationExtension
import org.jetbrains.kotlin.backend.common.extensions.IrPluginContext
import org.jetbrains.kotlin.ir.IrStatement
import org.jetbrains.kotlin.ir.declarations.IrDeclarationOrigin
import org.jetbrains.kotlin.ir.declarations.IrFunction
import org.jetbrains.kotlin.ir.declarations.IrModuleFragment
import org.jetbrains.kotlin.ir.declarations.IrSimpleFunction
import org.jetbrains.kotlin.ir.declarations.impl.IrVariableImpl
import org.jetbrains.kotlin.ir.expressions.IrBlockBody
import org.jetbrains.kotlin.ir.expressions.impl.IrCallImpl
import org.jetbrains.kotlin.ir.expressions.impl.IrGetValueImpl
import org.jetbrains.kotlin.ir.symbols.impl.IrVariableSymbolImpl
import org.jetbrains.kotlin.ir.types.isNullableAny
import org.jetbrains.kotlin.ir.util.hasAnnotation
import org.jetbrains.kotlin.ir.visitors.transformChildrenVoid
import org.jetbrains.kotlin.name.FqName
import org.jetbrains.kotlin.name.Name

class MyIrGenerationExtension(
    private val annotations: List<String>,
) : IrGenerationExtension {
    override fun generate(moduleFragment: IrModuleFragment, pluginContext: IrPluginContext) {
        moduleFragment.transformChildrenVoid(
            MyIrTransformer(
                annotations = annotations,
                pluginContext = pluginContext,
            )
        )
    }
}

class MyIrTransformer(
    private val annotations: List<String>,
    private val pluginContext: IrPluginContext,
) : IrElementTransformerVoidWithContext() {
    override fun visitFunctionNew(declaration: IrFunction): IrStatement {
        val transformed = super.visitFunctionNew(declaration)
        val hasAnnotation = annotations.any { declaration.hasAnnotation(FqName(it)) }
        if (!hasAnnotation) return transformed
        val body = declaration.body as? IrBlockBody ?: return transformed

        val systemClass = pluginContext.referenceClass(java.lang.System::class.java.classId)
        val currentTimeMillisFunction = systemClass?.owner?.declarations?.filterIsInstance<IrSimpleFunction>()
            ?.singleOrNull { it.name == Name.identifier("currentTimeMillis") && it.valueParameters.isEmpty() }?.symbol
            ?: error("currentTimeMillis not found")

        val printlnFunction =
            pluginContext.referenceFunctions(
                CallableId(
                    packageName = FqName("kotlin.io"),
                    callableName = Name.identifier("println")
                )
            ).firstOrNull {
                it.owner.name == Name.identifier("println") &&
                        it.owner.valueParameters.size == 1 &&
                        it.owner.valueParameters.single().type.isNullableAny()
            } ?: error("println function not found")

        val currentTimeMillisCall = IrCallImpl(
            startOffset = declaration.startOffset,
            endOffset = declaration.endOffset,
            type = pluginContext.irBuiltIns.longType,
            symbol = currentTimeMillisFunction,
            typeArgumentsCount = 0,
            valueArgumentsCount = 0,
        )

        val startTimeVariable = IrVariableImpl(
            startOffset = declaration.startOffset,
            endOffset = declaration.endOffset,
            origin = IrDeclarationOrigin.DEFINED,
            symbol = IrVariableSymbolImpl(),
            name = Name.identifier("startTime"),
            isVar = false,
            isConst = false,
            isLateinit = false,
            type = pluginContext.irBuiltIns.longType,
        )

        startTimeVariable.initializer = currentTimeMillisCall

        val printlnCall = IrCallImpl(
            startOffset = declaration.startOffset,
            endOffset = declaration.endOffset,
            type = pluginContext.irBuiltIns.unitType,
            symbol = printlnFunction,
            typeArgumentsCount = 0,
            valueArgumentsCount = 1,
        )

        printlnCall.putValueArgument(
            index = 0,
            valueArgument = IrGetValueImpl(
                startOffset = declaration.startOffset,
                endOffset = declaration.endOffset,
                symbol = startTimeVariable.symbol
            )
        )

        startTimeVariable.parent = declaration

        body.statements.add(0, startTimeVariable)
        body.statements.add(1, printlnCall)

        return declaration
    }
}
これでプラグインが完成しました!次のステップでMavenLocalに公開してテストしてみます。
MavenPublishの設定をしよう
MavenLocalにできたプラグインを公開して、作成したプラグインの動作を試してみましょう。各モジュールのbuild.gradle.ktsを次のように変更します。
plugins {
   // 省略...
   `maven-publish`
}

// 省略...

publishing {
    publications {
        register("mavenJava", MavenPublication::class) {
            from(components["kotlin"])
            groupId = "com.example.my-plugin"
            artifactId = "com.example.my-plugin.gradle.plugin"
            version = "1.0.0"
        }
    }
    repositories {
        mavenLocal()
    }
}
plugins {
   // 省略...
   `maven-publish`
}

// 省略...

publishing {
    publications {
        register("mavenJava", MavenPublication::class) {
            from(components["kotlin"])
            groupId = "com.example.my-plugin"
            artifactId = "kotlin-plugin"
            version = "1.0.0"
        }
    }
    repositories {
        mavenLocal()
    }
}
変更できたら、プロジェクトのルートで次のコマンドを実行し、MavenLocalへ公開しましょう。
./gradlew publishToMavenLocal
次のコマンドを実行して、my-plugin(gradle-plugin)とkotlin-pluginのディレクトリがあれば問題なくpublishされていると思います。
$ ls ~/.m2/repository/com/example/
kotlin-plugin my-plugin
デモのお時間です
さあ、いよいよ作ったプラグインを動かそうの会です!あともう一息、頑張りましょう・・!
場所はどこでもいいので、新しくdemoというディレクトリを作り、その中に次のsettings.gradle.ktsとbuild.gradle.ktsを配置します。
※このgradle設定、一応動くけどかなり雑なのでほ〜んくらいの気持ちで眺めてください・・
→ 2023/12/19更新:pluginsブロックで適用できるように変更を入れました(buildscirptでの適用は古いやり方です)。変更内容はこちらのPRをご覧ください。
pluginManagement {
    repositories {
        mavenCentral()
        mavenLocal()
    }
    plugins {
        kotlin("jvm") version "1.9.0" apply false
        id("com.example.my-plugin") version "1.0.0" apply false
    }
}

dependencyResolutionManagement {
    repositories {
        mavenCentral()
        mavenLocal()
    }
}
import com.example.MyPluginExtension

plugins {
    kotlin("jvm")
    id("application")
    id("com.example.my-plugin")
}

configure<MyPluginExtension> {
    enabled = true
    annotations = listOf("HogeAnnotation")
}

application {
    mainClass = "MainKt"
}
そしたら、次のファイルを demo/src/main/kotlin/main.ktにおきます。
annotation class HogeAnnotation

@HogeAnnotation
fun main() {
}
ここまできたら、demo直下で次のコマンドを実行してみましょう。
./gradlew run
次のような結果になれば成功です。main関数の内部に何も書いてないのに、現在のシステム時刻が出力されるようになりましたね。
> Task :run
1696735150055
最後に
ここまで読んでくださった方、ありがとうございます。当記事でご紹介したKotlin Compiler Pluginの実装コードはGitHubにて公開しています。
また、記事の説明で(特にコンパイラの仕組みの部分)怪しい箇所があるかと思います。もし誤りを見つけましたら、お手数ですが連絡をいただけると幸いです。
Kotlin Compiler Pluginはやりたかったことが色々できそうで夢を感じます。動いた瞬間、きっと感動するはずですので、お時間のある際ぜひ試してみてください!