AngularでもReactでも共通する話題ですが、フロントエンドでのコンポーネントをテストしやすい設計としてViewModelとFormModelを取り入れたらうまくいった話です。
コンポーネントテストの難しさ
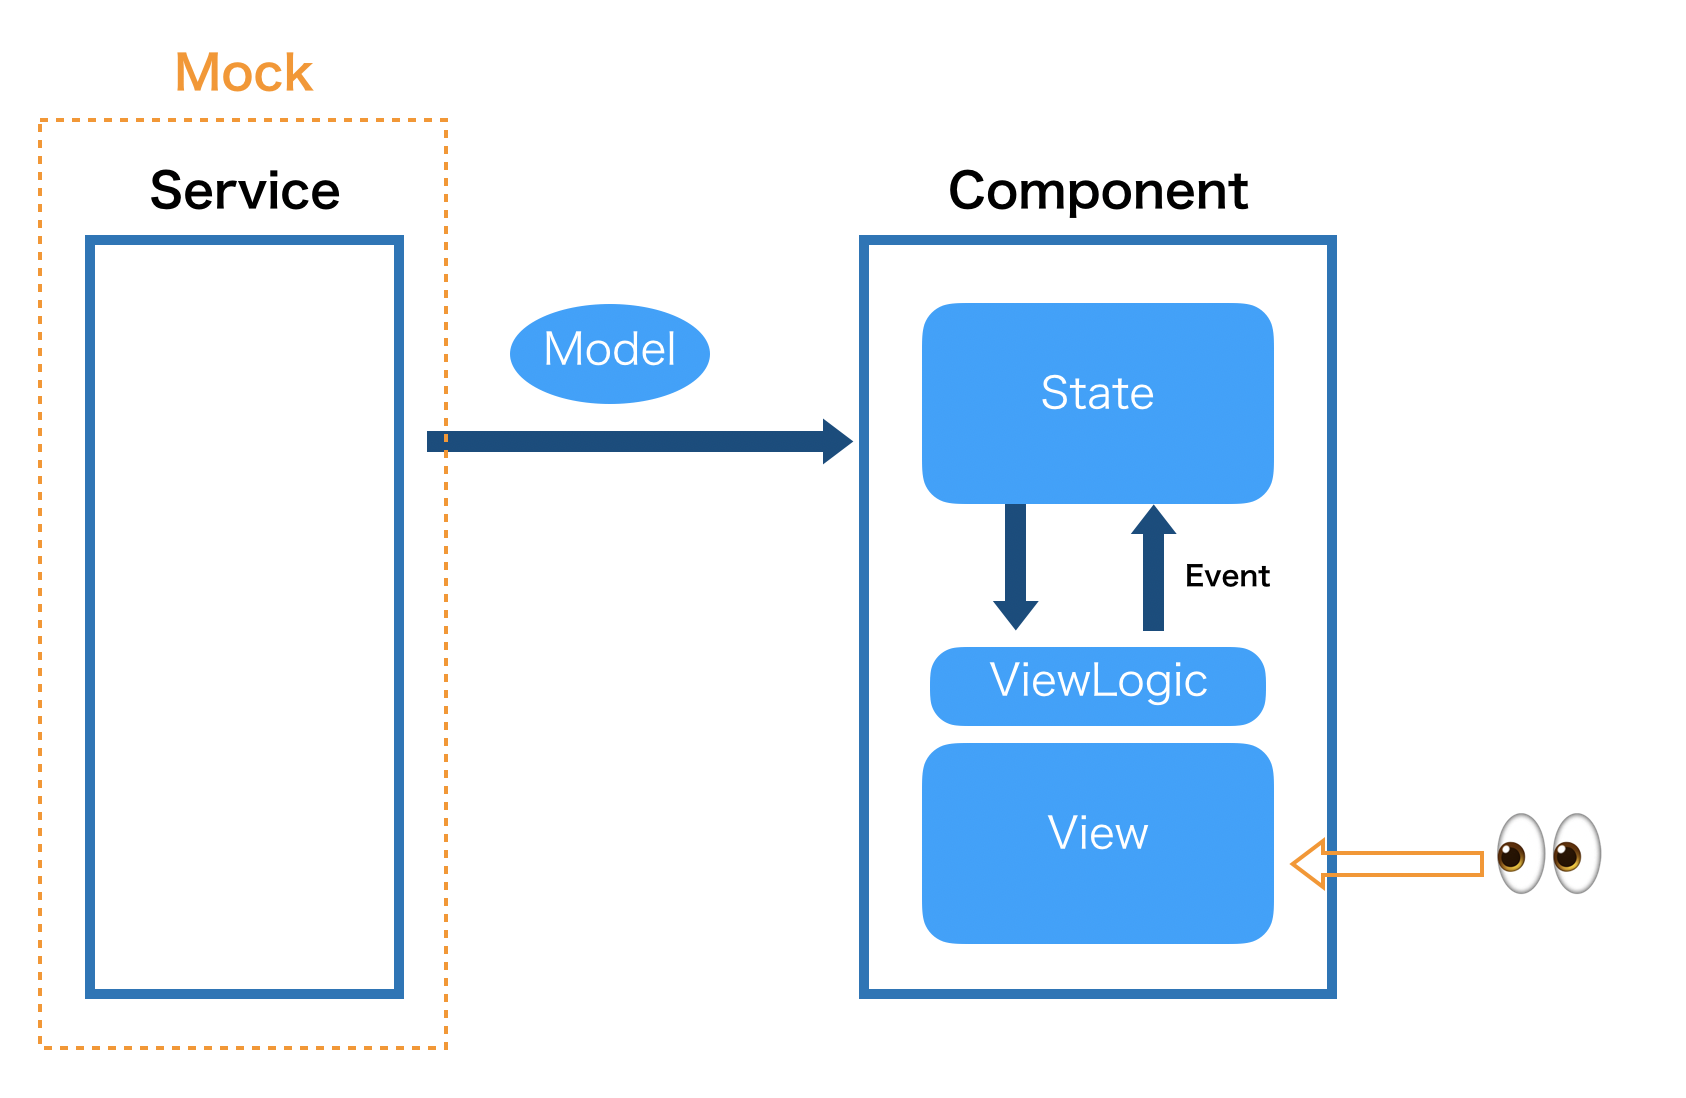
そもそもフロントエンドでのコンポーネントの単体テストする難しさ(面倒さ)は何故なのか。それはinputの作りにくさとoutputの扱いづらさが起因してると考えられます。
・ inputとして値を与えるために、Serviceなどの外部モックを作る必要がある。(AngularであればDIの部分)
・ outputがDOMなので、DOM操作をしての検証が必要となる。
責務を分割したコンポーネント設計
テストがしやすいコンポーネントにするために、コンポーネントを責務ごとに分割しよう、というのが今回の趣旨です。
まず、単純にコンポーネントを作った際にコンポーネントがもつ責務の範囲は、
・ Service層またはStoreとのデータのやりとり
・ 自身のStateの管理
・ Viewの構築
が挙げられます。
これを
・ Service層とのデータのやりとり & Stateの管理を行うコンポーネント(Container Component)
・ Viewのテンプレートとしてのコンポーネント(Presentation Component)
・ Viewの構築ロジックをもつ値オブジェクト(ViewModel/FormModel)
に分割します。
商品情報を表示するコンポーネントを例にして、Reactで実装したケースで説明します。
以下は、データの取得、State管理、View構築を含んだComponentです。
interface Props {
  productId: number;
}
interface State {
  product: Product | null;
}

export class ProductComponent extends Component<Props, State> {
  constructor(props) {
    super(props);
    this.state = {
      product: null
    };
    this.getProduct();
  }

  async getProduct(){
    const product: Product = await new ProductApiService().getProduct(this.props.productId);
    this.setState({...this.state, product})
  }

  formatCurrency(price: number): string{
    return `¥${(price || 0).toLocaleString()}`;
  }

  render() {
    return (
      <div>
        {this.state.product ? (
          <div>
            <h1>{this.state.product.name}</h1>
            <div>
              {this.formatCurrency(this.state.product.price)}
            </div>
          </div>
        ) : null}
      </div>
    );
  }
}
1. Stateを持たないコンポーネントへ分離
Stateを持つContainerComponentと、Stateを持たないPresentationComponentへ分離します。Redux関連でも割とよく使われるコンポーネントパターンです。
https://redux.js.org/basics/usage-with-react#presentational-and-container-components
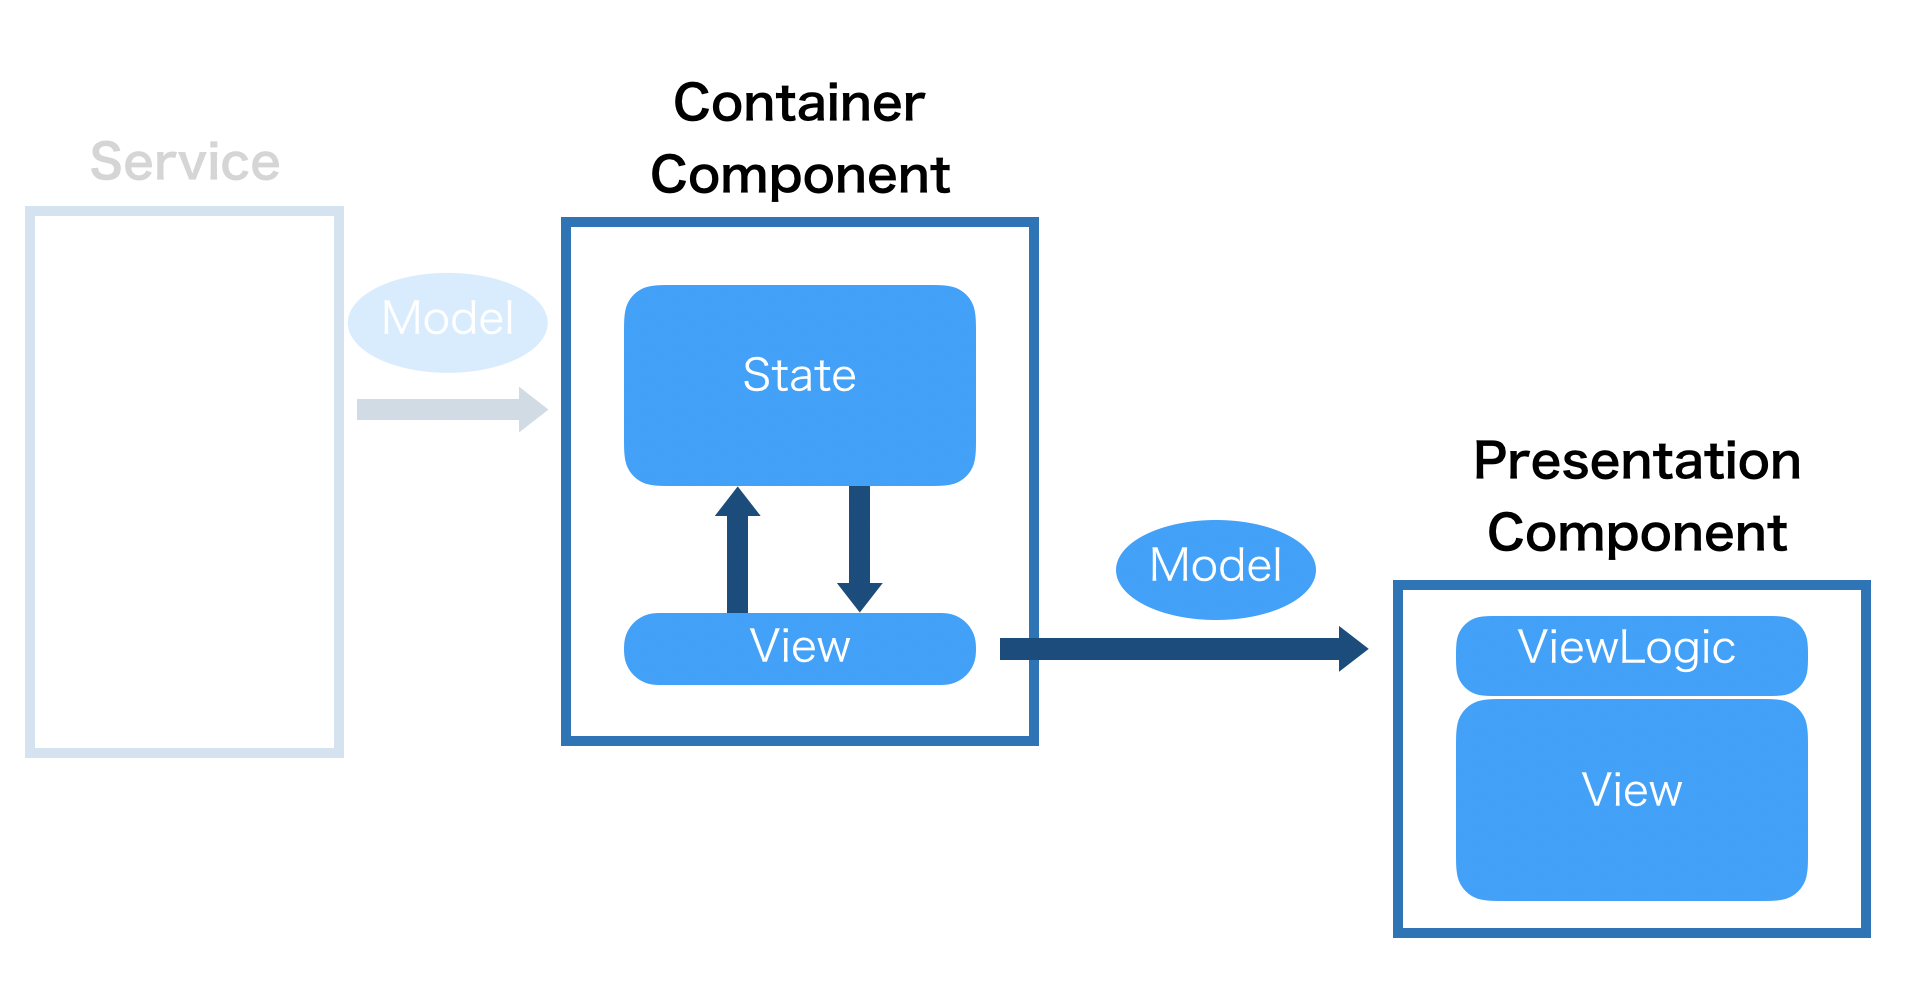
ContainerComponent
ContainerComponentはView部分を子コンポーネントに移し、View部分を薄くします。
interface ContainerProps {
  productId: number;
}
interface ContainerState {
  product: Product | null;
}

export class ProductContainerComponent extends Component<ContainerProps, ContainerState> {
  constructor(props) {
    super(props);
    this.state = {
      product: null
    };
    this.getProduct();
  }

  async getProduct(){
    const product: Product = await new ProductApiService().getProduct(this.props.productId);
    this.setState({...this.state, product})
  }

  render() {
    return (
      <div>
        {this.state.product ? (
          <ProductComponent product={this.state.product}></ProductComponent>
        ) : null}
      </div>
    );
  }
}
PresentaionComponent
PresentationComponentはStateを持たないので、渡された値を元にViewを構築します。
ReactであればFunctionalComponentとしてViewのみを返す関数にします。
interface Props {
  product: Product;
}

export const ProductComponent: React.FC<Props> = props => {
  const formatCurrency = (price: number): string => {
    return `¥${(price || 0).toLocaleString()}`;
  }

  return (
    <div>
      <h1>{props.product.name}</h1>
      <div>
        {formatCurrency(props.product.price)}
      </div>
    </div>
  );
}
2. ViewModelへのロジックの分離
本題です。
PresentationComponentでのModelからViewを構築するロジックをViewModelへ移します。
ViewModelは表示に特化したモデルクラスで、モデルをViewに合わせて整形します。値の変換、ifでの表示分岐ロジックなどを担います。
ViewModelはContainerComponent内で作成し、PresentationComponentにViewModelを渡すようにします。
PresentationComponentは受け取ったViewModelを表示するのみにします。
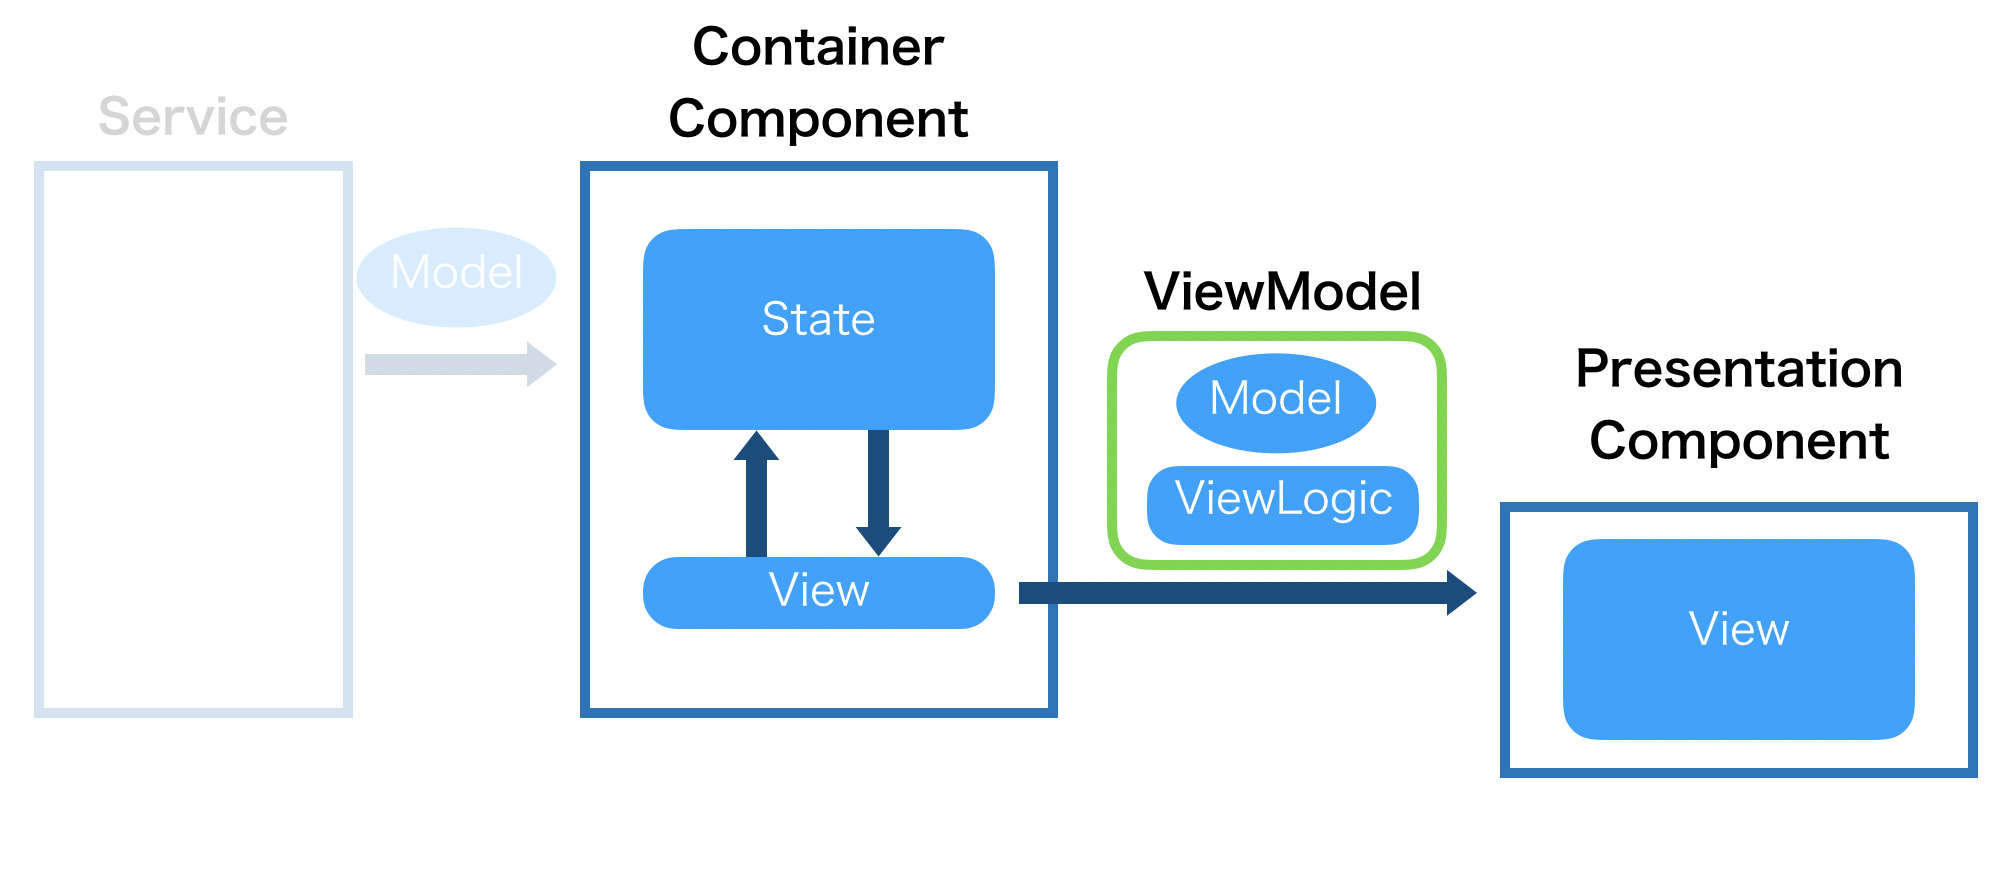
ViewModel
この例では、モデルの「名前」と「金額」を整形済みの形で返します。
export class ProductComponentViewModel{
  constructor(private product: Product){}

  get name(){
    return this.product.name;
  }

  get price(){
    return `¥${(this.product.price || 0).toLocaleString()}`;
  }
}
PresentationComponent
関数を持たず、受け取ったViewModelのプロパティを表示するのみになります。
interface Props {
  product: ProductComponentViewModel;
}

export const ProductComponent: React.FC<Props> = props => {
  return (
    <div>
      <h1>{props.product.name}</h1>
      <div>
        {props.product.price}
      </div>
    </div>
  );
}
ContainerComponent
ViewModelを作成し、子コンポーネントに渡します。
// ... (省略)
render() {
    return (
      <div>
        {this.state.product ? (
          <ProductComponent product={new ProductComponentViewModel(this.state.product)}></ProductComponent>
        ) : null}
      </div>
    );
  }
// ... (省略)
ViewModelの共通化
ViewModelは原則として1つのコンポーネントに対して作り、他のコンポーネントへの流用は行いません。
今回のようなProductの値を整形したい場合に、同じ整形ロジックを別のViewModelでも使いたいシチュエーションがあります。 その場合はmodelに対応した共通ViewModelをつくり、各ViewModel側で集約(aggregate)する形をとるとよいです。
export class ProductViewModel{
  constructor(private product: Product){}

  get name(){
    return this.product.name;
  }

  get price(){
    return `¥${(this.product.price || 0).toLocaleString()}`;
  }
}
export class ProductComponentViewModel{
  product: ProductViewModel;

  constructor(private _product: Product){
    this.product = new ProductViewModel(_product);
  }

  get name(){
    return this.product.name;
  }

  get price(){
    return this.product.price;
  }
}
FormModel
FormModelとは、Formに特化したViewModelです。Formに表示する値の整形や、Formのバリデーションを行います。
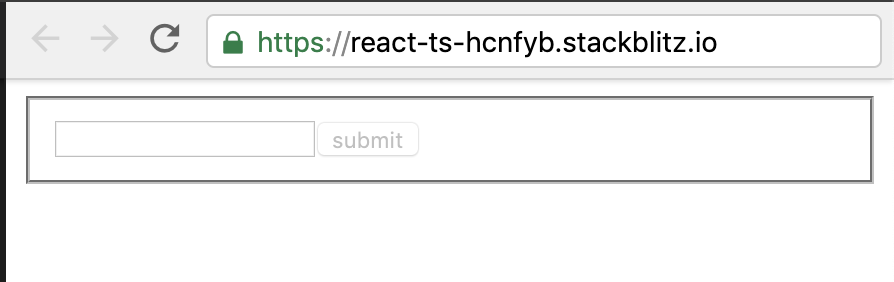
下の例は、フィールドとサブミットボタンだけの簡単なフォームで、フィールドに値がない場合はボタンを非活性にするバリデーションを行っています。
ContainerComponent
FormModelを作成して子コンポーネントに渡し、子コンポーネントからの変更のコールバックもFormModelで受け取ります。
export class FormContainerComponent extends Component<ContainerProps, ContainerState> {
  constructor(props) {
    super(props);
    this.state = {
      name: ''
    };
  }
  handleChange(form: FormModel){
    const name = form.name;
    this.setState({...this.state, name: name});
  }

  render() {
    const form = new FormModel({
          name: this.state.name,
          onChange: this.handleChange.bind(this)
          })
    return (
      <FormComponent form={form}/>
    );
  }
}
FormModel
フォームのバリデーションロジックを持ちます。また、フォームに変更があった場合に新しいFormModelを作成しコールバックを呼びます。
interface FormModelProps{
  name: string;
  onChange: (form: FormModel) => void;
}

class FormModel implements FormModelProps{
  readonly name: string;
  readonly onChange: (form: FormModel) => void;
  readonly isValid: boolean;

  constructor(private props: FormModelProps){
    this.name = props.name;
    this.onChange = props.onChange;
    this.isValid = this.validate();
  }

  validate(){
    return this.name !== '';
  }

  handleNameChange(name: string){
    this.onChange(new FormModel({...this.props, name}));
  }
}
PresentationComponent
ViewModelと同様に、FormModelの値を表示するのみにします。
onChangeのイベントハンドリングは、値をとる部分がViewに依存するのでfunctionを持ちますが、取得した値をFormModelに渡して後の処理は移譲します。
interface Props{
  form: FormModel
}

export const FormComponent: React.FC<Props> = props => {
  const handleNameChange = (event: React.ChangeEvent<HTMLInputElement>) => {
    const name = event.currentTarget.value;
    props.form.handleNameChange(name);
  }

  return (
    <fieldset>
        <input value={props.form.name} onChange={handleNameChange.bind(props)}/>
        <button disabled={!props.form.isValid}>submit</button>
      </fieldset>
  )
}
まとめ
・ Viewの構築ロジックをViewModelとしてピュアなJSクラスになるのでテストがしやすくなる
・ Formも同様に、FormModelにロジックを移すことでテストがしやすくなる
・ PresentationComponentはViewModelの値を表示をするのり、Snaoshotテストを行えば良い状態になる
(SnapshotテストはJestの機能なので、Jasmineを使用している場合はJestへの切り替えをおすすめします)