概要
2020/04/05 現在のIntel RealSense SDK 2.0で、Visual Studio 2019 の C# (WPFアプリ)で、RealSense D435 をまず動かすまでの手順メモです。
GitHub の [.NET Wrapper for Intel RealSense SDK] (https://github.com/IntelRealSense/librealsense/tree/master/wrappers/csharp) にあるサンプルは CMake 前提で用意されていますが、使い慣れていない人も多いかと思います。
そこで CMake は使わずに チュートリアル2のキャプチャ を動かすまでを説明します。
ポイント
- プラットフォームを「Any CPU」から「x64」に変更する
- SDKのフォルダのbin\x64にある Intel.Realsense.dll を参照に追加
- SDKのフォルダのbin\x64にある realsense2.dll を実行ファイルの出力ディレクトリーにコピー
以上が準備として重要でした。
検証環境
以下の環境で試しました。
- RealSense SDK 2.33.1.13
- RealSense D435 Firmware 05.12.03.00
- Visual Studio Community 2019 Ver. 16.4.5
- .NET Framework 4.7.2
前提条件
RealSense SDK はインストールしてあること。
インストール時には 「.NET Developer Package」を含めます。
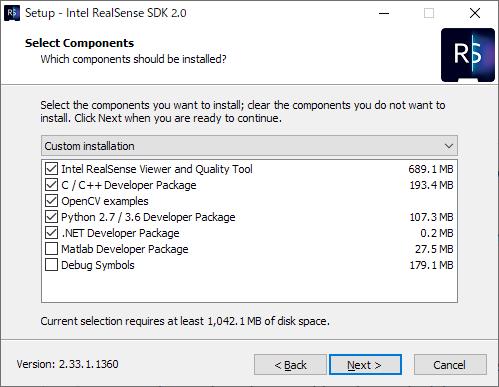
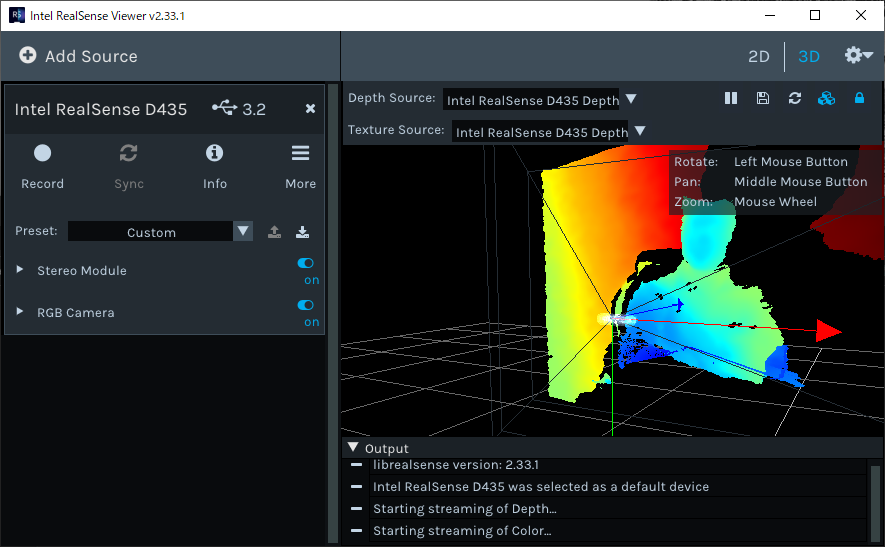
Intel RealSense Viewer でカメラの動作確認をしておいてください。
0. 新しいプロジェクトの作成
WPFアプリ(.NET Framework)を選択
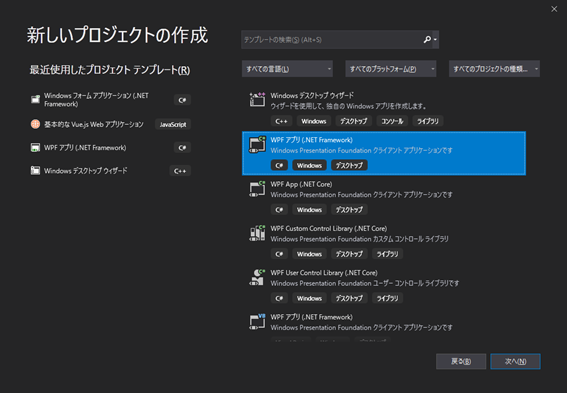
プロジェクト名を指定して作成

ここでは RealSenseWPFtest という名前にしました。
プロジェクトを用意したら、この記事のメインとなる RealSense を使う準備です。
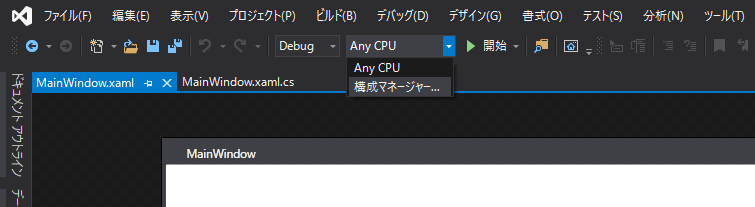
1. 「AnyCPU」→「x64」に変える
(もし32ビットで作りたい、という場合は以降「x64」は「x86」に置き換えて読んでください。)
構成マネージャーを開く
ツールバーで最初「Any CPU」と出ている部分を押して、「構成マネージャー」を選びます。
プラットフォームの 新規作成
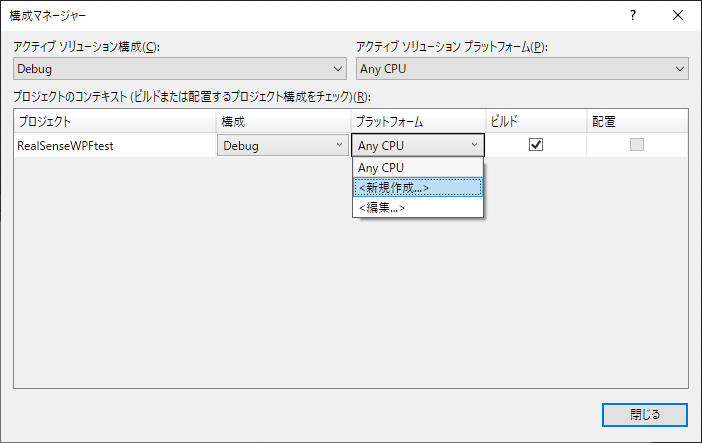
新しいプラットフォームとして x64 を作成します。
コピー元は Any CPU のままでいいです。

プラットフォームが x64 になれば閉じてください。

Visual Studio 上部のツールバーで x64 が選ばれた状態になっていればOKです。

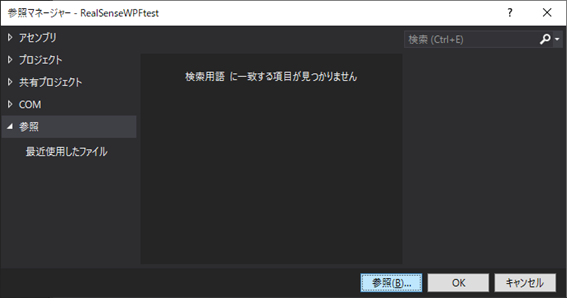
2. Intel.Realsense.dll を参照に追加
RealSense SDK は通常「C:\Program Files (x86)\Intel RealSense SDK 2.0」というフォルダにインストールされるはずです。その中の bin\x64 にある DLL を使えるようにしていきます。
そのうちの Intel.Realsense.dll は「参照」を含めることで using Intel.RealSense; ができるようになります。
プロジェクト(ここでは RealSenseWPFtest)の中の「参照」を右クリックし、「参照の追加(R)...」を選択します。

左のメニューから「参照」を選択して、右下の「参照(B)...」ボタンを押します。
C:\Program Files (x86)\Intel RealSense SDK 2.0\bin\x64
のフォルダにある、Intel.Realsense.dll を選択して「追加」
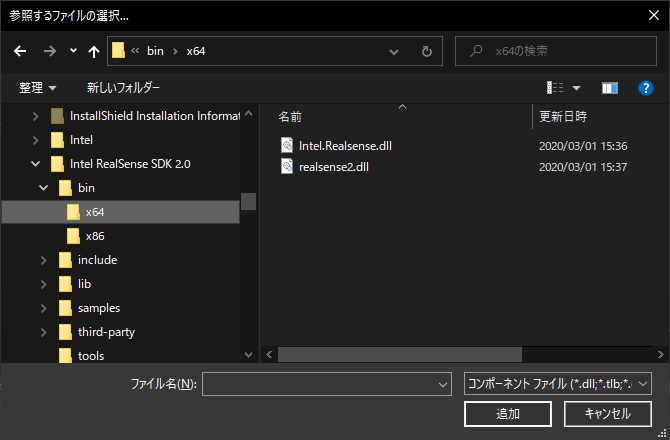
その後、参照マネージャー ウィンドウは閉じます。
3. realsense2.dll を追加
先の Intel.Realsense.dll は中で realsense2.dll を呼び出しています。アプリの実行時にこれを見つけられる必要があるため、実行ファイルと同じフォルダにコピーされるようにしておきます。
今度は Visual Studio とは別に、C:\Program Files (x86)\Intel RealSense SDK 2.0\bin\x64 フォルダを開いておきます。
そこから realsense2.dll のファイルを、プロジェクト(ここでは RealSenseWPFtest の所)にドロップします。
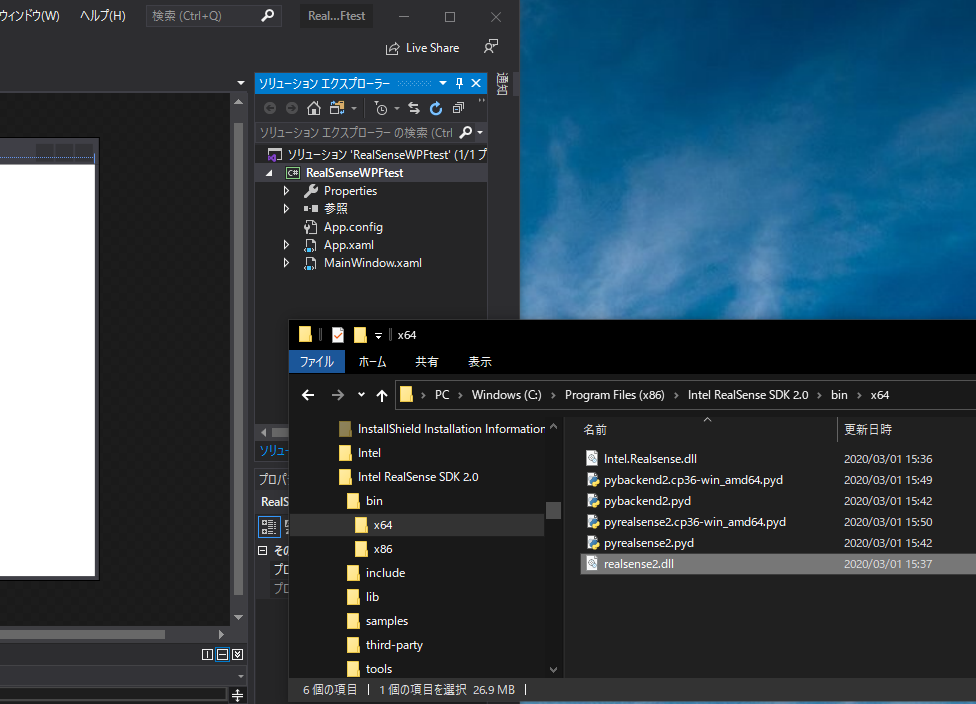
プロジェクトに realsense2.dll の複製が追加されます。
現れた realsens2.dll を選択して、プロパティの「出力ディレクトリにコピー」を「新しい場合はコピーする」にします。

以上で、このWPFアプリの実行フォルダに必要なDLLがコピーされるようになります。
4. 画面とコード作成
GitHubの cs-tutorial-2-capture サンプルと同様のものを作ってみます。
なお元のライセンスは Apache License Version 2.0 です。
ウィンドウの編集
サンプルの Window.xaml から Grid タグの中身だけコピーして MainWindow.xaml のGrid内に貼付けます。

また、Windowタグ内に Closing="control_Closing" も貼り付けておきます。
編集後の MainWindow.xaml
clr-namespace は必ずしも RealSenseWPFtest ではなく自分のプロジェクトに合わせてください。<Window x:Class="RealSenseWPFtest.MainWindow"
xmlns="http://schemas.microsoft.com/winfx/2006/xaml/presentation"
xmlns:x="http://schemas.microsoft.com/winfx/2006/xaml"
xmlns:d="http://schemas.microsoft.com/expression/blend/2008"
xmlns:mc="http://schemas.openxmlformats.org/markup-compatibility/2006"
xmlns:local="clr-namespace:RealSenseWPFtest"
mc:Ignorable="d"
Closing="control_Closing"
Title="MainWindow" Height="450" Width="800">
<Grid>
<Grid.ColumnDefinitions>
<ColumnDefinition />
<ColumnDefinition />
</Grid.ColumnDefinitions>
<TextBox x:Name="txtTimeStamp" Grid.Column="0" />
<Image x:Name="imgDepth" Grid.Column="0" />
<Image x:Name="imgColor" Grid.Column="1" />
</Grid>
</Window>
コードの編集
サンプルにある Window.xaml.cs から、MainWindow.xaml.cs に、namespaceが異なることなどを考慮して必要な部分を移植します。
編集後のコードをここに置きますので、これをコピーして貼り付けてもいいです。
編集後の MainWindow.xaml.cs
namespace は RealSenseWPFtest ではなく自分のプロジェクトに合わせてください。using System;
using System.Collections.Generic;
using System.Linq;
using System.Text;
using System.Threading;
using System.Threading.Tasks;
using System.Windows;
using System.Windows.Controls;
using System.Windows.Data;
using System.Windows.Documents;
using System.Windows.Input;
using System.Windows.Media;
using System.Windows.Media.Imaging;
using System.Windows.Navigation;
using System.Windows.Shapes;
using System.Windows.Threading;
using Intel.RealSense;
namespace RealSenseWPFtest
{
/// <summary>
/// MainWindow.xaml の相互作用ロジック
/// </summary>
public partial class MainWindow : Window
{
private Pipeline pipeline;
private Colorizer colorizer;
private CancellationTokenSource tokenSource = new CancellationTokenSource();
static Action<VideoFrame> UpdateImage(Image img)
{
var wbmp = img.Source as WriteableBitmap;
return new Action<VideoFrame>(frame =>
{
var rect = new Int32Rect(0, 0, frame.Width, frame.Height);
wbmp.WritePixels(rect, frame.Data, frame.Stride * frame.Height, frame.Stride);
});
}
public MainWindow()
{
InitializeComponent();
try
{
Action<VideoFrame> updateDepth;
Action<VideoFrame> updateColor;
// The colorizer processing block will be used to visualize the depth frames.
colorizer = new Colorizer();
// Create and config the pipeline to strem color and depth frames.
pipeline = new Pipeline();
var cfg = new Config();
cfg.EnableStream(Stream.Depth, 640, 480);
cfg.EnableStream(Stream.Color, Format.Rgb8);
var pp = pipeline.Start(cfg);
SetupWindow(pp, out updateDepth, out updateColor);
Task.Factory.StartNew(() =>
{
while (!tokenSource.Token.IsCancellationRequested)
{
// We wait for the next available FrameSet and using it as a releaser object that would track
// all newly allocated .NET frames, and ensure deterministic finalization
// at the end of scope.
using (var frames = pipeline.WaitForFrames())
{
var colorFrame = frames.ColorFrame.DisposeWith(frames);
var depthFrame = frames.DepthFrame.DisposeWith(frames);
// We colorize the depth frame for visualization purposes
var colorizedDepth = colorizer.Process<VideoFrame>(depthFrame).DisposeWith(frames);
// Render the frames.
Dispatcher.Invoke(DispatcherPriority.Render, updateDepth, colorizedDepth);
Dispatcher.Invoke(DispatcherPriority.Render, updateColor, colorFrame);
Dispatcher.Invoke(new Action(() =>
{
String depth_dev_sn = depthFrame.Sensor.Info[CameraInfo.SerialNumber];
txtTimeStamp.Text = depth_dev_sn + " : " + String.Format("{0,-20:0.00}", depthFrame.Timestamp) + "(" + depthFrame.TimestampDomain.ToString() + ")";
}));
}
}
}, tokenSource.Token);
}
catch (Exception ex)
{
MessageBox.Show(ex.Message);
Application.Current.Shutdown();
}
}
private void control_Closing(object sender, System.ComponentModel.CancelEventArgs e)
{
tokenSource.Cancel();
}
private void SetupWindow(PipelineProfile pipelineProfile, out Action<VideoFrame> depth, out Action<VideoFrame> color)
{
using (var p = pipelineProfile.GetStream(Stream.Depth).As<VideoStreamProfile>())
imgDepth.Source = new WriteableBitmap(p.Width, p.Height, 96d, 96d, PixelFormats.Rgb24, null);
depth = UpdateImage(imgDepth);
using (var p = pipelineProfile.GetStream(Stream.Color).As<VideoStreamProfile>())
imgColor.Source = new WriteableBitmap(p.Width, p.Height, 96d, 96d, PixelFormats.Rgb24, null);
color = UpdateImage(imgColor);
}
}
}
5. 実行
動かした結果、色分けされた深度とカメラの画像が映りました!。

Any CPU として動かした場合
参照に追加はできていないとコードでエラー表示があるため分かりやすいです。
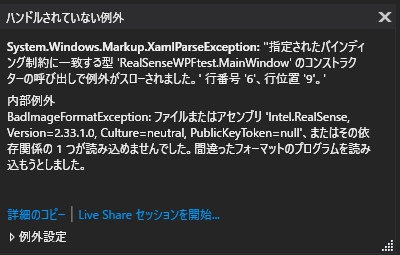
ですが「Any CPU」を「x64」にするというのは気づきにくいです。
そのまま動かすと、このような BadImageFormatException が出ました。
終了時の例外
実行させたウィンドウを閉じる際、Debugだとタイムスタンプを表示させている部分で TaskCanceledException が出やすいかもしれません。

タイムスタンプ表示が不要ならば、その部分(82~86行目)をコメントアウトしておいてもいいかもしれません。