はじめに
今回、ドキュメントをソースコードと同じ場所にまとめておきたいと思い、sphinx を使ってドキュメント作成を行なったので、その内容をまとめておきます。
sphinx とは?
sphinx とは Python 製のドキュメント生成ツールです。
reST(reStructuredText) 記法でドキュメントを作成できるので、マークダウンに慣れている人には非常に使いやすいと思います。
Python の公式ドキュメントも sphinx で作成されているそうです。
インストール
pip install で sphinx を install します。
$ pip install sphinx
プロジェクト作成
コマンドでプロジェクトを作成します。
人が作った、sphinx のプロジェクトを見ると、いろんなディレクトリがあって、ややこしそうだなーと思っていたのですが、
コマンド一つで自動作成されていたことを、この時初めて知りました。
まずはコマンドを叩く前にプロジェクトのROOTとなる、ディレクトリを作成します。
$ mkdir test_document
$ cd test_document
では、sphinx-quickstartコマンドで sphinx のプロジェクトを作成します。
下記のように色々質問されますが、基本的には Enter で OK です。
今回は下記項目だけ、入力しています。
- Separate source and build directories (y/n) [n]: y
- Project name: test_document
- Author name(s): kinpira
- Project version []: 1.0.0
- Project language [en]: ja
$ sphinx-quickstart
Welcome to the Sphinx 1.6.4 quickstart utility.

Please enter values for the following settings (just press Enter to
accept a default value, if one is given in brackets).

Enter the root path for documentation.
> Root path for the documentation [.]:
# ↑ドキュメントのルートパス省略時は今の場所

You have two options for placing the build directory for Sphinx output.
Either, you use a directory "_build" within the root path, or you separate
"source" and "build" directories within the root path.
> Separate source and build directories (y/n) [n]: y
# ↑ソースと、ビルド結果のフォルダを完全に分けるかどうか。
# デフォルトはソースのフォルダ内に_buildディレクトリができる。

Inside the root directory, two more directories will be created; "_templates"
for custom HTML templates and "_static" for custom stylesheets and other static
files. You can enter another prefix (such as ".") to replace the underscore.
> Name prefix for templates and static dir [_]:
# ↑Sphinxの作るシステムディレクトリの名前の先頭に付く接頭辞。デフォルトは'_'


The project name will occur in several places in the built documentation.
> Project name: test_document
> Author name(s): kinpira
# ↑プロジェクト名と著者名。

Sphinx has the notion of a "version" and a "release" for the
software. Each version can have multiple releases. For example, for
Python the version is something like 2.5 or 3.0, while the release is
something like 2.5.1 or 3.0a1.  If you don't need this dual structure,
just set both to the same value.
> Project version []: 1.0.0
> Project release [1.0.0]:
# ↑プロジェクトのバージョン。

If the documents are to be written in a language other than English,
you can select a language here by its language code. Sphinx will then
translate text that it generates into that language.

For a list of supported codes, see
http://sphinx-doc.org/config.html#confval-language.
> Project language [en]: ja

The file name suffix for source files. Commonly, this is either ".txt"
or ".rst".  Only files with this suffix are considered documents.
> Source file suffix [.rst]:
# ↑ソースファイルのデフォルトの拡張子。デフォルトは.rst。.txtも良く使われる。

One document is special in that it is considered the top node of the
"contents tree", that is, it is the root of the hierarchical structure
of the documents. Normally, this is "index", but if your "index"
document is a custom template, you can also set this to another filename.
> Name of your master document (without suffix) [index]:
# ↑ドキュメントのトップページ(マスター)のファイル名(拡張子なし)。デフォルトは'index'

Sphinx can also add configuration for epub output:
> Do you want to use the epub builder (y/n) [n]:
# ↑各種拡張機能をインストールするかどうか。必要なら後で追加できます。


Please indicate if you want to use one of the following Sphinx extensions:
> autodoc: automatically insert docstrings from modules (y/n) [n]:
> doctest: automatically test code snippets in doctest blocks (y/n) [n]:
> intersphinx: link between Sphinx documentation of different projects (y/n) [n]:
> todo: write "todo" entries that can be shown or hidden on build (y/n) [n]:
> coverage: checks for documentation coverage (y/n) [n]:
> imgmath: include math, rendered as PNG or SVG images (y/n) [n]:
> mathjax: include math, rendered in the browser by MathJax (y/n) [n]:
> ifconfig: conditional inclusion of content based on config values (y/n) [n]:
> viewcode: include links to the source code of documented Python objects (y/n) [n]:
> githubpages: create .nojekyll file to publish the document on GitHub pages (y/n) [n]:

A Makefile and a Windows command file can be generated for you so that you
only have to run e.g. `make html' instead of invoking sphinx-build
directly.
> Create Makefile? (y/n) [y]:
> Create Windows command file? (y/n) [y]:
# ↑ビルド用のMakefileとバッチファイルを作るかどうか。デフォルトはY。作りましょう。

Creating file ./source/conf.py.
Creating file ./source/index.rst.
Creating file ./Makefile.
Creating file ./make.bat.

Finished: An initial directory structure has been created.

You should now populate your master file ./source/index.rst and create other documentation
source files. Use the Makefile to build the docs, like so:
   make builder
where "builder" is one of the supported builders, e.g. html, latex or linkcheck.
これでプロジェクトの土台ができました。
ディレクトリの中をみて見ると、色々作成されていることがわかります。
しかし、この段階ではまだ HTML ファイルは存在していません。
HTML はまた別途コマンドを叩く必要があります。
$ tree
.
├── Makefile
├── build
├── make.bat
└── source
    ├── _static
    ├── _templates
    ├── conf.py
    └── index.rst
HTMLの作成
では、早速 HTML を作成してみます。
make html コマンドで作成できます。
$ make html
Running Sphinx v1.6.4
~~
build succeeded.
完了したら、中身を確認します。
$ tree
.
├── Makefile
├── build
│   ├── doctrees
│   │   ├── environment.pickle
│   │   └── index.doctree
│   └── html
│       ├── _sources
│       │   └── index.rst.txt
│       ├── _static
│       │   ├── ajax-loader.gif
│       │   ├── alabaster.css
│       │   ├── basic.css
│       │   ├── comment-bright.png
│       │   ├── comment-close.png
│       │   ├── comment.png
│       │   ├── custom.css
│       │   ├── doctools.js
│       │   ├── down-pressed.png
│       │   ├── down.png
│       │   ├── file.png
│       │   ├── jquery-3.1.0.js
│       │   ├── jquery.js
│       │   ├── minus.png
│       │   ├── plus.png
│       │   ├── pygments.css
│       │   ├── searchtools.js
│       │   ├── translations.js
│       │   ├── underscore-1.3.1.js
│       │   ├── underscore.js
│       │   ├── up-pressed.png
│       │   ├── up.png
│       │   └── websupport.js
│       ├── genindex.html
│       ├── index.html
│       ├── objects.inv
│       ├── search.html
│       └── searchindex.js
├── make.bat
└── source
    ├── _static
    ├── _templates
    ├── conf.py
    └── index.rst
build 以下に HTML や css や js などが作成されていることがわかります。
これは、source 以下にある index.rst を元に HTML が作成されています。
なので、 source 以下に reST ファイルを作成し、 make html で HTML を作成する形になります。
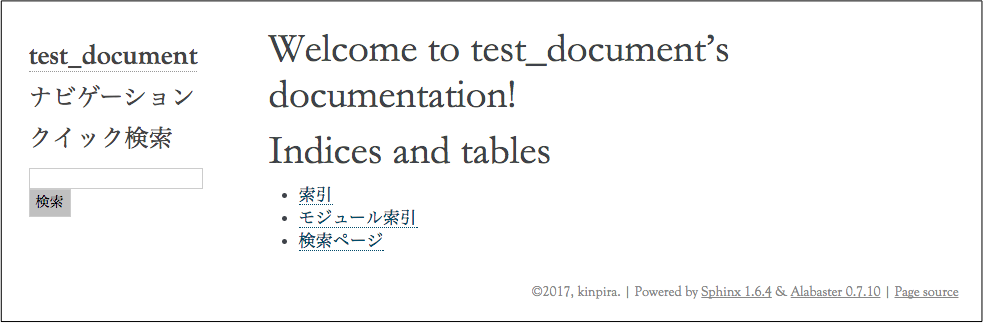
ちなみにブラウザで開くとこんな感じ。
デザインテーマは conf.py の設定を変える事で変更できます。
デザインテーマの変更
ちょっとこのデザインが気にくわないので、もっとドキュメントっぽいデザインにしてみます。
変更するには conf.py の html_theme の値を変更します。
変更可能なテーマに関してはこちらが参考になりました。
ちなみに、今回使用するテーマは拡張なので、cloud-spthemeをインストールしておきます。
$ pip install cloud-sptheme
conf のテーマを変更します。
# conf.py
html_theme = 'cloud'
では、もう一度 make html を実行します。
$ make html
Running Sphinx v1.6.4
loading translations [ja]... done
loading pickled environment... done
building [mo]: targets for 0 po files that are out of date
building [html]: targets for 1 source files that are out of date
updating environment: 0 added, 0 changed, 0 removed
looking for now-outdated files... none found
preparing documents... done
writing output... [100%] index
Exception occurred:
  File "/Users/xxxxxxxxxxx/.virtualenvs/doc/lib/python2.7/site-packages/sphinx/jinja2glue.py", line 200, in get_source
    raise TemplateNotFound(template)
TemplateNotFound: about.html
The full traceback has been saved in /var/folders/4m/j1vd525s6fv_2zsfrt47mtmwkk47dm/T/sphinx-err-aUkTiY.log, if you want to report the issue to the developers.
Please also report this if it was a user error, so that a better error message can be provided next time.
A bug report can be filed in the tracker at <https://github.com/sphinx-doc/sphinx/issues>. Thanks!
make: *** [html] Error 1
エラーになってしまいました。。。
これは conf.py に元々設定されていた、html_theme = 'alabaster' 独自の設定がconf に書かれているため、おきるエラーのようです。
どうやら、 html_sidebarsの設定がよくないらしいので、コメントアウトします。
# html_sidebars = {
#     '**': [
#         'about.html',
#         'navigation.html',
#         'relations.html',  # needs 'show_related': True theme option to display
#         'searchbox.html',
#         'donate.html',
#     ]
# }
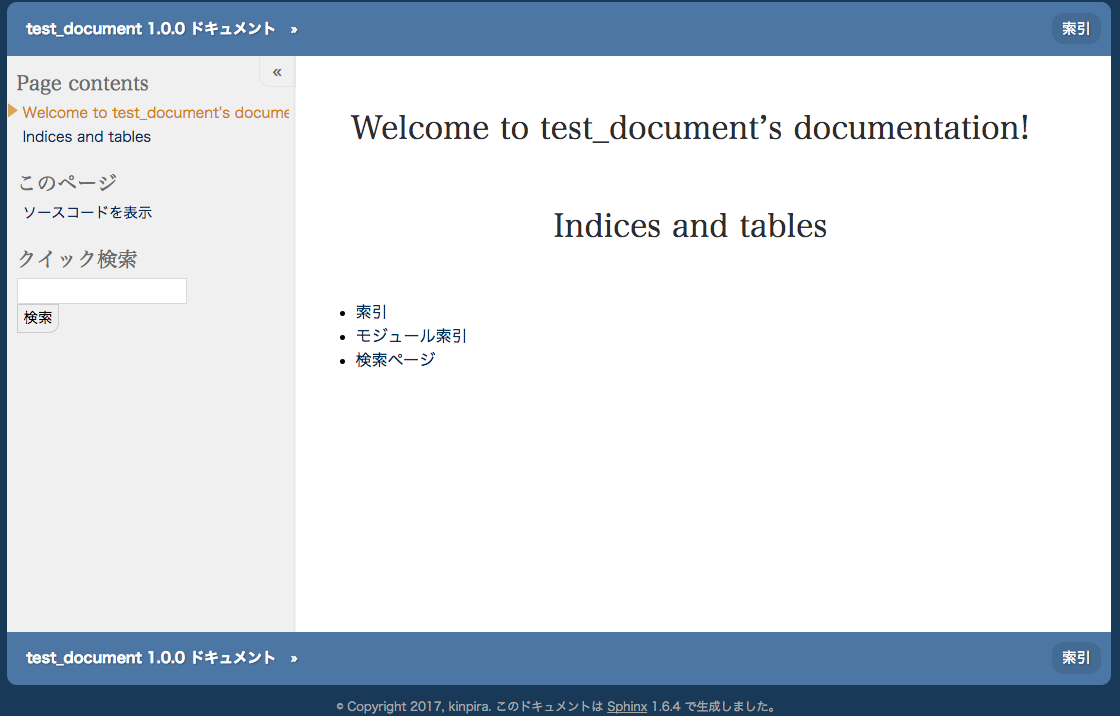
そして、make htmlを叩くと、次はうまくいきました。
見事にデザインがかわりました。
良い感じ。
フロー図を描けるようにしておく
ちなみに、フロー図とか描きたい人は、sphinxcontrib-seqdiag をインストールしておくと幸せになれます。
今回使用したので、一応手順を残して起きます。
$ pip install sphinxcontrib-seqdiag
conf に設定追加
# conf.py
extensions = ['sphinxcontrib.seqdiag']
ページを作成する
では、ページを追加して、ドキュメントを作成してみます。
ページを追加する
今回は source 以下に test ディレクトリを作成し、下記の用な test1.rst ~ test3.rst ファイルを追加します。
$ tree source/
source/
├── _static
├── _templates
├── conf.py
├── index.rst
└── test
    ├── test1.rst
    ├── test2.rst
    └── test3.rst
ファイルの中身はこんな感じ。
###########################
sphinx やってみた1
###########################

| 試しに、こんな感じのページを
| 作ってみる!

====== ================
ID      Value
====== ================
3      データ3
4      データ4
====== ================

.. seqdiag::
   :desctable:

   seqdiag {
      A -> B[label = "test"];
      B -> C[label = "test"];
      A [description = "browsers in each client"];
      B [description = "web server"];
      C [description = "database server"];
   }
topページに目次を作成する
次に TOP ページである index.rst に追加して、目次を作成します。
# index.rst
Welcome to test_document's documentation!
=========================================

.. toctree::
   :maxdepth: 2
   :caption: OverView
   :numbered:

   /test/test1
   /test/test2

.. toctree::
   :maxdepth: 2
   :caption: test3だけ
   :numbered:

   /test/test3
- toctree : のブロックが大項目になります。
- maxdepth : で目次に表示するのツリーの深さを指定できます。
- caption : 大項目のタイトル
- numbered : 目次に追加したい、ファイルの path を追記します。
ブラウザで確認してみる。
では再度 make html を行い、ブラウザで確認してみたいと思います。
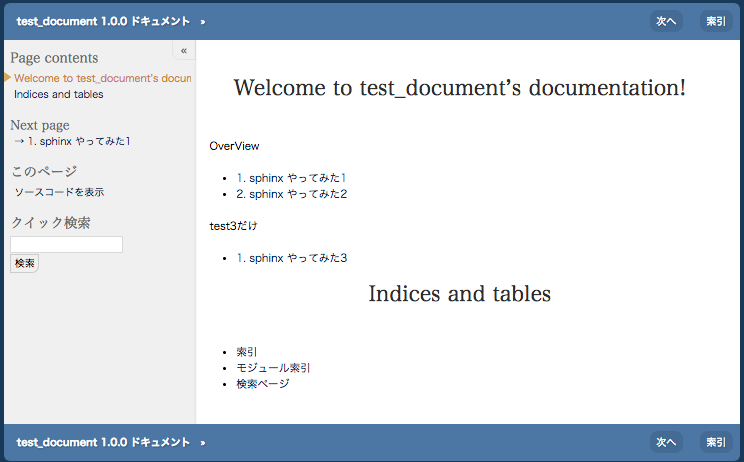
出来上がったのがこんな感じ。
topページ
目次が追加され、ページが増えている事がわかります。
先ほど index.rst に指定した、toctree のブロックごとに別れている事がわかります。
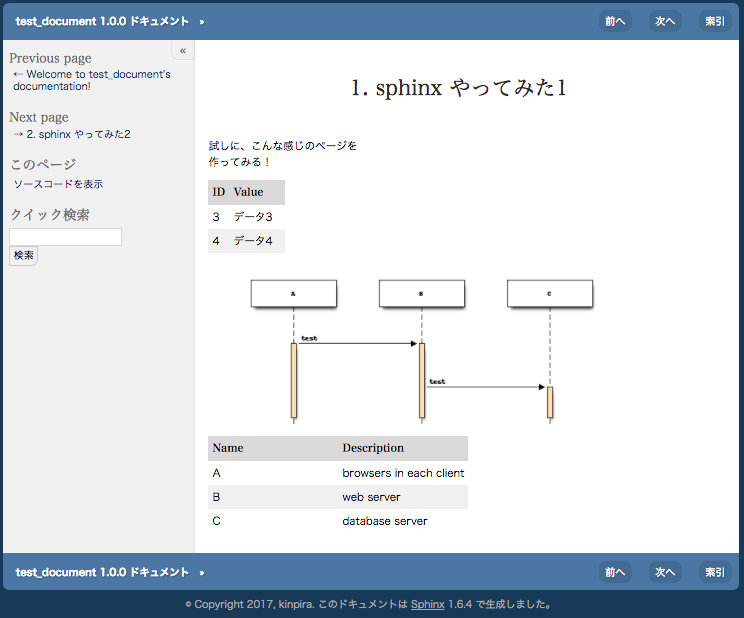
test1ページ
ちゃんとページが整形されている事がわかります。
フロー図やテーブルもしっかり作成されています。
github pages で web 公開してみる
github でリポジトリを作成する。
今回は sphinx_test リポジトリを作成しました。
次に /build/html 以下に移動し、そこで github にでている指示通り git init から push までを行います。
$ cd /build/html
$ git init
$ git add .
$ git commit -m "first commit"
$ git remote add origin https://github.com/kinpira/sphinx_test
$ git push -u origin master
ちなみに、このままだと CSS などが有効にならずに、表示が崩れてしまうため、先に .nojekyll ファイルを作成し、 gh-pages ブランチに切り替えて起きます。
$ git checkout -b gh-pages
$ touch .nojekyll
$ git commit -a -m "Add .nojekyll"
$ git push origin gh-pages
guithub で公開設定を行う
guihub の sphinx_test リポジトリの settings ページに GitHub Pages という項目があるので、
gh-pages ブランチを選択して save します。
上部に URL が表示されるので、そこにアクセスするとページが表示されます。

確認してみます。
無事に崩れる事なく表示されていました。

まとめ
今回やってみた通り、簡単に作成でき、web 公開ができるので、すごく便利でした。
あとは、ソースコードと一緒に git 上に置いておく事ができるのもメリットとして大きいと思います。